firstdefence
-
Posts
11,458 -
Joined
-
Last visited
Everything posted by firstdefence
-
 You can use a recolour adjust filter, set the lightness to 50% and move the hue slider to tint to a colour.
 -
Removing Sensitive Information
firstdefence replied to qbenguy's topic in Affinity on Desktop Questions (macOS and Windows)
If this is the case, it sounds like the document is already rasterised; certainly any text, and that it has been flattened but these are just assumptions, like Alfred has mentioned Affinity Designer has a Pixel Persona with a pixel eraser tool. -
Removing Sensitive Information
firstdefence replied to qbenguy's topic in Affinity on Desktop Questions (macOS and Windows)
How are you actually deleting the information? You can export a PDF that will require a password to edit content.
-
I'm thinking V_kyr is practicing typing Alabama styli.
-
Someone got excited with quoting lol!
-
You're most welcome John. Hope the event goes well.
-
The red dots are just marks that the tutor has created to indicate where line are going to converge. The vertical guide is the front corner of the box. If you draw a curve line from anywhere on that vertical guide to one of the red dots, you will start to create a shape that has two points of perspective: https://www.artistsnetwork.com/art-mediums/learn-to-draw-perspective/ The red lines are curves used as pseudo guides these are grouped and then locked. You can now use rectangles converted to curves and the nodes moved to fit to the pseudo guides.
-
I like the 3D version, it's more surreal.
-
I did think it looked a bit washed out but I also thought about changing the cyan to darker blue like RGB 13, 121, 242, or having it green like the other quiz headers.
-
Love the top artwork, right side panel., not sure about the warped image on the left panel, although it's a crafty way to accommodate the text, very sneaky lol! The bottom artwork left panel, I would change the text in the boxes to white makes it easier to read for biddy brigade lol! Not sure about the hit and miss use of the bold text and the mixed use of numbers and text numbers, I think you should stick to either either. The underlining looks a bit messy but I kind of get why you have done it. maybe a workaround is to make the header text 11pt and have the kind of bingo and quizzes in the title, like so... I set text styles for the header text and the description to make it easier to edit en masse, I know its personal taste at the end of the day but just a few idea's for the next one. Bottom artwork middle panel the No mobiles graphic needs to be a bit smaller to have even margins away from the text top and bottom. The "Thank you" banner needs adjusting slightly on the left side and I would go with a complimentary blue instead of brown background colour. I like the right panel, and the use of the cheesy font which works well. As for Ploughman's lunch/supper/breakfast/brunch/dinner/arfternoon tea and biccy break but for those obsessed with this: https://en.wikipedia.org/wiki/Ploughman's_lunch
-
Would be nice to have the blender version as a comparison.
-
Affinity Photo isn't a clone of Photoshop, it doesn't have a lot of the filters Photoshop has, so you have the only version, there is no derivative, what you see is what you get. You can use the procedural texture filter and you can also check out the resource section of this website for texture brushes: https://forum.affinity.serif.com/index.php?/forum/11-resources/ @StuartRc is a prolific creator of texture brushes and is very generous in sharing them in the resource section. There are plugins out there that you can add to Affinity that will create texture, like FilterForge, Exposure Softwares Eye Candy - although dwarfed by FilterForges range of filters.
-
Yes XP-Pen runs fine in both v1 and v2
-
Affinity does have a Lasso Node selection option under the Node Tool.
-
The problem is, you cannot have a layer both on and off in a single canvas/artboard, welcome to Affinity Schrödinger. You would need some sort of duplication within the export panel where an artwork is nested in a slice, it would be the reverse of using multiple artboards. Blue sky thinking: The only other way I can think of would be to have some sort of masking attached to a slice and that mask could be designated to a layer or layers/groups, so in a second slice a mask would be a child of the slice and that mask would have an option to mask only layer 3.
-
Tip: during post creation and adding images, if you double click on the image added to the post you can resize them, I generally use 500px in the first box with aspect ratio checked, viewers can see larger versions of the image by clicking on them.
-
As far as I am aware slices cannot have their own layer configurations within a single image. Layers can be turned off or on but that will affect all slices based on that image. You could create several Artboards and set the layers configuration to suit the slices over that artboard.
-
Replacing a background
firstdefence replied to Poohbear's topic in Affinity on Desktop Questions (macOS and Windows)
I assume you are using Affinity Photo, you need to take a screenshot of the Affinity app including the layers panel, if you cannot see the layers panel, it's because it's been deactivated (By default it is activated) or it is in a group of panels and one of those group of panels is foremost pushing the layers panel behind it. This link goes to the online help files to show you how to customise the workspace: https://affinity.help/photo2/English.lproj/pages/Workspace/customizingWorkspace.html -
Glad to help Chris. I would also suggest you remove the dreamstime files from your initial post as well
-
Yes I can do that, but I'll have to delete it from the forum after you have downloaded it because of copyright rules.
-
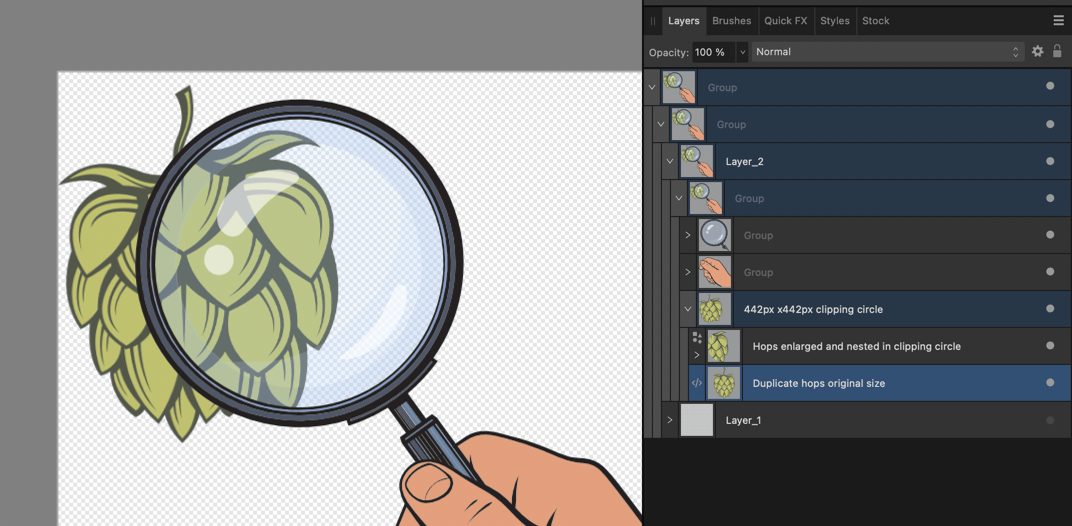
Alternative method... Create an ellipse sized 442px x 442px and align it with the magnifying lens Position the ellipse layer so it sits below the magnifying glass Drag the Hops graphic into the magnifying glass graphic and duplicate it Nest the duplicate of the Hops graphic in the ellipse created in step 1. Scale the nested hops so it looks magnified, don't forget to position the original hops graphic layer below the duplicate hops graphic layer. See image below. A few tweaks. Find the white highlights and reduce the opacity to about 65% There is also an alignment issue with some of the lens layers where it shows through clear
-
Make an image crisp
firstdefence replied to Matrix6028's topic in Affinity on Desktop Questions (macOS and Windows)
It is indeed, changed the post to an online website instead, but not fast enough for Alfred The Quick lol! -
Make an image crisp
firstdefence replied to Matrix6028's topic in Affinity on Desktop Questions (macOS and Windows)
You can go to https://vectorization.eu/ and use the upload feature to vectorise the image, use Affinity to convert to a png file first though, as pdf files aren't accepted. -
Make an image crisp
firstdefence replied to Matrix6028's topic in Affinity on Desktop Questions (macOS and Windows)
best way is to vectorise it, now it will be sharp at any size. RHS (1).afdesign -
Draw (graphic) to affinity
firstdefence replied to danielscott63's topic in Affinity on Desktop Questions (macOS and Windows)
Can you upload the file here?