toltec
-
Posts
3,560 -
Joined
-
Last visited
Everything posted by toltec
-
 How about the Align Centre text option ?
-
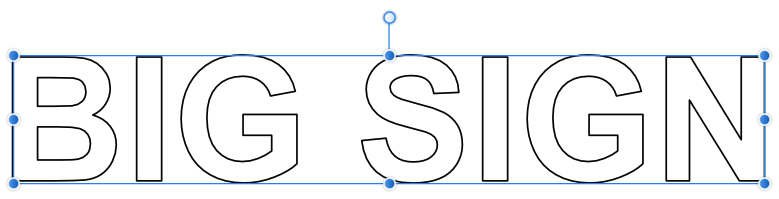
Hi Joanne Both Affinity apps have a solution that is probably much better for your needs ? You could set the text with just an outline and no fill?. Then there is no need to use a filter like Find Edges or Detect Edges and as it is still text, the print quality will be better. Should you print it out and notice you made a spelling mistake or need to change something, the text is still editable, even as outlines, so you only need to edit the text. You don't need to go through the whole 'find edges' routine again. What is more, the file sizes will be much smaller and will save you iPad memory You can adjust the thickness of the line as you like and you could even set a Style and use that, rather than having to convert the text to outline and no fill each time. Just set the text as normal, select it, then tap the Style and it's all done, literally a one click, outline solution. Well, maybe two taps An outline Style with a red outline. You could use the same Style on a shape, should you need to.
-
Parallel lines
toltec replied to William Scott's topic in Pre-V2 Archive of Desktop Questions (macOS and Windows)
Damn, that's where I went wrong. I always clicked first on the right, then on the left of the canvas. -
Align Text to a Curve
toltec replied to Terry Quinalty's topic in Pre-V2 Archive of Desktop Questions (macOS and Windows)
Hi @Quinalty Designer can, Photo can't. Here's a video. -
The burger menu is your friend. You could create your own category of brushes, and then export them as a backup using the burger menu, choosing Export Brushes They will be saved as a .afbrushes file. You can reload backed up brushes by using the burger menu and clicking Import Brushes.
-
Inpainting, layers, and classes
toltec replied to Heathersmith's topic in Pre-V2 Archive of iPad Questions
I suspect it is something to do with the mask in the 'water' layer. But could be wrong. The flag is very easy to remove normally. I just did a screengrab, placed a pixel layer above and inpainted that.
-
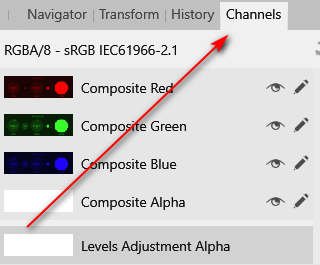
In Affinity Photo, you can go Document > Colour Format > Greyscale. Then it will be a greyscale document and will be smaller. There is no difference between Black and White and Black and White Adjustment. The Channels panel is down the bottom. If not go View > Studio > Reset Studio.
-
Well, I don't know how you work or how many shapes you draw at one time but would the power duplicate feature not help? Draw one shape and set it, size it, move it etc, then press Ctrl J to make an infinite number of exact copies. I am sure your feature would be useful but there are so many things on the Designer 'to-do' list it is unlikely to come soon. Therefore it is best to use what is already there the best way possible. I come from thirty years of using Photoshop all day, every day and missed lots of things but have got used to using Photo, so it doesn't bother me now. Mostly
-
Ouch, that hurts Truth always hurts
-
Release the mouse, press the spacebar and move the image, release the spacebar and keep, er 'mousing'
-
getting files into affinity designer, photo
toltec replied to VectorCat's topic in Pre-V2 Archive of iPad Questions
Not sure what you mean. If you tap on Open from Cloud or Import from Cloud This will access the Files app to get files from your iPad, etc. Below I can open files stored by Adobe Acrobat, Designer or Photo. or did you want something else ?
-
That said, I can press the middle mouse wheel button down and drag the image to pan it
-
Pressing the spacebar temporarily selects the Hand tool allowing you to drag the image. When you release the spacebar, the original tool is active again.
-
But if you place the Transform panel on the screen it is just as quick. In fact, if you do that you don't even need to refocus as the transform panel stays in exactly the same place for as many shapes as you want. If you keep clicking (AI style), unless you click in the same place each time, the dialogue box will move. So actually, you have to focus to click in the exact place, then focus on the dialogue box. In Designer you don't need to focus to click, because the Transform panel is already in the exact, same place. There is so little in it, I don't see the problem but I might be showing my age.
-
I can click and drag a basic shape without looking, as easily as I can make one click. It doesn't matter about the shape size if you are then going to adjust it in the Transform panel. I still have to move my eye focus to the dialogue panel to do that. Apart from a fractional drag (without needing to look), how much quicker could it possibly be?
-
Why? I don't see any real difference between selecting a shape tool and single clicking once on the canvas (AI) or click and drag a bit (Designer). What is the difference then between entering in a dialog box (AI) or in the Transform panel (Designer) ? It is the same number of operations, just a slightly different method. Perhaps that tiny drag after clicking is too much of a drag
-
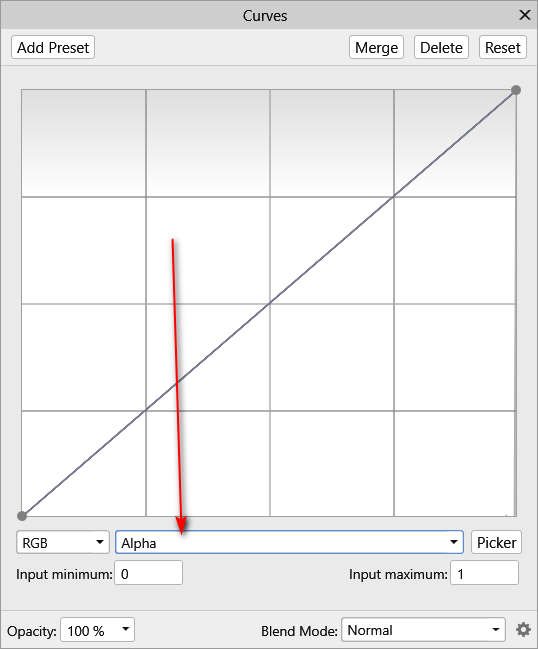
Apply a Curves adjustment layer. Select Alpha from the menu then you can play around with the curve to do pretty much what you want with those elusive semis
-
changing the colour of the sky
toltec replied to iMac1943's topic in Pre-V2 Archive of Desktop Questions (macOS and Windows)
Hmm, I can't imagine why. The original problem was that as the camera was rotated, different images contained different quantities of sky. Therefore the camera adjusted for that, changing the exposure of each image. Just changing the 'exposure' in Photo so they all match would make the images equal, so Panorama stitching would work much better. If not, something else seems to be happening? -
changing the colour of the sky
toltec replied to iMac1943's topic in Pre-V2 Archive of Desktop Questions (macOS and Windows)
Bear in mind that @firstdefence did a brilliant job and it is a good learning exercise but you would be much better off editing the photos before stitching, like I suggested. That is much simpler and only a few minutes work. Prevention is better than cure! -
If you are talking about Photo, you enter Quick Mask mode (Q), select the Move Tool and rotate and adjust the selection marquee how you want.
-
changing the colour of the sky
toltec replied to iMac1943's topic in Pre-V2 Archive of Desktop Questions (macOS and Windows)
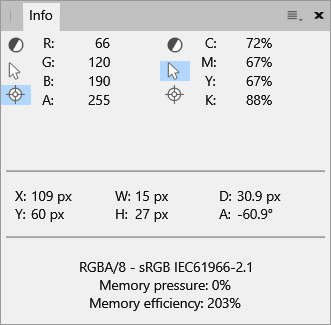
You will really need to adjust each photo first, concentrating on the non-sky area so they match. Then select the sky only with the Selection Brush Tool (or whatever) and adjust it so that each sky area matches. Use the Info Panel and the targets to match them. Then do your Panorama stitch. It is easy enough and quicker than a return trip to Namibia
-
Inpainting, layers, and classes
toltec replied to Heathersmith's topic in Pre-V2 Archive of iPad Questions
I don't think you are going to find any sort of one-on-one help (it's all too new) but don't despair. Post each issue on this forum as you come across it and there are usually lots of people who will help you out. Try and post a screenshot showing the Layers studio open. That is the most revealing part. Alternatively, do a recording as Gabriel suggests. The below link shows you how to make a screenshot (sorry if you already knew). https://www.macworld.co.uk/how-to/iphone/how-take-screenshot-on-iphone-or-ipad-3508856/ The screenshot image ends up in Photos where you can attach it to your post. Use the 'Click to choose files' link and navigate to Photo Library. -
1 AFAIK, no. Not perfect, but what I do is leave a small gap, select the Node Tool and drag the last node over the first node. You get an on screen magnifier and the node snaps into place, closing the path. 2 There is no vector path eraser, although you can reshape the Pencil's path with Sculpt. Just draw over the previously drawn path and it reshapes the path. Of course, you can use the node tool.
-
Photo and Designer share many features so there is not going to be much difference. Both can load the files you mention (apart from native .procreate). Your biggest issue is likely to be converting things like text or gradients. All of which can sometimes be an issue, so it will depend on what is in the Procreate files. I think Designer would be ideal and expect .psd or PDF would be the best choice for file format.
-
Plugins and AP UPDATE?????
toltec replied to Russ2's topic in Pre-V2 Archive of Desktop Questions (macOS and Windows)