Ballyshannon
-
Posts
69 -
Joined
-
Last visited
-
 Thanks for all the input. I'm using Windows, so Alt+7 works perfectly using the numeric keypad as #carl123 suggested.
 -
I'm doing a flyer for a real estate company and they want to include three of their strong points in one line: Residential Property Management Commercial and I want to use a bullet point type of dot between each one to separate them. I once knew the keyboard shortcut but haven't used Affinity Designer in a long time, forgot what it is and can't locate it. In InDesign, it's Alt+8. Any help appreciated.
-
I was getting pretty good with Affinity Designer prior to the pandemic, but since the pandemic began, I haven't used it at all. I now have some new design jobs but have forgotten a lot of what I learned! I distinctly remember being able to toggle the red spellcheck underlines on/off with a keyboard shortcut, but can't for the life of me remember what it is or locate that shortcut in the shortcut list. Since I'm not a great typist, I like to type with the spellcheck on, but prefer to quickly view the documents without the red underlines and not have to continually go to Text/Spelling/Check spelling while typing. Any help is appreciated. UPDATE: Did more searching online and found the shortcut! It's "h". Simply press the "h" key to toggle the red spellcheck underlines on and off.
-
Same issue here. I have a golden opportunity to pick up some freelance work with a print company that has a router, cnc, etc, and the standard file type is DXF. And there's no way I can currently afford Illustrator, which is why I went with Affinity Designer....but can't export files as DXF. Catch-22.
-
 Callum reacted to a post in a topic:
Lost activation code...UPDATE: Found!
Callum reacted to a post in a topic:
Lost activation code...UPDATE: Found!
-
Thanks, Patrick. I'll wait! And thanks for the link.
-
I haven't used Designer for a while and see there is an update 1.7.0.380. Before loading it, what exactly was updated, and is it stable? Is there a thread/discussion applicable to this update? A search didn't find anything.
-
After printing a trifold job in Designer, I need to update the skin tones on a couple jpg photos and just wondering... after updating in Photoshop, do I have to remove the original photos from the project, place the updated images and re-crop/resize them all over again? I'm not finding any other way.
-
firstdefence reacted to a post in a topic:
Making double line of violin outline in Designer?
-
This has all been extremely helpful. Reading through the suggestions and starting with the basic stroke outline, I increased the width to how far apart I want the individual lines with Align set to Inside, expanded stroke with no fill, set line width to .6 pt Black, and done. No need to duplicate original line or Divide. Takes just a few seconds. Many, many thanks!
-
Thank you both so much for taking your time to help. The detailed process and explanation is exactly what I needed.
-
As mentioned, I did that and doesn't work. I'm obviously missing something. I've included the original outline stroke in .afdesign format with line width at .6 pt. If it wouldn't be too much trouble and when you have time, would you mind sharing the steps to create the double line from this file? Appreciate it. Violin inner trim outline.afdesign
-
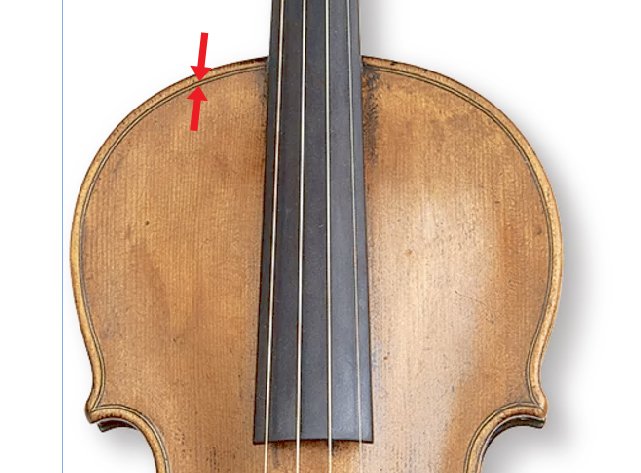
Thank you for the suggestions, but I guess I wasn't clear enough in what I'm trying to do. I've already created the wood binding trim around the outside. That's no problem. What I want to do is create the black thin double lines to the inside of the wood binding (see image with arrows pointing to the lines I'm referring to), which is simply an aesthetic touch to this particular violin. I've created the first thin line, which is the stroke outline submitted in my initial post. I just don't know how to duplicate that same line at the same stroke weight (.4 pt), but separated from the first line so it follows the contours of the first line exactly to create the double line effect. Creating the first line to the outside and duplicating the line to the inside doesn't work, and as mentioned, Designer has no offset path option. I could go the time-consuming route and copy the first line, use Transform to set it at the basic distance I want from the first line, then tweak a lot of nodes to make it follow the contours of the first line, but I'm hoping there's a quicker, easier, and more accurate work-around.

-
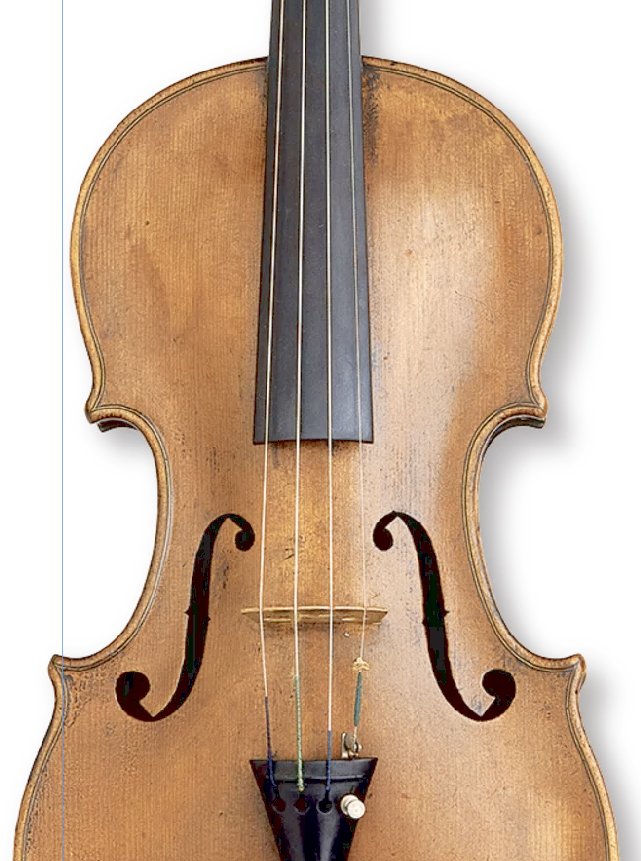
I'm working on a violin project in Designer and trying to create a black double line trim that follows the outline of the instrument top. I have a stroke outline of the trim outline and want to duplicate the line and place the duplicate just far enough to the inside to create a double line with the duplicate line following the contours of the original line precisely at a given distance. Copying and using the Transform function with aspect ratio locked doesn't work. Any help would be appreciated. I've included an image I'm working from to show the double trim effect I'm trying to duplicate.
-
I understand how that was confusing. I admitted yesterday that I had mistakenly thought the readout was showing the color space type, when it was my own naming process. Sorry for the confusion. I'm still learning about Designer. And yes, I got my concerns sorted out and mentioned it in a post yesterday that when creating an occasional ad at a different size in RGB that was originally CMYK, I'll simply open each component CMYK file in Photoshop, convert to RGB, re-save with 'RGB' in the file name, and use the Replace Image/Document option.