MEB
-
Posts
31,431 -
Joined
Everything posted by MEB
-
I think its quite good Andrew. You nailed the style (angular shapes, line expression, solid colours/shadow). Maybe the eyes are a little flat and could benefit from some additional reflections, but I´m very far from being a knowledgeable person on manga.
-
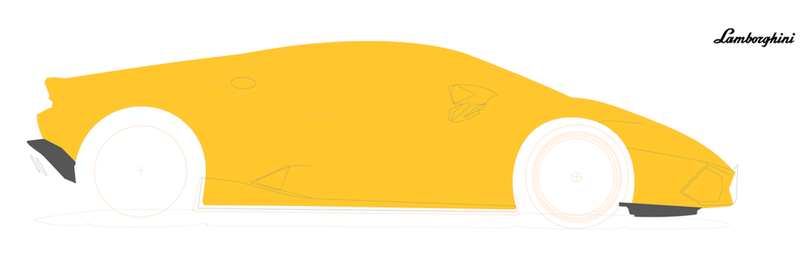
Inspired by Matt's post i decided to give it a try and draw a Lamborghini too in Affinity Designer. Here's what i got so far:

-

affinity designer Lamborghini Miura - Work in progress...
MEB replied to MattP's topic in Share your work
Another car nuts? Glad to know i´m not alone :) Nice pick, a truly classic from Lamborghini. -
GRScott, You already can do that. Go to the menu View -> New View. If you need to position both views side by side make sure that Window -> Separated Mode is checked (in the top menu). Then drag one of the document tabs to split the windows in two. You can now work in both views and have different zoom levels on them.
-
I´m trying to drag a node over another node in a different shape. The snap system already picks a lot from the geometry (mid-points, tangents etc) and it works fine but it's not node aware. Is this still being worked?
-
I've tried this on my system and it works fine in beta 5, but only if you don't have 'Close windows when quitting an application' in your system preferences 'General' settings checked as Andrew Tang pointed out. Otherwise it will behave like you described filling only part of the screen.
-
Besides the current grid system already in place i would like to see a quick way to set up a layout grid where we can define the width, the number or columns, the gutter etc to quickly setup the document structure for a web page design or for a print document. This could eventually be shared/based on Affinity Publisher since they share the same file format and could use the same parameters. I think it's useful to have it here in Affinity Designer since it's where the design/mockups starts and the layout grid would provide the necessary structure to build upon, without having to setup a huge number of guides or use fixed and inflexible bitmaps as reference.
-
Thanks Matt :)
-
Select the Node Tool and press ALT while you click over the control handles (not the node itself) that control the part of the curvature you want to straight up. They will retract (disappear) and you will get the straight edge. Hope i'm being clear :) Let me know if you still have trouble.
-
gillprice, Can you get it working?
-
Hello Deuce, I know this isn't a big help, since it's still (very) incomplete but here's what's in the Affinity help: The minimum and recommended system requirements are as follows: Intel processor with 64-bit support ?? GB of RAM (?? GB recommended) ?? GB of available hard-disk space for installation* 1024 x 768 display (1280 x 800 recommended) with 16-bit video card * additional free space required during installation (cannot install on a volume that uses a case-sensitive file system or on removable flash storage devices). I´m running Affinity on a Late 2008 13-inch Macbook Aluminium (2GHz Intel Core 2 Duo | Geforce 9400 256MB) with 8GB RAM on a Samsung SSD 840 Pro. Using Mavericks as OS. No problems whatsoever.
-
Thanks Matt. Glad to know it's coming :)
-
Gradient Tool -> Type: Bitmap; Extend: Wrap - How to set the bitmap scale to 1:1? I want to tile a bitmap inside a shape, but i don't want it scaled up or down. I want to use the exact pixel dimensions of the original to fill the entire shape. How do i do this? Seems there's no option to "reset" the scale to the original bitmap dimensions. Happy to see Lanczos resampling available in the Quality drop down! :)
-
Affinity - Mac only?
MEB replied to Seanyboy's topic in Pre-V2 Archive of Affinity on Desktop Questions (macOS and Windows)
Hi RPJ, I haven't used Affinity Designer that much either, but i can assure you it's in a whole new league compared to Drawplus. -
Loving the flexibility of filters... I would like to suggest a noise filter, with options for blending, size, dispersion/intensity and color, black and white types (black noise meaning the background black the noise points in white - and white noise would be the opposite). The goal is to have a "fractal" way to generate some noise/texture on the shape the effect is applied to. It can be used in various situations, from smoothing a gradient/combination of gradients and transparencies, to help breaking the clean look of vector drawings (as a complement to the brushes), or used as subtle enhancement to web buttons and ui elements of a web design...
-
You're welcome.
-
If you're looking for a light interface (like iPhoto), there's no way to get it as far as i know. I think they went with a dark interface because they are positioning Affinity Designer as a professional application. And like other pro apps on the Mac (Motion, Final Cut Pro, Adobe CC etc) they all feature a dark interface.
-
Hi DaveS, Check out the Gamma UI slider on the same tab. It does what you are asking for, although the changes (range) are not so drastic.
-
I see. It's a commercial decision, not a technical one. With such support Designer could cannibalise Affinity Photo... Hope you find a quick way to switch between the two. Thanks for your quick reply Andy.
-
That's strange. It's working fine on my system. If i move the Background Gray Level to the right, the background becomes white, if i move to the left, it becomes black. Check this video
-
With such a great integration between vectors and pixels, and since you already support pixel based selections (and pixel based masks (?) - still have to check this one), seems you have covered all requirements to fully support Photoshop Plug-ins. This brings a world of creative possibilities/adjustments to Designer, and while i understand this feature may be a perfect fit for Affinity Photo, i can´t help but wonder how cool it would be to have support for it in Affinity Designer too.
-
Hi gillprice, Go to Affinity Designer menu -> Preferences and select User Interface tab. You can change the Background Gray Level and UI Gamma there.
-
A more visible way to export a slice
MEB replied to Dale's topic in Older Feedback & Suggestion Posts
Some Mac apps allow the user to select a layer or group and just drag it to the desktop to quickly export that object as a png. It's the most efficient and quickly way i have seen to get/export objects based on layers/slices. -
Here's a way to get there: Instead of using a full circle (the larger one) use just half. First you will have to convert it to curves (select the large circle then go to Layer menu -> Convert to curves). Then delete one of the nodes to make an half-circle. From there you can figure the rest. After you have completed the half of the yin yang shape (step four on this image) just duplicate it and flip it in both directions (horizontal and vertical) and place it in position using snapping. yin yang shape.afdesign
-
As far as i know you can only create/combine shapes using boolean operations (the second row of buttons counting from the right). Select two overlapping shapes and click on those buttons (the tooltips say what action they will perform).