MEB
-
Posts
31,952 -
Joined
-
Last visited
Everything posted by MEB
-

Linked Files Not Displayed at Full Resolution
MEB replied to Hangman's topic in V2 Bugs found on macOS
@big smile, Not yet. I installed the OneDrive app and uploaded all the files via the browser to let it sync the folders. I then opened the Publisher file, and as long as the image links point to the correct locations, the images have been loading correctly for me (no blurring). I’ve now installed OneDrive on a second system and have been working on the files back and forth to check whether the syncing eventually causes any interference and prevents the files from fully render properly. -
Using "traditional" layers in AD
MEB replied to MickM's topic in Desktop Questions (macOS and Windows)
Hi @MickM, Affinity doesn’t work the way you’re expecting. You can’t create a group from objects that belong to different layers and keep their original layer reference/location. As soon as you group them, the group is placed inside one of the layers (usually the bottom-most one, if I remember correctly) and becomes part of that layer. -
Hi @Art51, Thanks for the file and the detailed steps. I’ve been able to replicate the issue here. It has been logged for further investigation.
-
Hi @Alex_M, No, it's not possible to disable them.
-
Hi @Art51, Could you try creating a simplified version of the file that still shows the issue please? Copy the pixel layer into a new document, repeat the duplicate and merge steps, and see if it still hangs. If it does, please share that simplified file with us. If it doesn’t, try duplicating the original file, removing as many unnecessary groups as possible, and testing again. If the issue persists in that version, please provide us the file so we can replicate and log the issue. Thanks for your feedback.
-
Affinity Photo not working properly with RTX 5090 card
MEB replied to LetoAtrell's topic in V2 Bugs found on Windows
Report updated/bumped again. Thanks for your feedback @elevencore. -
There’s no need to change the origin point of the path. The Point Transform Tool is aware of geometry nodes. Make sure to place the cursor over the node you want to use as a (place) reference point, click (without dragging yet), then press Control (to move the shape) and Command (to duplicate the shape while preserving snapping), and drag the node over the end node of that path. See the clip below for reference. transform_point_tool.mp4
-
Uncheck Protect Alpha.
-
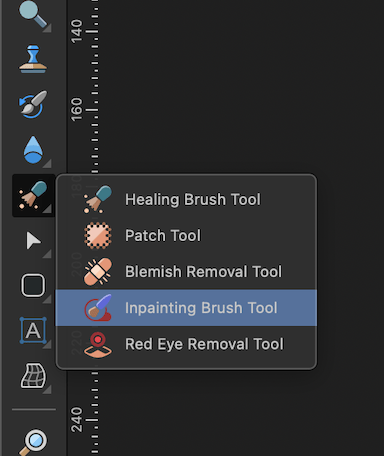
Inpainting brush tool not available
MEB replied to Robsen's topic in Desktop Questions (macOS and Windows)
You're welcome -
Inpainting brush tool not available
MEB replied to Robsen's topic in Desktop Questions (macOS and Windows)
Hi @Robsen, Welcome to Affinity Forums In your first screenshot, toolbar on the left, 9th tool in the second row. It's the fourth tool of that group.
-
Hi @markw, No issues here as far as I'm aware. Make sure the Blend Mode for the brush is set to Normal in the context toolbar (for the Brush Tool). If that's not the issue can you post a screenshot of the Pixel Persona with the Brush Tool selected and the Layers panel visible (with the mask layer selected)? Thank you.
-
Hi @jackamus Keep scrolling the page to the section "To create path text".
-
Hi @PierMax, Welcome to Affinity Forums I’ve been working on the exact same type of task using that same technique for the rims and haven’t noticed any issues, except for one case where certain objects inside symbols lost their state. I’m still not sure how that happened. I’m glad you managed to sort it out but If you come across any other symbol issues that you can reproduce consistently please let us know. Thanks for your feedback.
-
@Ana Mendes, @RE4LLY, The Power Duplicate feature is tied to the Move Tool’s transforms only (while the object remains selected). Transformations can also be applied through the Transform panel, as long as the object stays selected. Unfortunately, anything related to node manipulation cannot be handled by Power Duplicate. This is more of an improvement request than a bug, as it was designed to work this way.
-
How do I add an inner border/outline to text in Affinity designer?
MEB replied to ASee's topic in iPad Questions
Hi @ASee, Welcome to Affinity Forums One easy way to do this is duplicating the letter, setting a stroke width and removing the fill from the duplicate, then using the Contour tool and drag the corner of the bounding box to inside. countour.mp4 -
Linking Text Frames to Newly Added Pages
MEB replied to snackdaddygaming's topic in Desktop Questions (macOS and Windows)
Hi @snackdaddygaming, Welcome to Affinity Forums After pasting the content on the first page, hold Shift and click the red triangle in the text frame to automatically add as many pages as needed to fit the entire text. -
Hi @Ana Mendes, One way to do it is selecting the Point Transform Tool (it's grouped with the Node Tool), holding CTRL (to translate the object) then dragging the node of one of the paths over the one you want in the other path.
-
Designer 2.6.3 export to PNG adds huge blank space on macOS 14.5
MEB replied to A42 Games's topic in V2 Bugs found on macOS
Hi @A42 Games, Welcome to Affinity Forums Yes, this is a bug. Technically, it’s doing what it’s supposed to - the mask object is included in the export selection even if only part of the objects it masks is visible. But in practice, if we’re using a mask, it’s usually because we don’t want anything visible beyond its boundaries, and therefore its "space" shouldn’t be included in the export. I’m checking if we already have this logged, and I’ll log it for the devs’ consideration if not. Thank you for your feedback. -
Inserting rainbow flag emoji with unexpected result
MEB replied to Andreas J's topic in V2 Bugs found on macOS
Hi @AlexEaton, Welcome to Affinity Forums Thanks for your feedback. I've bumped/updated the existing report. -
Hi @trichens, Both issues have been logged. The second one (Publisher doesn’t appear to have the Smart Objects option available) was logged as AF-1935.
-
Hi @Brett Stebbins, The issue was logged as AF-1772, and there was some progress on it around that time (it was marked as ‘In Progress’). I’ve updated the report to bring it back to the developers’ attention. It may have fallen off the radar or is still on hold, awaiting a complete fix.
-
Hi @CaroleA, Yes, apply the all effects you want to the first shape then invoke the Move/Duplicate command. Alternatively, if you want to be able to make changes on the fly to all duplicates, you can generate a symbol from the first shape, then invoke the Duplicate/Move command and generate the duplicates (Symbols are only available in Designer). This way, any changes you make to the symbol will automatically update all instances in real time. In Affinity Photo you can also reproduce this using Links (Menu Window > Links). First create your first object with the effects you want, then with it selected go to menu "Layer > Duplicate Linked" to create a duplicate which is linked to the first object/layer. With this duplicate selected, invoke the Move/Duplicate dialog to generate the number of duplicates you need. All linked layers will then update when you make changes to one of them. You can create a symbol by opening the respective panel (Window > Symbols).
-
Hi CarolineA, You don't have to duplicate it manually. Draw the rectangle with the gradient as G13RL suggested, then with it selected (Move Tool) press Enter o open the Move/Duplicate dialog. Set the Horizontal value to the width of the rectangle, so it moves along horizontally that distance, tick the Duplicate checkbox a set the "Number of copies" value to whatever you need, then press OK.
-
render problems with Affinity Photo, W11, nVidia 5070Ti
MEB replied to grapher's topic in V2 Bugs found on Windows
Hi @Havranek, Welcome to Affinity Forums Thanks for your feedback. I've updated/bumped the respective report. -
Linked Files Not Displayed at Full Resolution
MEB replied to Hangman's topic in V2 Bugs found on macOS
Hi @big smile, The file you uploaded (01 PopPosi.afpackage) links to several other .afpub and .afdesign files, which in turn link to several .jpg images that were not included in the files you sent. As a result, they appear blurry on system as expected. Could you please upload the missing images as well, so I can check if Publisher loads them at full resolution? Thank you.