dmstraker
-
Posts
829 -
Joined
-
Last visited
Everything posted by dmstraker
-

Pools of light (or dark)
dmstraker replied to dmstraker's topic in Tutorials (Staff and Customer Created Tutorials)
Aha! Found it! Many thanks for sticking with me on this, owenr. I've learned something today (at last) which makes me happy. Select shape and then Gradient tool. I'm guessing that using a rectangle container shape rather than an ellipse is to ensure the gradient can fade all the way out. I still think there's a bug in the shape fill subsystem, but that's less of a worry now I have a fix. For completeness, for anyone reading later, the sequence is hence: Draw rectangle with Rectangle Tool over area where you want a pool of light. Click Gradient Tool. Change Type on top context toolbar to Ellipse. Click on colour box on context toolbar and click on left node to set it to white then right node to set it to 50% grey. Set Blend Mode on Layer panel for Rectangle to Overlay. Adjust with Opacity, node colours and gradient axis tools. -
Pools of light (or dark)
dmstraker replied to dmstraker's topic in Tutorials (Staff and Customer Created Tutorials)
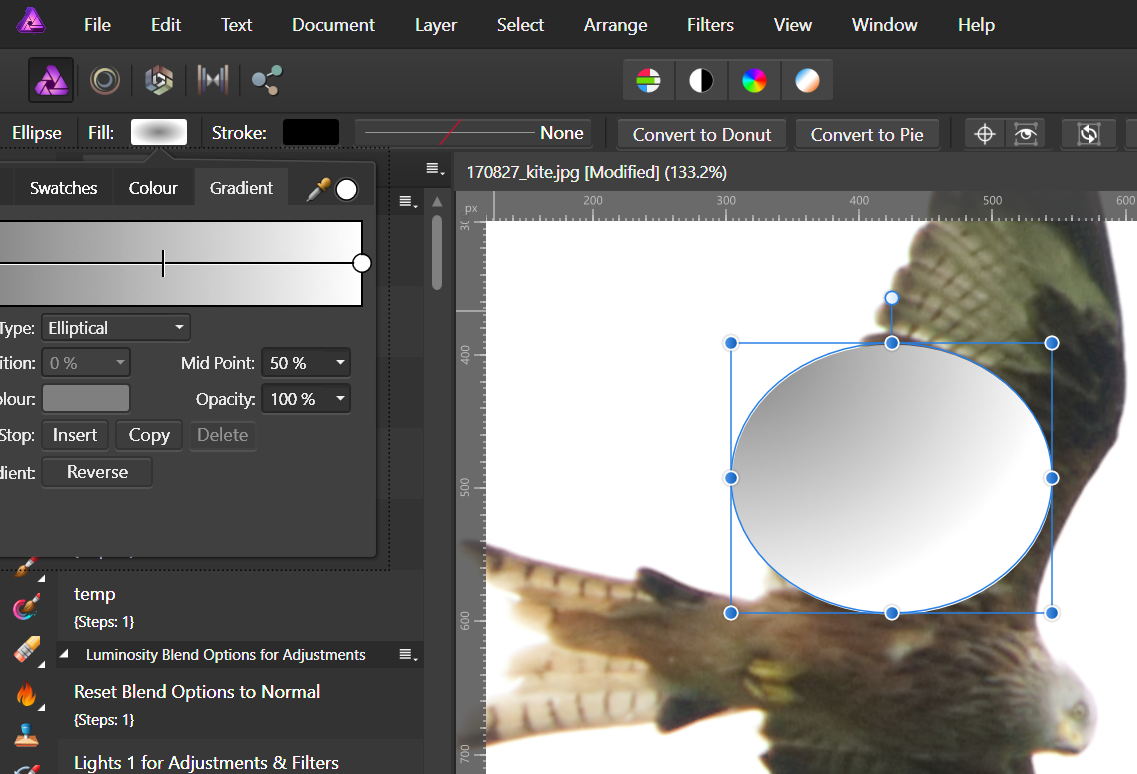
This is the idea. I started with the Gradient tool but picked up on MBd's first note about using shapes. I really appreciate owenr's time and concern, but it's shapes, not gradient tool I'm now using. In detail: Click on shape tool near bottom on left toolbar and select ellipse Draw the shape on the image Click on Fill colour box on top toolbar Click on Gradient tab Leave Type as Linear. Click on an end node, then the colour box and set to 50% grey The drawn ellipse then has a correct linear gradient across it. Now click on the Fill colour box again and change Type to Elliptical. The drawn ellipse is incorrect as the centre of the gradient is at the edge, not at the centre. Now reset history, going back to the beginning. Repeat steps 1 to 6, except for step 5, where you change the Type to Ellipse. Now the drawn ellipse is correct, with the centre of the gradient in the middle, not at the edge. -
Pools of light (or dark)
dmstraker replied to dmstraker's topic in Tutorials (Staff and Customer Created Tutorials)
Sorry Owen. Not so obvious to me yet. I'm drawing gradients within shapes, not using the gradient tool. Where do I enable bounding box midpoint snapping? Appreciate your help here! Attached is example of the problem happening.
-
Pools of light (or dark)
dmstraker replied to dmstraker's topic in Tutorials (Staff and Customer Created Tutorials)
Grab handles in shape are at edges. No clues about centring radial fill gradient. -
Pools of light (or dark)
dmstraker replied to dmstraker's topic in Tutorials (Staff and Customer Created Tutorials)
Yes, you can drag gradients in the gradient tool, but can you do it when a gradient is used within a shape? (Aside: oddly, the problem I was getting yesterday about centring of the radial gradient within a shape now seems to be ok) -
Pools of light (or dark)
dmstraker replied to dmstraker's topic in Tutorials (Staff and Customer Created Tutorials)
Good move. However, I drew an ellipse set the fill to Gradient, Type: Radial, and the gradient is coming from the LHS, not the centre (as the top toolbar icon suggests it should. Bug? -
It's often nice to be able to add a pool of light, for example under a lamp or generally around the image to create more contrast. A simple way to do this: Gradient tool (left toolbar) Type: Elliptical (top context toolbar). Note: this will create a new pixel layer. Click on colour panel in top toolbar. Leave left circle at white and set right circle at 50% grey. Blend Mode: Overlay. Control intensity with Opacity. You can easily drag and shape the pool of light. Change the left circle to any hue to create coloured pools. Drag half-way mark on ellipse axes to change gradient, or even click on axis to add more points. To do dark pools: Reverse gradient (top context toolbar button) and Blend Mode: Multiply. Note: While these are non-destructive (on separate layer), you don't seem to be able to go back and re-edit the ellipse afterwards. Using the Filters/Lighting filter as a point would seem an alternative, but it doesn't appear to be able to do an ellipse.
-
api expose the API for programmers
dmstraker replied to Yuuko's topic in Older Feedback & Suggestion Posts
If developers were able to create fancy plugins, then lots of people would be delighted. -
Just came across a simple way of solarizing a picture. Convert to black/white. Add Levels adjustment. Turn Gamma right down (goes white) Turn Black Level steadily up until you get the effect you want. This progressively selects darks upwards, making them black, and could be used to create a stark darks/shadows mask. The reverse effect happens if you invert the image, turn the Gamma right up and progressivelyl turn down the White Level.
-
Tutorial for Special Drawing Style
dmstraker replied to Mischugo's topic in Tutorials (Staff and Customer Created Tutorials)
Another variant: Convert to Black and White. Add Levels adjustment. Turn Gamma right down, then turn Black up until you get the effect you want. -
After selecting an item you can also use Edit/Paste Inside (Ctrl-Alt-V). This pastes the selection as a child of the current layer (rather as a separate layer above) and doesn't show it unless you open up the layer with the little triangle on the left in the layers panel.
-
The Selection Process Mystifies Me
dmstraker replied to ttibsen's topic in Pre-V2 Archive of Affinity on iPad Questions
I've never found a perfect selection method on any software, but do find Affinity to be pretty much as good as anything else. My standard selection process is: Selection brush gently around edge, then fill in middle. Then zoomed in going around edges, adding and removing. Quick mask (with various softness of brush) to improve further. Refine, for things like hair and leaves of tree against sky. Mostly with Matte and occasionals Foreground brushes. Depending on the foreground/background contrast I may omit 2 or 3, and perhaps fiddle more with 3. Using the right brush size and softeness can be important. -
I don't think Affinity does this but it is really easy anyway. Just cut/copy and paste. Yes it'll be on a new layer. Move it to where you want with Move tool (shortcut: V), then if you want to go back to a single layer, merge down (Layer/Merge Down, shortcut Ctrl-E) or flatten (Document/Flatten). Turn off any remaining marching ants with Ctrl-D.
-
Tutorial for Special Drawing Style
dmstraker replied to Mischugo's topic in Tutorials (Staff and Customer Created Tutorials)
Layer/New Adjustment Layer/Posterise Adjustment. Then set Posterise Levels to 1. You can simplify it further with Layer/New Live Filter Layer/Denoise Filter. Set Extreme checkbox and ramp Luminance Denoise right up. The lighting on your original photo may be signficant. Side lighting in particular will help. -
Affinity macros are very useful but still far more limited as compared to the PS actions. No compatibility at all, I believe.
-
Excellent tutorial, DC. Ripples of applause. Good conversational tone with lots of screenshots and 'clickalongs'. The only note I'd make about the tutorial is to keep the text size to about the same as the screenshots and allow more white space. Sampled content is fine. Like you, I taught for a couple of years (Maths and Computing) before drifting off into more lucrative work. Still, once a teacher... I also now write as an indirect teaching outlet. I've published here notes on the 200 Ritson videos and a guide to blend modes.
- 18 replies
-
- 1
-

-
- affinity photo
- book
- (and 2 more)
-
Detect Edges
dmstraker replied to John Rostron's topic in Pre-V2 Archive of Affinity on Desktop Questions (macOS and Windows)
The starting point was the downloaded first image in the original post. The process creates a separate layer above with just the lines on (which you can then use in various ways). -
Detect Edges
dmstraker replied to John Rostron's topic in Pre-V2 Archive of Affinity on Desktop Questions (macOS and Windows)
To create the attached, I used the following process to add a contours layer: Duplicate background Detect edges Adjustment layer: Black/white, Merge Layer/Invert Adjustment layer: Levels black 50%, Merge Filters/Colours/Erase White Paper
-
Maybe a good argument there for gestures.
-
I'm the webmaster of Abergavenny Camera Club and keep interesting links in pages such as: http://www.abergavennycameraclub.org.uk/help/links-photoshop.htm Other links are found under Photography in website top menu.
-
Indeed. Raises the general question of where else 'next/prev' shortcuts would be useful and what PS to copy or configs to allow. ...and whether a standard next/prev could be applied to the most recently used thing in an intuitive way.
-
Flow value keyboard shortcuts
dmstraker replied to DreamLight Images's topic in Older Feedback & Suggestion Posts
Asked for back in 2015. Number for Opacity done and most welcome. Shift-Number for Flow --- come on folks--it's an easy and useful one! -
Inpainting Not Working Correctly
dmstraker replied to LilleG's topic in [ARCHIVE] Photo beta on macOS threads
Here's my fix: Process: Layer/Rasterise… Select/Alpha Range/Select Opaque Select/Invert Pixel Selection Edit/Inpaint Select/Deselect Macro to do this in one click attached. Dave's Alpha Inpaint.afmacros -
I've just found that you have to rasterise before inpainting into transparent corners (and after canvas stretch). Process: Layer/Rasterise… Select/Alpha Range/Select Opaque Select/Invert Pixel Selection Edit/Inpaint Select/Deselect Macro to do this in one click attached. Dave's Alpha Inpaint.afmacros
-
Auto Inpainting After Crop?
dmstraker replied to skiphunt's topic in Pre-V2 Archive of Affinity on iPad Questions
I've just found that you have to rasterise before inpainting into transparent corners (and after canvas stretch). Process: Layer/Rasterise… Select/Alpha Range/Select Opaque Select/Invert Pixel Selection Edit/Inpaint Select/Deselect Macro to do this in one click attached. Dave's Alpha Inpaint.afmacros