davidbjames
Members-
Posts
28 -
Joined
-
Last visited
-
Change photo taken with wide angle lens
davidbjames replied to davidbjames's topic in Desktop Questions (macOS and Windows)
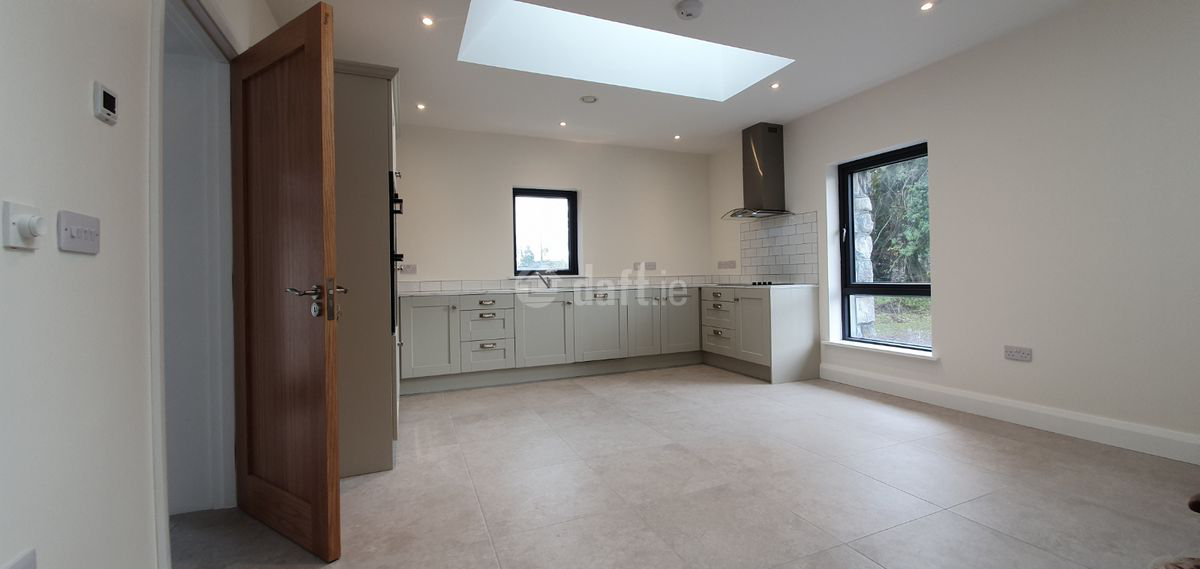
Here is an example from a real estate web site. Objects at the outer edges are distorted/enlarged and objects near the center are small. -
davidbjames started following Change photo taken with wide angle lens
-
I would like to take a photograph made using a wide angle lens and change it to a photo without wide angle. For example, going from the effect of a 13 mm lens to a 24 or 35 mm lens. I think this should make the objects near the left and right edges smaller (less distorted) and objects near the center larger.
-
 Megnusin reacted to a post in a topic:
Way to scale rounded corners proportionally?
-
 davidbjames reacted to a post in a topic:
AD - building concentric circles
-
 davidbjames reacted to a post in a topic:
Creating a spiral or coil
-
Leading
davidbjames replied to Orchard Collie's topic in Pre-V2 Archive of Desktop Questions (macOS and Windows)
Also make sure you don't have Space After Paragraph set in the Paragraph panel, as this will make it appear that lines separated by line breaks have excess leading. -
This is an old issue, but I was able to isolate the problem further. If you make the selection by clicking on the layer palette, presuming this would just be a regular selection of that layer/sublayers, then the problem is reproduced. The exported image is sized with excess background around the intended selection. However, if you "drag select" the same area, then there is no problem. The exported image is sized correctly.
-
 Jowday reacted to a post in a topic:
How to update global colors across embedded documents.
-
I have a document palette of global colors. I would like to use this palette in different embedded AD documents and then update the colors in one place and have them update in the other embedded documents. Specific workflow: I have an AD file that I use as a template for creating iOS icons of various sizes. These icons are embedded AD documents. There are 4 variations – XL for iTunes store, L for high res devices, M for low res devices and S for search/notifications, and within each of those a few different sizes – Icon-60@3x, Icon-83.5@2x, etc. Each has the same general motif but slightly different design optimized for the size of the icon (e.g. smaller icons have less detail). To edit the documents, I double click on them which opens up the <Embedded> document. I need to be able to change colors in one and have those color changes reflected in the other embedded documents.
-
 Steffenvy reacted to a post in a topic:
Way to scale rounded corners proportionally?
-
 WhiteX reacted to a post in a topic:
Way to scale rounded corners proportionally?
-
 markw reacted to a post in a topic:
Way to scale rounded corners proportionally?
-
Just ran into this the other day. VERY frustrating. Considering the crazy math that must drive this app, the ability to scale dynamic corners proportionally seems easy to implement by comparison. PLEASE FIX!
-
1. Create a background on a layer that extends across the screen 2. Create an object or text on the same layer (the size should be smaller than the background to see the problem) 3. Make the object into a mask for the layer so only the background shows for that area 4. Select the layer 5. (Note: the blue bounding box shows only the area of the mask, not the entire background) 6. Export > PNG > Area > Selection without background... Save. Expected result: PNG size to include only the selection/masked area. Actual result: PNG size includes the entire area of the background.
-
Thanks so much @dutchshader for the excellent video demonstration! (learned this today!) However getting back to my original question, should I report this as a bug? 1. Create a background on a layer that extends across the screen 2. Create an object or text on the same layer (the size should be smaller than the background to see the problem) 3. Make the object into a mask for the layer so only the background shows for that area 4. Select the layer 5. (note that blue bounding box shows only the area of the mask, not the entire background) 6. Export > PNG > Area > Selection without background... Save. Expected result: PNG size to include only the selection/masked area. Actual result: PNG size includes the entire area of the background.
-
Here is a screenshot of the Export dialog, with the setting I want "Selection without background": https://cl.ly/50508bbd8932 I have attached a test document and exported document showing the problem. As you will note when opening the Designer document, the background of "FOO" are large rectangles that extend beyond the "FOO" mask. If you select the main layer you will note that the selection does not include the background, but only the masked area. However, if you export this (the Test Foo.png file) you will see that the resulting PNG includes the entire area, so requires trimming later. (I think all this was clear in my post, but now you have some examples to work with.) Test Foo.afdesign
-
Is it possible in Affinity Designer to export a selection (File > Export > PNG > Area: Selection without background) where there is masked content, with the resulting file being trimmed to only include the visible content. For example, I am creating a logo that has a background that extends well beyond the edges of the logo, where the logo shape reveals (via mask) the background I want visible. In fact, if I select the item in Designer the blue bounding box shows the rectangle of the visible content only. This is what I want to export. However, instead the export includes the entire area that the background occupies, so I then have to reopen the file in Preview to trim it down, which is obviously not very efficient. (btw, if I choose "Selection with Background" it then exports the entire file which I don't want. I just want the selection) Thank you, David
-
Spurious "Linked Resource Changed" notifications.
davidbjames replied to davidbjames's topic in V1 Bugs found on macOS
Excellent. Thank you.


