LCamachoDesign
-
Posts
375 -
Joined
-
Last visited
1 Follower

Recent Profile Visitors
3,850 profile views


-
 LCamachoDesign reacted to a post in a topic:
Too quiet …
LCamachoDesign reacted to a post in a topic:
Too quiet …
-
 LCamachoDesign reacted to a post in a topic:
[Des 2.6.3] Using certain Select Object commands enables deleting the app interface
LCamachoDesign reacted to a post in a topic:
[Des 2.6.3] Using certain Select Object commands enables deleting the app interface
-
LCamachoDesign reacted to a post in a topic:
[Des 2.6.3] Using certain Select Object commands enables deleting the app interface
-
loukash reacted to a post in a topic:
[Des 2.6.3] Using certain Select Object commands enables deleting the app interface
-
Hello! This is one wild bug, with it I'm able to delete the main UI view and break the whole app. Steps to reproduce are simple: Start a new document without Artboards Use the menu Select > Select Object and pick one of the options below: Unfilled Objects Unstroked Objects Undashed Objects Opaque Objects Press Backspace or Delete, the main UI is gone! Notice this is not deleting an artboard since none was been created. Also, the undo command and History panel list this as Delete Spread. Which is odd since there's no spreads here? But you can make this bug worse: Starting from point 3 above, zoom your document You can use the Zoom tool, or any mouse or keyboard command Notice the zoom level does not change at all Try to undo this spread deletion It will no longer undo it, and you cannot recover the UI anymore Notice the History panel now lists this deletion as simply "Delete", no spread mentioned It will show up as "Delete Spread" again if you redo, but you can't recover the UI The only way to revert this situation is to close the document and open it again From what I've tested, it seems you can still save the document and the contents will be safe By the way, this seems to be a variation of this bug I reported years ago and it's still unfixed: Lastly, I've attached a video to demonstrate this bug in action in a visual way. Thanks! delete UI bug.mov
- 2 replies
-
- 1
-
-
- select command
- select
- (and 3 more)
-
LCamachoDesign reacted to a post in a topic:
[Affinity (all apps) 2.5.7] Export Persona Options UI text unreadably small
-
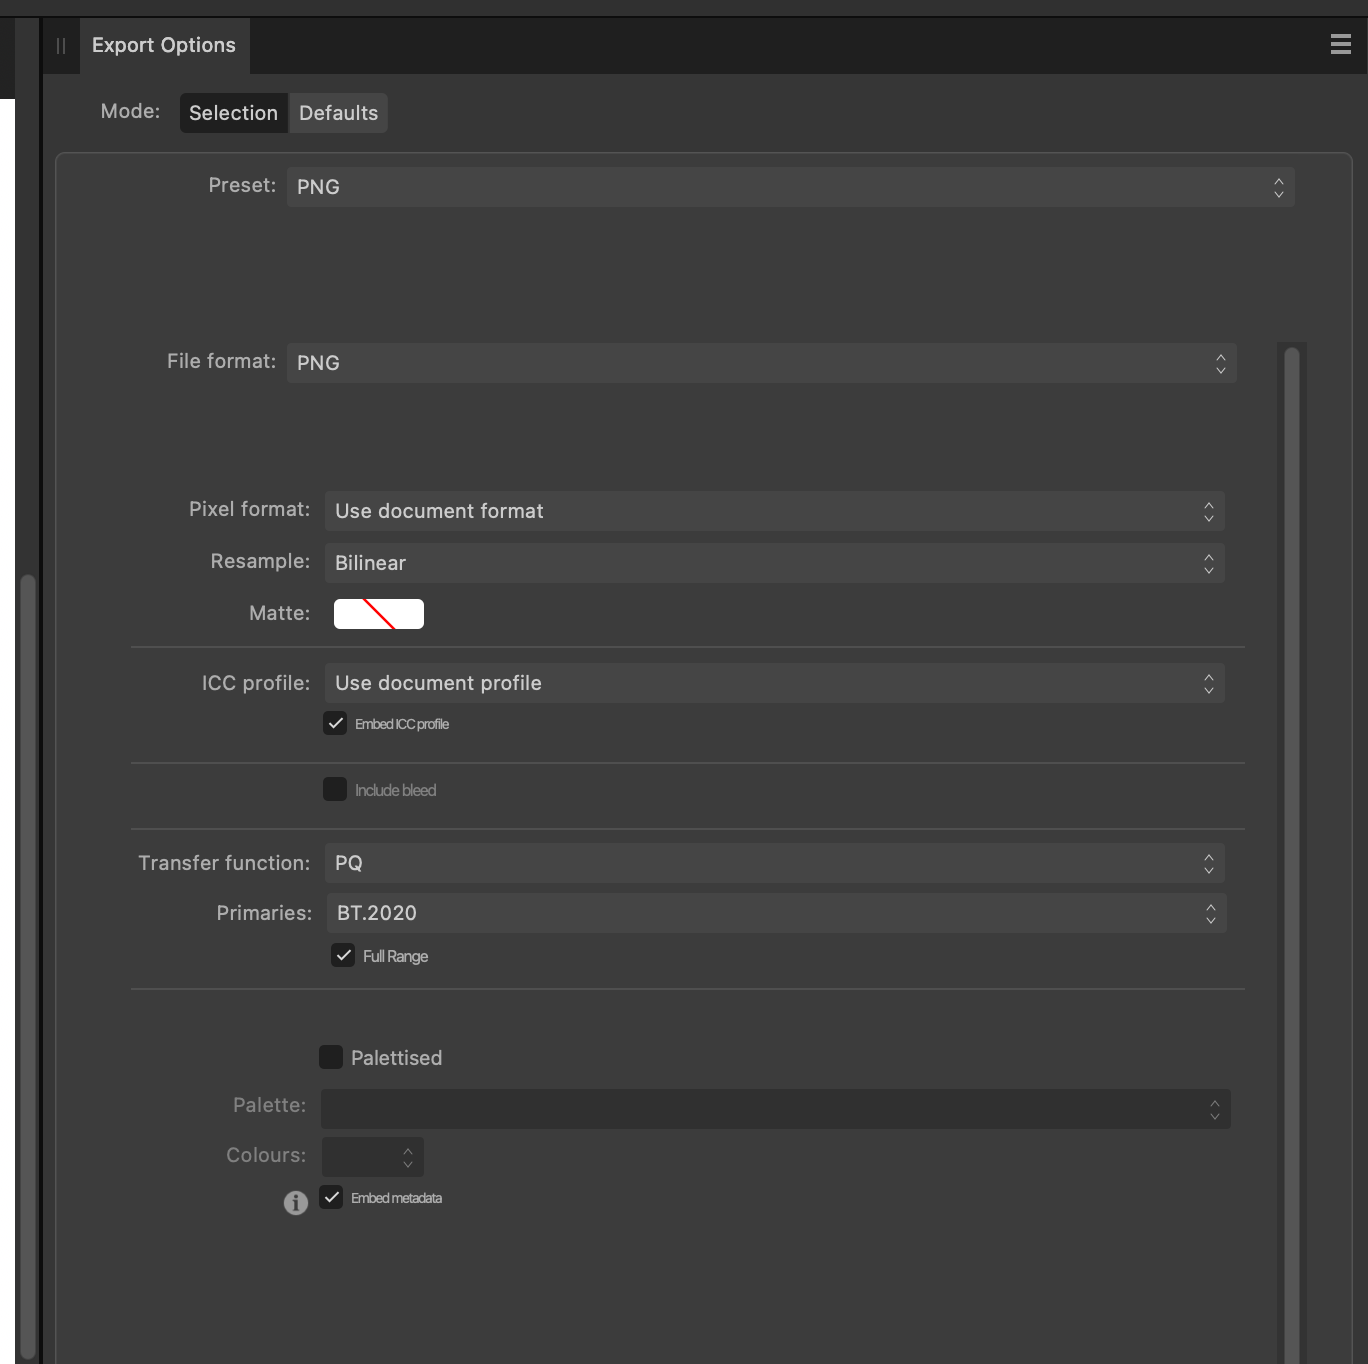
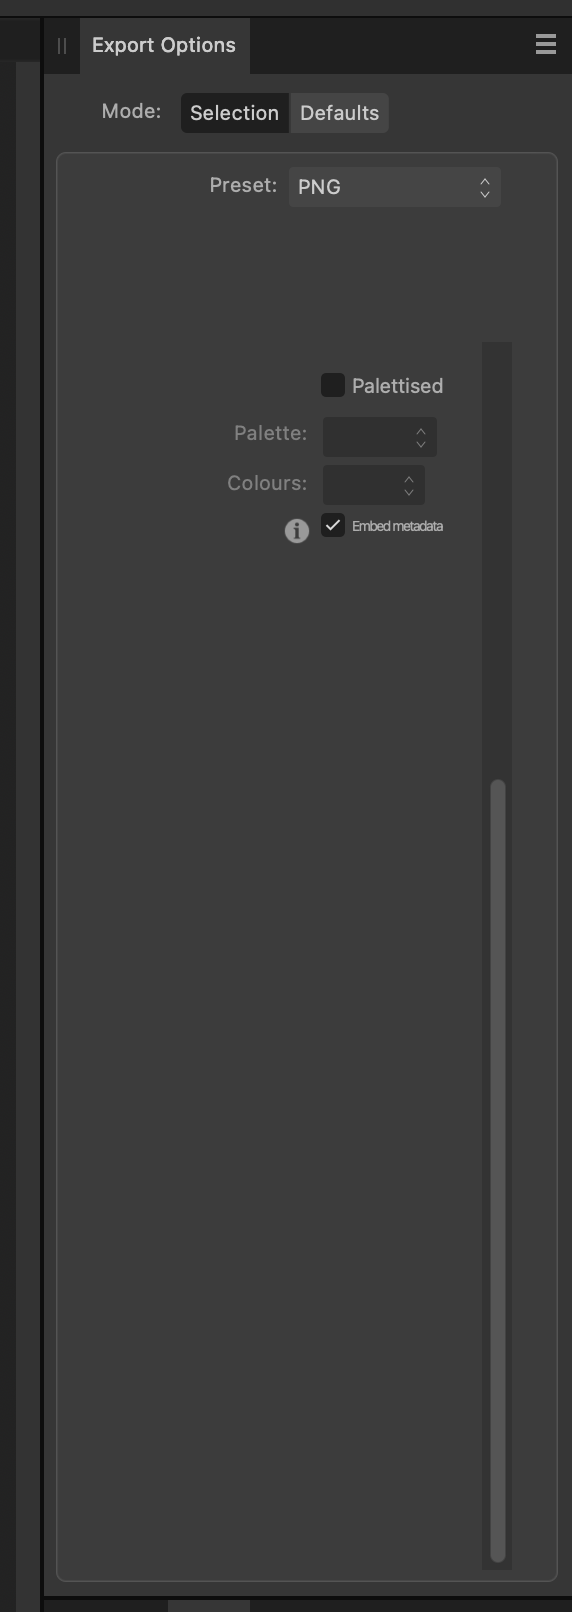
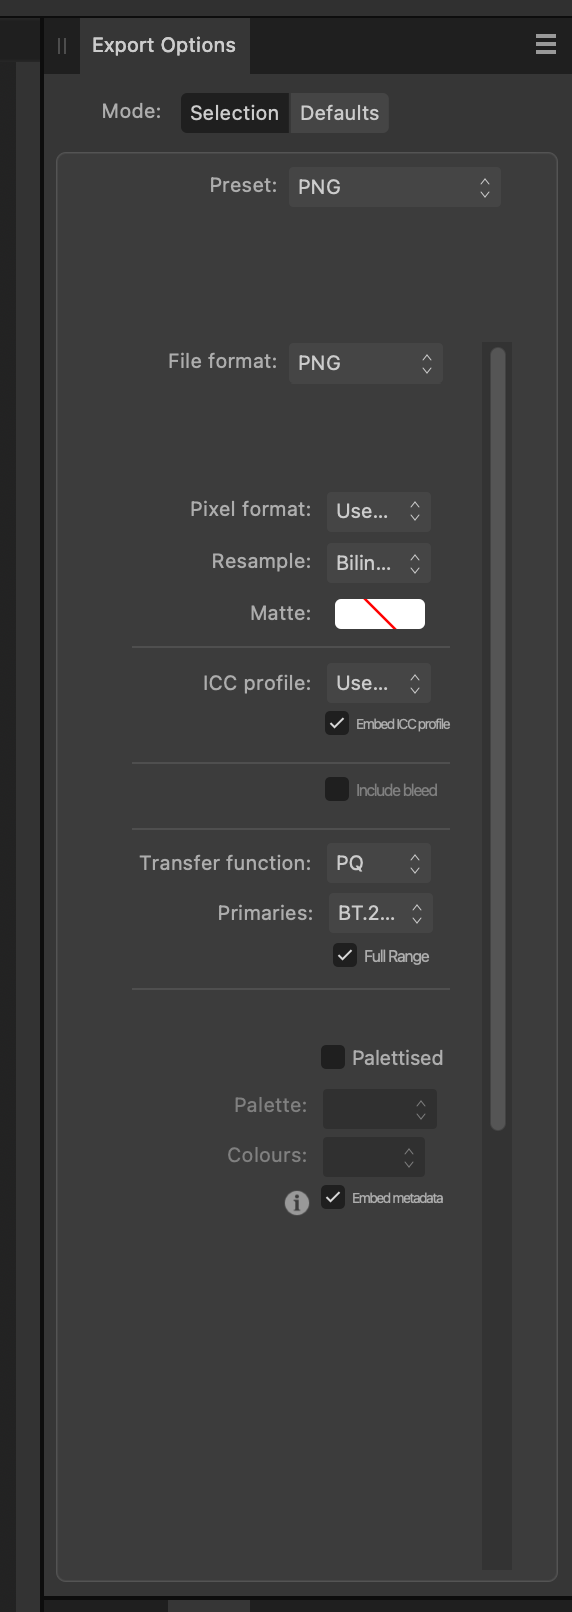
Text for the checkbox items is unreadably small. Additionally, the scrollbar seems misplaced, takes too much space, and shows up even when there's plenty of space to accommodate the whole UI. The scrollbar also goes on for an unnecessary length, scrolling all the way down will leave almost nothing of the UI visible. Please see attached image. Happens in Export Persona for all apps. This is so obvious that I'm wondering if there's something wrong with my installation. I've just started using macOS, so I'm not sure what's going on. There's other parts of the apps which are questionably sized, but this one is the most obvious. This particular screenshot is from Affinity Photo, but it happens in all apps. Details: macOS 15.2 Affinity apps downloaded from Mac App Store All are version 2.5.7 Screen is 4K resolution at optimal scaling (1080p@2x) Expanding the panel size does not fix it Don't know if you need more details? Thanks!

-
LCamachoDesign reacted to a post in a topic:
[Photo 2.5.7] Tone Mapping Overlay opacity slider caps at 10%
-
This one is a bit hard to explain, but easier to see. When you first create a tone mapping overlay, it is supposed to be translucent red until an edit to the mapping value is made. This turns off the temporary red overlay and starts displaying the changes. This particular switch does not work well if you do changes to the Shadows & Highlights values on the Master overlay, and then create another overlay, be it brush or gradient. Steps to reproduce: Create or open a 32 bit image that has easily identifiable shadows or highlight areas Switch to the Tone Mapping Persona Do any adjustments to the Shadow & Highlights that's easily visible Create a tone mapping overlay, can be either brush or gradient Notice the Shadow & Highlights section is already active Do any changes to this section values, and only this section, don't touch any other Notice there are no changes in the image Notice the red overlay does not turn off Turn off the checkmark for the Shadow & Highlights, turn it on again Notice the changes are now applied to the image Notice the red overlay disappeared as expected To make it easier to test and isolate this, I turned off the other sections in the Master overlay, but this step is not needed to trigger the bug. Video included showing the steps to reproduce. Thank you! shadow highlight overlay.mp4
-
When trying to change a tone mapping overlay opacity, the slider UI limits the values to between 0% and 10%. Steps to reproduce: Create or open a 32 bit image Switch to the Tone Mapping Persona Create an overlay, can be either brush or gradient Use the opacity slider to decrease the overlay opacity Notice the value immediately drops to 10% Notice you can't bring it back to any higher value using only the UI Notice you can type higher values as a workaround Please see video attached for a visual demonstration. Thanks! tone mapping opacity.mp4
-
Old Bruce reacted to a post in a topic:
[Designer 2.5.7] Opacity changes when cropping placed Photo file
-
When vector cropping an Affinity Photo file placed inside an Affinity Designer document, with an opacity value different from 100%, the visual opacity will suddenly and unexpectedly drop, but the value on the layer remains unchanged. Steps to reproduce: Create an Affinity Photo file, even a simple file with just a circle will do Create a new Affinity Designer file Place the Affinity Photo in the Affinity Designer document Change the opacity of the placed Photo file, to 30% for example Select the Vector crop tool, and start copping the Photo file Notice the visual opacity of the placed document drops substantially Delete the vector mask, notice the opacity returns to the original I've also attached a short video demonstrating the issue, and sample files to test this situation. This seems to only happen with Photo files, any other types of placed files work fine. It also only happens with vector masks, if you create a pixel mask, by using the Eraser too on the Pixel Persona for example, this will not happen. The vector mask does not need to be created by the Vector Crop tool, that is merely the easiest way to trigger this problem, but other vector masks will have the same problem. Additionally, this is not just a visual bug. If you export the file, for example to a JPEG file, the image will have the incorrect bugged opacity rather than the correct value. Thanks! Vector crop bug.mp4 Test Photo File.afphoto Test Designer File.afdesign
- 6 replies
-
- 1
-
-
- affinity designer
- affinity photo
- (and 6 more)
-
fiery.spirit reacted to a post in a topic:
We need to talk about artificial intelligence.
-
LCamachoDesign reacted to a post in a topic:
2.6 or 2.5.6 beta when?
-
LCamachoDesign reacted to a post in a topic:
2.6 or 2.5.6 beta when?
-
LCamachoDesign reacted to a post in a topic:
[Publisher 2.5.3] Cannot select carrier return character with Old Style numbers
-
PE1 reacted to a post in a topic:
[Publisher 2.5.3] Style settings measurements in the Text Style Editor completely broken
-
LCamachoDesign reacted to a post in a topic:
[Publisher 2.5.3] Cannot select carrier return character with Old Style numbers
-
LCamachoDesign reacted to a post in a topic:
[Publisher 2.5.3] Cannot select carrier return character with Old Style numbers
-
There's so many things wrong it's just easier to see the attached video, screenshot, and sample file. I've noticed that: Hyphenation value does not display correctly Numeric values seem to be randomly (?) displayed with other unrelated values or even units I've seen point values show up as completely different point values, like the font size I've seen units display different altogether, like paragraph stops in mm showing in px The actual values that appear in the design are correct though. For example, setting a font to 12 pt in the Text Style Editor will result on a text with 12 pt size, even if the Style settings text in the dialog box says 37.5 pt. Also happens in Designer, and likely in Photo too. Thanks! Gravação 2024-07-11 153625.mp4 Publisher Sample 2.afpub
- 3 replies
-
- 1
-
-
- text style editor
- text styles
- (and 5 more)
-
When you drag select text going from left to right, you should always be able to also select the carrier return special character. This is for a number of reasons related to text layout. However, this function breaks in Publisher and Designer (and likely in Photo too) if your paragraph starts with a number, and the Figure Style of the said number is set to Old Style. Steps to reproduce: Create a text frame object Set the font to one that supports Old Style numbers such as Arial Write a few paragraphs that start with numbers Set the Figure Style for all paragraphs to Old Style Try to select the whole paragraph including the return special caracter See that you cannot, at least not without selecting the line below Set the Figure Style to Default Try to select the paragraph again See that selection works as expected See attached video and samples files for an example of what's happening. Thanks! Gravação 2024-07-11 151638.mp4 Designer Sample.afdesign Publisher Sample.afpub
-
If an object has rounded corners that only round the outside angle of the shape, but not the inside, upon expanding the stroke of the said object the outside nodes will be sharp instead of smooth. This is actually hard to explain in words, so I've included a video showing the issue and a sample file for you to try. In any case, here's my attempt to provide a steps to recreate: Create a shape, such as a rectangle Give it a rather thick stroke such as 15pt or more Set the corners to rounded Input a rather low corner value such as 3% for example Expand the stroke of the object Notice the jagged outside edges Undo back to step 4 Try again with corner value 0 and repeat See the stroke expands correctly Undo back to step 4 Try again with a large corner value such as 30% See the stroke also expands correctly This bug is not limited to shape objects, it also happens with simple curves, provided they have a low value rounded corners. This bug does not seem to happen with any other corner type. Also, this bug can be inconsistent, I've seen shapes that follow the "rounded outside sharp inside" rule expand correctly. Thanks! Gravação 2024-05-24 120849.mp4 Sample File.afdesign
-
 fiery.spirit reacted to a post in a topic:
Questions on Canva acquiring Affinity
fiery.spirit reacted to a post in a topic:
Questions on Canva acquiring Affinity
-
NoLongerHere reacted to a post in a topic:
Questions on Canva acquiring Affinity
-
Yeah, this is pretty much my take. And we've seen mergers and acquisition on the design/software enough times to know this will likely end badly. I mean, just look at Gravit Designer -> Corel Vector after the acquisition, or even more recently Vectornator -> Linearity Curve after VC poured in. This is why we can't have nice things.
-
michalmph reacted to a post in a topic:
We need to talk about artificial intelligence.
-
Wait, what? There are key objects in Affinity? When did this happen? I just tested it in 2.3 and it works! I had no idea. Is this even in the documentation? Well, I guess finding out there's key objects is the best feature announcement! 😂😂
-
Placing an image and trying to set its scale on the toolbar is basically impossible. Steps to reproduce: Create a new document, I've used a simple press ready A4, 300 DPI Drag and drop an image into the newly created document, I've used this from Unsplash Select the image and use the toolbar to set a percentage scale, such as 50% Notice the image is scaled, but to a completely different value Keep trying to scale the image, the values will increasingly become completely erratic (!!!) Notice that trying to set a specific DPI value, such as 300 or 600, works as expected See the attached video below for a visual guide: Erratic Percentage.mp4 Thanks!
-
Right clicking a swatch created on any document palette created after the first one will no longer have the Edit, Rename and Delete menu entries active. See the image below: Steps to reproduce: Create a new document Create a new document palette, name it 1 for easy reference Create a new global swatch, make it spot to enable the Rename Spot menu too Right click the newly created swatch See that you can edit, rename and delete this swatch Create a new document palette, name it 2 for easy reference Create a new spot global swatch Right click this new swatch, notice the disabled menu items Creating further palettes and swatches Notice the problem continues Video guide below: Swtaches menu.mp4 Thanks!
-
midvok reacted to a post in a topic:
Symbols loose connection to global colors
-
Small UI bug when the Swatches Panel view option is "Show as list" and a swatch is set to overprint. This is how the documentation shows how the swatches should look: This is how the show in "normal" (?) mode, and it's correct: And finally, this is how the look like in "Shows as list" mode, we can clearly see the grey circles are not being correctly cropped and overlap the swatches above: Thanks!
-
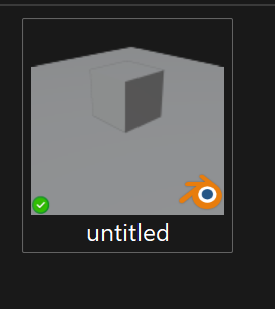
Just to let you know this is still happening, and only in Affinity apps. No other apps have this problem, so I'm not changing system settings just for this. Can you please look up what's wrong with your icons? More importantly, whatever happened to the mini icon over the file explorer thumbnails? Attached is an example of how Blender does it. Affinity used to do this as well, but somewhere along the way this was lost, and it never came back. So now, when we export a PNG file next to the source file, both thumbnails look exactly the same. The only way to tell them apart is by hovering the file and waiting for Explorer to say what file type it is. Thanks!
-
I see. But in that case, it's still a problem in Affinity, and not with my system. You should be using the value marked in green, "decimal separator", since that's literally what it is. Instead you seem to be using the "list separator" value marked in red, which is the incorrect value to use (and also; is the correct value for a list separator, so I'm not changing it, it would break stuff elsewhere). Thanks!