Bri-Toon
-
Posts
2,183 -
Joined
-
Last visited
Everything posted by Bri-Toon
-
some selection options needed
Bri-Toon replied to zuzaem's topic in Older Feedback & Suggestion Posts
For this, you can just hold Ctrl to select part of a group. You can select one path or multiples. -
Basic Move tool question
Bri-Toon replied to waltl's topic in Pre-V2 Archive of Desktop Questions (macOS and Windows)
Hello Waltl, Hold Shift to constrain your selection, and hold Ctrl/Cmd to scale it from the center. -
I'm very glad that all is going well again. Anyway, I do want to point out two minor bugs I caught. They're just minor, so no worries. 1. Locked layers can still be drawn on. 2. When the brush tool is selected, I cannot change the width size in the Stroke tab unless an object is selected, but I can change the width from the context toolbar.
-
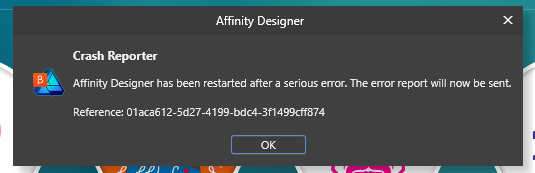
Hey I have great news, Mark. I was able to launch the program again. Thank you very much for the support. I should notify Sean as well. There was just one thing. I got this dialogue, but nothing happened after I closed it. I closed the program and reopened it to test if the dialogue will pop up again, and it didn't. It was just that one time. It feels great using this program again!

- 35 replies
-
- 1
-

-
- designer
- public-beta
- (and 4 more)
-
Applying brushes to pen curves
Bri-Toon replied to vincer's topic in Pre-V2 Archive of Desktop Questions (macOS and Windows)
You can also convert lines to brushes or brushes to lines in the Stroke panel. Those icons on the top will do the converting. Plus, while there isn't really manual line pressure for the pen tool, you can still change the weight variation in the Profile option in the Stroke tab as well. -
A vector flood fill tool has been requested (by me actually). Anyway, it may not be the most ideal way, but you can use the pixel tools to make your fills. With a pixel layer created, use the Magic Selection tool to do one of two things. 1. Tick off "All Layers." Make your selections in between the vector lines but in the pixel layer, and then apply your fills with the Paint Bucket tool. It is preferred that your pixel fills should be underneath the vector layer. 2. To make more precise selections, hold Ctrl and click on the vector layer thumbnails while the Magic Selection tool is selected. That will create a selection border around your vector lines. You can now close up your selection. Now create a pixel layer and move it underneath the vector one, and fill away with the Paint Bucket tool. It's too bad that there is not an "All Layers" option for the bucket tool. That would make things faster.
-
That's a good point. That's actually something I should be more careful of.
-
As MEB said, once you install a new font, it will be installed in all programs automatically. Are you using Windows or Mac? For Windows, here is a fairly short video on how to do it. Link Also, you do not always have to buy fonts depending on their location. It looks like Linotipe is free here for example.
-
That looks really good. I like the spots in the sidewalk in which rain splashed. I also like the choice of having light, rain, and a night sky, all together. The way they come together almost makes me feel like I'm there.
-
This sounds similar to the request I just added a response to. I see you are very familiar with using the effects. :P Anyway, I can't test it for myself currently, but if you use that color picker in the Effects window, can you copy an actual swatch?
-
use gradient swatches in layer fx
Bri-Toon replied to Schubi63's topic in Older Feedback & Suggestion Posts
I agree with this request. A user can have a full palette of custom swatches, but the user can't find those colors (easily) without a palette in the Effects panel. -
Well I'm glad your problem is solved. I hope this request can be added.
-
I vote for the third. I like the filters added on the first and third. The second is most detailed but it is too saturated compared to the other two and since you are trying to portray a horror theme. (The colors are always toned dark in horror movies, and not fully being able to make out the face or minor details can make the picture look more scary.) In the second and third, it looks like you have a shadow of a man on the face's forehead which can't be seen as well on the first. I imagine it is supposed to be noticed. Also, the dark eyes on the third actually works for me. Since this is horror, the rules of photography may bend a little. It's all about the scare.
-
It may not be as fast as just copying the gradient, but you still have all of the values there in that screenshot you provided. And so, you can transfer everything over to the color indicator on the context toolbar. Once you do that, you can save your selected color as a swatch. In the Effects panel, click on each gradient color separately, and copy the values such as position, opacity, and so on. While you are in the Gradient Overlay tab, does clicking on the Colour indicator show a code value for that color? If so, then everything is transferable. You shouldn't have to line everything back up and track down the exact color.
-
I don't know entirely, but I think that only locks the artboard itself. If it is to show in the Layers panel, then its corresponding objects would have to nest from it to indicate which ones go with which artboard. To lock all objects, drag them into another layer within the artboard layer, and then lock that one.
-
Is anyone else getting the unhandled extension thing? This is the 4th beta in which I am not able to launch the program because of that dialogue that comes up on the launch. I wonder if there is some compatibility issue with my computer. I really want to use the program again.
-
You're welcome. B)
-
Crash upon saving file
Bri-Toon replied to AdamStanislav's topic in [ARCHIVE] Designer beta on Windows threads
If it helps, you can use something called Screencast-O-Matic. The free version allows 15 minutes of video and it's online, and there is a downloadable version. It's certainly not the best screen recorder, but it will get the job done if you need to work this issue further in the future. -
Go to View, then Studio, and then check off the studios you want back.
-
Huh... I didn't realize that. I thought HSL were just corrections, but I guess they would have to change the color value.
-
Flip selection?
Bri-Toon replied to waltl's topic in Pre-V2 Archive of Desktop Questions (macOS and Windows)
Too bad those transform buttons are not on top of the Affinity Photo UI like Designer. Hmm... might the Transform panel do the trick? -
I could be wrong, but I don't think HSL would change the tint after all. If you were at 20% tint like in your example, you would have a very faded color (a light color). Tint is what determines between dark and light. That would mean that any result of HSL would also be 20%. Neither of those options will maker your color darker, just for correction. Someone can correct me if I'm wrong. I didn't make the program, but I'm guessing it's because the overall zoom size could not fit on such a small slider. After all, you can zoom in to over 1,000,000 percent.
-
In regards to this part of your question, the answer is no, they are not both the same thing. The Tint slider gives you a full scale difference between black and white of that colour you have selected. The HSL colours are for adjusting the hue, saturation, and lightness of that colour. You can find the same colour code in the HSL colour wheel, yes, but if you open the HSL sliders, you will see you don't have the same scale as the Tint slider.
-
Hi Alfred, thank you for your feedback. You are right. I overlooked something. In this video I recorded, I show that before I clip the three dots to the frog's skin, the frog's skin has nodes. After the dots are clipped to it, it no longer has nodes. However, what I didn't realize is that I have to hold Ctrl to bring up the nodes (not in the video); similar to as I would need to do for grouping. I'm making the correction in my list now.
-
Oh man, as much as I love Affinity, I will miss the whole Plus range. I assume so, Peter.