NathanC
-
Posts
4,437 -
Joined
Everything posted by NathanC
-
 Welcome to the forums @Tim222, If you'd like to keep the MSIX version and create a desktop shortcut, I've linked the FAQ with further instructions below.
 -
Hi @MartinHH Since gradients applied to mask and pixel layers are destructive, you could use a quick shape as the mask instead which is non-destructive: Create a rectangle quick shape to the size of the canvas bounds Select the Gradient Tool and add a black to white gradient on the shape Edit either of the gradient stops and change the opacity to 0% Offer the shape to the Gaussian Blur's thumbnail to mask it You should now be able to non-destructively edit the Gradient stops to adjust it's position as required.
-
No key for affinity Photo 1
NathanC replied to Ledeko's topic in Customer Service, Accounts and Purchasing
Welcome to the forums @Ledeko, If you historically purchased the V1 apps from the Affinity Store, you can access your product keys via the 'Downloads and Product Keys' page linked below after signing in to your Affinity ID. If you can't remember your login credentials there is also a password reset link on the login page. https://store.serif.com/account/downloads/ -
Hi @KAB-TyBB, Does your .Afpub/PDF have a bleed set? The 'Page Size' field in Acrobat's Document Properties is likely inclusive of the bleed in the W/H displayed.
-
Can't select element with bitmap mask by clicking (AD 2.6.3)
NathanC replied to WaveF's topic in V2 Bugs found on macOS
Hi @WaveF, I can confirm i'm able to re-produce this on MacOS by following your steps, so I'll get this logged with the developers. Yes, this outline indicates the original bounds of the masked object. -
Un dossier temp qui pèse 50Go et fait planter Photo et le PC
NathanC replied to reivax500's topic in V2 Bugs found on Windows
Merci, je ne vois aucun problème spécifique à ce fichier. Je peux interagir et modifier librement les calques de pixels sans pics de mémoire, et l'utilisation est normale tout au long de la session. L'option « Limite d’annulation » contrôle la durée de l'historique accessible pendant cette session d'application. 1024 est la valeur par défaut, et nous déconseillons généralement de la modifier, car son impact est généralement négligeable. -
Un dossier temp qui pèse 50Go et fait planter Photo et le PC
NathanC replied to reivax500's topic in V2 Bugs found on Windows
Bonjour @reivax500, Affinity commence à paginer vers un fichier temporaire « personabackstore.dat » lorsque la mémoire RAM disponible est insuffisante pour stocker des objets tels que des images. Ce fichier temporaire devrait être automatiquement vidé au redémarrage de l'application, libérant ainsi de l'espace. En plus de désactiver l'accélération matérielle comme mentionné par Carl, je recommande d'augmenter la limite d'utilisation de la RAM au même niveau que la mémoire disponible de votre système et de minimiser l'exécution des applications en arrière-plan afin de libérer des ressources lorsque vous travaillez dans Affinity. Le problème pourrait également être lié au fichier sur lequel vous travaillez dans Photo. Si vous pouvez partager une copie du fichier où vous rencontrez des problèmes lors des retouches, nous pourrons l'examiner. -
Can I change my app update method?
NathanC replied to PeterFitz's topic in Desktop Questions (macOS and Windows)
Hi @PeterFitz, It sounds like you have a used a mixture of installation methods (MSIX and MSI/EXE) for the three apps. If Designer is re-directing you to the 'Downloads' page when an update is available, this confirms that Designer has been installed using the MSI/EXE method, which can only be updated manually from the website. Publisher and Photo will be installed using the MSIX method, which is a more automated update process and does not require a manual download. I'd therefore recommend uninstalling Designer 2 via Windows Settings -> Installed apps and then downloading and installing the MSIX(x64) version from the page below, this is the first option in the download button dropdown. https://store.serif.com/update/windows/designer/2/ -
Hi @Ton Ouwehand, Native Affinity files are not a compatible format with the Panorama feature so won't appear in File explorer, only raster based formats are supported. See the list of supported formats below: JPG/JPEG/JPEGXR TIF/TIFF PNG GIF WEBP DNG HEIC/HEIF - (no depth maps) Supported RAW files TGA BMP EXR HDR This is currently logged with the Docs team to better reflect the compatible formats in the help documentation.
-
Publisher print export showing weird rectangle on Photo-layer
NathanC replied to maikm's topic in V2 Bugs found on macOS
Thanks, looks like the Curves adjustment is getting cropped on the right-hand side, exposing the original pixel content underneath. In the .afphoto file I swapped Curves for HSL and the effect was similarly cropped. However, if I clip the adjustment layer to the pixel layer underneath, the issue doesn't trigger when exporting the host .afpub to PDF. The presence of the second linked .afphoto file (Backcover.afphoto) also appears to be part of the problem as the issue only triggers on export when that linked resource is also present, though I'm not sure why at this stage. As the problem is re-producible using your file, I'll log this with the developers for further review. -
Publisher 2.6.3 - Book PDF Export won't add blank pages
NathanC replied to YMot's topic in V2 Bugs found on Windows
Welcome to the forums @YMot, This issue has been logged with the developers, thanks for your report. -
Welcome to the forums @WonkoTheSane, It's possible that they have the 'Align to nodes of selected curves' snapping option enabled on the Node/Pen tool context toolbar. This aligns any moving node to another node on the same or a different curve, and will show the Red/Green dimension lines to indicate the distance.

-
Hi @mwdiers, We are keeping track of any issues reported specifically against the Tahoe Beta. This has now been logged with the developers, thanks for your report.
-
Welcome to the forums @MagmaMouse, This is a known bug with the Live Perspective Filter on Artboard based documents, I've updated the existing issue and bumped it with your report.
-
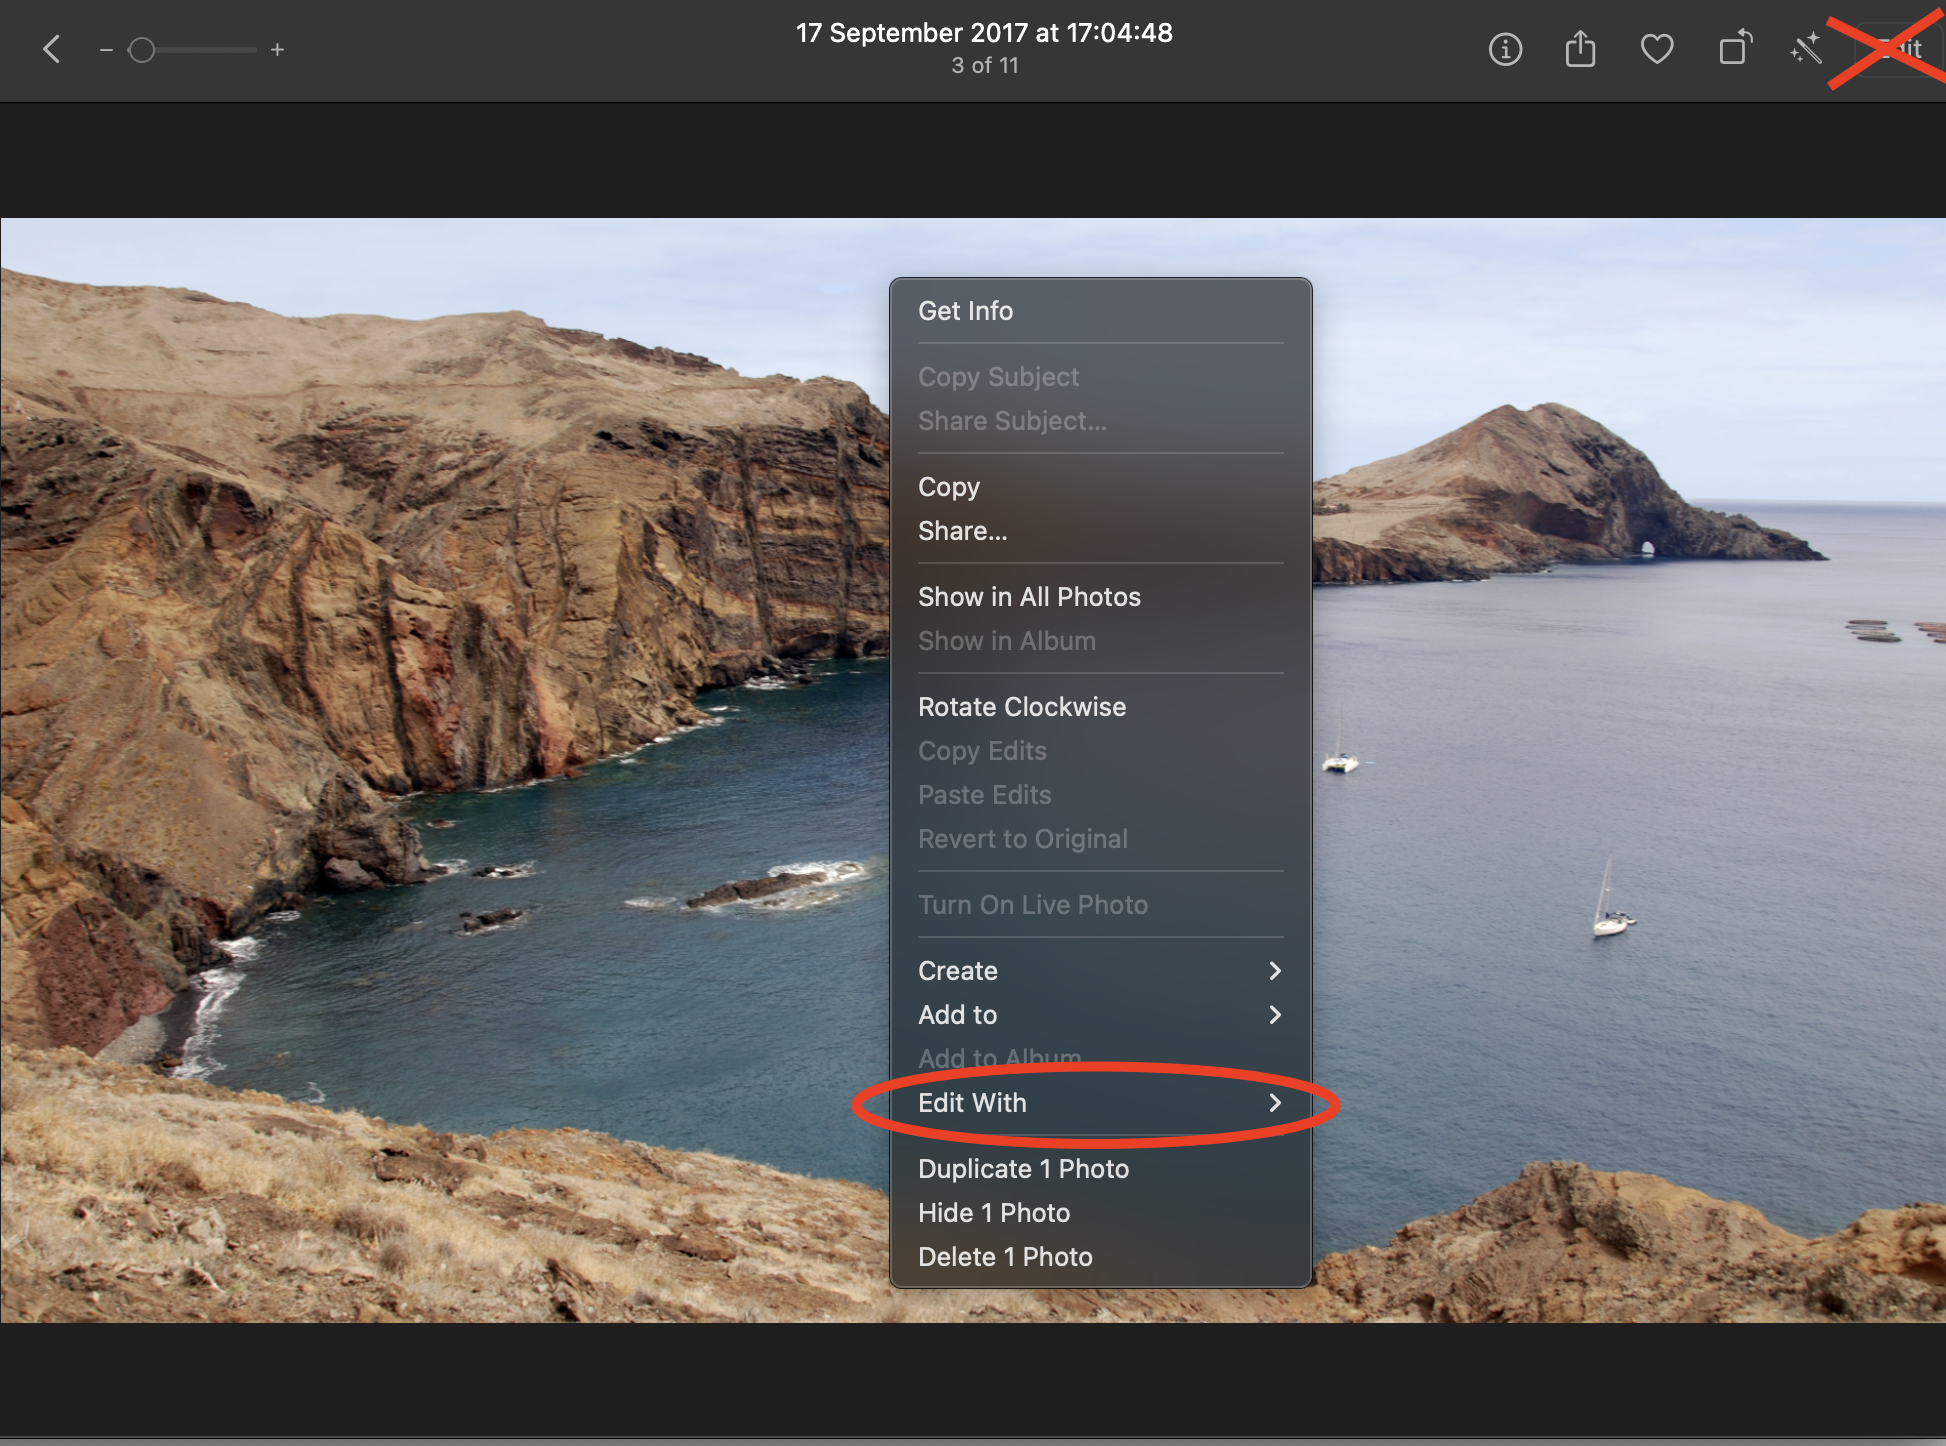
Yeah, the Photos Extension is triggered after going to 'Edit' -> 'Edit in Affinity Photo', but if you right-click an image and go to 'Edit With' from Apple Photos, this is essentially the same as opening an image directly in the app, and therefore won't trigger the Saving issues.
-
I've now updated my original response, the latter part wasn't very clear. 🙂
-
Hi @blackxacto, This is a known issue with the Apple Photos 'Edit in' extension, it can intermittently fail to successfully round trip and save the changes in Apple Photos, I've bumped this issue with your report. After selecting an Image in Apple Photos, Right Click the Image -> Edit With -> Affinity Photo 2 to open the Image directly in Photo instead of using the 'Edit In' extension. This workflow should avoid the save errors.
-
こんにちは、 これはエクスポートプレビューウィンドウのバグです。画像サイズが大きい場合、プレビューが生成されず、ウィンドウに透明な部分だけが残ることがあります。現在、開発チームに報告しています。 プレビューが表示されなくても、画像のエクスポートが失敗するわけではありません。コンテンツのエクスポートは可能です。
-
Hi @MmmMaarten, There is a similar historical issue logged in relation to merging adjustments in a hidden group layer losing the adjustment, so on this basis I've logged this with the developers for further review.
- 10 replies
-
- 1
-

-
- affinity photo
- merge selected
- (and 1 more)
-
Problems with blotchy whites once exported to jpg
NathanC replied to Keve's topic in Desktop Questions (macOS and Windows)
Welcome to the forums @Keve, Using a lower brush hardness % when inpainting may also help alleviate the contrasted edges if you later resample using Lanczos 3. 🙂 -
Hi @Erus, This is a known bug currently logged with the development team, attempting to export with a custom palette to GIF or PNG will fail to complete the preview generation, and will also show an error when attempting to export. I've updated the existing issue to reflect that it's still an issue in the latest version and bumped it with your report.
-
Publisher print export showing weird rectangle on Photo-layer
NathanC replied to maikm's topic in V2 Bugs found on macOS
Hi @maikm, Feel free to upload the affected files to the private upload link below, we can then confirm if the issue can be reproduced. https://www.dropbox.com/request/onfnYrkqtfsSFNJm1XDO Thanks! -
Hi @joe_l, Can confirm I've replicated this issue, as well as the subsequent crash when attempting to change the view, this has now been logged.
-
Welcome to the forums @Rina Leto, This has now been replicated and logged internally with the developers.
-
Macro crashing when building (answered thank you
NathanC replied to ianrb's topic in Desktop Questions (macOS and Windows)
Hi @ianrb, It's likely that you're running into a known bug currently logged with the developers. Clicking anywhere within the empty space in layers panel while actively recording a macro will trigger an immediate app crash, this will hopefully be fixed soon. Interacting with Layers within the panel (such as renaming) shouldn't cause the crash, but I understand it's fairly easy to unintentionally click in the empty area in the panel.