

Intuos5
-
Posts
828 -
Joined
-
Last visited
Posts posted by Intuos5
-
-
In Publisher, I noticed that the image names of images placed in image frames are not truncated, which cause the entire context toolbar to shift.

-
The previously viewed page is still not available as shortcut in the 2.5 Beta:
-
1 minute ago, Bryan Rieger said:
It requires you to enable 'Transform Objects Separately' in the top control bar (see below).
If '=' is only ever available/permitted when 'Transform Objects Separately' is enabled, then maybe it would make sense to enable it automatically if somebody types '=' into a field for that transformation only. Adding a little 'toast' animation or some sort of indication that 'Transform Objects Separately' has been applied would be helpful not only to provide feedback, but to aid in further understanding of how the feature is intended to work.
For me it is also possible to type "=" without 'Transform Objects Separately' enabled. It's the same as not typing the '='. But that's on Windows.
-
27 minutes ago, AffinityMakesMeSad said:
Why why why do you relate to Indesign in this thread??
It's really really Off-Topic...
Affinity Publisher isn't Adobe Indesign, so, what's the point??
Something about multiple menu clicks being more intuitive than typing "=" as expression...
I like the feature. One thing I could imagine is that the button for transform individually could be exposed to the transform panel as well, because that saves mouse travel to disparate places. Especially with the new expression feature, it makes sense to put them together imo.
-
Indeed, you can only smooth curves. This import feature is about getting rid of cached data from the DWG, meaning segmentation that is added for display purposes.
-
22 hours ago, anto said:
But why look for it in the manual? It should be intuitive. No one looks in a manual to find out how to resize a rectangle. They just drag the node. Isn't that right?
Using software requires training. To assume that everything should be intuitive makes no sense in that context.
There will always be new things to discover and people also forget about existing features. These types of expressions are of this kind.
-
The "Go to page..." command could be improved by showing a page range as default, grey input (i.e. 1-224) and a page preview, so you know you hit the correct page in advance.
-
There are two cross-reference related files in the Common folder, which can be transferred over to the Beta folder. This gives me my presets.
C:\Users\<user>\.affinity\Common\2.0\user
C:\Users\<user>\.affinity\Common\2.0 (Beta)\user
-
I'm trying out whether the bugs in the release version are fixed in the beta and noticed that transferring settings from the release version of Publisher do not transfer cross-reference presets.
Is there another way to get the presets over? I've got quite a bunch of them.
-
Just now, Sean P said:
There is an indicator on the nodes themselves to let you know if you're changing one or both.
When they have a dot in the middle it means you're affecting both start and end node. If there isn't then it will only adjust the one you change. You can single click on them to switch between the two states.Adjusting both start and end node position:
Adjusting single node position:
Yeah I know, but it is tricky to spot at times, or the clicks aren't registering the way I want then to. Granted, I tend to use a double click button, so that may have something to do with it. Will try it again in the beta anyways.👍
-
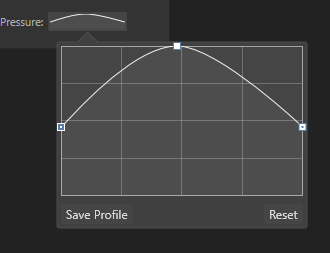
I usually have the issue with open curves. Can the pressure points be used to change where a profile starts as well? Say you reuse a profile, but need to take an object's rotation or perspective into account.
-
3 hours ago, Frozen Death Knight said:
I love this! Works great!
Only thing that's related to this tool that I hope gets improved is this panel:
It's too small. Being able to resize it and the Profile feature could be more global so other features could reuse them, i.e. brush settings. Also needs an option to invert the profile.
1. And I hate it that the end points often get moved together. It's a real trial and error clicking them and hoping you can get to move just one of them.
2. Also, when you make a steep curve profile with a high peak or low valley, it can be that you can't actually double click to add a pressure point in the graph, because it is out of view.
3. Could the option be added that the graph is not an interpolate curve? I'd like to specify on a per point basis whether it's a linear or smooth pressure transition.
4. If the panel ends up being reworked, please add the reset pressure button to the strole panel immediately? That'll save lots of clicks, especially if you can reset multiple curves this way at once. Perhaps adding a reset shortcut could also be added?
5. Will the bug that strokes cannot be expanded when they have a pressure curve applied (i.e. the pressure curve is omitted and treated as single width) also be fixed?
That said, I'm really happy to finally see this tool. It's been on the top of my wish list for a long time! 🥳🎉
-
Can't reproduce it here, think its a text flow issue. It happened with a footnote in a rounded rectangle converted to text frame with a footnote in the overflow area.
-
I now have a case where if I change the group size, the software hangs.
-
@Lee D Ah right, Blend modes and opacity are not supported for SVG then. I was surprised, because Inkscape files I got from someone else do. So I looked into it and this makes sense now:
I do have the source file, could I upload them via dropbox?
-
17 minutes ago, walt.farrell said:
Perhaps try Document > Add Pages from File?
The pages it adds are affected by linked text frames from prior pages.
-
3 hours ago, Brian_J said:
Something I found useful in Adobe apps was the Duplicate file option. Duplicating a file presents a dialog with the original file name appended with “copy” — so there’s no chance of accidentally overwriting the original — and the option to change the file name. Duplicating a file keeps the original open and the duplicate can be saved or experimented with and closed without saving.
But say you want page 100-106 from a document, the section stats at page 80 and all of the text frames are linked. Then getting page 100-106 as is, without changing their appearance is tricky due to text flow.
-
@MikeTO Yes, that's a logical explanation for this case, because I used the group to scale the text frames.
-
@MikeTO I want to use the text frame's baselinegrid, not the document wide one.
As mentioned by @Brian_J, ungrouping this text frame changes the alignment to the baselinegrid:
39 minutes ago, Brian_J said:It looks like there are some Paragraph panel settings overriding the Footnote - Note Text Style... so text is aligning to every other baseline grid line. If the base style is reapplied (Text > Reapply Base Styles) the text aligns correctly to the Text Frame Baseline Grid.
While I could get the baseline grid alignment working by reapplying the text style, in the document I am working on, I also had to ungroup for it to work properly.
-
I want it to align to the text frame baselinegrid for the footnotes frame, but it won't for some reason.
-
Just copied and paste a group with a two text frames I am working on. For some reason, the text does not align to the bottom of the baselinegrid, despite the fact that I have checked the setting. It seems as though the leading for the text takes precedent.
Does anyone kno w how to solve this?
-
22 hours ago, Hangman said:
Can't reproduce this.
-
21 hours ago, Hangman said:
There is something very odd going on though with your file.
I literally created this from scratch in a new document assuming these were the steps to produce the issue. I'm on Windows though.
-
There is another related bug with footnotes. If you group a text frame that has a footnote and overset text, the bounding box changes for the group selection.
Steps to reproduce
1. Create a text frame in a new document
2. Fill the frame with text (e.g. lorum ipsum generated) and make sure it has overset text.
3. Add a footnote to the text.
4. Group the text frame
5. Switch to the Move tool and notice how the selection's bounding box changes between a selection of the group and that of the text frame within the group.
Overset text and footnote bounding box.afpub


Can't set a keyboard shortcut to "Go to previously viewed page" in Publisher
in V2 Bugs found on Windows
Posted
Yeah, I see it now. Bit inconvenient that it is under a different header.