kirkt
-
Posts
440 -
Joined
-
Last visited
Everything posted by kirkt
-
Where are the plugins
kirkt replied to 8675309's topic in Pre-V2 Archive of Desktop Questions (macOS and Windows)
1. You need to have Photoshop plug-ins in order for AP to use them. 2. I am not a Windows user, but you can probably Google the default location for where Photoshop plug-ins get installed for your particular version of Photoshop (it appears that you use Elements - I am not an Elements user, and I am not sure that Elements supports Photoshop plug-ins). 3. While AP has a default plug-ins location (you can drop any compatible PS plug-in in this location and AP will "see" it), you can designate any folder as a plug-in folder for AP to search for PS plug-ins. As was noted above, you will need to add this folder to the list that AP searches - do this in the Preferences > Photoshop Plug-Ins dialog. Add, for example, the folder where your plug-ins currently reside for your version of PS. NB: You will also need to authorize AP to look for plug-in support files globally (in the dialog box below the list of additional plug-in folders) - this allows AP to find and use other files on your computer that assist the plug-ins. 4. Not all PS plug-ins work in AP - search the forums if you are having trouble getting your particular plug-in to work in AP. 5. Once AP finds your plug-ins, they will appear in the Filters > Plugins menu if they are compatible. You might still find that the plug-in does not work as intended - for example, any plug-in that attempts to change the dimensions of an image will not work (for example, a plug-in that does lens correction and automatically crops the result). Whatever you end up doing to solve the issue, don't change your number. kirk -
@rikkarlo - see this form group for reporting bugs: https://forum.affinity.serif.com/index.php?/forum/76-report-a-bug-in-affinity-photo/ kirk
-
How to Edit the Alpha Channel
kirkt replied to John-B's topic in Feedback for the Affinity V2 Suite of Products
Sort of - you can now create a spare channel, edit it directly, and then send that result to a layer's alpha (or the Composite alpha). kirk -
How to Edit the Alpha Channel
kirkt replied to John-B's topic in Feedback for the Affinity V2 Suite of Products
Channel packing seems to work properly if you save your file as an EXR and associate the alpha (in Prefs). You can use OCIO to go back and forth between gamma encoded and linear data. You can also export a multi-channel EXR from AP, where each layer gets exported as a channel. https://affinity.help/photo/en-US.lproj/index.html?page=pages/HDR/openexr.html?title=32-bit OpenEXR support kirk -
@rikkarlo - I can reproduce your problem - it is not the correct behavior for a white balance tool. I also get slightly different results when I change the bit depth of the document (a document filled with your original color RGB = 183, 167, 152). No tint adjustment is made in any bit depth though. Kirk Mac, v1.9.0
-
@BARBAKANE - Use a custom keyboard shortcut (see screenshot of Preferences) to invoke the adjustment layers you use frequently. Currently, the default configuration for AP is CMD-M on the Mac for a Curves adjustment layer, for example. kirk

-
Change file date to date shot
kirkt replied to GrahamMYC's topic in Pre-V2 Archive of Desktop Questions (macOS and Windows)
Maybe EXIFTool can help, but it really depends on the tags in the file and what your OS supports in this regard. See: https://exiftool.org/filename.html Kirk -
Phew! That makes me feel better. LOL. Kirk
-
Also - I am not sure if that image you uploaded has some fancy star filter on it, or that lens just renders those point light sources that way, but that lens is not very well corrected and may be experiencing all sorts of diffraction effects, even at the relatively modest aperture (f/6.3) of that photo. Some applications may also apply some diffraction correction with their built-in lens correction profile, another reason to disable the lens correction if you want to see the most stripped-down raw conversion. Kirk
-
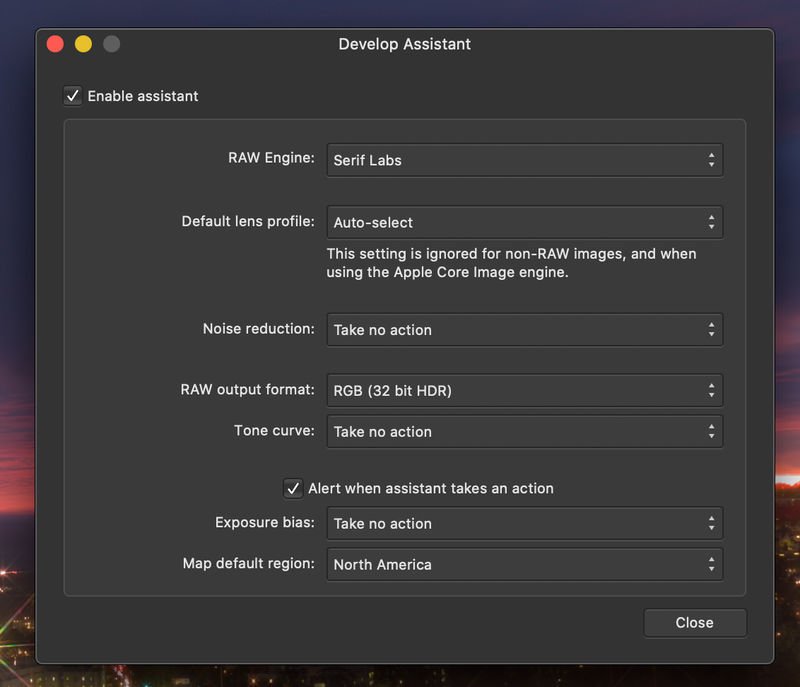
You can sharpen the image - just apply some capture sharpening, either during conversion or afterward, with whatever your favorite technique is. Also, remember to turn off lens correction if you are trying to compare apples to apples, as it will distort and change the rendering of your image to a certain degree. Remember to compare the output of your conversion at 100% zoom always, as some applications will render lower levels of magnification with different scaling algorithms that may increase the apparent sharpness of the image. If NR is not disabled in the Develop persona by default, you can use the Develop Assistant to configure it so that it is disabled by default ("Take no action."). See attached screenshot. Kirk
-
unknown noise when I open photo
kirkt replied to dougc53's topic in Pre-V2 Archive of Desktop Questions (macOS and Windows)
The yellow speckled pattern on the preview in the Develop persona is from the "Show Clipped Tones" control being enabled, as the video from v-kyr has demonstrated. It is displaying clipped (saturated) pixels in the deep shadow areas. The yellow pixels are not noise, they are the clipping warning overlay - however, there are pixels of color noise that are in the darkest shadow tones and are fully saturated, so they get targeted by the clipping overlay, giving the appearance of yellow speckled noise. kirk -
Also take a look at the difference in brush application of color between OPACITY and FLOW. For a SINGLE CONTINUOUS STROKE, opacity will lay down partial color at the specified opacity and not any more color, even if you overlap that continuous stroke on itself. On the other hand, Flow will lay down partial color in a continuous stroke that will build up ("intensify") if you overlap the continuous stroke on itself. If you overlap multiple strokes (not a single, continuous stroke), then opacity appears to give a result a lot like flow. Kirk
-
Clock Face Restoration
kirkt replied to Film Photog's topic in Pre-V2 Archive of Desktop Questions (macOS and Windows)
Scan the clock face or photograph it paying particular attention to making sure that the face is perpendicular to the axis of the camera lens (so circles remain circular, for example). Use a vector tool to trace the various characters and markings and create a PDF or similar vector output file. There are many different ways you can then print or etch the graphics onto a new dial and replace the existing, aging dial. I assume you want to restore the clock's dial versus just retouching the photo of the clock. Have fun! - Kirk -
@PatrickF Sounds like a Windows issue, perhaps. I opened your uncompressed raw file in the current Mac beta, added a new layer filled with black and dropped the opacity and it renders in the document window as expected. kirk
-
Overlap between pictures
kirkt replied to alialjabri's topic in Pre-V2 Archive of Desktop Questions (macOS and Windows)
I am pretty sure it is simple math to find the intersection between two images - you can use a median filter to find or eliminate the common elements, for example. Anyway, there are always several ways to accomplish a task, so whichever you choose will hopefully fit your workflow. Plus, you get to try AP, which is a little different than PS, but in many ways a more modern image processing experience. best, Kirk -
@PatrickF - If, as I suspect, AP uses the libraw library for Serif raw processing, the current libraw library: https://www.libraw.org/news/libraw-0-20-2-Release supports the X-T4 for uncompressed and lossless compressed raw files only. See the release notes to which I linked. There probably is no compelling reason to use a lossy compressed raw format anyway, which is probably why 3rd party raw converters do not spend much effort supporting them. Kirk
-
Overlap between pictures
kirkt replied to alialjabri's topic in Pre-V2 Archive of Desktop Questions (macOS and Windows)
@alialjabri: consider using ImageJ or any of its variations (Fiji, for example). Fiji: https://fiji.sc It is made for image analysis and has been around for a long time. It is free, open-source, well-maintained and cross-platform. It also has a macro language and plug-in architecture which will permit you to automate and explicitly define the math and procedural operations you want to perform. Chances are someone has already written a publicly-available macro or plug-in to do what you need, beyond simple blend mode layering. Kirk -
I downloaded a sample ARW file form the a7rIII from imaging-resource.com. I opened it in AP v 1.8.6 as a 16bit per channel file in the Develop persona and brought it into AP. I saved the file as a .aphoto file. It is 336MB, which makes sense given the large pixel dimensions and the 16 bit per channel encoding. (7952 x 5304 pixels) x (4 channels) x (16bits per channel / 8 bits per byte) = 337 MB. Close enough. If you save the file as a 16bit TIFF in AP, the file size is 203 MB, versus 253 MB, which is what the above calculation would predict for a 3 channel image (saving in PS with no compression yields a 253MB file). AP might be using some compression or similar file-reducing strategy when saving to TIFF, I do not know. Anyway, the large file size for a large pixel dimension raw file rendered to a 16 bit per channel RGB file is expected. Remember that a raw file is only a 1channel image, in this case encoded at approximately 16bits per channel (yielding the 85MB raw file). Once you demosaic the raw file and render it to a 3-channel 16 bit per channel RGB image, the file size starts to get big quickly. When you use an application like OnOne, the large file that results from converting the raw image data is not saved to disc in a high-bit format if you do not need the large TIFF for editing outside of the application. So, you never see the large files accumulate on your drive - they live in RAM until you render something smaller, like a JPEG to print or post to the internet. When you actually save the large, high-bit image to disc, you realize how bit it is. kirk
-
When you CMD-click (Mac) on the adj layer with the existing mask, a SELECTION is created based on the grayscale values of the mask. You can then use that selection to fill the mask of the next layer that you want to have masked identically to the exiting adj layer. This is one way to transfer the mask grayscale values from one layer to another. When you create a mask on an adj layer, you can see the mask in that layer's ALPHA channel - you need to open/view the Channels palette to view a layer's channels. You can right-click on this alpha channel and you will see various options , such as making it into a grayscale layer, making it into a mask layer, etc. Choose the one that works best for your application. You can make a mask layer from the existing alpha and then nest that into your new adj layer - the effect will be the same as using the new adj layer's built-in mask. Another way is to group the adj layers and then apply the desired mask to the group. All of the adj layers in the group will only be applied according to the Group mask. The most recent beta version has more ways of masking layers with a single mask that will make the job even easier. kirk
-
@JDM It is the Macro and Library panels. Go to View > Studio > and uncheck Macro and Library. Kirk
-
It looks like the EXIF data in the DNG indicate, in the tag called "As Shot White XY," a cue for the effective white balance of the image. It appears that AP is using this information behind the scenes and automatically removing the orange mask. Try enabling the White Balance check box in the Develop module and you will see that there are automatic settings that appear. Remove the Tint correction (zero it) and set the Temperature correction to 6500 °K and then, again, slide the Temperature slider to even higher CCTs. The orange mask will look correct. I used the CCT of 6500K because that is what Adobe Camera Raw sets as the "As Shot" WB when I open the image in PS. Interestingly, when I changed the As Shot White XY values to 1.0 and 1.0 with EXIFTool, the White Balance operation in AP did not do anything. This leads me to believe that the As Shot White XY values are being used by AP to understand white balance in the image. Kirk
-
@dkallan - Thank you for the explanation. I understand what you are saying. In terms of editing/previewing the non-Live-Projected image, there are a few things you can do and definitely should not do when opening and editing the DNG in AP. 1) In your stitching software, if there is a function to offset the edge/spilt of the equirectangular image, you should use that to shift the image content so that the left and right edges do not split important areas of the scene, like the people at the table in your example. If you just bring that image into AP, do a basic conversion and render it to an RGB image, you can use the Affine transform (it is called Offset in Photoshop) to wrap the equirectangular image so that you move/wrap the image horizontally to get less important image content split at the left and right edges of the image. I know this does not help you in your quest to have a Live Projection in the Develop module, but it will give you a better view of important image content in the flattened view that AP will currently show you in the Develop module. I was going to suggest that you simply open one of the raw/DNG files that went into making the panoramic composite, and determine the best settings for raw conversion in AP with that file, then apply the same settings to the composite DNG, but the insta360 camera takes such distorted, fisheye images, that that strategy may not help too much if the important parts of the scene are distorted significantly by the optics of the camera. 2) Regardless of how you bring your DNG or rendered RGB image into AP, you should not apply any local contrast or similar local adjustments to the image until it is in a Live Projection - presumably Live Projection mode automagically mirrors the edges of the image so that the local enhancements know about what is on the other side of the image. Does this make sense? For example, if you add a local contrast enhancement to the image (like HiRaLoAm sharpening) or anything that needs to know about local pixel values at the left and right edges, the filter will not know about the image data on the other side of the seam that is actually continuous in the scene. Therefore, if you go ahead and process the image with a local enhancement, there is the chance that when you view it in a Live Projection, you will see a distinct discontinuity where the left and right edges should be joined seamlessly - this has been caused by the local enhancement gone wrong. If AP does not handle this automagically in Live Projection mode, you can add some of the left edge to the right edge of the image and vice versa (the canvas/document will need to be made bigger to do this) - once the local enhancement is performed, crop the image back to its original extent and you are good to go (you will probably also need to mirror the top and bottom pixels a little, too). You would not be able to do this in the Develop persona, unless there was a check box that was labeled something like "360 Panorama Image" - some software has this option to make such operations aware of the continuity of pixels in the actual scene (I have seen it in a couple of HDR applications). Anyway, I see what you are getting at - you can always post a a request, with a link to this thread, in the Feature Requests section of the forum and see what feedback you get. I have no idea how much muscle would be required to render a preview of a Live Projection from a raw file, or if that is even realistic to achieve, especially because panoramic images can become extremely large and require a lot of resources. I hope it works out! Kirk
-
Hi @dkallan - I do not understand how you could view a "pre-stitched" DNG spherical panorama - it hasn't been stitched. I apologize in advance, I must be missing something here. It sounds like you mean that you want to be able to take the equirectangular DNG file that has already been stitched and rendered to DNG, open it in the Develop persona in AP (as you would a raw file) and be able to view it in the same Live Projection as you can in the Photo persona when making your raw conversion choices. I would propose that a more effective way to accomplish your goal, and provide many other side benefits, would be for AP to implement something similar to Smart Objects - people have been asking for this for years now. With a Smart Object, you could bring your equirectangular DNG into AP, open it in the Develop persona, make your initial Develop decisions, render the result to an RGB file, and inspect it in the Photo persona in the Live Projection mode. If you need to change things, you would just go back to the Develop persona, change the RETAINED settings from the previous conversion(s) (yes, the entire conversion history could be saved in the smart object), and then rerender the RGB result from the original raw file (i.e., a Smart Object raw workflow). As it stands now, when you bring a raw (DNG) file into AP and convert it to an RGB image in the Develop persona, none of the settings are retained and any work you did during conversion (global and local overlay edits) is gone. Implementing a Live Projection view in the Develop persona might be helpful, but if you need to change the resulting initial RGB render, you will have to start over from scratch in the Develop persona. I think what you want to do would be better served by a Smart-Object-like workflow in AP. That would also help A LOT of other users with the various benefits that SOs give image editors. Kirk
-
Checking for stitching errors and blending seams sounds like something you would want to examine in your stitching software prior to making your final stitch for output. If your stitching software does not permit you to do this, then that is a deficiency in your stitching software. The Develop persona in AP is for adjusting tone, color and detail/noise (general image attributes, typically for raw image files). kirk
-
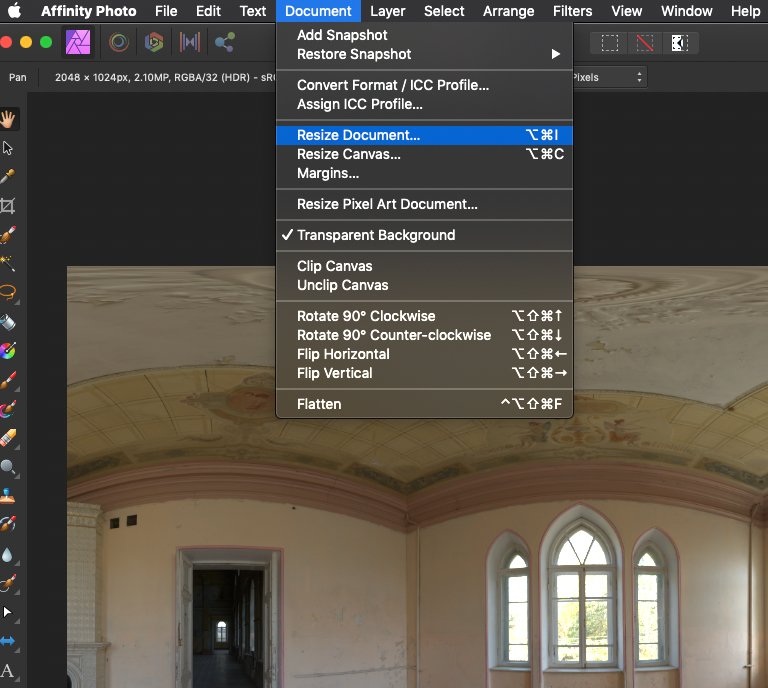
HDRI background.
kirkt replied to Ray 2's topic in Pre-V2 Archive of Desktop Questions (macOS and Windows)
@Ray 2 - Choose the menu item Document > Resize Document ... The aspect ratio is locked by default, which is what you want because equirectangular images are always twice as wide as they are tall. You can experiment with the interpolation algorithm, try Bicubic first. Once you resize it to your desired dimensions, you will need to EXPORT (File > Export...) it as an EXR or HDR file (SAVE will just save it as an aphoto file, the native file type of Affinity Photo). kirk