

kirkt
-
Posts
440 -
Joined
-
Last visited
Posts posted by kirkt
-
-
Have you tried just copying the file from your phone to your computer (say, with AirDrop or a file sharing service like Dropbox) and then opening the file in AP??
As @walt.farrell asked, how are you transferring, sending or otherwise opening the TIF file from Photos into AP? Do you drag it from Photos onto the AP icon or into AP? Do you use the AP Photos extension? What happens if you simply drag the file from Photos onto your Desktop (to copy it there) and then open that copy in AP?
Kirk
-
As an FYI - the current beta (v 1.10) of AP permits the use of ACR lens profiles. Copy them from the ACR Lens Profiles folder on your machine into the location where you would place custom lensfun files (you can have AP open this folder on your machine via the General Preferences).
kirk
-
As an FYI - the current beta (v 1.10) of AP permits the use of ACR lens profiles. Copy them from the ACR Lens Profiles folder on your machine into the location where you would place custom lensfun files (you can have AP open this folder on your machine via the General Preferences).
kirk
-
19 hours ago, 3DJ said:
I got it working, really odd, I have tried and tried walked away and it is now working - logically at that too.
LOL. Glad it is working.
kirk
-
-
@hhauten The cropping is due to the automatically applied lens correction. Uncheck the Lens Correction check box in the Develop persona and you will see the result return to what you expect. There is significant lens distortion at the wide angle end of this zoom, so after correction there is a significant portion of the image that is cropped away from the edges. You can examine how the edges of the image are being corrected (which forms the basis for the automatic cropping) by reducing the Scale slider in the Lens Correction panel.
Because there are no geometric straight lines in this image, you can probably get away with no correction at all, especially if the details at the edges like the trees or the people on the left edge of the image are important image elements.
Kirk
-
-
If you want to use a grayscale representation of an image as a mask (for example, using the luminosity of the image to modulate an effect), you need to create that grayscale image and then apply it as a mask to the layer you want to modulate. For example, open an image as the Background layer. Make a Recolor adjustment layer above the Background - it will recolor the Background image as it should. Let's say you want the recoloring to take place only in the shadows (the darker portions of the Background image). In the Channels palette, right click on the Red, Green, or Blue channel of the Background layer (whichever gives you the proper contrast and luminosity you want) and select "Create mask layer." A new layer appears in the layer stack that is a mask. Drag it onto the Recolor adjustment layer and it will modulate the recolor adjustment - in this case, because you wanted to recolor the dark portions of the image, you would need to INVERT the mask layer - select it and use the keyboard shortcut CMD-I (capital letter i). Done.
If you do not want to use a channel as above as the mask, you can make a grayscale copy of the image with normal tools and then right-click the resulting grayscale image layer and choose "Rasterize to mask" and drop that on the Recolor adjustment layer.
If you then ALT-click on the mask layer, it will be displayed as a grayscale image, just like in PS. In this view, you can paint on it, etc. You can also modify it will an appropriate adjustment layer, like a curves adjustment layer - add a Curves adjustment layer to the layer stack and drag it onto the Mask that is already nested in the Recolor adjustment. It should appear below the Mask. Then, and here is the KEY to making this work, in the Curves adjustment dialog, you need to select the RGB ALPHA curve to modulate the mask. Manipulating the Master curve, or the R, G, or B curves will do nothing to a mask. Now you can change the contrast of the mask with a non-destructive adjustment layer, which you cannot do in PS (that is, when you adjust a mask in PS with a Curve, it is a destructive change to the mask).
Kirk
-
Yay! No problem. Have fun!
kirk
-
I have made my own profiles for the lensfun/AP lens correction. I guess it is time for me to buckle down and write a tutorial. See this thread for a similar discussion, where I posted an example of a homemade lens profile for a Leica R mount perspective control lens:
-
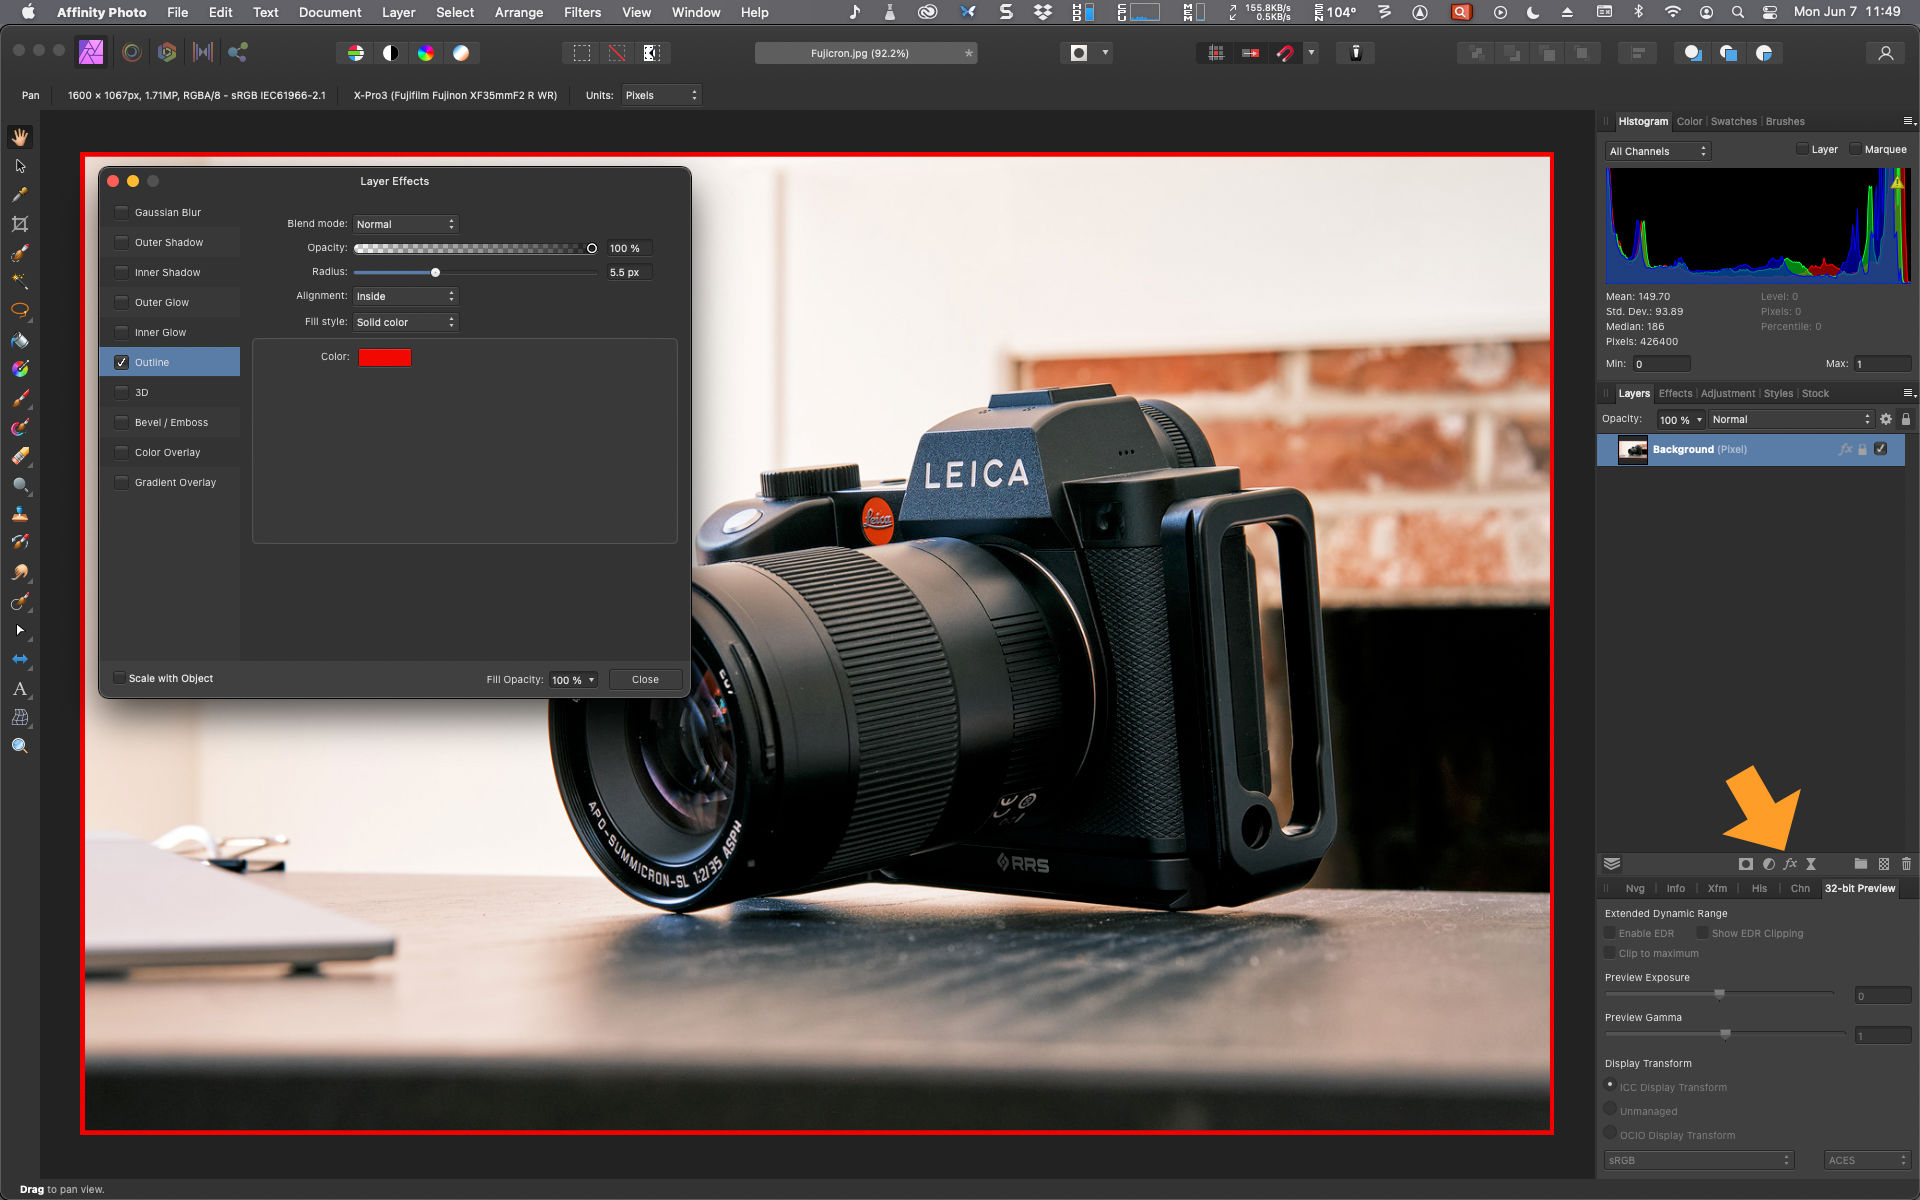
Make sure that the Alignment of the outline is set to INSIDE, otherwise the stroke (outline) will be outside the bounds of the canvas and it will appear as if nothing has been applied. Also, set the size to something big while you are testing the procedure to make sure you can see the result.
kirk

-
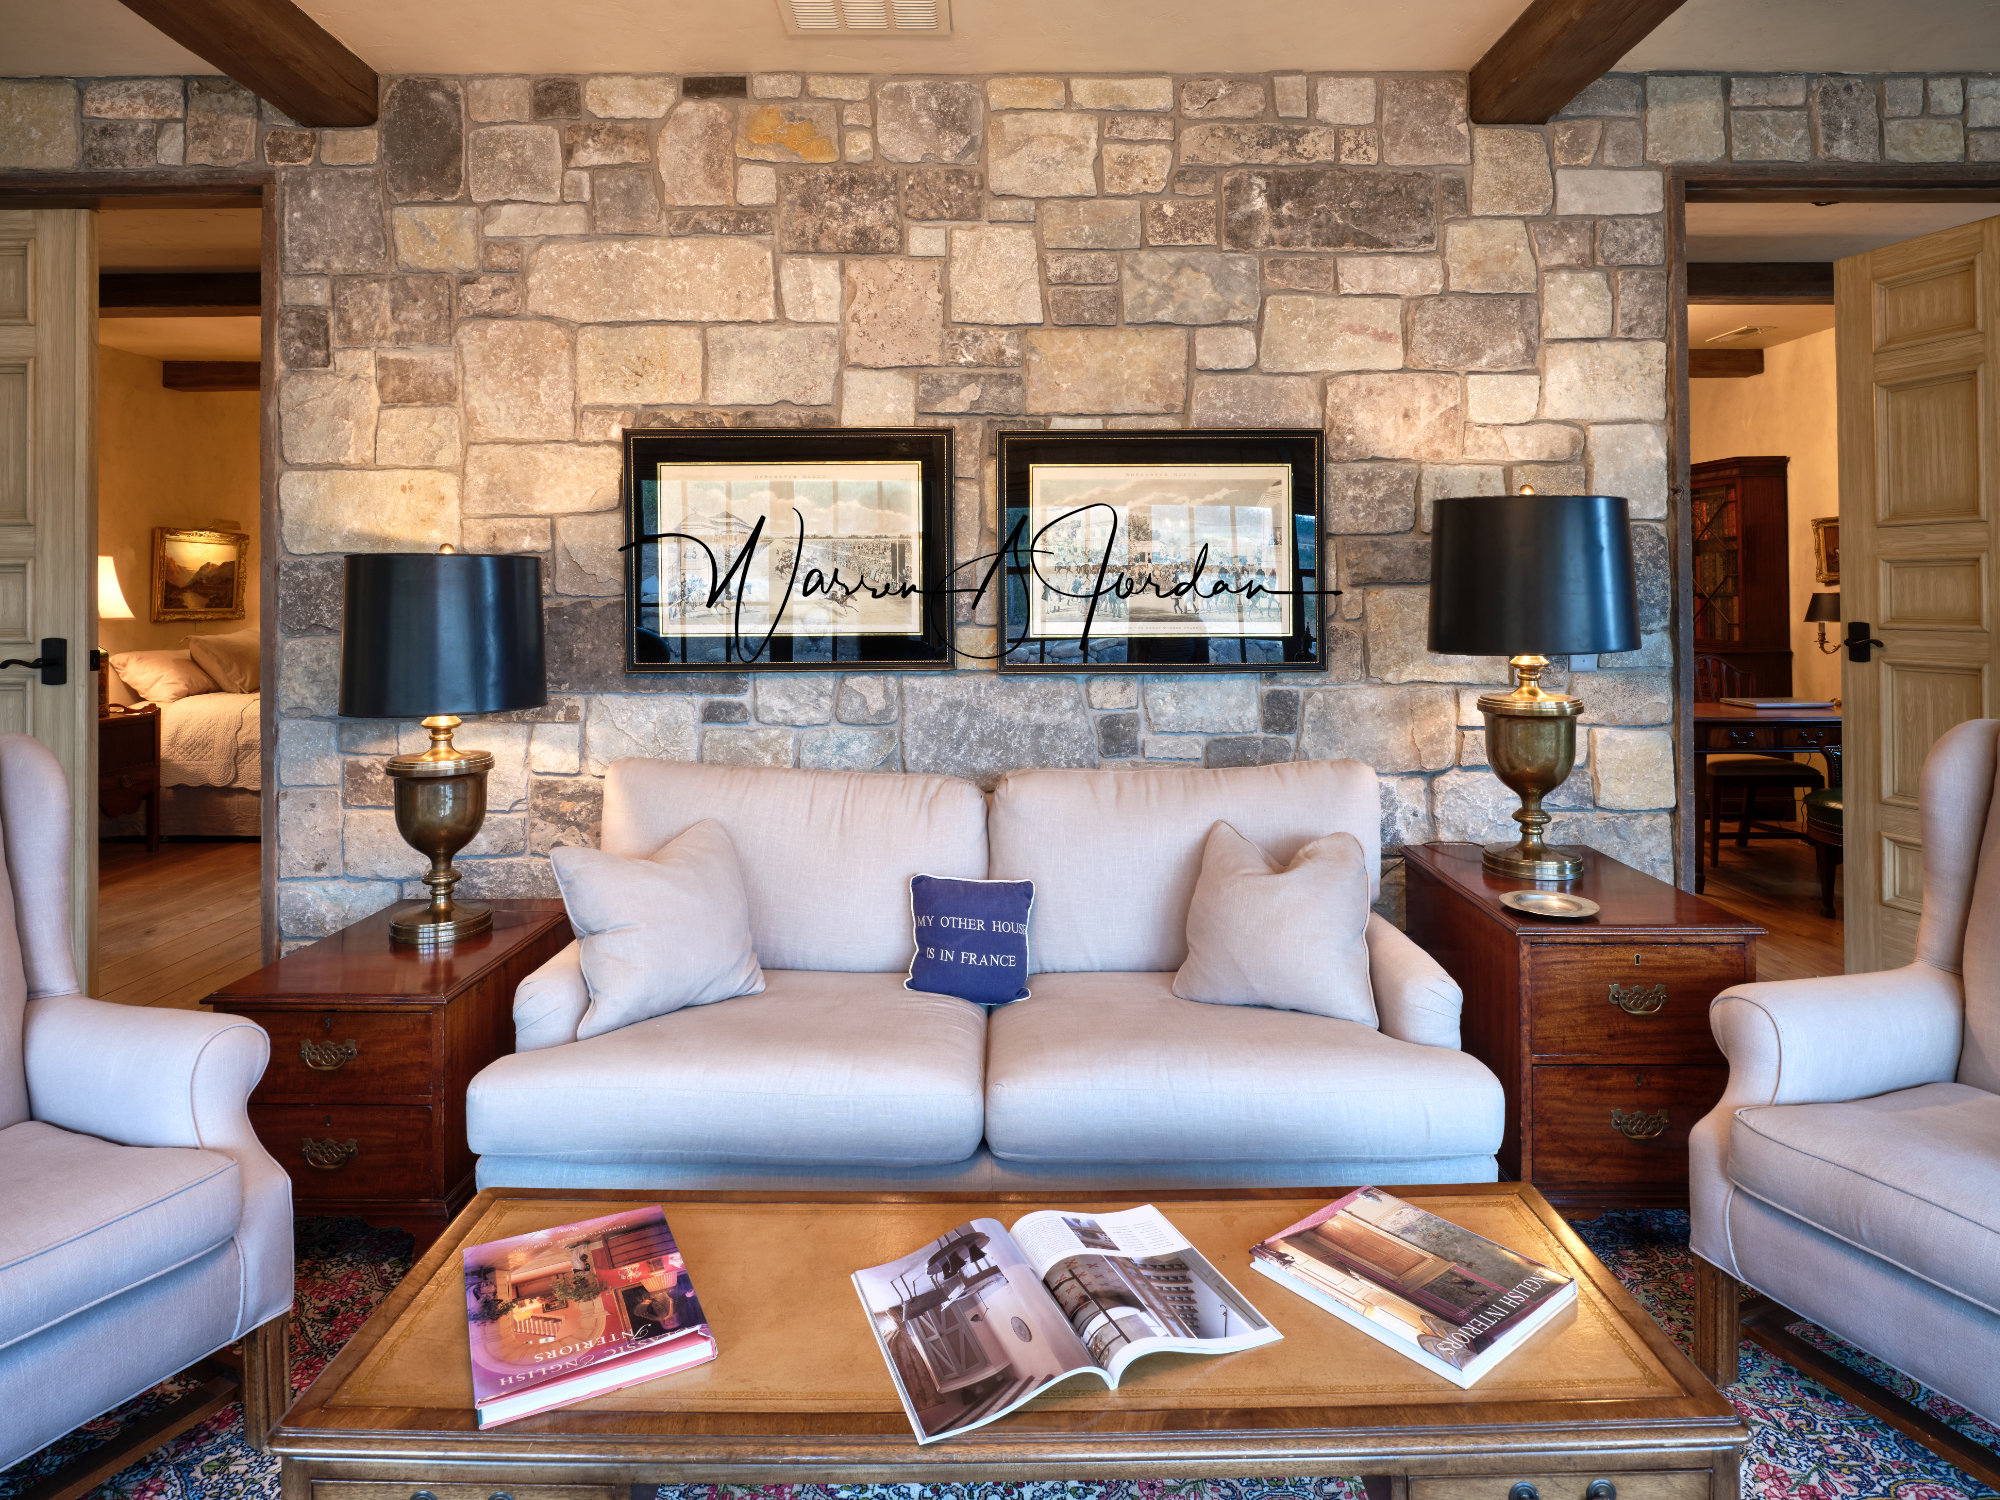
@Mehal - You can record a macro that will do the following:
1) add 1/4 in around the image.
2) add another 3/4 below the image.
3) matte the resulting image with white.
4) apply the black outline.
I do not think you can add text in a macro, but others may have a better solution for that aspect.
EDIT! I found a way to add text - see step 7 below...
Here's how I did all of this....
1) Set the Document Size to the final size in inches, specifying the DPI correctly. This establishes units in the image and permits you to use inches instead of pixels.
--> Document > Resize document...
2) Now add 1/4 inch around the entire image:
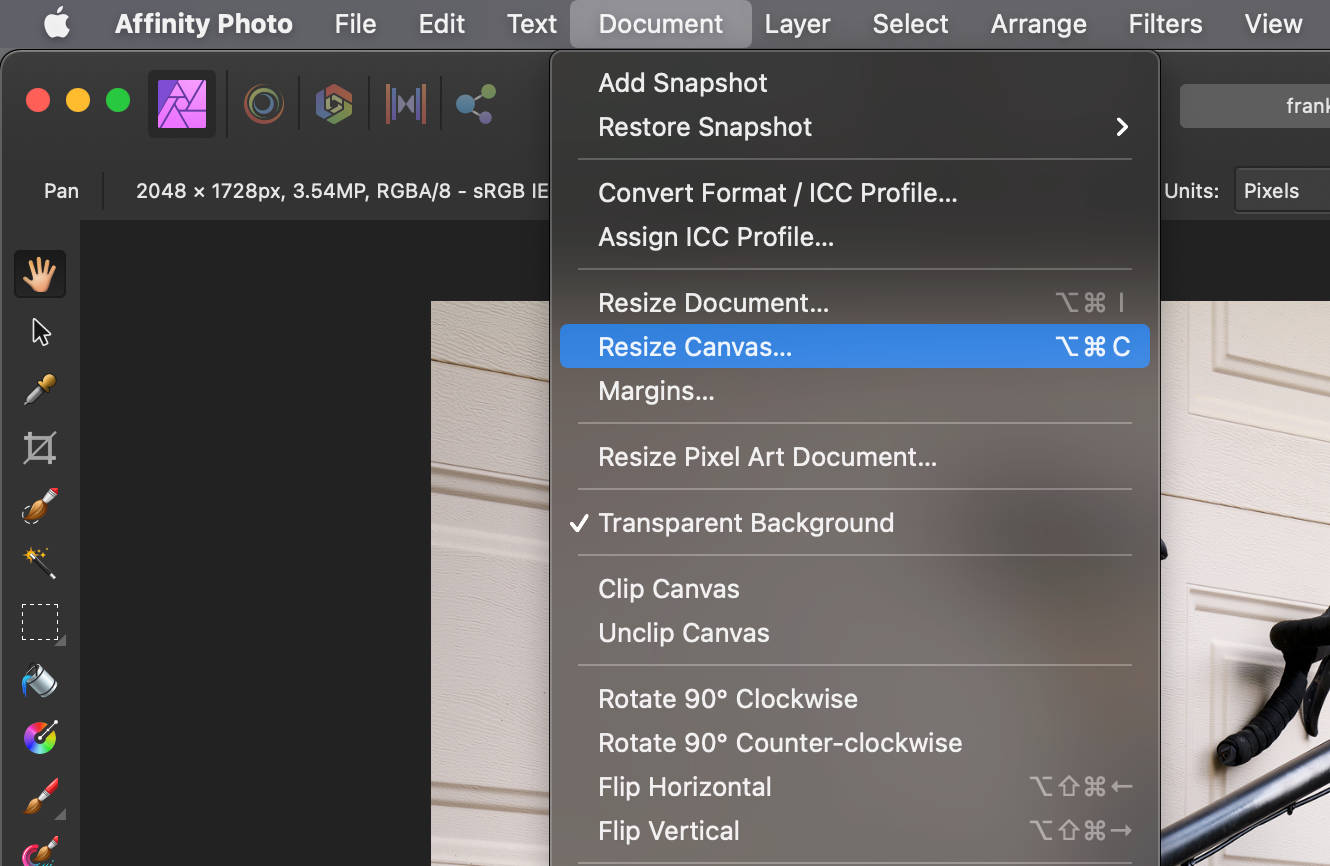
--> Document > Resize canvas ... - make sure that the center of the resizing operation is set to the center of the canvas and that the aspect ratio link is unchecked. In the width and height box enter +0.5" to add half an inch (1/4" on each side) to the canvas.
3) Add an additional 3/4 inch to the bottom:
--> Document > Resize canvas ... - make sure to select the top, center as the center of the resizing operation and unlink the aspect ratio. In the height field enter +0.75" to add 3/4 inch to the bottom.
4) Matte the image to replace the new, transparent areas with white:
--> Edit > Matte and fill with primary color (by default, is white).
5) This step is IMPORTANT! Select the background layer and choose:
--> Layer > Rasterize and Trim ...
This will make sure any pixels outside of the document preview are are trimmed away. When I tested all of this, for some reason there were extraneous pixels outside of the canvas area. I think the Matte operation may have introduced some jankiness into the canvas, and this operation makes sure that the extent of the canvas is properly defined.
6) Now apply your layer effect to get the outline - you can specify the outline width in inches as well, instead of pixels - for example, enter 0.125" to get a 1/8" border around the image. Make sure you select "Inside" as the location of the stroke.
7) To add text in your macro, type placeholder text ("Enter Text Here...") into a text editor, etc., and copy it to the clipboard. While you are recording the macro, paste the text into the document, resize the resulting text box, format the text alignment, font, etc. and place the text box in the position you want it - apparently AP can record all of this, so you will end up with placeholder text in the document at the end of the macro - you can then edit it accordingly.
I made a Macro out of this and it worked. As long as you are always adding the same amount of canvas (1/4 and then 3/4 inches) it should work for all images.
You can also experiment with entering "%" in the resize fields too, as in add 50% of the image width to the canvas. AP does the math for you on the fly. This is different than PS, where you have to set the document units in the Preferences in order to record actions with those units, including percent.
Have fun!
kirk
-
@Mehal - You can also add a (non-destructive) layer effect to apply a stroke - see screenshot. The layer effect is initiated with the "fx" button at the bottom of the Layers panel.
kirk

-
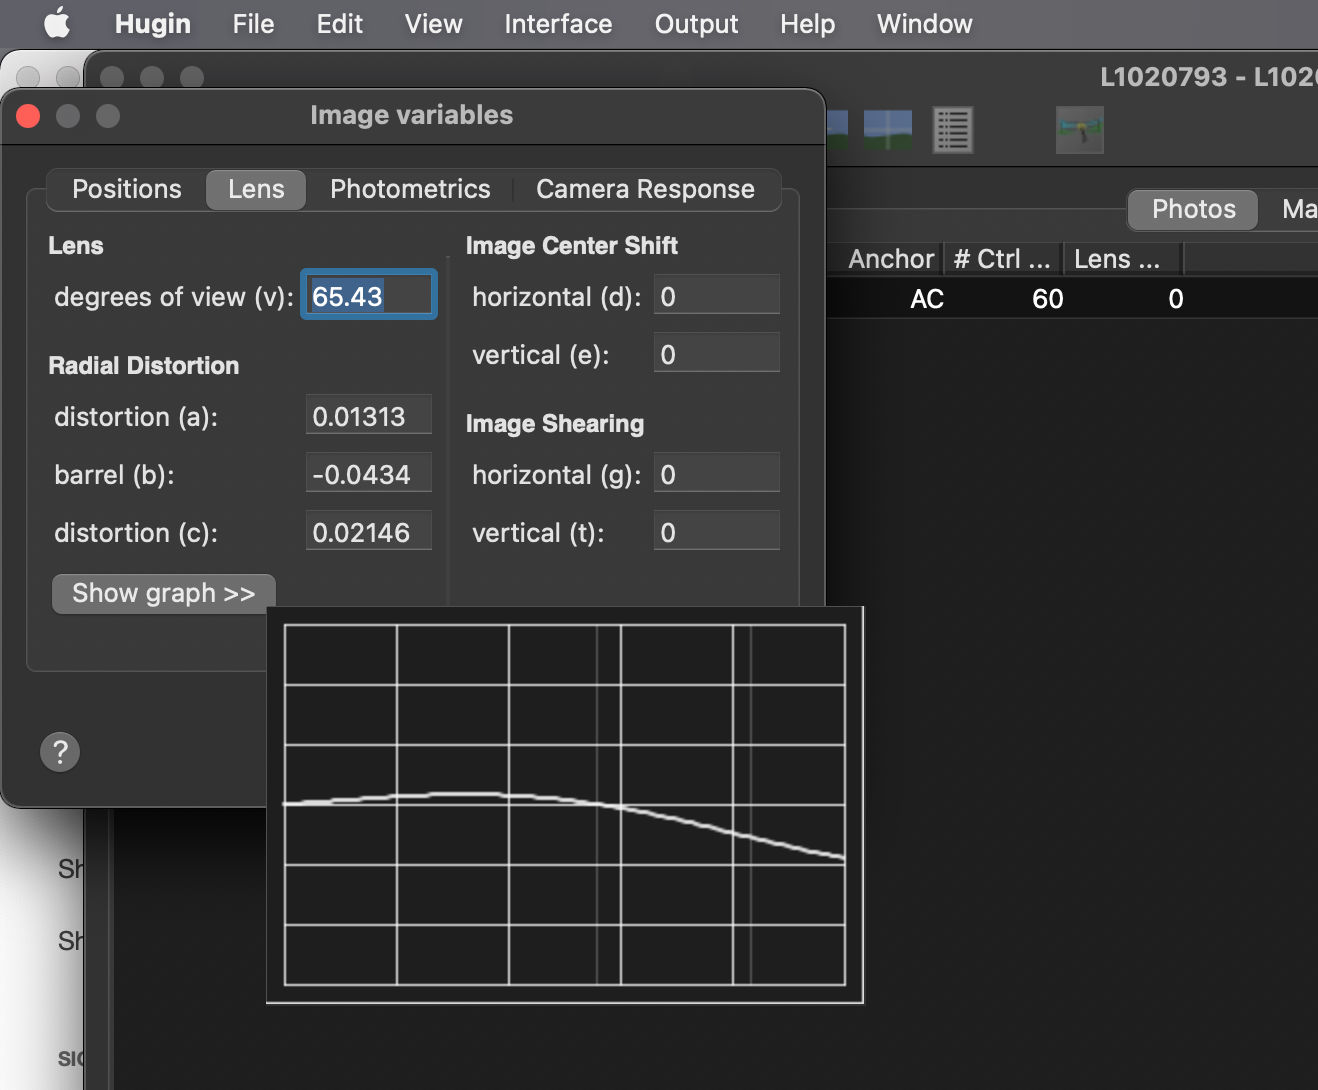
Here are some screenshots of the Hugin interface and the lens optimization results window. Also, some behind-the-scenes shots!
Kirk
-
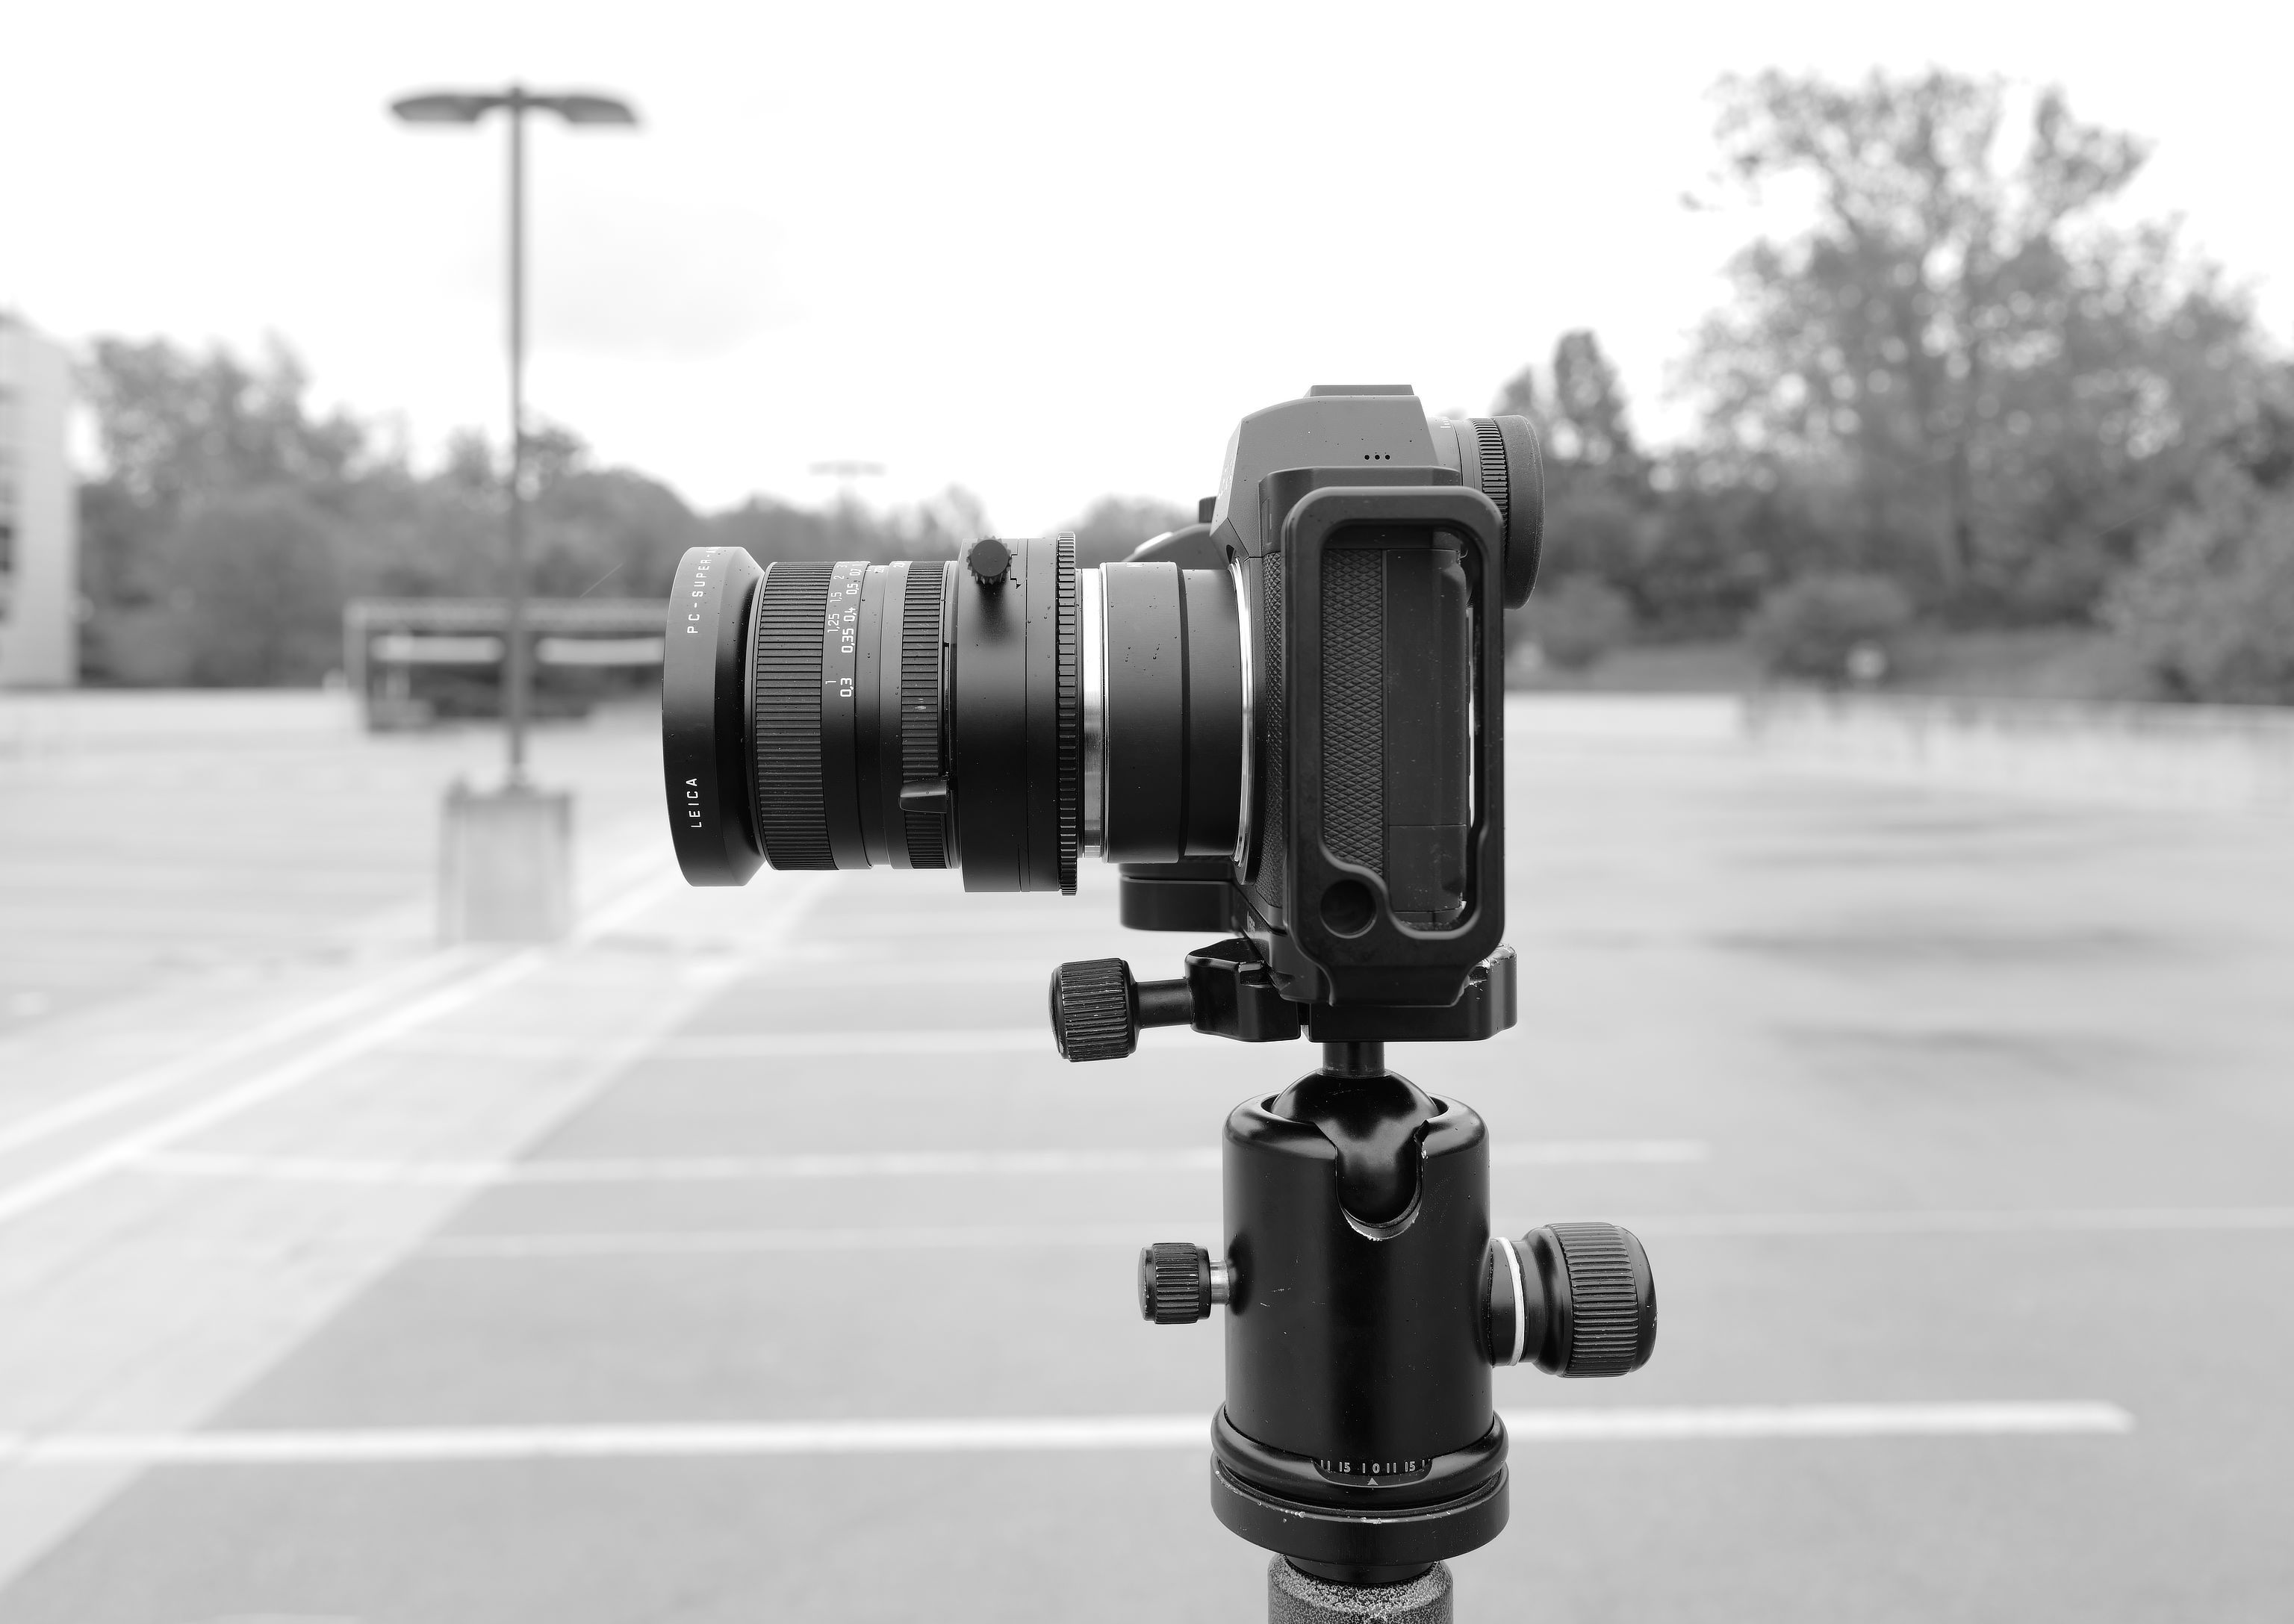
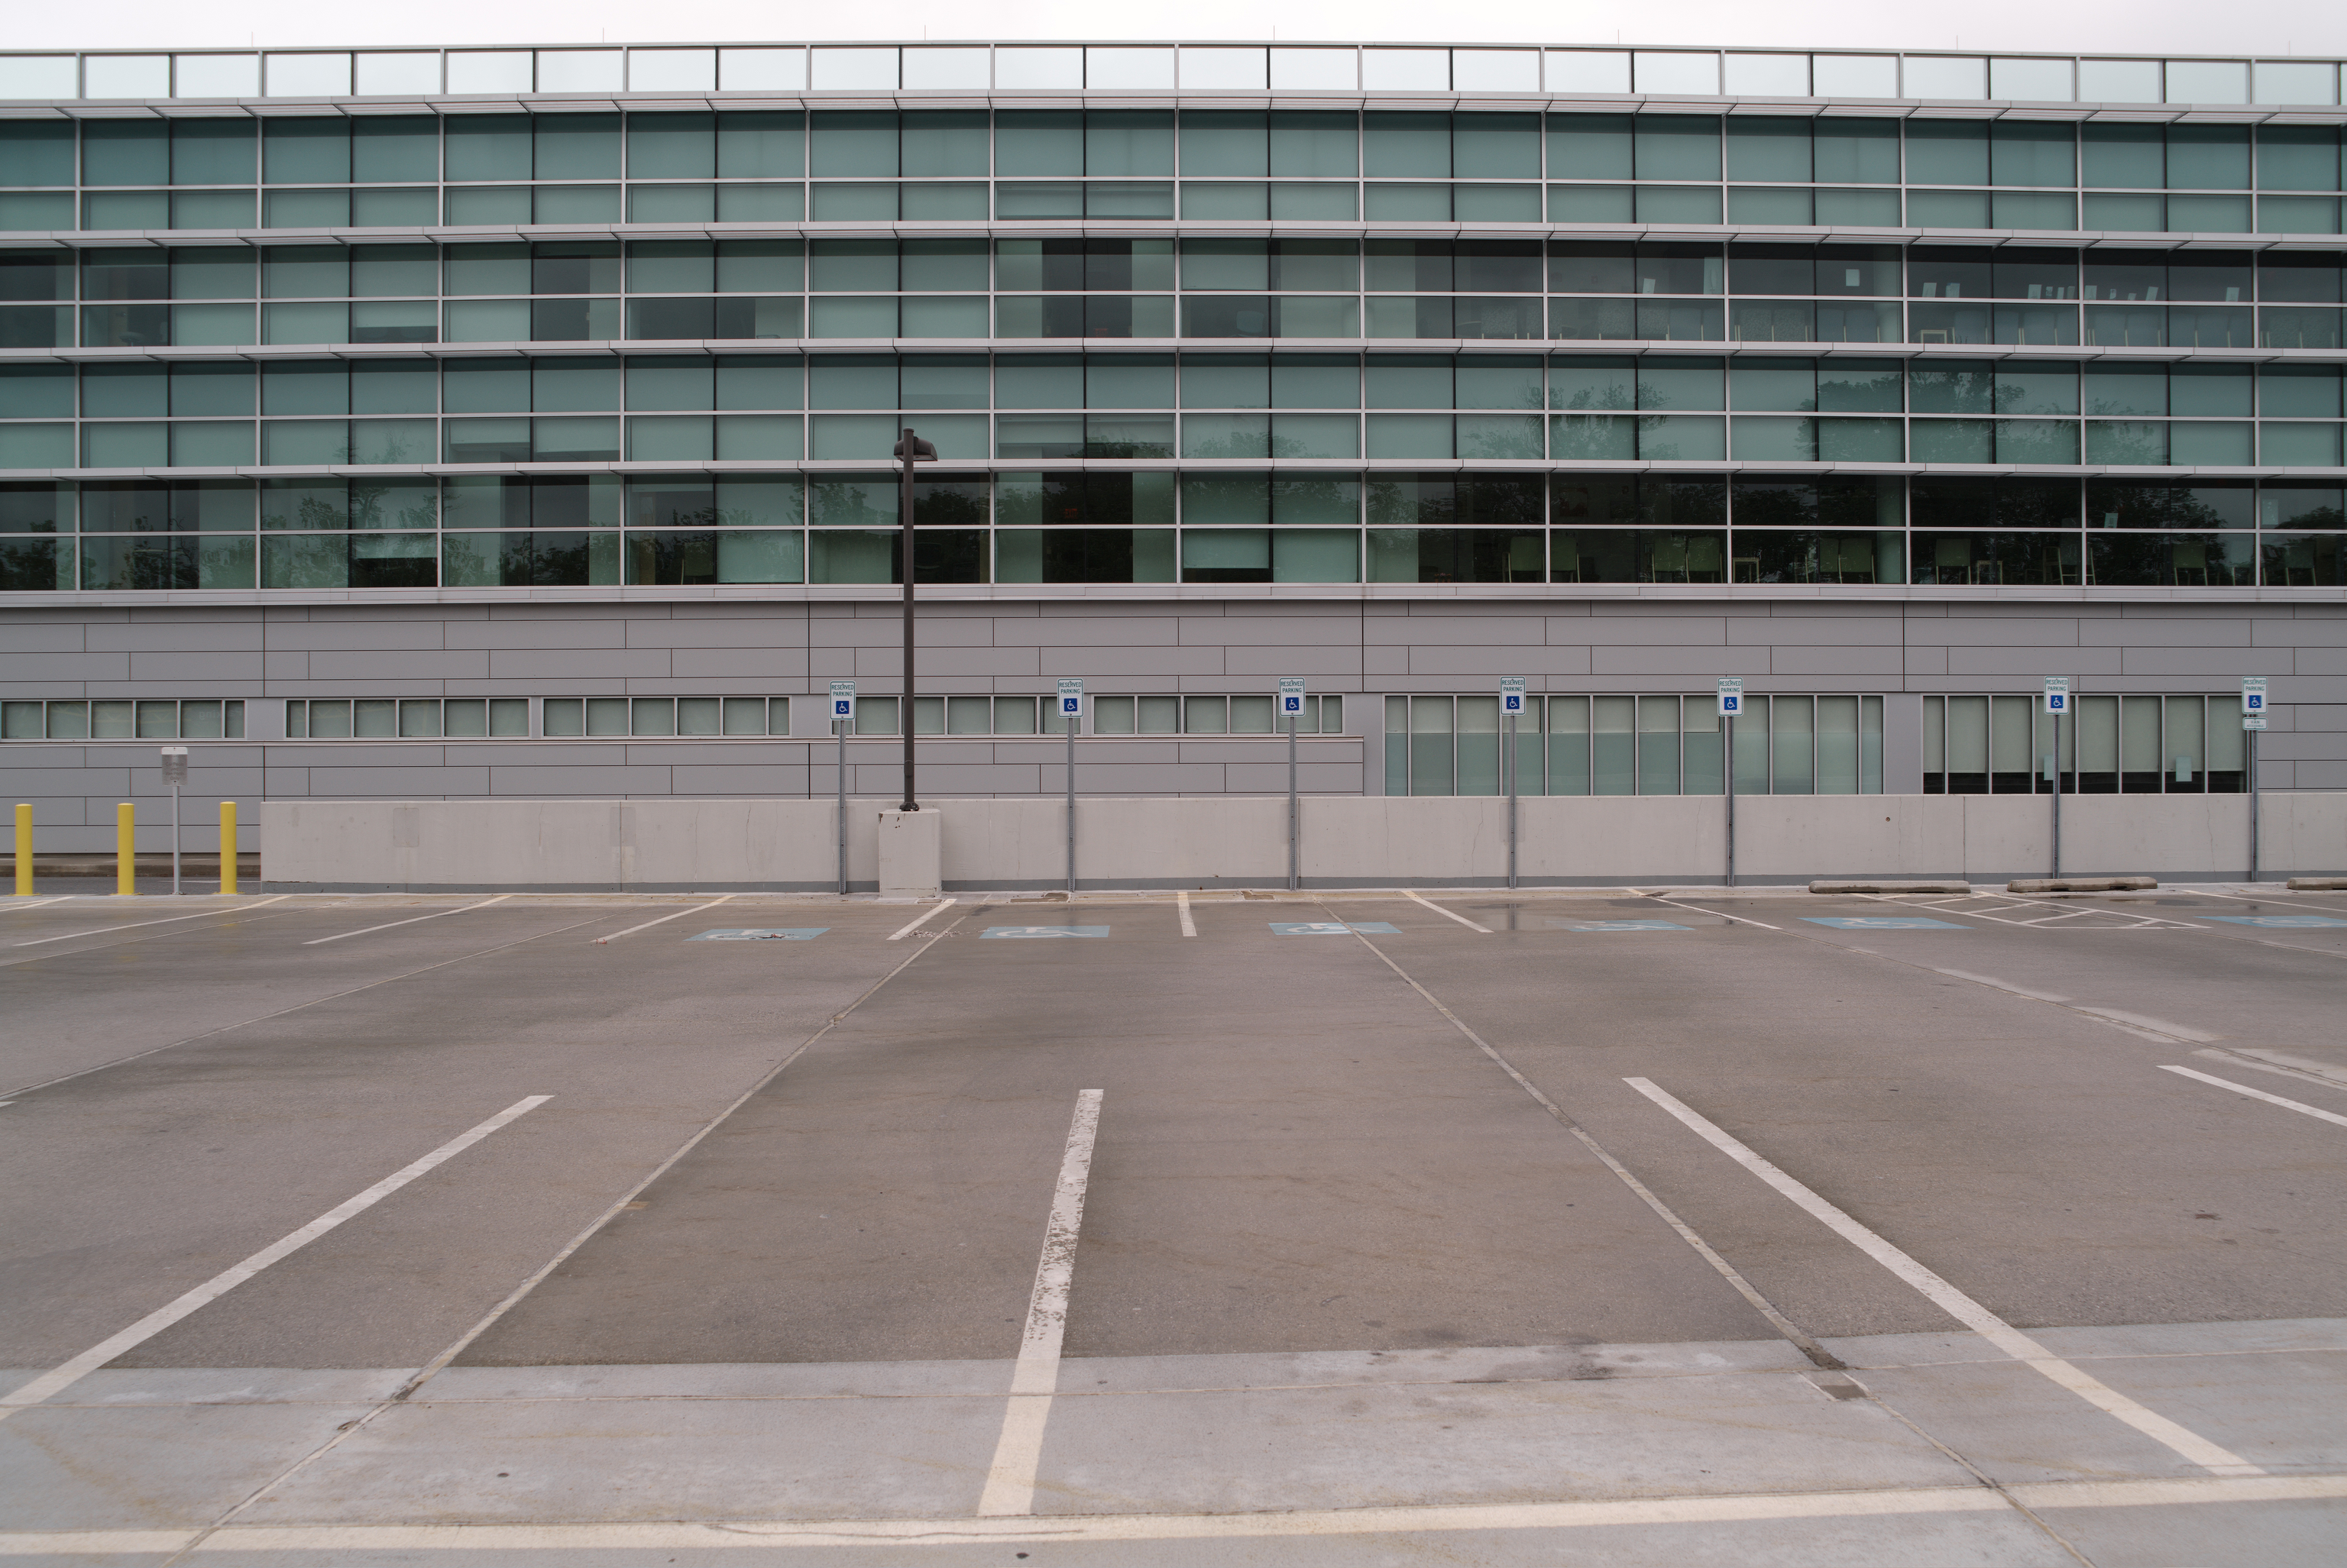
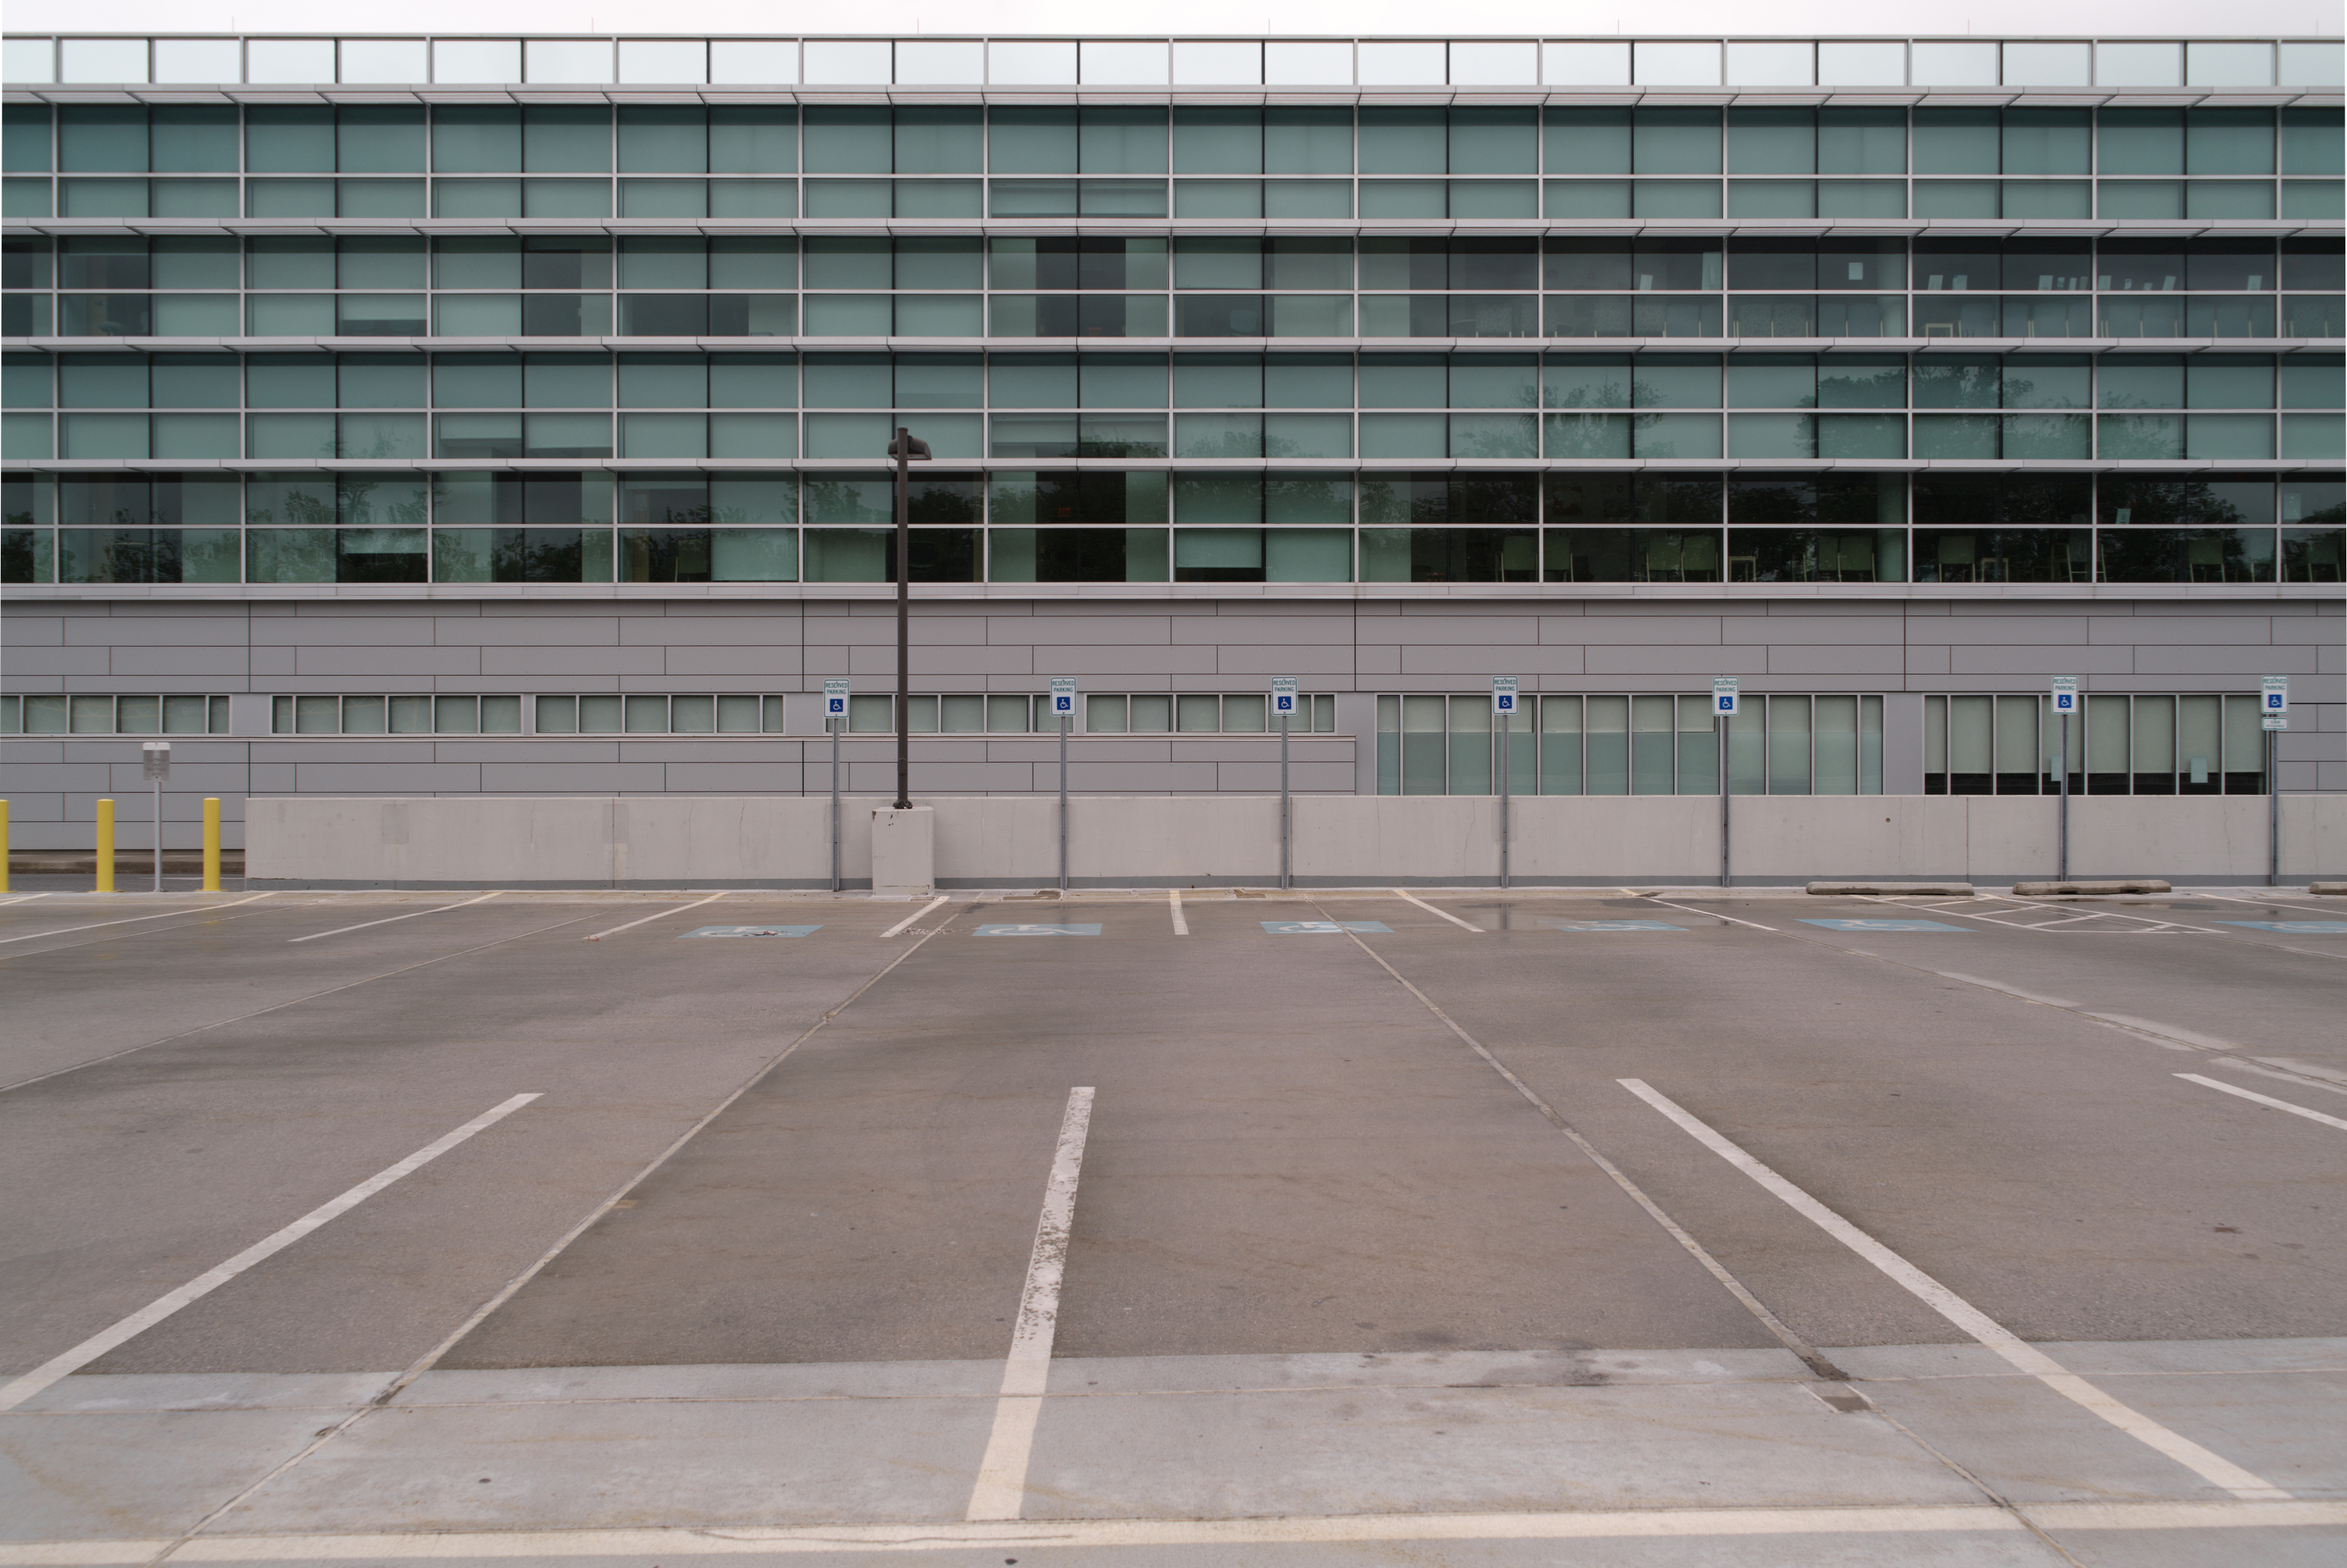
I went out today and shot a proper building as a reference for the PC-Super-Angulon-R. This building is pretty perfect for the job and permits a good deal of sampling of the lines in the image. Attached is the before and after of the shot. Apparently I had the axis of the lens slightly tilted and slightly skewed off of perpendicular to the face of the building, which is also easily corrected in the Develop persona with the Vertical and Horizontal controls.
Sweet.
Kirk
-
Here are some resources to check out as well:
https://wilson.bronger.org/lens_calibration_tutorial/
Kirk
-
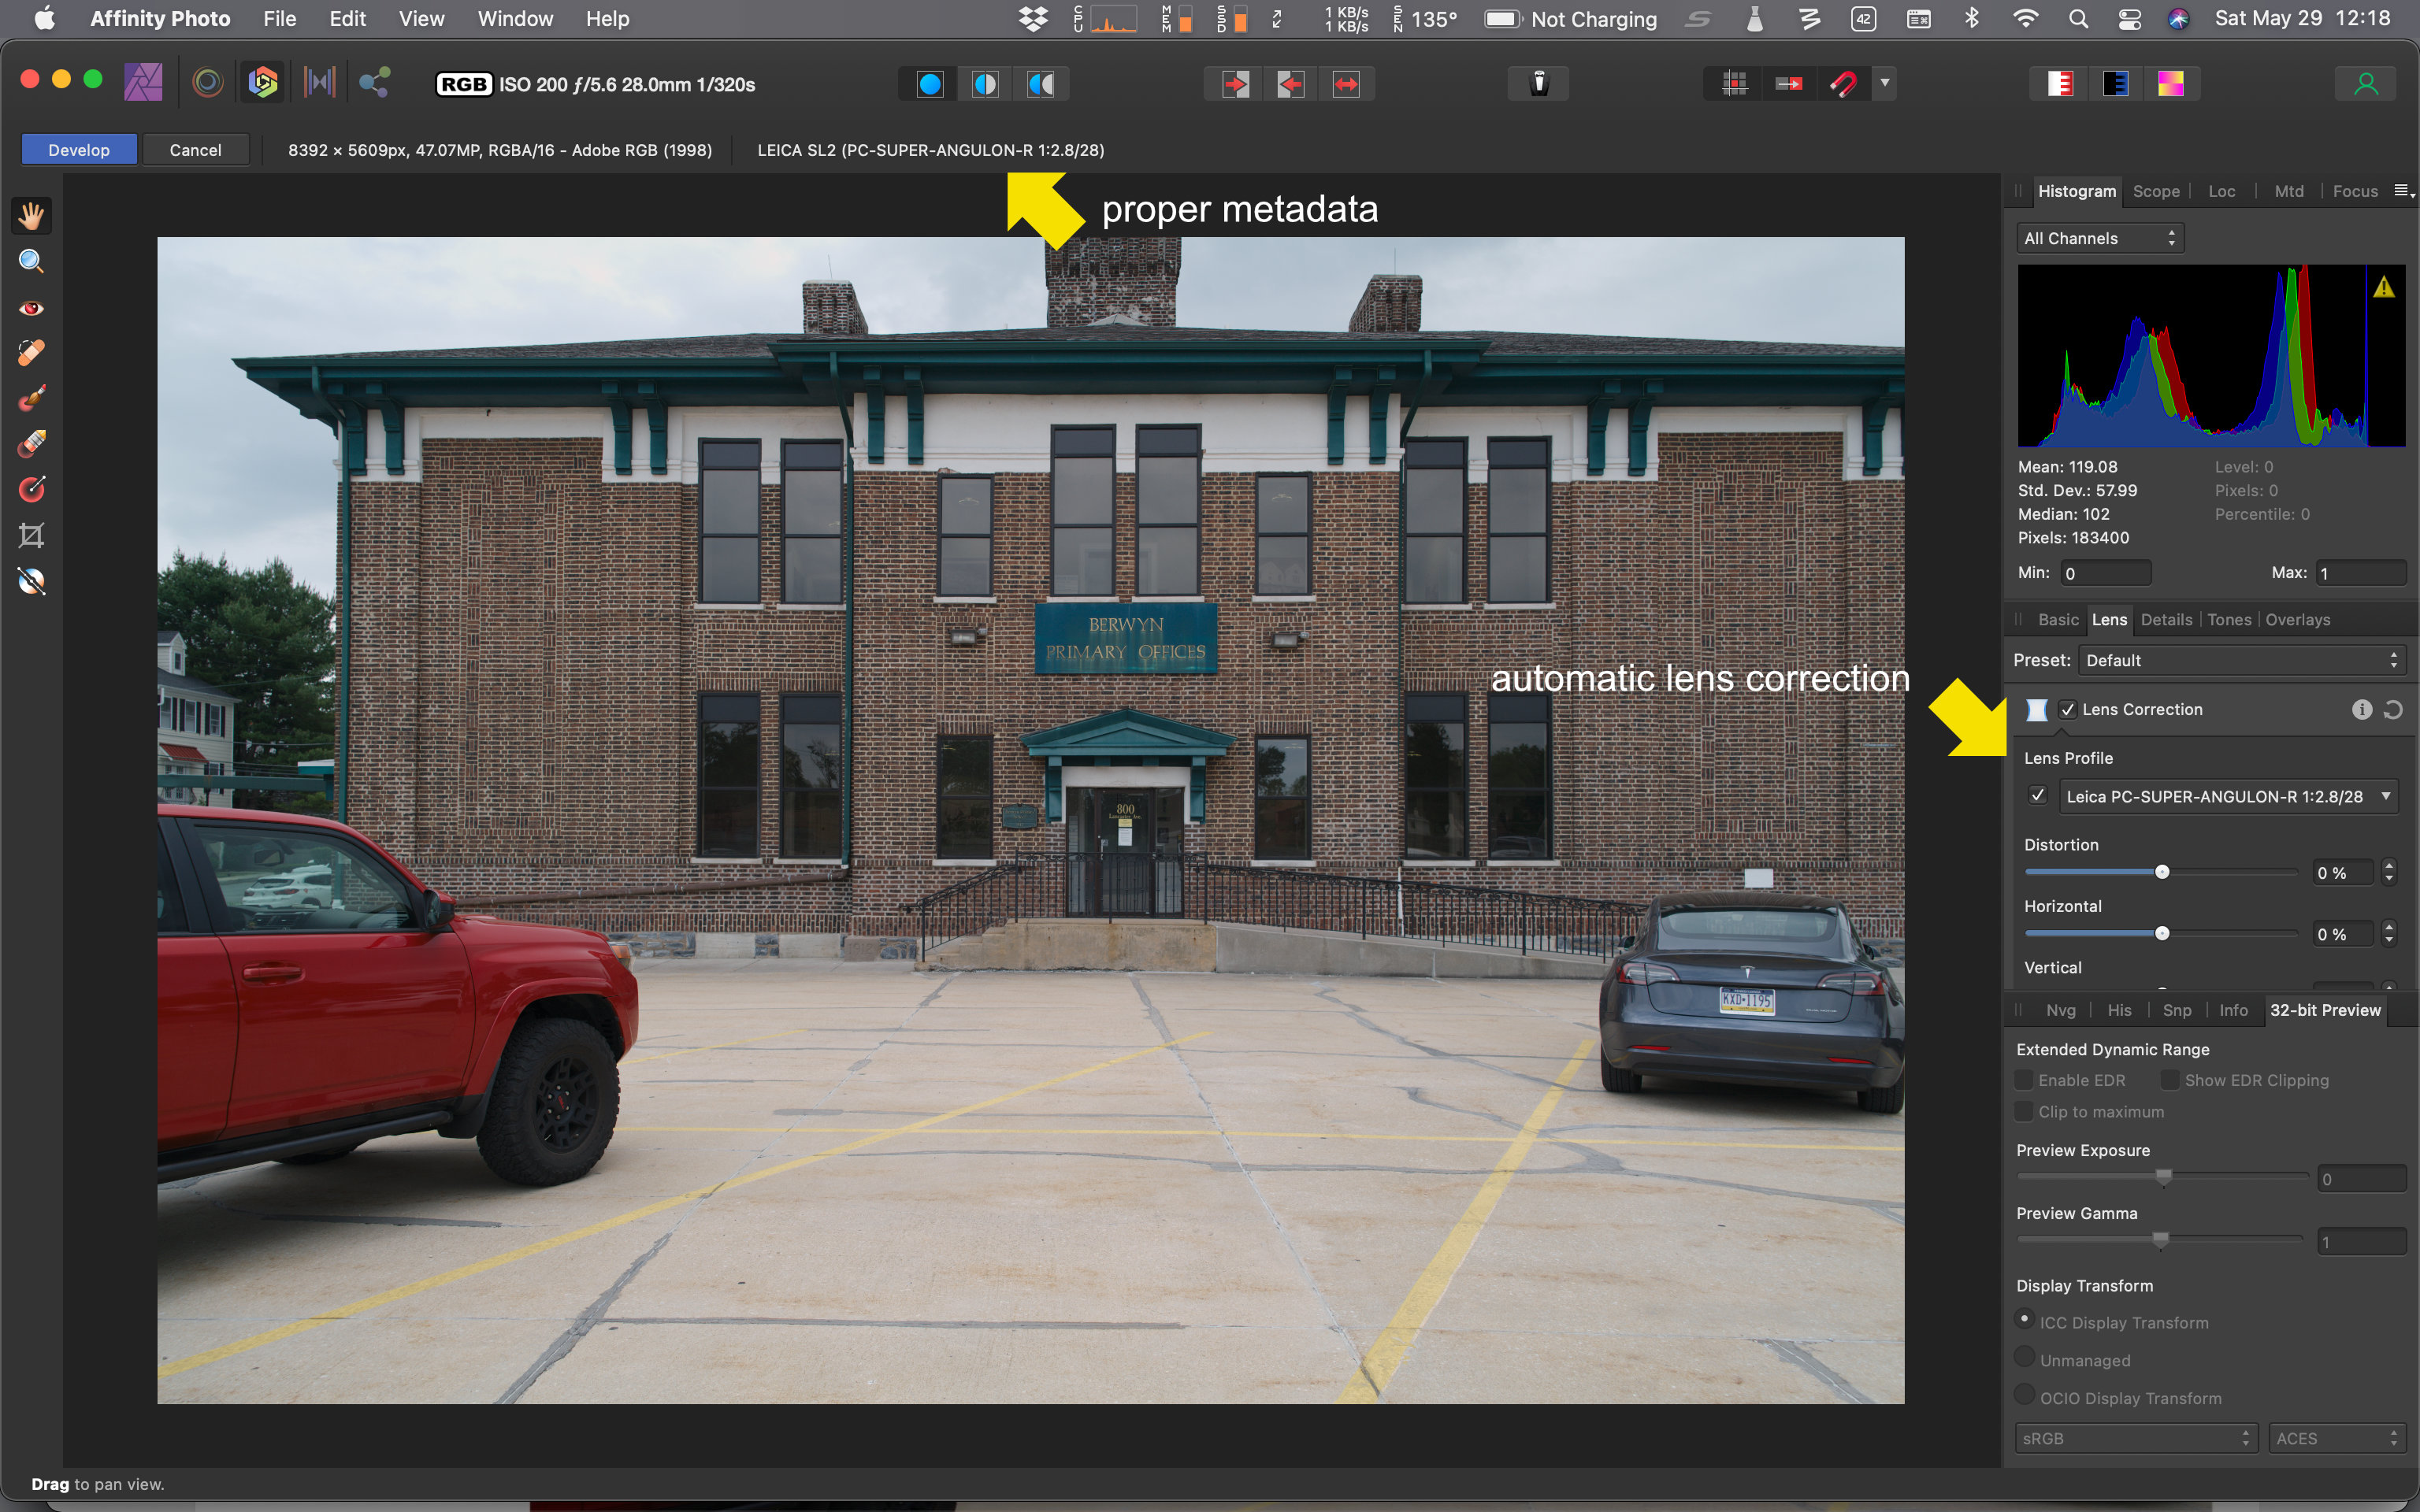
In the attached example, I used an external raw converter (Raw Photo Processor, aka RPP) and brought the resulting conversion into AP as a 16bit TIFF. I then used the Develop persona to apply the custom lens profile (see screenshot). Because the EXIF data are all consistent between the image file and the customized LensFun database, AP automatically finds the lens profile and applies it. Note that "0%" correction means the base amount, not zero lens correction. Changing to more positive or negative values amplifies or inverts the correction beyond the baseline.
Kirk
-
To get prepared, consider installing and learning a little bit about two free tools used in the process:
1) EXIFTool: https://exiftool.org
2) Hugin: http://hugin.sourceforge.net
Kirk
-
I went through the process of creating a custom lens profile for one of my lenses, a perspective correction lens (the Leica PC-Super-Angulon-R 1:2.8/28). It is actually pretty straightforward. In my case, because the lens does not communicate with the camera body (it is an R mount lens on a Leica SL2 via a Novoflex R to L mount adapter) I had to inject some lens and aperture metadata into the DNG file to get the right stuff in place for AP to recognize the lens and apply the custom profile.
The basic idea is this - for a prime lens (fixed focal length) you need to shoot one image that has well-defined horizontal (and vertical if you want) lines in the image. They need to be coplanar and they need to go across the entire image field. You want the lines to make the lens distortion obvious and you want them at the edges of the image (top and bottom) as well as across the middle. An ideal image is a grid like you might see on a modern building - you also need to make sure that the lines are truly straight, so older buildings may not be the best candidate. The lines need to be in the same plane (coplanar) across the entire image field, again making a modern building a good candidate.
Once you have your image, you open it in Hugin or similar application that is typically used to stitch panoramic images. These applications all use optimization parameters that include the lens distortion model used by LensFun (the ptlens model - the "pt" is an abbreviation for panotools or Panorama Tools, the granddaddy of pano stitching tools). If you are familiar with making an panoramic image with Hugin, or PTGui or any of these applications, you typically import a set of images, set up a bunch of "control points" across the image set that tells the stitcher how the images should fit together, and then let the application correct for distortion, alignment, etc. and stitch and blend a panorama as the final output. In our case, we are going to abuse Hugin to get the information we need to make our own LensFun library entry.
The LensFun ptlens model requires knowledge of three parameters, known as "a," "b," and "c." Hugin will give us these parameters if we ask nicely. Once you bring your single image into Hugin, you will place control points along lines that span the image, and then ask Hugin to optimize the image so that those lines become straight lines in the final output. You are basically asking Hugin to determine the a, b and c values that remove the distortion that the lens is causing to make those straight lines not so straight (like pincushion or barrel distortion, mustache distortion, etc). Once Hugin does the optimization, you can enter those a, b and c values into the LensFun database xml file that you are customizing for use with AP. After you place that customized LensFun xml file in the proper directory (the AP Preferences will open the directory for you as shown in a previous post above) and restart AP, if the EXIF data in your image matches the customized database entry properly, you should be able to apply your custom profile. What is even better is that you can use a raw converter outside of AP (if you prefer not to use the AP Develop persona to convert your raw images) and bring the resulting RGB image into AP - then, use the Develop persona to apply the lens correction to the RGB file! Sweet.
I will try to put together a detailed tutorial here to go through the whole process, including writing EXIF data to a DNG file for lenses that do not do so automatically.
Have fun rolling your own lens profiles!
Kirk
I did not use the attached image as my reference image - this is an old building with a non-coplanar facade. However, I used this image as an example to evaluate the correction.
-
FYI - the free pano stitcher called Hugin comes with a Lens Calibration utility that essentially automates the manual process of finding horizontal lines and using Hugin to determine the a, b and c coefficients of the lensfun lens correction model.
Kirk
-
Take a look at using a focus rail to iterate your focus plane instead of refocusing the lens.
Kirk
-
-
-
Can you post a link (Dropbox, etc) to one of your EXRs so we can try to replicate your issues?
kirk


Gradient Banding in HDR
in Pre-V2 Archive of Desktop Questions (macOS and Windows)
Posted
I would guess you are working on an 8bit image - there is no need to have the display adjust for HDR content. Leave that OS-level box unchecked unless you are viewing HDR content.
kirk