

Gregory Chalenko
-
Posts
27 -
Joined
-
Last visited
Posts posted by Gregory Chalenko
-
-
I would also much prefer to have a possibility to install Affinity applications to custom folders, like I have always been doing with all major software on my personal computers.
The way V2 is installed, it's not just about inability to maintain a certain structure of storage or the moment of confusion for the ones who install it for the first time.
Even such basic things as configuring image viewers or scanning utilities require a cumbersome workaround. -
12 minutes ago, kirkt said:
If you want to create a grayscale image from the Spare Channel there are a couple of ways
Sure, it works, but a possibility to do it in one click would make it much easier and more intuitive
-
Now I only wish we could create a grayscale layer from any item in the channel menu: not just current layer RGBA, but also from Composite RGBA, from Pixel Selection and well... from Spare Channels.
-
20 minutes ago, kirkt said:
A couple of thoughts in the meanwhile - 1) You can reset the view from individual channels to the composite by clicking on the clockwise circular icon with the arrowhead in the upper right of the channels view.
....
a) Starting with your source image, make a duplicate of the image layer upon which you want to base your mask (CMD-J) and make this layer active. We will call this the "LayerForMask" in the layer stack.
...
e) Below the Composite layer channels in the Channels panel will be the LayerForMask channels listed. In this case we want to use the Green channel for our mask, so Right-Click on the Green channel for this layer and select "Create Grayscale Layer" - this will create a grayscale copy of the Green channel at the top of the layer stack. This is a pixel layer that you can edit with all of the tools like dodge and burn, etc. to construct and refine your mask. We will call this "WorkingMaskLayer."
Kirk
This is a really neat workaround, I haven't thought about duplicating the image first.
Creating a grayscale layer from the context menu is also a great function, I haven't noticed it before. I guess, the reason why it's not quite obvious, is that it's available only for the current layer channels, while creating of a spare channel is present in every channel's menu.
Thank you Kirk!
-
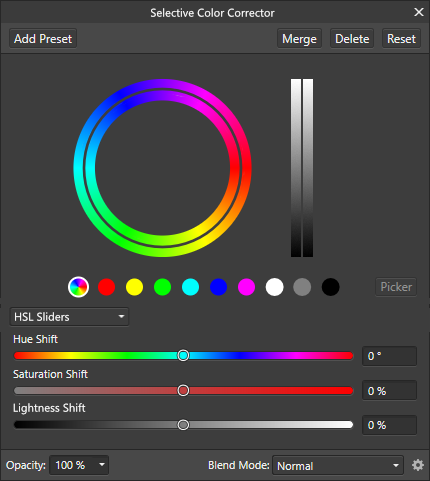
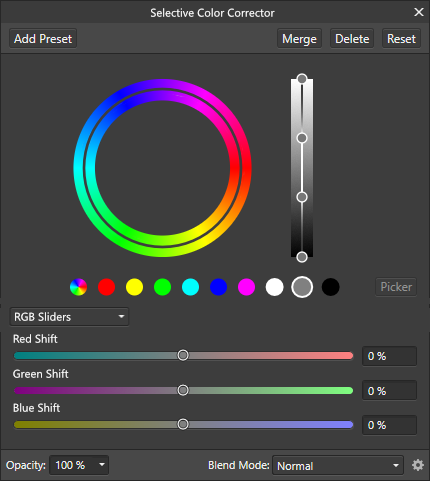
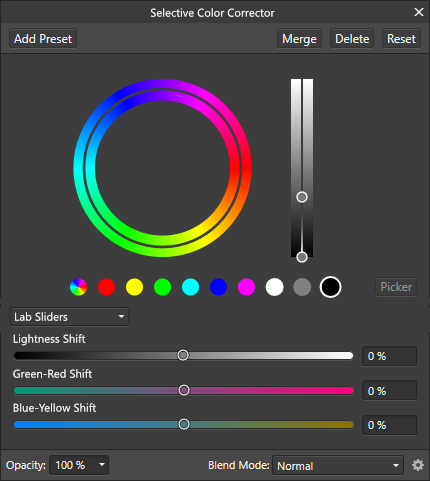
I've been thinking a bit more of this comprehensive Selective Color Corrector idea, and here are new mockups.
First image - adjustment of all colors in HLS, second image - adjustment of midtones in RGB, and finally, adjustment of shadows in Lab:

-
8 minutes ago, ashf said:
Yeah, PhotoPlus - predecessor of Affinity Photo had only alpha channels and not spare channels, much more like Photoshop's.
Not sure the purpose of this change.I've never used other Serif software, but if you say it wasn't like this before, then I think it wasn't a good decision to limit the channels functionality, regardless of how much performance gain it provided.
-
3 hours ago, anon2 said:
I simply do not understand why the developers chose to make channels editing so clunky and limited instead of doing the blatantly obvious alternative of making them be editable as if they were a layer of grey pixels.
I'm pretty sure there was a reason which had to do with efficiency, but indeed, it would be great if they found a way to make working with channels more streamlined for the user, regardless of how the software deals with them internally.
-
Wow, after happy exploring of AP for a few weeks and recommending it to everyone I know, this came as a surprise!
Never expected to find a limitation in such a seemingly basic functionality.
I think a possibility of viewing and editing any channel directly is essential, and if I were to choose which new feature has a priority, this would be the number one by a large gap!
Dear developers, Affinity Photo is an amazing software, winning in many areas, but this one thing makes it inferior for any more or less elaborate work. If you put aside everything else and implement seamless channel workflow, you will definitely win professional community.
-
Hi guys,
I find the Selective Color Adjustment extremely useful with its possibility to adjust not only selected hues, but also tones.
What seems weird in it though, is that regardless of the current document color mode, it operates in CMYK primaries.
Surely, this works, but wouldn't it be more intuitive to have RGB sliders as an option?
How about a more general selective color tool, that would allow hue range selection like in HSL Adjustment, but also with similar tone selection for shadows, midtones and highlights?
It could offer a choice whether you want to adjust the selection in HSL, HSV, Lab, CMYK or RGB.
Wouldn't such a tool be more straight forward than variety of different tools for the same purpose, that can only be applied one on top of another, distorting the input color for every next one?
Think of it: HSL, Selective Color, Color Balance, Split Toning and Shadows / Highlights are all essentially selective color tools, but for some reason each of them lacks some functionality that others offer. I understand that they are important to make transition from Photoshop easier, but Photoshop is a very old software with legacy of limitations and concepts changing over time. Affinity Photo, being a new application designed from scratch, can be more streamlined and logical, while also supporting older Photoshop approaches for those who need them.
Why can't we have one adjustment layer where all the tuning based on hue and luminance can be made in one place using same consistent logic? If you care about a possibility to separate adjustments into steps, you could just apply this tool several times, and each instance would adjust different things, but using same simple idea.
P.S.: speaking of HSL, I think it should use Lightness slider instead of Luminosity, because Lightness is what L stands for in HSL.
-
Hi guys,
Has anyone had an experience of using Affinity Photo in visual effects industry? Texturing, digital matte painting etc?
At a glance, considering the OCIO tools and full support of 32 bit color depth, it seems to be better suited for the pipeline than Photoshop.
It would be interesting to hear impressions of those who have used it on actual projects. Did it do the job? Were there any shortcomings? Unexpected difficulties?
-
14 minutes ago, Medical Officer Bones said:
I think that you might have misunderstood my explanation: unlike Affinity Photo (or any other image editor that I am aware of), PhotoLine's layer opacity setting ranges from -200 up to +200. It is the only image editor on the market with that option for layers: Photo, Photoshop, Gimp, Pixelmator, etc. all offer a range from 0 to 100. And a negative layer opacity setting also allows for any adjustment layer's effect or blend mode to be inverted.
This entirely novel concept of a -200 --> +200% layer opacity range setting falls outside the usual sphere of experience of most users (whose familiarity with layer blending is generally limited to a 0% --> 100% range). It falls outside the usual accepted paradigm how layer-based image editors work with layers.
That's a cool approach! Exactly same principles as in Blackmagic Design Fusion, the node-based compositing software
-
7 hours ago, John Rostron said:
The problem with your algebra is that 'Blurred + Original' is a single entity. You cannot disentangle the blur without using more complex deblurring (deconvolution) methods.
I agree that without deconvolution it's impossible to do it properly, but with a larger radius of the source Unsharp Mask it can be close.
7 hours ago, John Rostron said:The effect of oversharpening is to introduce halos and that is why the other techniques suggested use a blending mode of Darken since this will reduce or eliminate the bright halos.
What about dark halos? Unsharp Mask produces both bright and dark edges, so both bright and dark ones need to be addressed.
-
I would say, to try and revert the result of Unsharp Mask, you first need to know how exactly Unsharp Mask works.
What it does, is it subtracts a blurred copy of the image from the original and adds some amount of it back to the original:
Original - Blurred + Original = Unsharp Mask
From this we can reverse engineer the operation to restore the original. I leaved the amount of Unsharp Mask out to avoid over-complication of the formula, so let's say, it was applied at 100%.
Solving of the equation:
Original + Original = Unsharp Mask + Blurred
2 * Original = Unsharp Mask + Blurred
Original = (Unsharp Mask + Blurred) / 2
As you can see, you can't get the original restored with 100% precision, especially if the Unsharp Mask used a small radius, but you should get a fairly good result, if you blur the sharpened image that you have and average the blurred copy with the sharpened image. The radius of the blur needs to be tuned in every case individually. You can try playing with the opacity of the blurred layer as you average it with the sharpened image.
-
The more I use Affinity Photo, the more I see how an [x] closing the document would be much more convenient to have right next to the file name in the tab, which would be the result of implementing the first item of the OP's list.
-
1 hour ago, Jowday said:
Perhaps even closer
If something like this was available in the Levels, it would be good. Although, I'd still prefer seeing fractions of percent or even range from 0 to 1 instead of percentage, rather than 8bit or 16bit steps.
-
I definitely support number 1 and 4.
1. The tabs are indeed too far apart, and one needs to look for the proper one, especially on a wider screen
4. There is no reason of blowing a 600x400px image onto the entire 2K or 4K screen
-
Looks like this has been implemented at some point:
https://affinity.help/photo/en-US.lproj/index.html?page=pages/Retouching/retouching_cloningHealing.html?title=Cloning and healingThank you Serif guys, this works like charm!
-
I was also missing these exact two features while cloning in AP for the first time today, but then I noticed that Left and Right keyboard keys do rotate the source. And since rotation counterclockwise with the keyboard keys seamlessly goes from >0 to <360, negative values don't seem necessary.
-
Hm, interesting! Thank you for the tip!
Still, the fact of someone making a feature request on the subject shows that this behaviour is not very intuitive...
Maybe, indeed, like Jowday suggested, there could be an option to display decimals in values defined as percent in the Preferences > User Interface?
-
Thank you for the suggestion, but I'm on Windows, and this mode doesn't seem available.
-
Well, I've described scenario which seems to be quite common for photo editing, and 1/100 is too rough of a step for it. Why does it have to be adjusted by a whole percent increment? Why not by permille or a tenth of percent?
I understand the 1/256 step in 30 years old Photoshop. It was designed to work with 8bit per channel. But what's the meaning of even rougher control for 32bit linear images in a modern software?
-
6 minutes ago, Jowday said:
As an option (somewhere discreet in the dialog), sure.
For example, the Gamma control in Levels dialog is adjusted by integer increments using mouse wheel, but you can type in any decimal values, or you can get decimals while dragging the slider. This could be the same for Black Level and White Level
-
Hi guys,
Thank you for this amazing software! I'm a new user, and I'm enjoying it a lot!
I would like to ask you though to please allow fractions of percent in the Levels. Adjusting the levels in 1/100 steps is just not precise enough to make a series of images match color-wise.
Today I spent the whole morning trying to make five images look consistent, nudging 1 percent back and forth in Levels, but eventually gave up and exported them with quite some difference in colors.
-
Automatic tiling would be very useful indeed!


V2 Installer NOT GOOD, Please go back to original, MY WORK IS CUTTING AFFINITY BECAUSE OF IT
in Feedback for the Affinity V2 Suite of Products
Posted
Good to know.
I used a workaround with a .bat file containing just this single line:
%LocalAppData%\Microsoft\WindowsApps\AffinityPhoto2.exe %1I'm pointing the third party apps to this file instead of Affinity Photo executable.
This works, but I'm personally not a big fan of the extra console window popping up in the background as Affinity launches.