mpowell
-
Posts
122 -
Joined
-
Last visited
Everything posted by mpowell
-

Where is text wrap?
mpowell replied to mpowell's topic in Pre-V2 Archive of Affinity on Desktop Questions (macOS and Windows)
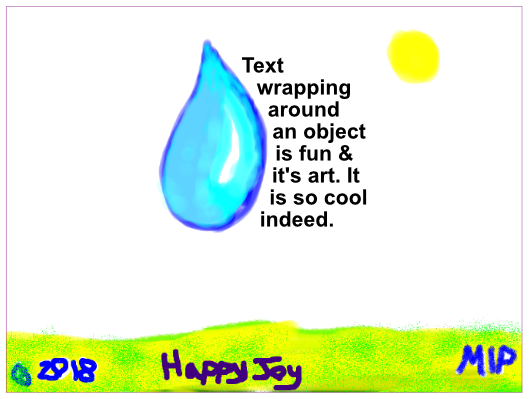
Cool, thanks. Just checking. Found another way to do it, Create a solid shape using a pencil tool that surrounds another object. Left-Click on the shape, then Right-click on the solid shape & convert it to text frame. Resize the fonts to fit in the shaped text frame. Then type anything. You can notice that I created a shape around the waterdrop, I converted it to text frame.
- 3 replies
-
- 2
-

-

-
- affinity designer
- text wrap object
- (and 1 more)
-
Affinity Publisher for Windows - 1.8.0
mpowell replied to Patrick Connor's topic in News and Information
Amazing: Thanks for the update, I enjoy using it alot. -
Miter.. What is it?
mpowell replied to mpowell's topic in Pre-V2 Archive of Affinity on Desktop Questions (macOS and Windows)
Cool, thanks 😁 -
Cool, i've been curious of what miter is? I noticed it in the settings.
-
Most definitly love using the mask method, it's so easy to use in Affinity, I even used it to decorate Art Text.
-
Remember the famous blue dot from Windows 3? I recreated it in Affinity Photo.. I created a blue rectangle for the background of the image. I used rectangles to create these 4 shapes the image had. I lined them up accordingly where each corners touch each other. Then I rasterized the image to flatten it, & exported as PNG.
-
I agree. Right now, I've been manually counting the words in my document that I create in Publisher, Designer, Photo & I rename the layer to number of words that I counted "402 words" for that individual layer for example.
-
Oh, Ok. Thanks for letting me know. One way around is first create the text on a curve in Affinity Designer, left-click on it to select it, then right-click on it to get a context menu, the choose copy. Then open up Affinity Photo, choose a new file. Then right-click on the canvas "Or work area" to get a context menu, then choose paste.
-
To create path text: Select a previously drawn line, curve or shape. From the Tools panel, select the Artistic Text Tool. Do one of the following: For text running outside a shape or above a line: Click the cursor outside (or above) the object's outline. The cursor will change to indicate path text will be created. For text running inside a shape or below a line (right to left): Click the cursor inside (or below) the object's outline. Click or drag on the page for a default or custom 'sized' text size, respectively. The line, curve or shape is converted to a path ready for accommodating text. Do one of the following: Type your text. Paste previously copied text. From the File menu, select Place. In the pop-up dialog, navigate to and select a file, and click Open. Alternatively, select a previously drawn line, curve or shape and then, from the Layer menu, select Convert to Text Path. To modify the flow of path text: With the path text selected, do one of the following: Drag one or more path text handles. On the context toolbar, set Baseline to adjust distance of text baseline from path. On the context toolbar, click Reverse Text Path.
-
Cool, I created this cool Spirograph called Spring Fever.
-
Hi, been wondering where the text wrap option went to in Affinity Designer? I cannot find it anywhere.. I cannot seem to wrap text around an object..
-
Cool, thanks for the update. It rocks! 😁
-
Affinity Designer for Windows - 1.8.0
mpowell replied to Patrick Connor's topic in News and Information
Cool 😉 Thanks for the new updates, It rocks 😁 -
Amazing! It works! Would like to keep the brush stroke option in Publisher, please..
-
Cool, I did a cool Spirograph using Affinity Designer Warm & Bright.afdesign
-
Usually whenever I add something to a document, or when I modify it, I save it right away. That way I don't forget to save it.. Like for example I add an image to a document, then I go to >File >Save I usually do this per change
-
I actually do both; News information. Checking with Windows Store.
-
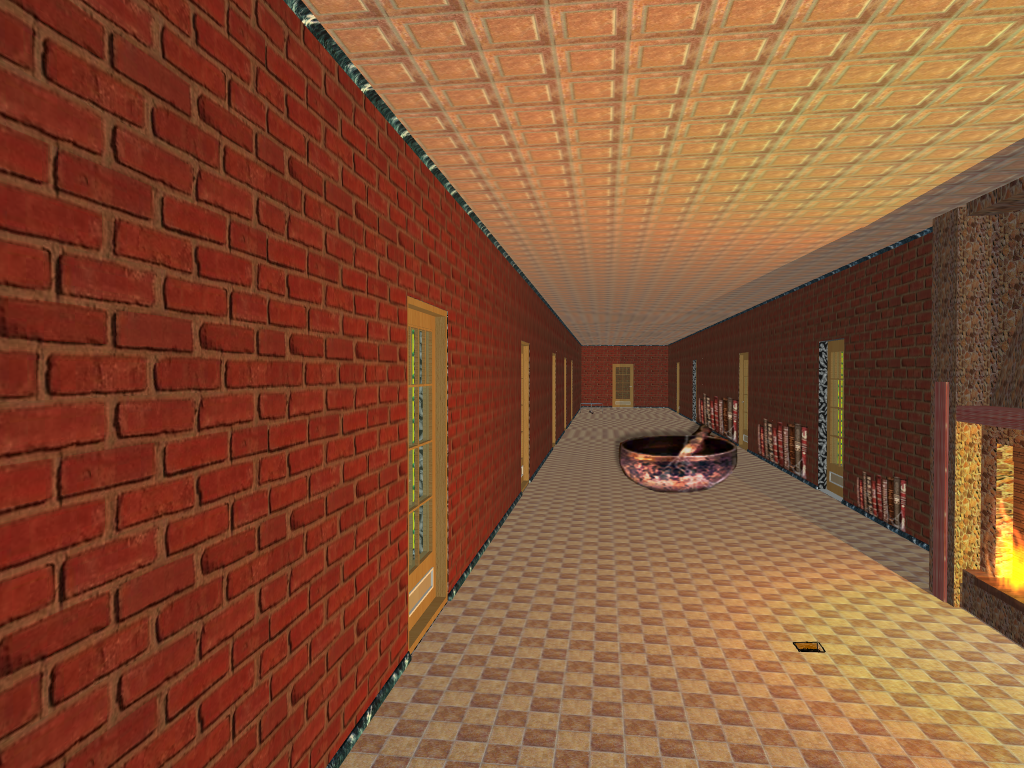
Cool, did a photo manipulation in Affinity Photo. It's a huge bowl in the middle of a hallway. I used the following; Perspective mesh on the bookshelves on the wall. Pasted the bowl image on a different layer. Used color curves to match the hallway atmosphere. added the shadow on the bowl to match the lighting. I drew the square hole in the ground by hand.
-
Cool, been waiting for lots of new features & fixes, especially the ones mentioned in this post. I have the Windows Store Version, everyday I check for updates, looking forward for version 2.0.
-
You're Welcome 😉
-
What I usually do in this situation is that I resize the photo manually by clicking on the photo, then I click-n-holding one of the white boxes on each corner of the photo, then I resize it to fit inside one of the square area's in the template.
-
A particular font has to be installed for it to work.. I found the font on 1001 free fonts website; Sans Variable Roman >Click on the Download link. >Save As. >Goto the directory the font was downloaded. >Right-click on the font. >Select "Install for all users".
-
Tap the double vertical lines || , while holding it down, you can move the dock.
-
Cool, It's Amazing!
-
text at paths
mpowell replied to Jörg Thiemer's topic in Pre-V2 Archive of Affinity on Desktop Questions (macOS and Windows)
You're Welcome