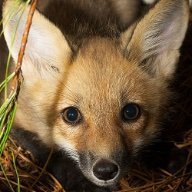
Ldina Posted February 6 Posted February 6 Snowy Plover is a shore bird (similar to a sandpiper) that is seen in the Americas, along the Gulf Coast, etc, and is considered a near-threatened species, mainly due to habitat loss. I recently illustrated this little guy using Designer, Pixel Persona and AfPhoto. Hope you like it. IthinkthereforeIam, jmwellborn, StuartRc and 8 others 11 Quote 2024 MacBook Pro M4 Max, 48GB, 1TB SSD, Sequoia OS, Affinity Photo/Designer/Publisher v1 & v2, Adobe CS6 Extended, LightRoom v6, Blender, InkScape, Dell 30" Monitor, Canon PRO-100 Printer, i1 Spectrophotometer, i1Publish, Wacom Intuos 4 PTK-640 graphics tablet, 2TB OWC SSD USB external hard drive.
dannyg9 Posted February 6 Posted February 6 Great job. The textures are always the part that make your illustrations so absolutely refined. Ldina 1 Quote
Ldina Posted February 6 Author Posted February 6 1 hour ago, dannyg9 said: The textures Thanks, Danny. I agree...textures can add a nice feel to some illustrations and I like using Texture image overlays, Procedural Texture filters, Lighting Filters, etc, using different layer blend modes and opacities. They seem to work especially well for organic images. Quote 2024 MacBook Pro M4 Max, 48GB, 1TB SSD, Sequoia OS, Affinity Photo/Designer/Publisher v1 & v2, Adobe CS6 Extended, LightRoom v6, Blender, InkScape, Dell 30" Monitor, Canon PRO-100 Printer, i1 Spectrophotometer, i1Publish, Wacom Intuos 4 PTK-640 graphics tablet, 2TB OWC SSD USB external hard drive.
KarinC Posted February 7 Posted February 7 15 hours ago, Ldina said: Thanks, Danny. I agree...textures can add a nice feel to some illustrations and I like using Texture image overlays, Procedural Texture filters, Lighting Filters, etc, using different layer blend modes and opacities. They seem to work especially well for organic images. Would you consider making a tutorial on how you use some of these filters to make one of these beautiful illustrations? Alfred 1 Quote
Ldina Posted February 7 Author Posted February 7 2 hours ago, KarinC said: Would you consider making a tutorial on how you use some of these filters to make one of these beautiful illustrations? Thanks, Karin. Let me think about how I could best do that. It's not a clearly ordered, step by step process, and depends on the image, brightness, contrast, saturation, the desired effect, the image resources I have on hand, when to do what, etc. Many things can influence what and how I do this, and it evolves with the design, usually when I look at it and decide it is too smooth or plain and needs some extra texture (in all or part of the design). My initial thought is to provide a few very simplistic examples as a starting point for others' experimentation, showing the layer structure. If I can come up with something that I think is at all helpful, I will post it here. Some of the techniques I use (pixel persona, smudge brush, etc) should be credited to Isabel Aracama and her butterfly illustrations. I don't remember if she overlaid textures or whether I added that on my own. Quote 2024 MacBook Pro M4 Max, 48GB, 1TB SSD, Sequoia OS, Affinity Photo/Designer/Publisher v1 & v2, Adobe CS6 Extended, LightRoom v6, Blender, InkScape, Dell 30" Monitor, Canon PRO-100 Printer, i1 Spectrophotometer, i1Publish, Wacom Intuos 4 PTK-640 graphics tablet, 2TB OWC SSD USB external hard drive.
Ldina Posted February 7 Author Posted February 7 @KarinC OK...here's an attempt to demonstrate 3 methods I have used to add texture to some of my AfDesign illustrations. It is very basic, as it needs to be, because what one does is very image dependent. I downloaded a fairly smooth vector butterfly image from Pixabay for illustration purposes. I'll show a series of JPGs (small, so not great quality) to show the original, and 3 alternative methods to add some texture. I'll follow with more detail and an AfDesign file with all these variations. The Lighting Filter and Placed Image methods require the use of some bitmaps textures, which you can create yourself, download from various websites, generate from your own photos, etc. Below is the Original Pixabay Vector Image. This was the original vector image, unmodified. Nice image, but lacking any added texture. Next up is the Lighting Filter (done in AfPhoto). I used "Edit in Photo" and added a Live Lighting Filter above the image (or it can be clipped to a layer to limit the effect to whatever element you wish). I selected "Load Bump Map" from the Lighting Filter dialog box, selected a likely bitmap image that had a suitable texture, then played with the various settings in the Lighting Filter to get the desired effect. All these are rather "overdone" so they are clearly visible online. Next, a Placed JPG Texture Image (set to Overlay blend mode in this example). Below, I Edited in AfPhoto, "placed" a suitable bitmap textured image (see the layer stack), and tried various Layer Blend Modes. In this case, I chose "Overlay" blend mode. The result was too light, so I added a Curves Layer to adjust the density of the bitmap file I chose. The texture you choose will have a HUGE effect on the final texture. I usually try 5 or 10 different texture files until I find one that seems suitable and works best. I'll adjust layer opacity, blend modes, etc, until I get the effect I am after. Finally, a Procedural Texture Filter (done with Edit in AfPhoto). I added a Live Procedural Texture Filter and experimented with different presets, my own custom filters, parameters, etc. (I'm no expert on PT filers, so you're on your own here...it's complicated and poorly documented). A PT texture filter needs to act upon a Pixel Layer, so I duplicated the original Vector Group, rasterized the duplicate, then made the PT filter a child layer (clipped to that layer) of the pixel version of the butterfly. As always, blend modes, opacity, etc, can alter the effect, and it takes some fiddling around to get a suitable result. PT filers also tend to keep file sizes smaller, since they are mathematically generated, unlike adding bitmap layers for texture. Screenshot of The Layer Structure (all variations included but visibility turned off) The above are overdone to make the effects clear and visible. These effects can be extremely varied, limited to foreground, background, both, etc. The images or PT filers you use to add texture have a big impact on the result, as do layer blend modes, opacities, original image density, etc. I've attached the AfDesign File used to create all of the above. I find adding textures can make a difference, especially on some images...like butterflies, which tend to have some iridescent shimmer and variation in their wings. I hope this is reasonably clear and helpful. Butterfly Texture.afdesign markw, stokerg and IthinkthereforeIam 3 Quote 2024 MacBook Pro M4 Max, 48GB, 1TB SSD, Sequoia OS, Affinity Photo/Designer/Publisher v1 & v2, Adobe CS6 Extended, LightRoom v6, Blender, InkScape, Dell 30" Monitor, Canon PRO-100 Printer, i1 Spectrophotometer, i1Publish, Wacom Intuos 4 PTK-640 graphics tablet, 2TB OWC SSD USB external hard drive.
KarinC Posted February 8 Posted February 8 @Ldina Interesting. Thank you. I get a little intimidated by all the photo filters. I can see I need to learn more about how to use them. I'm especially intrigued with the live lighting filter. Ldina 1 Quote
Ldina Posted February 8 Author Posted February 8 @KarinC For adding texture, I tend to use bitmap images (using different layer blend modes) the most, followed by procedural textures (but the PT filters tend to be confusing to many users). I probably use Lighting filters less than the first two. These methods give you a lot of flexibility in choosing the texture you want to add. One thing I didn't mention is you can also use a Live 'Add Noise' Filter, and you can also add noise to a fill color using the Color Panel (along with different layer blend modes). They do add noise texture, but I usually prefer the above methods. Here's a tutorial by Trent that may help. He also shows how you can use "Texture Brushes" to add noise, which is a nice technique. stokerg 1 Quote 2024 MacBook Pro M4 Max, 48GB, 1TB SSD, Sequoia OS, Affinity Photo/Designer/Publisher v1 & v2, Adobe CS6 Extended, LightRoom v6, Blender, InkScape, Dell 30" Monitor, Canon PRO-100 Printer, i1 Spectrophotometer, i1Publish, Wacom Intuos 4 PTK-640 graphics tablet, 2TB OWC SSD USB external hard drive.
Recommended Posts
Join the conversation
You can post now and register later. If you have an account, sign in now to post with your account.
Note: Your post will require moderator approval before it will be visible.