Search the Community
Showing results for tags 'layers'.
-
 Can I convert Layer FX to Layers? I need to be able to selectively erase or mask certain parts of them. Thanks for any help. David Mac
 -
 My question right now is how to compile multiple images into a layout for a website header. I created a new document as a web file with a transparent background. I created a new layer, opened my first image, and copy/pasted it into the document, but it pasted onto the background and not the new layer. So I can't move it, and I'm not sure how to put it onto a different layer and keep the background layer clear. As a disclaimer: I'm trying to learn Affinity Photo without prior experience with Photoshop or any other similar editing program. I would love any help someone can offer! Thanks so much! :-) ~ Stacey
 -
 I am working with an image removing the background. When I go to apply the refinement the new layer with mask does not appear. I only have the same layer and picture. How do I fix this? Test.afdesign
 -
 Hi I've just started learning Affinity and am loving it… I was a big Freehand fan and never got on with the other one. My question is this: I grouped a whole image in order to scale it up a little. When I ungrouped, I discovered all the objects were on one layer! Apart from being more organised at set up, is there a way round this? Alan
 -
Is it possible to export each layer to individual PNG and how?
-
 It would be better for layer and object management if 1. New layer would be inserted at the current location (currently selected object) in the layer stack. It is awkward to have to scroll, find and drag new layer where you want in the object stack after you create one when you have hundreds of objects. 2. There were a modifier key when creating new layer (like shift-click new layer icon) which would move all the selected objects to a new layer. That layer would be created at the current position in the layer stack (uppermost selected object, I guess).
 -
Badass Designer roadmap. Please at least review how Fireworks implements shared layers across states (which I have been misusing as pages for years). It's the most powerful implementation of a layer - sublayer - "page/mock" relationship I've seen; suppose you need a main menu across 10 pages/mocks, but you have a 20-page doc. You simply “share layer to states”, then hide it from those pages you don't want it on. All updates to that layer appear on all states (again, as pages) without absurd asset duplication cause by art boards. If you need unique menus, you can simply hide that layer and make another, or unshare the layer and decide which pages get that content. It works like a symbol but with the advantage of edit in place and locking certain sublayers if needed.
-
 Will Affinity Photo have support for Photoshop Linked Smart Objects?
 -
Hey Guys, are you going to implement layer colours to bring the layer stack inline with AD?
-
 Hi all, I've just been sent this little link: about a group of today's Photoshoppers, who were asked to use PS Version 1.0 and see how the slimline software started off. http://petapixel.com/2015/03/12/watch-as-photoshop-experts-try-their-hand-at-the-original-photoshop-1-0/ This should be a trip down memory lane for some and a history lessons for others. (Win XP/Mac OS 9.22 and Photoshop 6.0 for my first taste.) But more importantly, this a lesson for the APh detractors. There are plenty of things missing right now/on the roadmap. So go easy on the app's limitations: it's STILL useable and that's what matters B). So for a Beta, it's still better (Than PS V1.0) :ph34r:
 -
 In photoshop there is really nice way to show and fast layers, simply by holding your mouse button over the eye icon and dragging up and down which will do the exact same operation showing or hiding other layers on which you drag the mouse pointer. Another approach would be to multi-select layers and than hit the show hide button to show or hide all selected layers.
 -
Hi, I would like some options to split the current layer in it’s components whether those are groups or individual objects. Thanks, Vlad
-
 Hi there I am editing an AI file and need to replace existing text with my text. I cannot edit the text. The instructions for illustrator state you are required to. "Right click and Ungroup your chosen illustration then select the Isolate Selected Group option." When I view the layers they are not grouped together but simply individual letters. I have attached the file, can you edit any of the text? Would GREATLY appreciate any assistance, I am very new at this. Meat-Cut-Illustrations.ai
 -
The ability to name layers would be an important feature to me. As you work with more and more layers, I typically name them so I know which one is what.
-
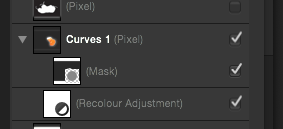
 I wish you would reconsider your logic for how a layer looks in the layer panel once it has received a mask and also a layer adjustment. It makes little to no sense. Dont get me wrong I've seen your post on how you handle clipping masks by the placement of a layer above, below, next to another, very clever. But in the end when a designer wants to look at a file you want to be able to see where masks are, adjustments made, all based on this layer order, and lastly if the file is to be opened by a client or agency that only has PS, then they should be identical.
-
 I have recently downloaded the affinity photo beta. I have played a little with it and it does seem to be a very good program with great potential with all the user support. I'm a photographer that uses lightroom 5 for 95% of editing. I have tried to understand CS6 and have learned a little bit of the program but find it a complicated and extremely powerful program. Since this is a new program and I don't use Affinity Designer I am having difficulty understanding how to use the layers and masks in this program. I'm sure they work in a similar fashion but things are laid out in a different manner I find. If you know how to use layers, masks, and the tools that affinity photo has can people start to post some short tutorials here please. Would be great help. I'm sure the affinity crew is working hard at creating some but think they are likely very busy fixing and adding features to the program that simply learning how to use the features for newcomers is being overlooked. Things I would like to know: 1. how the layers work 2. how the masks work 3. how to create a layer-mask and then be able to "hide" or "reveal" part of that mask by using a brush and a black or white swatch what all the tools do down the left side of the screen. I know I can play with them but I can't seem to get some of them to work so I don't know what they do... 4. the basic navigation of the UI, since it's new to me Would appreciate the help and hopefully people can post little youtube videos right in this thread that people could search and find... cheers, Jason
 -
 Hello! Very nice application. But... subject. Fireworks layers support will be in future or not?
 -
v 1.1.2.22568 After creating an empty new layer the delete layer command does not seem to work. Using either the trashcan or the drop down command has no effect.
-
After using AD for a few months now I still forget where to open the right sidebar thingie - which is apparently called "UI" and specifically layers. Here are my beefs: UI is too general a name - something KB Shortcut for UI should be more obvious There should be a button to show hide "UI" at the top for newbs Layers panels usually needs to be very tall, I want to dock it side by side to the other UI panels - docked, not free floating And therefore separate button / KB shortcut for layers Much of this is more or less (sans docking to workframe) illy UX, if I remember right, and it has been helpful. T
-
 Please please please please add this super important functionality to layers palette: When using the Move (V) tool, pressing 0 through 9 sets the current layer/s' opacity to the following: 0 = 100% 9 = 90% 8 = 80% 7 = 70% 6 = 60% 5 = 50%, etc. for remaining numbers. Now if you press two digits within a certain timeframe, then it interprets those two digits as a more specific opacity value: 05 = 5% 09 = 9% 38 = 38% etc... Additionally, pressing "Shift +" and "Shift -" cycles forwards or backwards through the Blend/Transfer modes. These two sets of keyboard equivalents speed up my ideation and production process by orders of magnitude... Whatddya say @MattP? Pleeeeeeeease :D :D :D
 -
I've been trying to use the Option+drag method of duplicating a layer within the Layers palette, but it doesn't seem to work. Is this a bug or missing feature? Thanks guys!
-
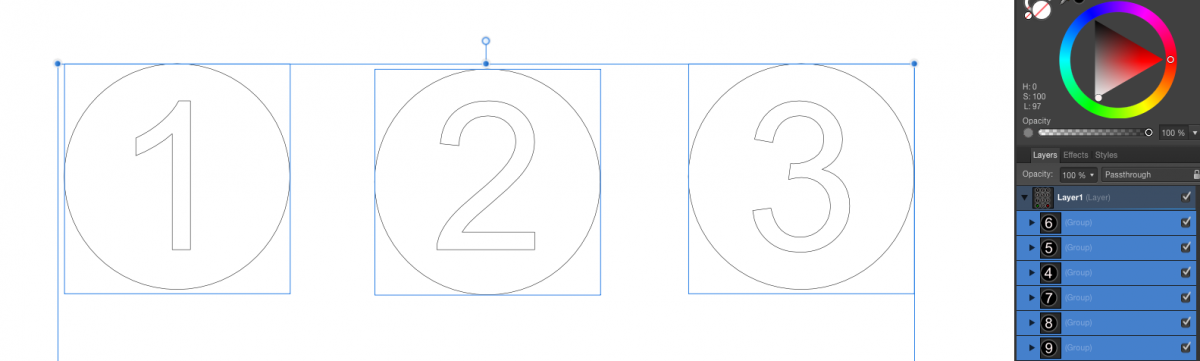
 Hi, I'm really loving this so far. Ran into a roadblock today: I've created several layer groups, each of a black circle with a white number in it. Very simple -- think calculator buttons. They are all on the same page which I set up as an iPad Retina project. I want to set up slices for each of the identical calculator buttons so I can export them all at once into PNGs for my project. I go to export persona, select all the layers, and select "create slices". This works*** Except I notice that the slices are slightly different sizes. For example some are 142x142 and some are 141x141 and some are 141x142 etc... So I went back to draw personal and noticed that the layer groups were also different sizes, even though they were made with the exact same copies of the original surrounding circle with a number in it. I thought, maybe I can go through and make sure they are all the same size, but as soon as I do that the circle and number inside gets stretched. I can clearly see on the screen that that layer boundary is not touching one side of the circle on some of them, but there appears nothing I can do about it? It's important that all my slices are exactly the same size. Any advice? Thanks for the help! PS. I've added a screen capture to show how Affinity has chosen layers sizes differently for identical objects. *** (Note that before I grouped each number with its circle, the layers-to-slices function stopped working and kept putting all slices in the same place, or then it started putting them in the the complete wrong place. I downloaded the beta to see if it fixed anything and it did't. So I grouped each number with their surrounding circles and the slice from layer function started working again).
-
Drag n Drop and Duplicate FX among layers
ronnyb posted a topic in Older Feedback & Suggestion Posts
Would be great to have drag-and-droppable FX icons in AD's UI to move effects from one layer to another and duplicate the effects by holding down the option key and dragging the FX icon onto another layer. -
PASSWORDS! This isn't really a great piece of work. It's more, a piece of my mind. Basically I have a bad short term memory and HAVE A HARD TIME trying to remember them all...banks, work, phone, email, forums, Ebay, Amazon, iTunes, Antivirus, Pinterest, yadda, yadda ya....Rant over! This is best viewed at, whilst listening to Transient from their Blue Album by Orbital Roll on Affinity Publisher! Happy 2015
-
Hi, I'm getting used to it (switching from photoshop) but there is one thing that I think should be little bit twicked. All this export persona and slices works awesome. But when You want to export some slice, but not only one layer, but some area, You need to switch to "pixel persona" a switch on/off layers that You don't want/do want. Maybe this hiding layes feature should be also in layer tree at "export persona"? It will be much faster when You want to export some croped area. Or I'm just doing something wrong? @edit And maybe one more thing related to "export persona". When You unselect slice, it should disappear from viewport. When You have a lot of slices, there is huge viusal mess.