Search the Community
Showing results for tags 'Affinity designer'.
-
 Hello guys! There are only FIVE days left of the Vectober Event! 😬 Come participate while there's still time, as the tutorials will be available until October 31st! Today we are on DAY 27 where the Parrot Design is created! 🦜 Did you like it? So join us by going to the link http://vectober.com! Enjoy! 😉
-
Hello my friends! ☺️ Countdown to end of Vectober Event! Come participate while there's still time! We are on the 26th with the Pearl Design! 🤘 Take on this challenge and show us your talent by accessing the link http://vectober.com! Join us! 🤗
-
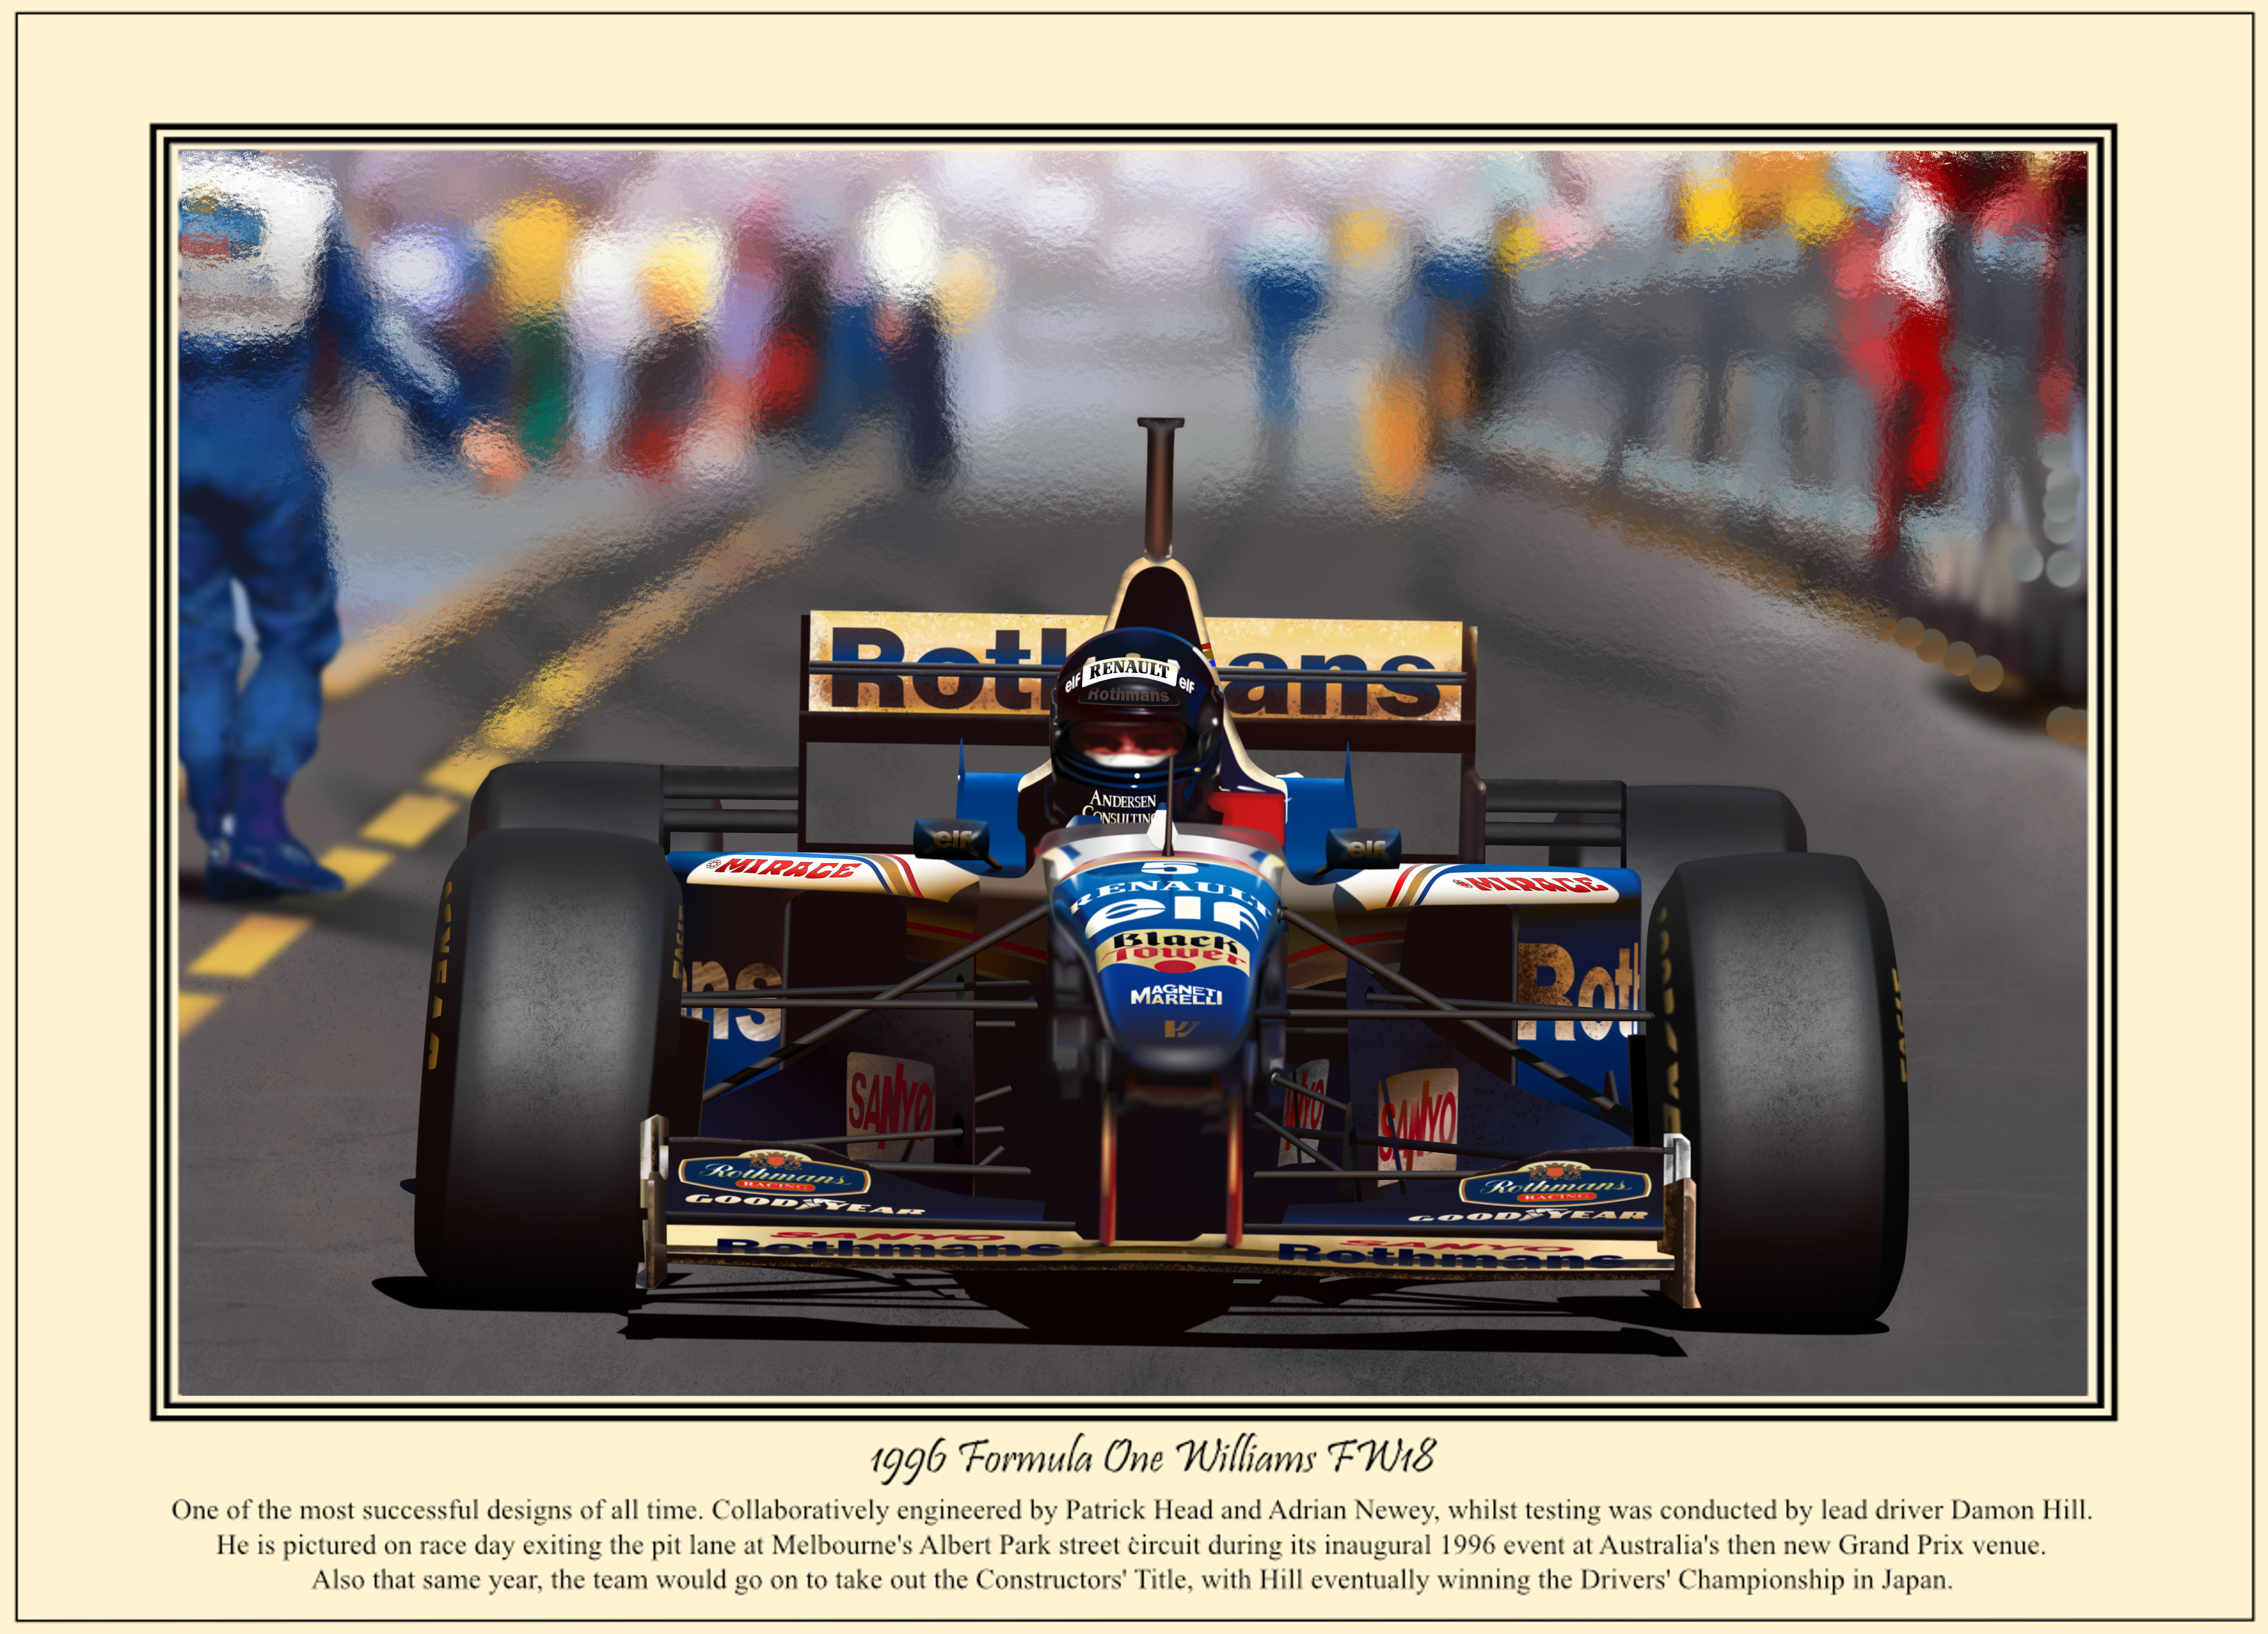
As an avid fan of Formula 1 racing, I practically grew up listening to the great man's commentary alongside his hilarious Murray'isms "Unless I'm very much mistaken... and yes I am very much mistaken," "And now excuse me while I interrupt myself" "The first four cars are both on the same tyres" "Tambay's hopes, which were absolutely nil before, are absolutely zero now" "I imagine that the conditions in those cars today are totally unimaginable" "With half the race gone, there is half the race still to go". Including this TV commercial https://www.youtube.com/watch?v=93igduisgzY Over the intervening months since his passing earlier in the year, I've been off and on developing this drawing in AD as a personal tribute. EDIT: Please take note that the elaborate Rothman's badge either side of the front wing and back of the foreground figure, is free stock vectorized content. It's inclusion is simply due too the intricate calligraphy that I was unable to replicate accurately although all remaining elements of the drawing is my work.
-
 Title: When The Rocks Hide Us #001 Media: Digital - Infinity Designer Dimension: 3000px x 3000px
-
Hello guys! 🤗 It's the 25th of Vectober and I challenge you to use all your creativity in today's challenge, which is to create a starfish design! Come join the event by accessing the link http://vectober.com and show us your art! Do not waste time! Challenge tutorials available until October 31st! 🐱🏍 Hope to see you there! 🤘
-
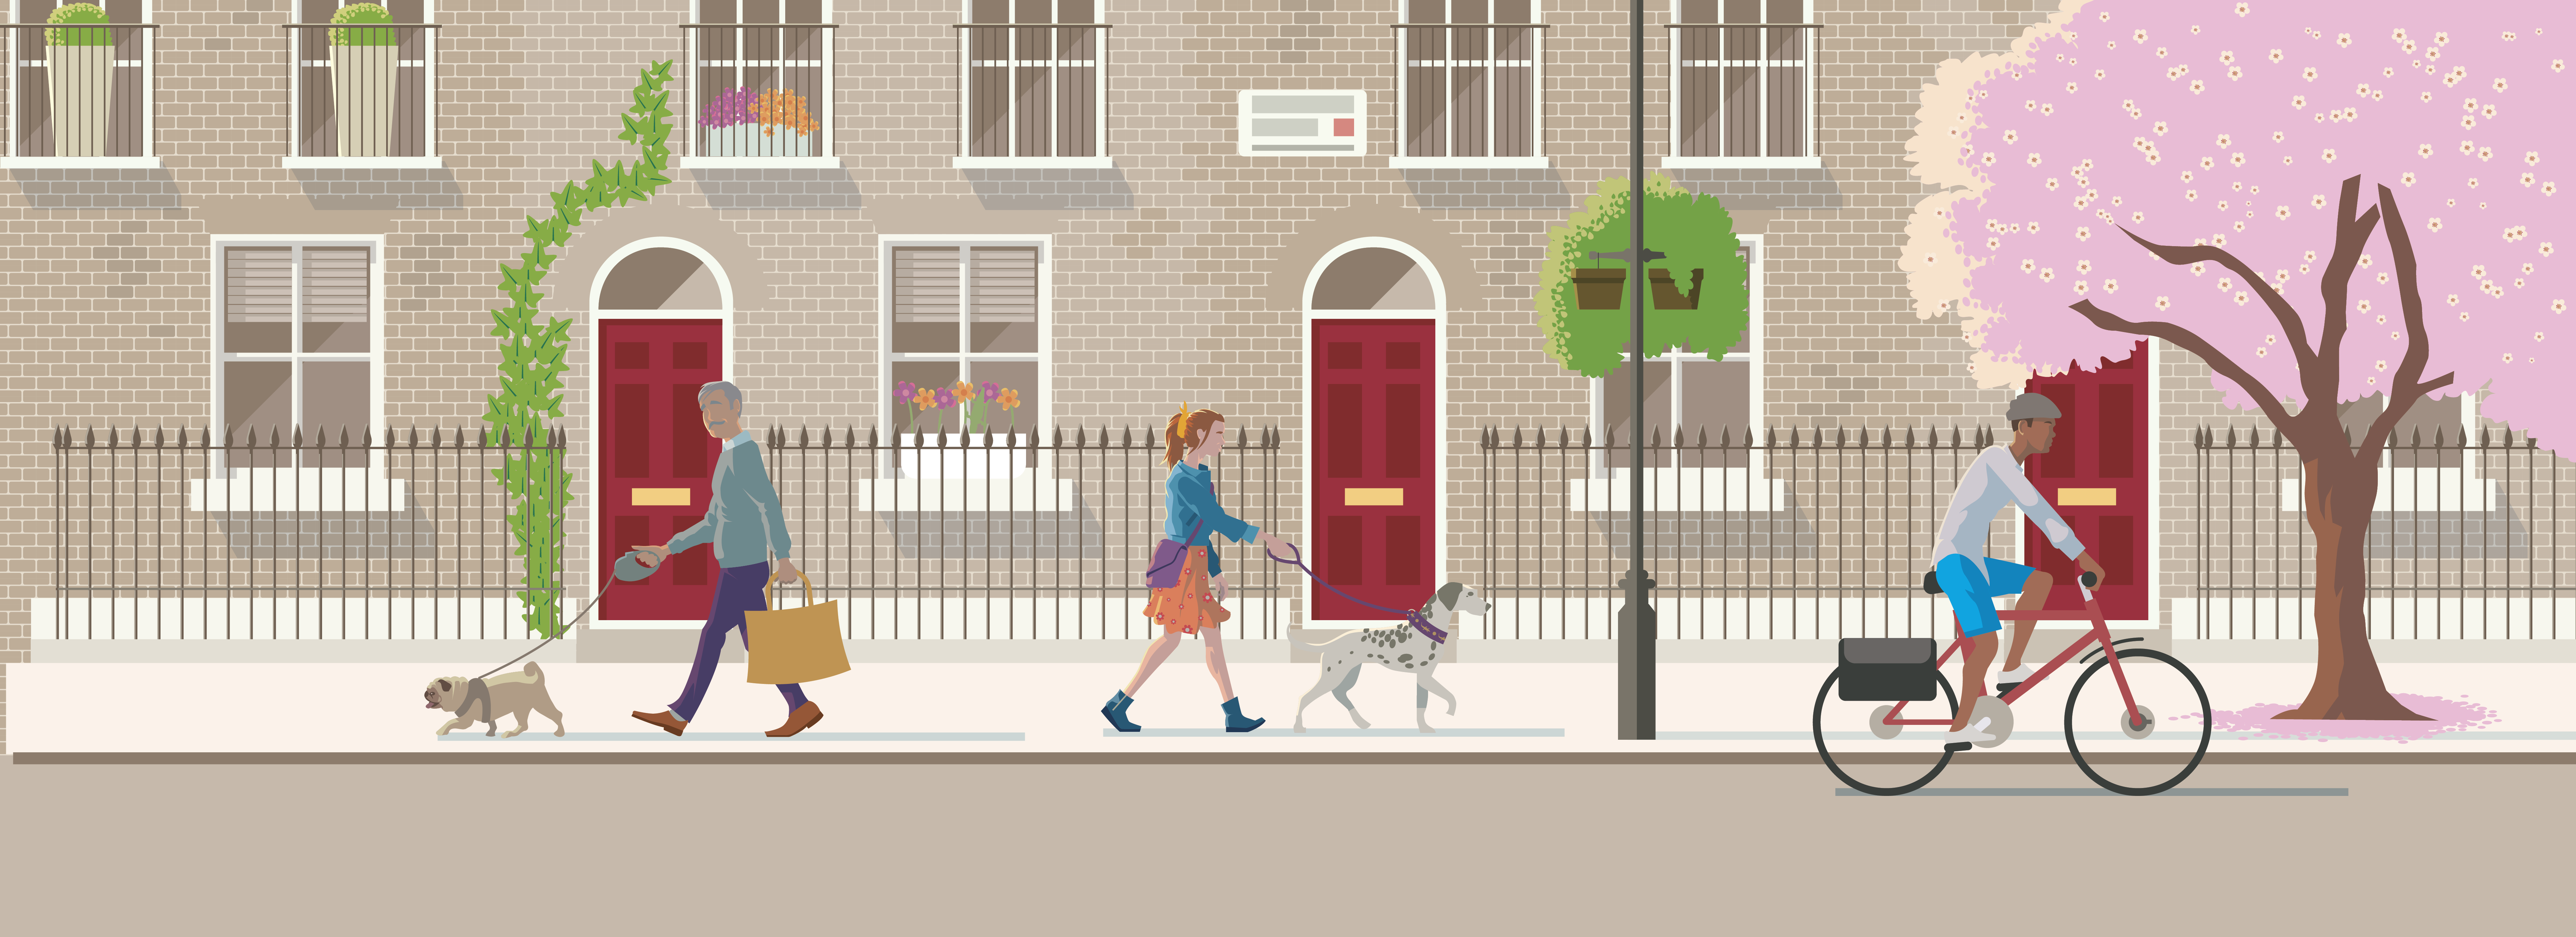
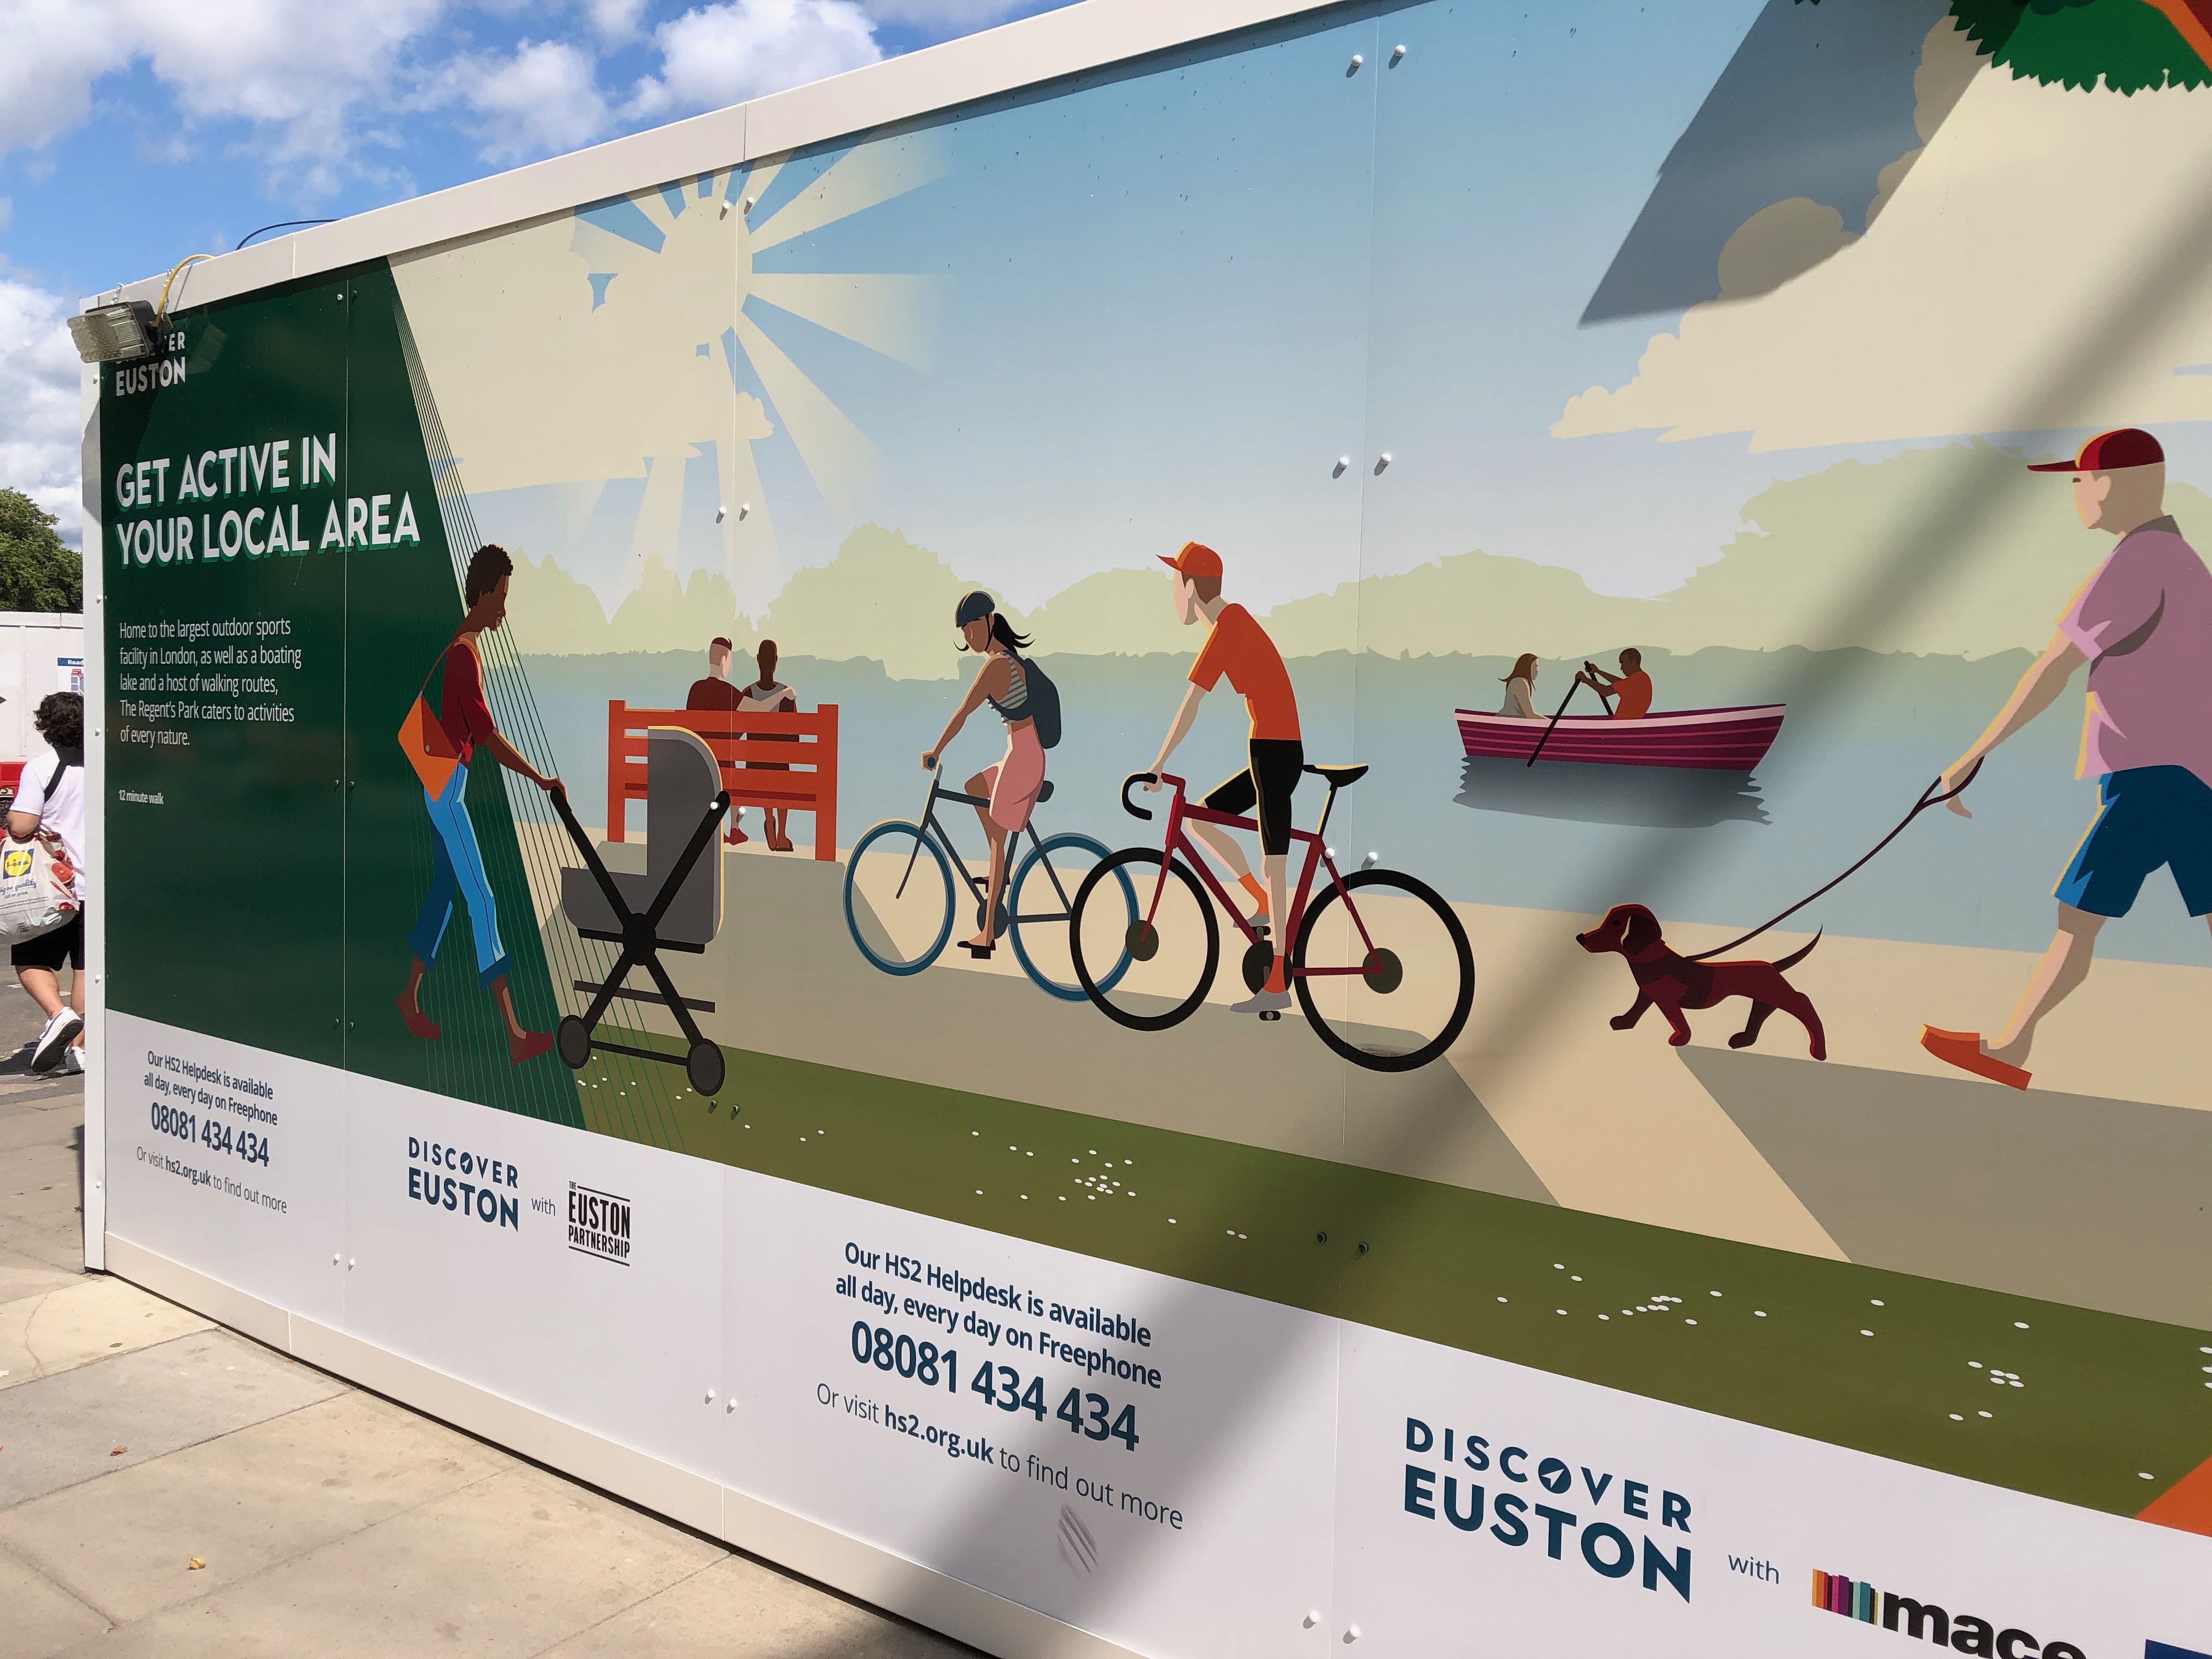
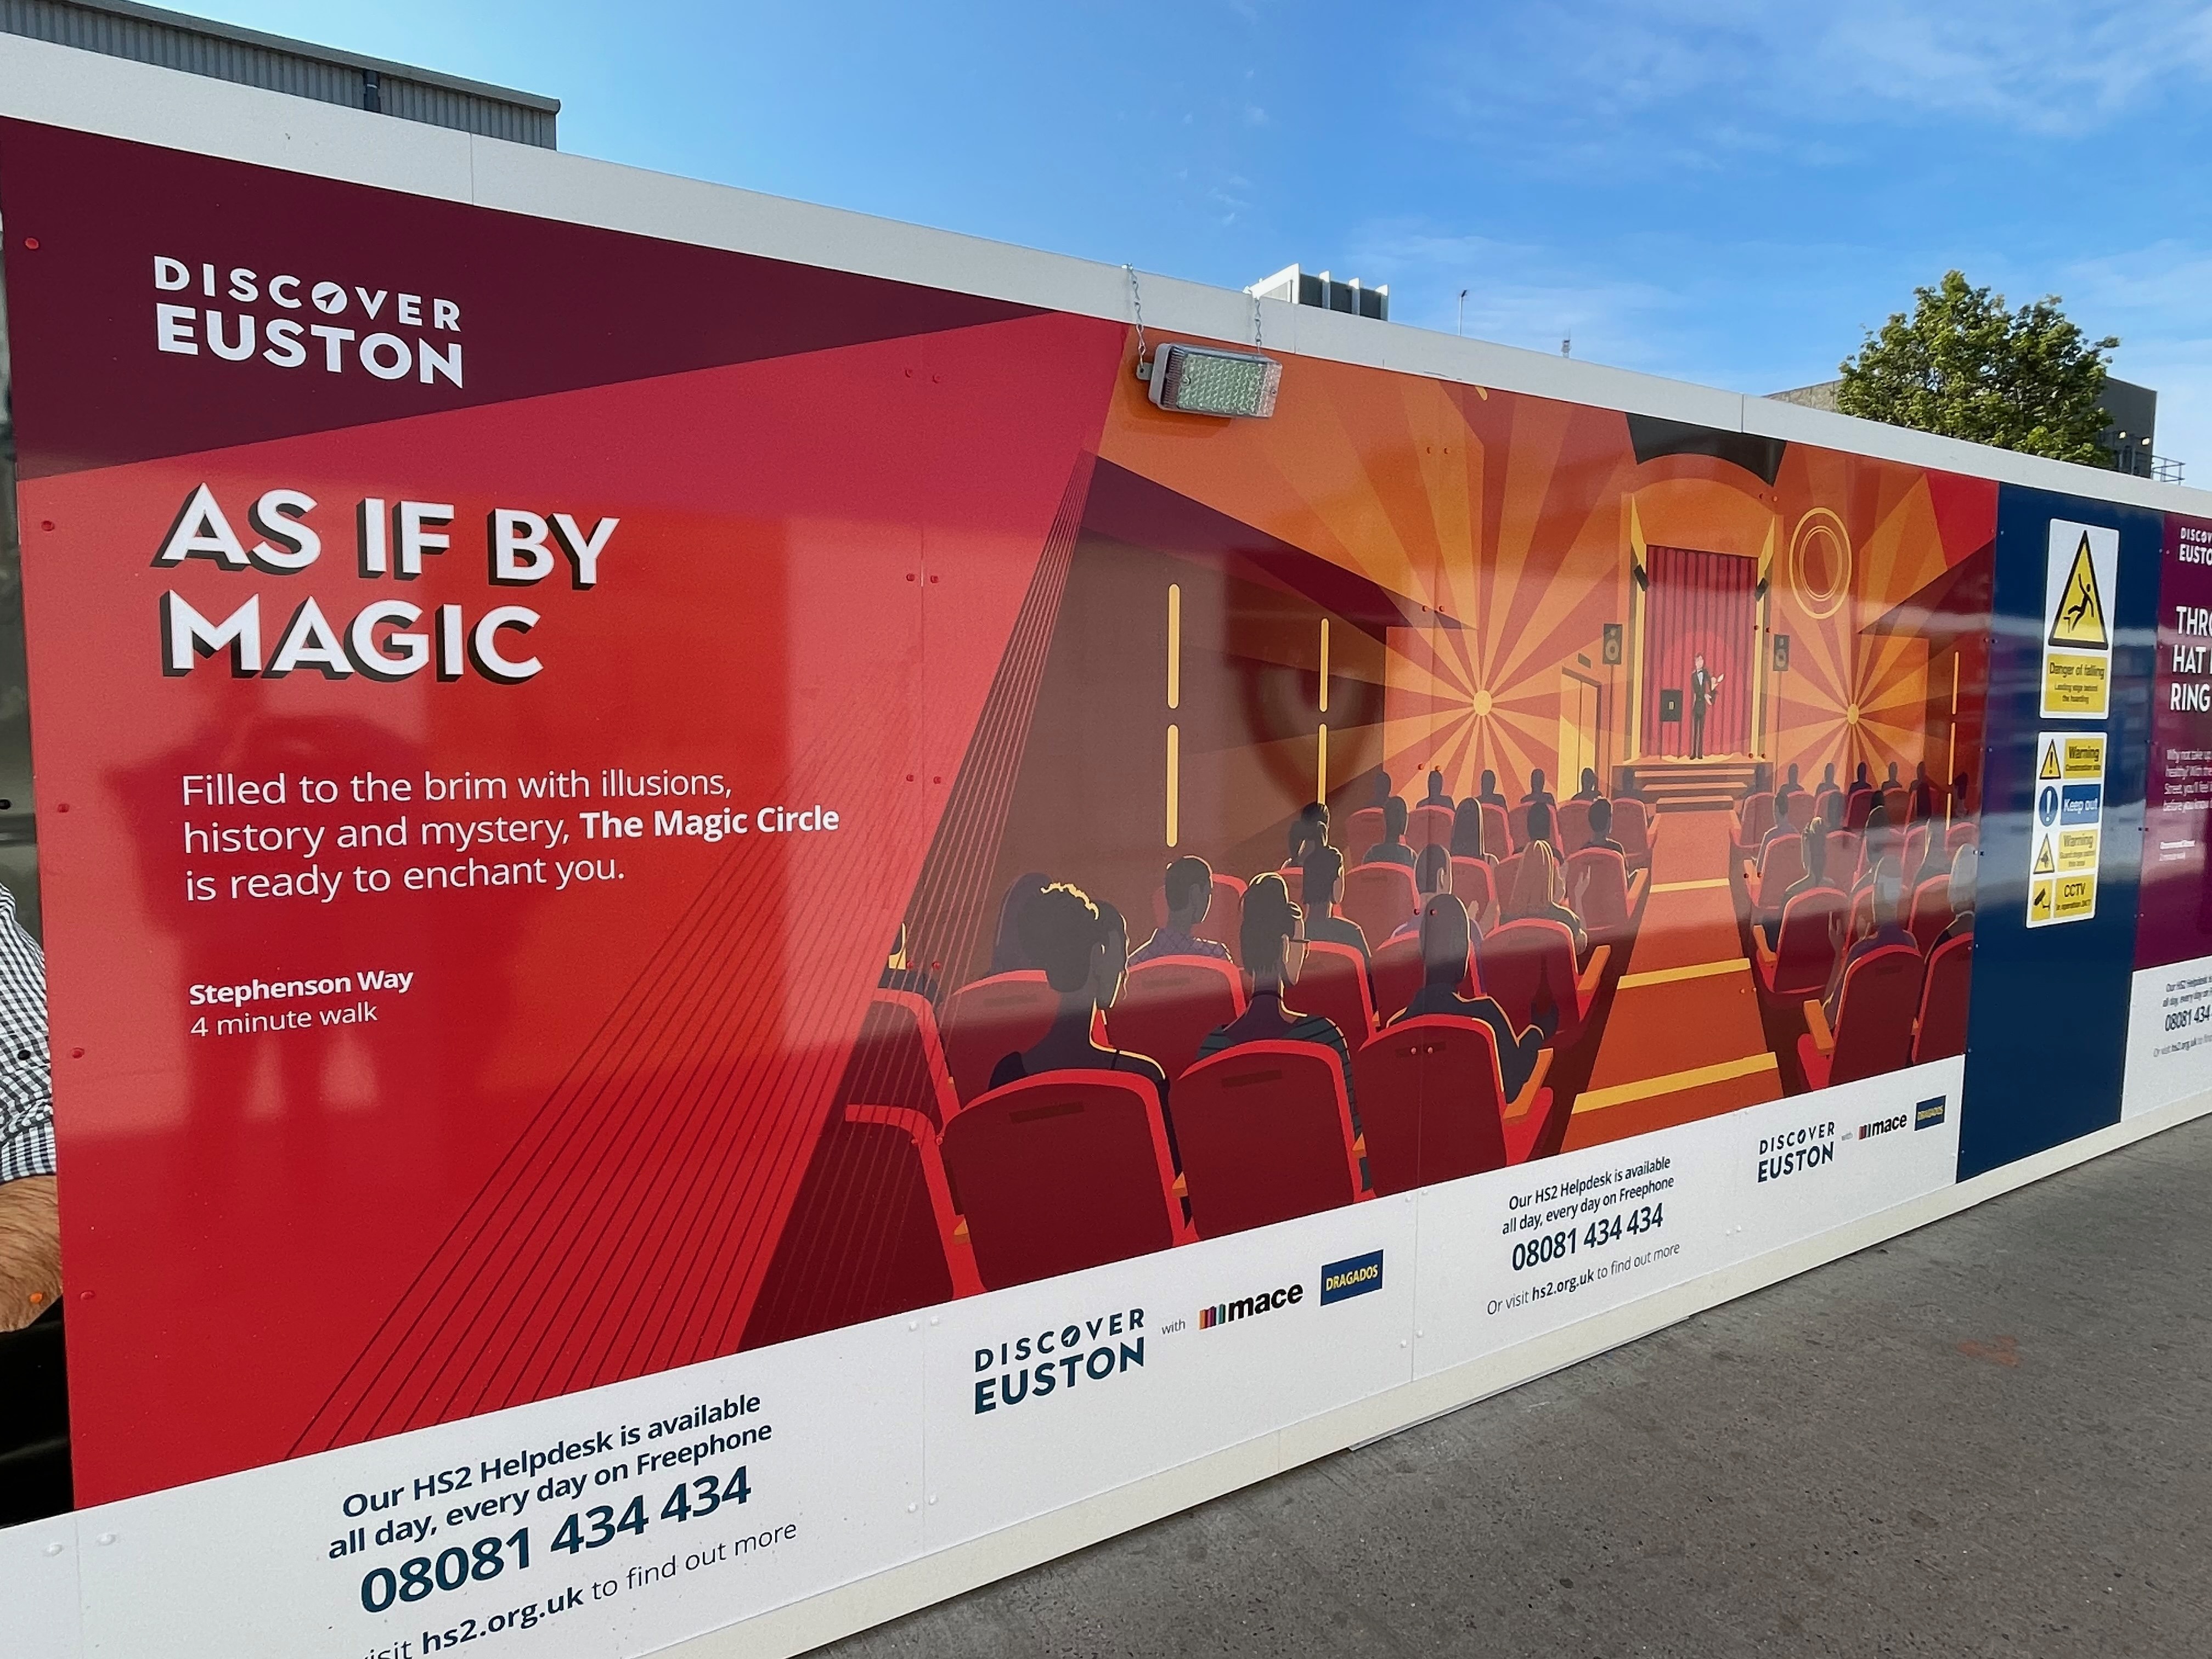
I was recently commissioned to create a set of illustrations to go on construction hoardings around the Euston Station (London) area. I picked Affinity Designer as my weapon of choice, and the results can be seen if you take a wander around the district. The one small production bummer was that the agency doing the artwork insisted on AI files so I have to convert them all before sending them out. Even despite that I would still have used Affinity for these as it's just a much nicer illustration tool than Adobe. I think these would have taken me twice as long in Illustrator, and given me a migraine along the way.
-
How about making an art like this? 🤩 Join us on Vectober and learn various techniques and tips to deepen your knowledge of the Affinity Designer tool! 🚀 Do not waste time! We are already on the 24th where the challenge is to create a crab from scratch! Come participate by accessing the link http://vectober.com! Hope you like it! 🤗
-
 So see attached images. Designer on iPad When I first select the pen tool - whether on opening a file or after using a different tool... Both places where line thickness is indicated Show it as 0 pt. 0 pt remains on display when I place the first node. (In a way that makes a weird kind of nonsensical logic because I’ve not actually drawn a line yet, I suppose). add a second node and hey presto, the app shares a secret with me, but only in one of the two places. The secret is the thickness the line is set to. add a third node and the second place line thickness is ‘shown’ decides to fess up on the secret too. so I alter the line thickness.. I’ve not diligently examined this. I think it often, but not always, shows the line thickness setting in the studio bar, but the pop-up at the bottom doesn’t until well into drawing. it then always reverts to being a secret every time I deselect the pen tool... so my questions are: Is this how it’s supposed to behave? if yes, then Why is the line thickness the pen tool is set to a secret until I start drawing? (iPad 12.9", 4th gen, ios13)
-
Hi guys! 🤓 Let's enter the world of Affinity Designer together! At Vectober you have a different challenge every day! We are already on the twenty-third day where the Whale Design challenge is created! 🐳 Come check out this completely free Event by accessing the link http://vectober.com! Cheers! 😍
-
Hallo. In meinem neuen MAGAZIN62 - Heft Nr. 7 habe ich mal auf 24 Seiten für alle Affinity Designer - Einsteiger einige Grundlagen zusammengefasst, die man für das Arbeiten mit dem tollen Programm benötigt. https://magazin62.de/
-
Hello my friends! Awaken the art within you! Come join the Vectober Challenge Tutorials, and send us your art for feedback and tips! So you want to learn various techniques from Affinity Designer? So don't waste your time and join us! We are on Day 22 of this Event where a Boat Design is created from scratch! The link to access Vectober is http://vectober.com! Bye!
-
 Firstly I know very little about scaling images, so it is possible that my concerns are groundless. The issue is this. I am using Affinity Designer for this particular purpose, but the question is of use for other projects with other Affinity Software too. I have found that there are a pair of very nice webcam feeds from a station, in fact a present terminus, on a heritage railway line. The second one is perhaps more interesting usually, but the different angle relative to the track on the first one is good in some circumstances. https://www.ipcamlive.com/broadway1 https://www.ipcamlive.com/broadway2 No trains today, but there are planned to be over the weekend. https://www.gwsr.com/planning_your_visit/what_to_see_and_do/locomotive_roster.html https://www.gwsr.com/ The railway is single line, but with two tracks at a few places, as here. Trains arrive from the right of the picture and on the track next to the station building. If the train is locomotive hauled, the locomotive goes beyond both cameras, is uncoupled and runs round the train so that it can pull the train back the other way. If the train is a railcar set then the driver goes to the cab at the other end, so no uncoupling or run round. For background information in case you might like to go virtual trainspotting, https://www.gwsr.com/planning_your_visit/visiting_gwsr/2021_Calendar_and_Timetables.html https://www.gwsr.com/planning_your_visit/what_to_see_and_do/locomotive_roster.html However, the issue here is that I can get a Print Screen image from the webcam and I can use it to make a greetings card using the Papier facility and I can then frame the greetings card in a frame from Tesco delivered with the grocery. So all done from home. The issues is that the webcam image does not have the same pixel size as needed for the greetings card, nor indeed the same aspect ratio. So either I get all the picture and some white space on the card, or I get to fill the card yet lose some of the picture, or I lose some of the picture and also get some white space. The webcam can be set to full screen view, which on my computer gives a Print Screen image that is 1366 pixels by 768 pixels, so 16:9 which is an aspect ratio ofabout 1.77 to 1.00 The images for the greetings card is 2171 pixels by 1571 pixels which includes bleed areas, so giving a card 7 inches by 5 inches with 3 millimetre bleed areas, so an aspect ratio of about 1.38. Maybe it is not the best way to do it, so I am open to advice, but I have been pasting the Print Screen image from the clipboard into Microsoft Paint and saving as a png file with the locomotive number, the date and time and possibly a bit of extra information, such as stationary or in motion all in a long file name so as to know which image is which.. So I start with a blank canvas of 2171 pixels by 1571 pixels at 300 dots per inch and I place the png image onto the canvas and then centre it on the page. So I could have that as the finished artwork, produce a jpg image, upload to the template at the Papier webspace, add some information about the image, locomotive, place, date, time, other as I choose where the greeting goes, one can change the font to Garamond, black, letter spacing 1.0 and it looks very different from the placeholder text. https://www.papier.com/landscape-photo-313 There is a Customise button that takes one to a blank canvas, one can upload a jpg file. Notwithstanding the advertising as a photo card and to send the card to someone else as a greetings card, it is possible to use a jpg file of artwork, and send it to oneself as an art print for framing. The issue that I am asking about is what if I want to scale the card to get a larger image. Previously, both with a picture from the webcam and with artwork I have only scaled by exactly two times or exactly by three times. I know that that can make it blocky but I wanted some prints of bitmap artwork from many years ago and it was risk blocky or go without, but, whilst recognising that I do not have expertise in assessing printed images, from my hobbyist artist standpoint, the prints that I got look very good. So what I am concerned about is if I scale by some real number, such as 2171 divided by 1366, which is 1.589, will I get sort of funny effects in the print due to rounding or whatever it might be called? What scaling is considered sfe and what is not if starting with a bitmap image please? That way I can choose the best scale to balance getting a good picture to frame against losing some of the detail around the edges. William ,
 -
 I saw this reported in the past but find no solution. I have version 1.9.1.979 running on Windows desktop. I can no longer drag layers up and down in the layers panel because the panel will not scroll. It doesn't matter how I position the mouse when I move it up or down. This worked before and I am not sure when it stopped. I even created a simple file with just 10 blank layers and tried to move layer 1 to layer 10 to scroll the panel but it would not. If I scroll the mouse wheel while dragging the layer, the panel will scroll but this is very cumbersome. I cannot find any setting related to this. Auto-scroll is on but my understanding is that this has nothing to do with the problem I am describing.
 -
Hello Everyone! 😄 For those who want to deepen their knowledge of Affinity Designer join us on Vectober, where challenging tutorials are rolling EVERY DAY! Today we are on the 21st with Island Design! Come participate and share with us all your talent! 😆 Interested? Access the link http://vectober.com and check it out! See you Later! 🤗
-
The font is available from the following thread. https://forum.high-logic.com/viewtopic.php?f=10&t=4695 William
-
 I'm working on horizontal A4 size art board and when I print it, it doesn't fully print. Somehow, A4 paper size in print option is shorter than actual art board that is the same size. I tried to change the options in Affinity and printer itself's options, but both doesn't solve the problem. What should I do?
-
Hi guys! 😆 Creating designs has never been easier with Affinity, has it? Come have fun and learn with Vectober's challenge tutorials! We're already on the 20th with the Queen's Design! You can join Vectober by clicking the link http://vectober.com! Bye! 😘
-
William These asterisks are not part of the poem: they are included so that in the event of any reviews being added to this thread, any new reader may, if he or she so chooses, read the poem and consider the poem uninfluenced by any reviews before perhaps adding his or her own review to this thread. * * * * * * * * * * * * * * * * * * * * * * * * * *
-
An illustration for a Christmas mug for one of the grandchildren.......
-
Hi! For those of you looking to improve your knowledge of Affinity Design, but don't know where to start. Join us on Vectober! There every day there is a different challenge for you to learn a lot! Today we are on the nineteenth with Ring Design! Hey did you like it? So don't waste your time and go to the link http://vectober.com! See you!
-
Hello, If you guys could add these contrast ratio feature in Affinity, it would be a really great tool. Here are some links that checks the contrast of background and foreground color. https://coolors.co/contrast-checker/112a46-acc8e5 https://colourcontrast.cc/ https://webaim.org/resources/contrastchecker/ I also attached a video explaining the feature request. Regards, Hossein Affinity-Feature-Request.mp4
- 7 replies
-
- 5
-

-
- color wheel
- contrast
- (and 5 more)
-
Hello guys! 😆 It's DAY 18 of Vectober, with the awesome Dwarf Challenge tutorial! Don't miss this super cool and fun event, check it out while it's still on! 👊 to join us visit this link below www.vectober.com I hope to see you on this journey! 🥰
-
 Is there something similar to the donut tool to create a rectangular 'picture frame' effect?
 -
V E C T O B E R Day 17 Spider! 🕷 In this completely free event, which will last until October 31st, in addition to learning many tips in the daily challenges, you can even submit your designs to receive feedback! 😍 💥 And attention we are using the NEW Marvelous vector brushes, released To join us visit this link below www.vectober.com Bye bye! 🤗
-
I wanted to avoid that pictured below when snapping a line to a rectangle with a stroke outline and without having to move the line behind the rectangle. The line snaps to the rectangle's bounding box, not its overall outline. The following workaround seems to do the job: Draw a rectangle with no stroke. Copy it. Select the copy and then select the Contour tool. Adjust the contour radius to suit, say -1mm. Select the original rectangle and change its fill colour. Place the contoured copy on top of the original rectangle and centralise it. Group the two together. It seems that resizing the group always maintains a 1mm gap between the two rectangular shapes. Optional - add to Assets for future use.