Search the Community
Showing results for 'ROMM RGB'.
-
I'm not entirely sure if this already exists but I've tried it several times. I'm an astrophotographer and in my editing flow I'm often manipulating individual RGB channels, compositing and then re-inserting them in. Or just adding in totally different images to RGB channels. So far I have to make a spare channel, name it. THen make a new white layer, then go in and load that spare channel into R, G or B. I think this is a really convoluted method where as in Photoshop you could literally click the channel, and hit paste to put the photo into the channel. If this already exists and I'm doing it wrong please inform me. But otherwise I would enjoy seeing this. Thanks
-

Massive problem with saving tga files with alpha channel
NotMyFault replied to IdleJohn's topic in V2 Bugs found on Windows
The trigger condition is simple: If mask is full black: TGA export is broken (mask is ignored, export is fully opaque). If mask is not fully black, but is only non-black where the pixel area is black: The exported TGA does not allow to recover RGB pixels. all RGB values get zeroed out. You may have any number of black mask pixels but you need at least one single pixel which is both not black in RGB channels and not black in alpha channel. Then the exported TGA file can be fully recovered in RGB channels. Tested on Mac with Photo V2. You milage may vary on iPad or V1 -
 Publisher creates really large PDF files, up to three times larger file sizes than InDesign. That is, a similar document with one large image, 300 dpi, LZW, RGB, 100 JPG compression: InDesign 1 Mb (Acrobat 5 or 8/9) and Publisher 3.4 Mb (Acrobat 8). What could be the reason? Publisher's PDF files sometimes have to be further compressed in Acrobat Pro 🤔
 -
 This is probably covered somewhere on the forum, but I couldn't find it. A recent forum discussion piqued my curiosity about AP's JPG compression algorithm regarding quality loss, file sizes, etc. So, I took an original image (from an old Canon 40D, 2538 x 3866 pixels) and exported to 8-bit RGB TIFF and 15 separate JPGs of varying quality levels (quality 0 to 100). I have generally used Quality 85% up to now, since it usually retains very acceptable quality with a significant reduction in file size. All the exported files are in the attached ZIP file. I picked an image with some fine details and some smoother areas, as JPG compression works differently in high and low frequency portions of the image. I found that anything below a quality of about 20–30% generally resulted in severe posterization and artifacts. JPG quality of 100% results in huge file sizes and is probably not required, except perhaps for special cases. Even lowering the JPG quality from 100% to 95% or 98% results in a significantly smaller file size. Interestingly, large portions of similar, low frequency color (e.g., skies, gradient backgrounds, smooth walls, etc) probably require higher quality levels to avoid visible posterization and artifacts. Higher frequency images can often get away with more compression (i.e., lower quality and smaller file sizes) without it being as noticeable. Below are the file sizes for the various JPG compression qualities (all files were 2538 x 3866 pixels in size). Different files will compress differently depending on saturation, brightness range, amount of detail, etc. JPG 0% 82KB JPG 5% 104KB JPG 10% 157KB JPG 20% 262KB (ones in red were generally pretty bad and resulted in extremely noticeable artifacts) JPG 30% 379KB JPG 40% 497KB JPG 50% 622KB (Not too bad, at least in this test image, but a little soft) JPG 60% 891KB JPG 70% 1.1MB JPG 80% 1.5MB (Acceptable quality in this test image) JPG 85% 1.9MB (A good compromise for my general needs, unless maximum file size reduction is critical) JPG 90% 2.5MB JPG 95% 3.8MB JPG 98% 5.9MB JPG 100% 9.8MB TIFF 8-BIT 15.5MB (no compression) If smaller file sizes are critical, I'd be inclined to reduce JPG Quality level to 50% or even lower, depending on the image, especially on images that are mostly higher frequency. Where gradients and smooth, similarly colored areas are prominent, you may wish 50% or higher. On size doesn't fit all, so some experimentation is usually in order. JPG Quality-Filesize Comparisons.zip
 -

Black ink fill rate control in CMYK?
lacerto replied to mykee's topic in Affinity on Desktop Questions (macOS and Windows)
I am not sure if Softproof adjustment is something the messes this up for you (at least it should be turned off when you export). But Affinity Publisher is really quite lost when checking effect of effects 🙂 The following demonstrates how it wrongly reports an RGB 0,0,0 shadow with low opacity as excessive ink usage (so just staring at naive conversion of RGB 0, 0, 0, not taking into account the opacity level), while it totally ignores the effect of K99 shadow (not in itself causing excessive ink alarm, but because of having Multiply blend effect, will mix with underlying colors so that the TAC limit is exceeded): effectofeffects.mp4 So, the cause of effective TAC becoming too heavy in your design might be either in leaving Softproof adjustment on when exporting and messing up the colors, or using shadow effects with RGB 0, 0, 0 (becoming four color CMYK when converted) with Multiply effect. You could try if defining the shadow color as something like K99 and lower opacity level makes the job pass within the defined TAC limits. -
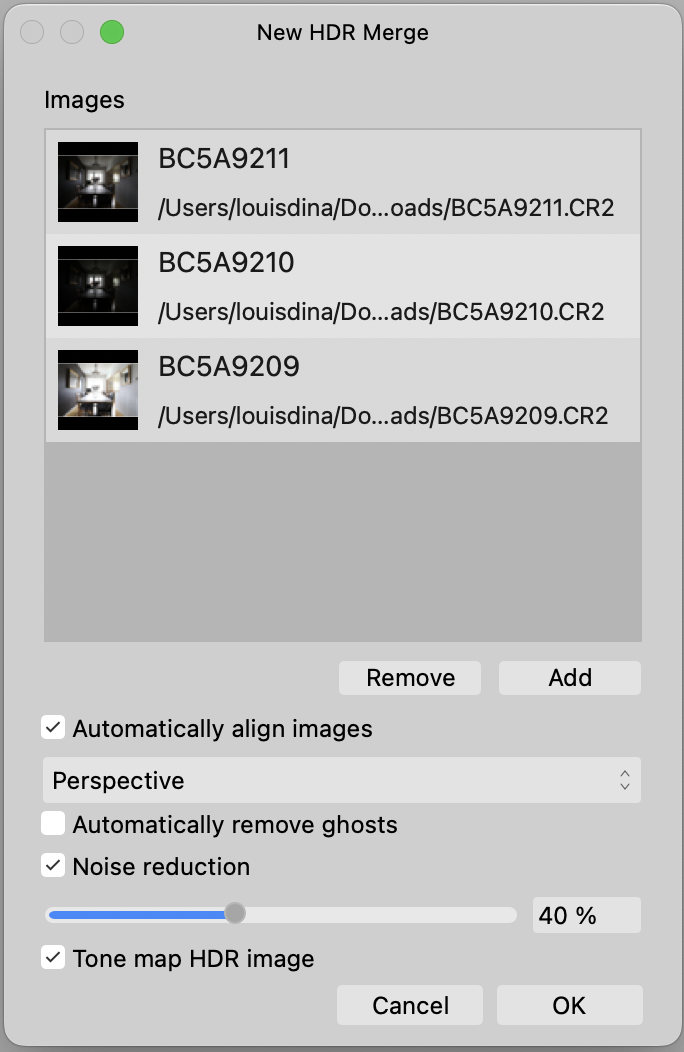
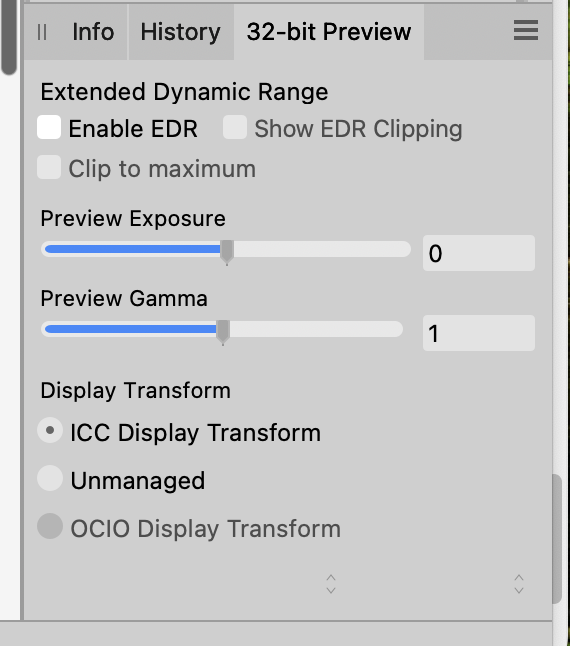
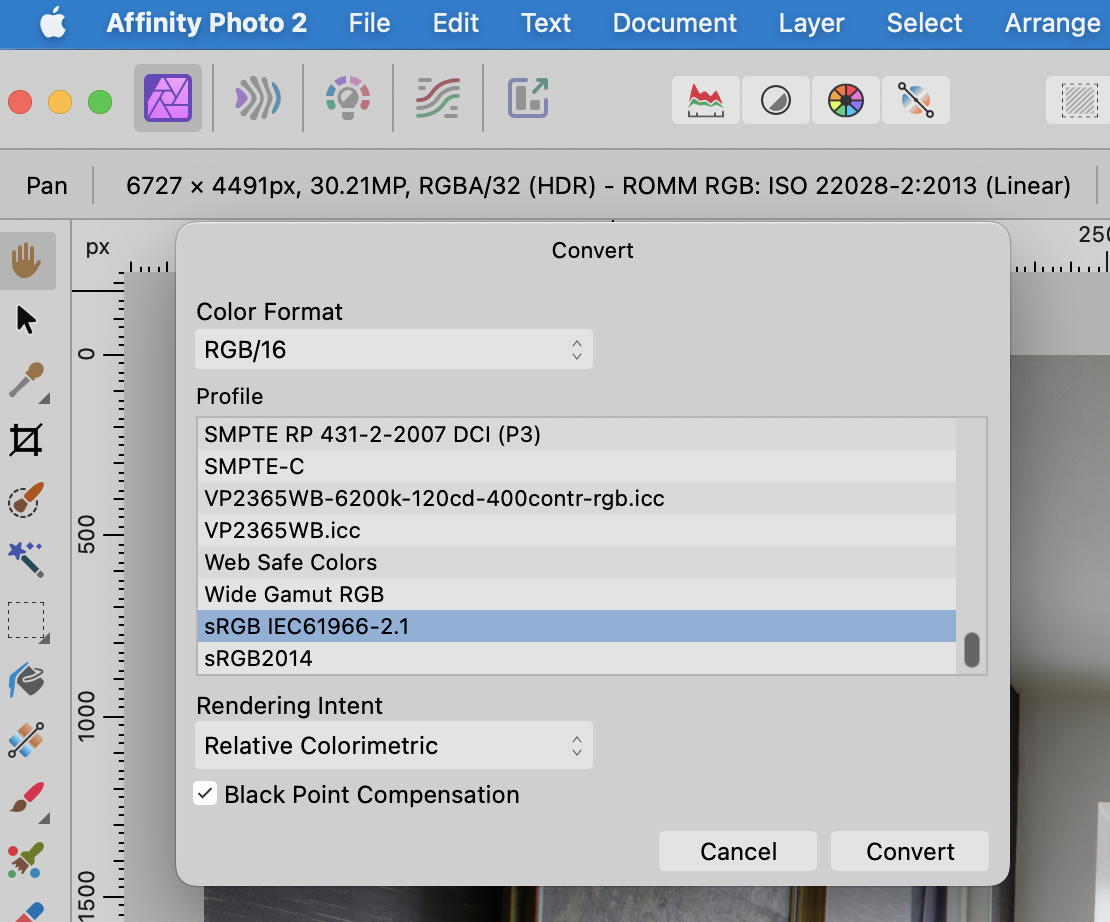
@Max89 OK...first, what is your final delivered file format going to be? Standard JPG, PNG, TIFF, 8 bit, sRGB, etc? If your final format will be, for example, an 8 bit, sRGB JPG, here's one workflow... Create a new HDR image, add files, and leave it per the attached screenshot, then click OK. This will import, align, noise reduce your RAW images and send your file directly to the Tone Mapping Persona. In the lower righthand Studio, you will see the 32 bit Preview panel. If your end product is a standard JPG (which only supports standard dynamic range, i.e., 0–1 values), make sure you have the same settings as shown below. Next, make whatever adjustments you wish to make in the Tone Mapping Persona to sculpt tonal range, color, saturation, etc. When you are happy with your adjustments, click Apply. This will deliver a 32 bit, linear gamma (1.0 gamma) file to Affinity Photo in your chosen color space (sRGB, Adobe RGB, etc...whatever you chose initially). This will be a single, flattened pixel layer. In the screenshot below, you can see that the Tone Mapping persona delivered a RGBA.32 bit HDR file in ROMM RGB to Photo. I'd immediately convert the file to 8 or 16 bit (both of which are 2.2 gamma and limited to 0-1 standard dynamic range). I'd also chose your final color space. sRGB is probably the best overall choice if you plan on posting images online. Document > Convert Format / ICC Profile. Below, I chose RGB/16 and sRGB. Now that you are in a file space compatible with JPG, PNG, TIFF, etc, feel free to "edit away", adding adjustment layers, live filters, or whatever. The appearance should be preserved when saving and exporting. Export to JPG, sRGB, etc. That should do the trick. Your final JPG will be 8-bit, sRGB and should match what you see in AFPhoto.

-
I could provide a procedural texture filter which generates RGB black from cmyk K only black, and leaves all other colors for Affinity default conversion. Assuming that the document color format is cmyk and jpg export is RGB.
-
 I don't think there is "a" setting to do that, because 0/0/0/100 is not RGB #00000000 in general. For an sRGB document, for example, RGB 00000000 is CMYK 72/68/67/88.
-

Artefacts using Natural Pencil brushes - Affinity Photo
Art51 replied to Art51's topic in V2 Bugs found on macOS
G'day NotMyFault, No, I haven't tried that. I'm working in RGB/8. As it happens, right now, I've been drawing for about 40mins without a single beachball. I had a feeling there was something being cleared by the system every few minutes and so as a test I changed my RAM usage and disk warning limits from 32GB to 22GB each and I also upped my Undo Limit to 500 (it was 131 beforehand). I don't want to jinx things, but this seems to have worked. I reckon if it was going to stall or beachball it would have done it by now. If anything changes I'll post again. Hopefully this might be helpful to folk in a similar situation. -
It's 2023 and we still get frequent request to "edit the alpha channel as normal color channel", and export / import files where the alpha channel is used for e.g. depth information (z-axis) or something else / not for alpha. I support these feature requests to allow easier editing of alfa channels using all brushes, filters, adjustments etc. Never the less, it is perfectly possible to do this even today with Affinity Photo, Designer both in V1 and V2. Opening a file The key is to separate alpha channel as greyscale layer once you open such a file, and fill the alpha channel to recover RGB pixel values where alpha was 0. Open a TGA, PNG, TIFF file which contains exactly one RGBA layer. Assuming the layer name is "background" Use channels panel, click on background alpha, and "create greyscale layer" Use channels panel, click on background alpha, and "fill alpha" Rename the greyscale layer to "alpha" You can now edit the alpha layer with all tools. Notes: keep the alpha channel in background always at 100% (if not: channels panel->fill). keep the alpha layer in greyscale (all pixel should have identical values for R and G and B channel for one pixel, do not colorise) (if not->HSL adjustment, set SAT to 0, merge down) In case you want to see the alpha channel acting as traditional alpha channel: Create a channel mixer adjustment Choose alpha channel (output) Set "red" input to 100% (all color channels should have identical values) set „alpha“ input to 0 Nest channel mixer layer in masking position to alpha layer Nest alpha layer to background layer You can continue to edit both layers individually, but you see a preview of the document using alpha layer as alpha channel. Exporting the file To export the file: unnest the alpha channel layer from background layer, move it to top rasterise to mask The file should have exactly 2 layers: alpha on top (mask layer), background on bottom (RGB channels, alpha filled 100%) Export as TGA, PNG, TIFF etc Closing notes Gamma is not handled correctly for alpha channel when simply mapping from alpha to color channel or vice versa. RGB channels need gamma correction (normally 2.2), whereas alpha stays linear for rendering. If the difference is critical, you can correct the gamma with help of a procedural texture filter. I have tested the import and export steps repeatedly with TGA files in Photo V1.10, V2.04, V2.1 This method was not invented by me, I simply wrote this tutorial to have a URL which I can use if someone raises questions or feature request concerning this topic. Edge case (added 24.04.2024) It is not possible to correctly export with empty mask (alpha zero for all pixels).
-
Black ink fill rate control in CMYK?
lacerto replied to mykee's topic in Affinity on Desktop Questions (macOS and Windows)
Yes, I agree that it would be appropriate to default the effect color to the document color mode (I guess the app just remembers the last used color model?). The preflight calculator should of course also apply color profile based conversion instead of naive conversion RGB value to CMYK, and should naturally consider the effect of opacity and blend mode. As it is now, the warning is, as demonstrated, often given for an RGB based effect color using an opacity setting, and even if there is no overlapping (that is, when the color is not blended with underlying colors), but not when the color (even with a K value) actually causes exceeding of the TAC limit because of the blending effect and underlying colors. -
I don't think this is a bug. If you Develop to a Raw layer (embedded or linked) rather than a pixel layer, then when you go back into the Develop Persona again you are re-developing your original Raw image. And part of Developing is changing the color space (to RGB-16 or RGB-32) and setting the color profile to the default color profile you've specified in your application Settings/Color. But perhaps there is room for improvement. I will be interested in seeing the thoughts from the Serif staff when they respond to your report.
-

Black ink fill rate control in CMYK?
mykee replied to mykee's topic in Affinity on Desktop Questions (macOS and Windows)
@lacerto In the case of Soft Proof, if I select an ICC of 300 that is similar to the original, it does not noticeably degrade the colours (e.g. you can see in the video that if I select Fogra39, which is not 300) it already improves the shadows. Although it's strange, because the point of Fogra39_VIGC_300 is exactly that it takes the richness back to 300 compared to the plain Fogra39, it's still the wrong one. For shading, however, it might be interesting to switch to CMYK color and not use rich black shadows. Although the ICC profile is supposed to soften, it doesn't for multiply. Or the other is that for a CMYK project, the program should offer CMYK black by default for effect shading, not RGB. Or convert them to ICC profile when exporting. Here's the video where it turns out that you should work in CMYK for shadows too, not use the default RGB as a routine. 20240425-152641.mp4 I must admit, until now I thought that if I worked in ICC 300 profile, whatever colour I specify, Affinity would convert it to the correct colors. Apparently it doesn't. -
Tested as follows: Image: RGB TIFF, No LZW (8-bit): 39 Mb, LZW (8-bit): 32 Mb InDesign: Image quality (JPEG) Max. LZW ON = 3,3 Mb LZW OFF = 3,3 Mb Publisher: Image quality (JPEG) 100 LZW ON = 13 Mb LZW OFF = 13 Mb JPG image quality 87 (no LZW) = 3 Mb
-
Black ink fill rate control in CMYK?
lacerto replied to mykee's topic in Affinity on Desktop Questions (macOS and Windows)
Odd, now that I tried, the macOS version of Publisher (2.4.2 on macOS Sonoma 14.4.1) does have native objects CMYK readings updated after a profile change, so perhaps it was just a temporary (memory related) issue. But for placed images, reopening is still necessary. I tested the profile you referred and it seems to operate correctly: limitingtacmacos.mp4 Color data seems to be very easily affected by memory issues. At some point I experienced problems (on macOS) where I could not get realtime CMYK readings (in Photo Persona accessed Info panel) at all for placed RGB objects, neither for native or placed RGB images. -
 Unable to convert RGB files to CMYK process despite multiple attempts. Each time, the file comes back in RGB. This is a new problem So far, everything was fine. What?
-
 As a game developer, I'm having an issue creating assets using Designer for use in a game. Consider this simple asset: If I export this as a small PNG in Designer, this is what the RGB layers look like before applying the alpha layer/transparency: However if I put this into an OpenGL game with texture filtering and the OpenGL render mode set to normal (i.e. not premultiplied src), all that black will be used in selecting resized pixels, resulting in black artifacts around the edges 😢 If instead I change the PNG's RGB to be ALL white, the RGB and A are correctly filtered and resized, and I get exactly what I'm looking for, a nice smooth result: From what I can tell, there are only three solutions: 1. Export images with extra bleed or a specific colour for transparent pixels. As far as I can tell Affinity Designer has no option for that, and I'll need to investigate additional software that can, further messing up my workflow. 2. Force your graphics software to export premultiplied alpha images, and use a premultiplied alpha render mode instead, and Affinity Designer doesn't support that. (Photo might have a filter or something that does?) 3. Stop using Affinity Designer and use different software that supports this use case. Ideally Affinity Designer would support option 1 or 2!
-
 Hello, I've got a document where the masks change (white patches appear) when the document's bit depth is changed from 8 bits to 16 bits. Hardware Acceleration/Open CL compute in Settings is turned off. Please check the attached file. Steps to reproduce: Open the file. Go to Document > Convert Format / ICC Profile... Change format from RGB/8 to RGB/16. Check the masks. White patches will appear in the masks. convert-to-16-bit-mask-changes.afphoto
 -
Welcome to the forum, @Hindsight. The task you are facing is not easy to achieve, and you already hit several limitations of Affinity software which require workarounds. In case you have a live stack group, opacity / layer transparency does work differently, becoming binary on/off. So you need to remove all layers from the stack first if you want to work with layer transparency. This is an intended functionality (which i personally don‘t like). For such extreme variations of lightness the HDR persona comes to its limits. Remember that is primarily intended to reduce strong contrasts and map all color values into the SDR (standard dynamic range). First you really work with source files of 16 or 32 bit color depth. Then stack the images and stay in RGB/32 color depth for all editing (except exporting, see below), and enable „ICC managed“ in 32-bit preview. It you’ll really help if you have a HDR capable GPU and display (supporting e.g. 1000nits max brightness and EDR/HDR with 32 bit input signals). You might need to hand-select the best fitting source files (and exclude some who spoil the result). Sometimes you may get better result manually adjusting the brightness with help of curves, levels, or other adjustments. If you want to finally export to jpeg (for social media), you then need a second HDR processing to reduce the dynamic range to 8 bit. There were some issues exporting directly from RGB/32 to RGB/8, so i prefer to save a copy of the file, do the final work ind tone map persona to reduce DR to SDR. Save again a copy, then open that file, convert dolor format to RGB/16 or RGB/8, and export the JPG (or JPGXL etc). It takes a lot of practice and expermientation to achieve good results.
-
 Hello, I am trying to export an Affinity Designer file into PDF and SVG while maintaining the color profile as RGB, but it is switching to CMYK when I do that and there is no box to maintain RGB. Will you please let me know how to export in the different file formats while maintaining the design and color? Thanks! You can see the original design in the AD file, and how it has changed the flower coloration when a PDF, as well as SVG, where it is completely messed up. 2. LOVE SAVES THE DAY for inflatable flat for printing color copy.afdesign 2. LOVE SAVES THE DAY for inflatable flat for printing color copy.pdf 2. LOVE SAVES THE DAY for inflatable flat for printing color copy.svg
 -
I'm unsure whether this would be considered to be by design or should be logged as a potential bug or an improvement... Switching between the Wheel and Slider Colour Panel Models will display Hex values in Base 16 when the Wheel is displayed with no option to change this but as Percentage values when the RGB Hex sliders are displayed if the document has previously set the RGB slider values to be displayed using percentages in the Colour Panel Preferences... When displaying the RGB Hex sliders it is not possible to switch from Percentages back to 8-bit or 16-bit because the option isn't available which means the Hex Values displayed can initially appear to be incorrect (despite being correct) because: The Hex value displayed in the RGB Hex Sliders differs from the Hex Value displayed in the Wheel because the former displays the values as percentages, the latter in Base 16 It's not possible to change the RGB Hex slider values back to Base 16 without first reverting to the RGB sliders Questions Should both the Colour Wheel and Sliders adopt a uniform display method, i.e., Base 16 or Percentage Should the option to switch from Percentage back to 8-bit or 16-bit be available when displaying the RGB Hex Sliders
-
 Are you using the same colour space (e.g. CMYK versus RGB) and colour profile in both applications? Can you share two documents, each made with a different application, in which you have placed the same image, in the same way, so we can see the difference?
 -
 Good morning @Hangman, Yes some photos are used twice because the English can't choose what name they want to give a colour of a chicken. To accommodate their indecision, I gave both options. The printer & me, already did a 12 pages printing test, which I needed because I've never sent them pdfs from Affinity Publisher and the standard .pdf from Publisher give perfect printing results. Zero issues. Consistency is not my thing, throughout the book (some 260 pages) cmyk and rgb (new photos in rgb) and .eps .jpg .afphoto are mixed and I never looked what colour space is used for the Publisher documents because only the pdf matters. RIGHT > just checked, all Publisher documents of the book are cmyk US swob-something, haha. I do remember I 'discovered' the colour space when making a new Publisher document and put it to rgb, hoping for a smaller file size. I don't use the book feature, because InDesign-trauma 😅 Now continue the images/texts in your fixed document, thank you!
-
 Hi @Sigs, That's no problem at all... There are several images not sitting in a picture frame which isn't a problem, some but not all don't have the thin black border so you may want to drop them in picture frames for consistency and to add the border. but it's not essential when they already include the border... The duplicate image that appears on pages 5 and 19 is RoodWitgezHa.afphoto. On page 5 it is under the heading 'Chamois - (Gold dominant white laced) On page 19 it is under the heading 'Gold white laced, Chamois' If you're not already you use Publisher's Book feature which would allow you to split the book up into Chapters... The version I've sent you is, as mentioned CMYK using the U.S. Web Coated (SWOP) v2 profile but if you're moving forward with everything in RGB you can open the .afpackage file, change its profile back to sRGB, move it to a folder alongside your RGB images and relink the RGB versions. Let us know how you get on and whether you encounter any issues. I didn't see any error messages when working with your file so hopefully, all is good.
 -
 Where is the setting to export CMYK-black (0/0/0/100) as pure RGB black (#00000000)?