
.jpeg.1b727463d44a0d52bc3499597e28d11c.jpeg)
James Ritson
-
Posts
855 -
Joined
-
Last visited
Posts posted by James Ritson
-
-
Hi James,
I've uploaded a quick attempt at editing the image with two slight variations in tone, is this the kind of developing you are referring to? I used a combination of various features and techniques, some unique to Photo, to achieve it.
One video tutorial you might want to look at in particular is Creative Painting - it covers how to bring out colour and tone, especially in low light imagery.
Regarding the practical side of the photography, you may want to try evaluating your focus, as the image is slightly soft. What focal length lens were you using? There's nothing specific in the EXIF data, were you using a manual focus lens on an adapter? You can probably switch to the camera's live view, raise the ISO and zoom in to the frame to really fine tune your focus. If you're using a lens on an adapter and the focus is set to infinity, you may find you can get sharper results by just pulling the focus back a tiny amount so it's not quite at infinity.
I would also look at trying some longer exposures in order to lower the ISO and increase the aperture if possible. If lowering the ISO isn't possible, try shooting several exposures and stacking them to reduce the noise. Again, for tutorials, check out Stacking for Noise Reduction and also Maximum Stacking for some additional ideas with long exposure/low light photography.
Hope that helps!

- MEB and Jim Gosselin
-
 2
2
-
Hey Asvolas,
You can align images using stacking, there are a couple of tutorial videos that cover how to do this:
Aligning Images and Stacking: Exposure Merging
As you are wanting to merge three separate exposures, at the moment you can only average the exposures using stacking; proper HDR merging is however coming in a future beta, so do keep an eye out for it.
Alternatively, once you've aligned the images, you can always merge the exposures manually - there's a video for that too, Manual Exposure Merging.
Hope that helps!
- Asvolas and NataliaWu.
-
2
-
Hi Johannes, looks like all you need to do is drag that mask layer and nest it into the sky (the top Hintergrund) layer. That way it will only affect the sky layer and not the entire image. You'll notice in the video tutorial that the sky layer is selected (marked blue) when I click the add layer mask button; this ensures the layer mask is nested into that sky layer.
Hope that helps!
-
Hello all, here's a new video for the weekend: Creative Painting
This one covers how to really bring out colour and saturation in images using manual paint brush techniques. Hope you all have a good weekend.
- superhaschi and maritan
-
2
-
I´ve got a question regarding sharpening as shown in one of your tutorials
at 1min 50s you're loading the lightness channel and applying it as a mask to an USM adjustment and saying that you´re only sharpening the lightness channel and not the color channels.
But aren´t you just restricting the sharpening to the luminance values of the image, while also effecting the color channels?
So isn´t the effect much the same as if you´d choose a top left to bottom right underlying composition range blend ranges setting?
I think in PS one can really sharpen the lightness channel whereas in AP you´d have to create a greyscale layer from that channel, sharpen it, load to pixel selection and paste back to substitute the original lightness channel information?
Thanks in advance!
Hi MBd, you are correct and you have my apologies! The video is going to be re-recorded as it's in need of an update anyway. You can currently do what I actually intended to show destructively by using the Unsharp Mask filter from the Filters menu and editing only the Lightness channel (disabling the pencil icon from the other channels).
-
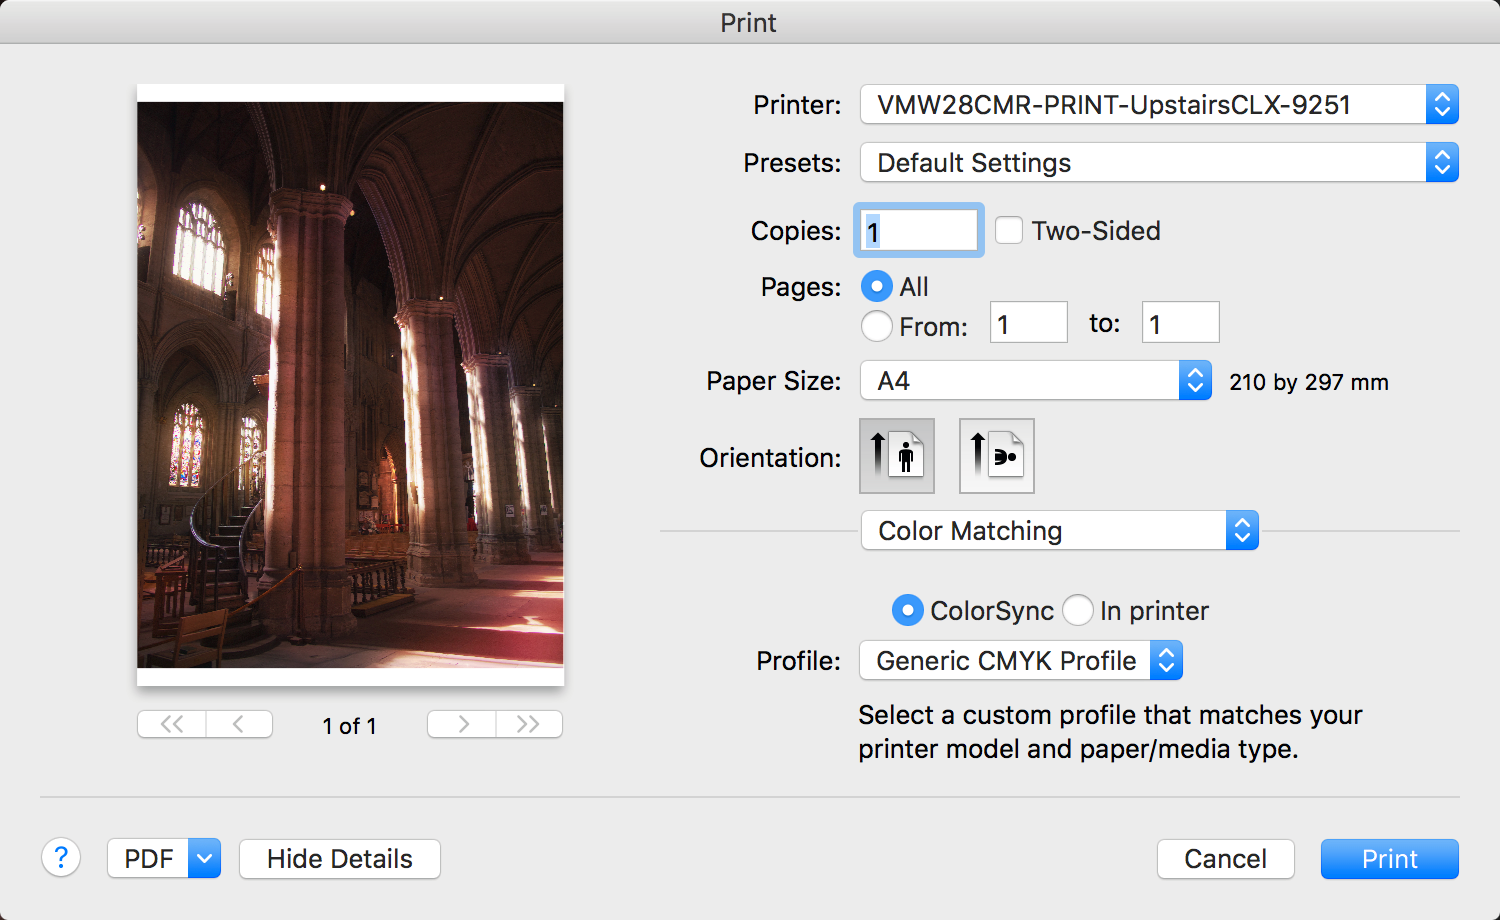
Hi Garnick, do you not have an option to use ColorSync in the Color Matching options on the print menu? I've attached a screen grab of my print dialogue to show you, hope it helps.
-
The video has been re-uploaded, should be working fine now!
-
Thank you for pointing this out, it seems to be an issue with the Vimeo encode, we'll re-upload it!
-
Hi all, based on user feedback we've added a new video that covers layers in more detail; what they are conceptually, why you would use them, and a couple of workflow pointers when using them.
Let us know if you find this video helpful and whether it aids understanding of what layers are!
-
Thanks James, useful as usual.
I'm surprised though with the one about FFT. I don't see when you might have to deal with such images, except may be on scanned magazines ?
Hi yakk, some common repeated patterns arise from photographing screens/monitors, fixed pattern noise on imaging sensors (not so common nowadays but some earlier digital cameras exhibited it, especially at high ISOs) and image captures where there has been some external interference to the sensor (aerial/satellite captures for example). Most photographic situations will never need it, but it's there if required!
-
Hello all,
We've got four new videos for you to enjoy over the weekend, inspired by our time at the Photography Show this year and comments from this thread:
Stay tuned for a specific beginners set of videos which are also being worked on!
Thanks,
James
-
All well and good but does not answer the question as to when we will get proper Documentation.
Hi, both Photo and Designer ship with comprehensive help documentation that does provide information on each tool, filter and adjustment available. It is also searchable, but the search mechanics are somewhat out of our hands as they are part of Apple's Help app (this is in reference to speed and caching issues). All we can do is index the topics accurately and make them easier for users to find.
A printed handbook for Designer is in development, with one planned for Photo later, but any suggestions to make the help more accessible are always welcome. Are you able to explain your initial difficulties with the help that led to not being able to find what you wanted?
Thanks
-
Hi maritan,
The "Pixel" bit comes from the name of the layer, if you select your Background layer you should see "Background Red/Green/Blue" channels. Apologies for the confusion as "Pixel" is the name given to merged layers (if you flatten a document or merge visible layers). If you've just developed an image, it's called "Background".
Hope that helps!
-
Hi couchpotato,
Thanks for your feedback, I'm sorry you're having difficulty following the tutorials; as you've noted the majority of the tutorials are not specifically targeted at beginners and they do assume a working knowledge of image editing software in general.
There is a Beginners video here that serves as a more gentle approach to the software, but a beginners set of videos are in development, and they will indeed be easier to follow and will take more time to explain concepts and steps that are unfamiliar to beginners.
Regards,
James
-
Hey again,
Three more videos for you this week, hope you find them useful!
Channels: Creating/Storing Selections
Thanks,
James
-
Hi bgriswold, have you watched the in-house tutorials at all? The Channels video explains how to do this, it's simply a case of right clicking your desired channel on the Channels panel and choosing "Create Mask Layer". Hope that helps.
-
Hello folks, three more tutorials this week for you, enjoy!
Curves Picker - https://vimeo.com/154293467
Vector Lighting - https://vimeo.com/152576339
Simple Gradients - https://vimeo.com/152558498
Thanks,
James
-
Hello all,
Four new videos for you this week, a nice blend of technical and creative:
Soft Proofing - https://vimeo.com/152413642
Creating Atmosphere - https://vimeo.com/152433012
Creating Light Beams - https://vimeo.com/152450430
Scopes - https://vimeo.com/154281478
Enjoy!
-
Thank you so much for these awesome videos. The value and power of this app increases with each one as many of us do not do enough experimenting on our own.
I learn something new each time, in fact there is so much in each video that I do watch them many times, each time picking up something else. They have also made me do some experimenting on my own. Unfortunately it does lead me to crashing the app sometimes teaching me to save, save, save, every step so as to not let the 'glitch witch' take all my hard work.
I was wondering if you could explain the difference between the photo setting and the photo (print ready) and why I am not getting the colours and brightness from my printer as I see on the screen. I am using an iMac (just prior to the release of the Retina display) and a MacBook Pro with Retina display. My printer is listed as one I can select but still don't get what I want.
Hi p_mac,
You're welcome for the videos! It's good that you're getting so much out of them, thank you for the comments.
Regarding your screen/print issue, it is difficult to get consistent and accurate results between the two mediums because they are so different.
One step you can take is to profile your monitor, and you typically do this using a calibration device that you put on your screen, such as an i1 Display Pro or a Spyder. It helps you match your monitor to a certain standard and create a colour profile. For example, I use a white point of D65 (6500K, daylight balanced) and luminance of 80cd/m, and generally my prints are accurate when viewed in daylight. Are you typically finding your prints end up darker than what's on screen?
The other step, which goes hand in hand with profiling your monitor, is to disable your printer's colour management and instead pass control over to the software. This then allows you to use a colour profile specific to the print media. Some printer drivers include profiles to be used with different media, such as glossy and matte paper, and this generally helps you to get more accurate prints.
Colour management is a bit of a minefield and you can end up spending a lot of money if you're not careful! You could try some (free) online monitor calibration websites as a first step and see if that improves your results.
Hope that helps!
-
And all I get is a corner of the original photo filling the screen of the New document, that is all that is fitting, the rest of the photo seems to be gigantic and so won't fit.
As usual, I'm sure it is a small step that I am missing in trying to follow a tutorial where a small step is performed but not talked about and I can't see it from my small screen.
El Capitan 10.11.3
Affinity Photo 1.4.1
(Edit) So sorry, I missed R-C-R's post which explains the same solution, that's what I get for posting on a phone!
Hi, sounds like a straightforward solution, when you paste the image into your 4x6 document it will be too large. The pointer tool should be active by default, but if not, you can toggle it using the V key. If you then zoom out on your canvas, you will see handle bars that you can click drag to resize your image and make it smaller. Just resize it until it fits your 4x6 document.
Hope that helps!
-
James, I hate to always be comparing to PS, but that is the tool AP would replace for me. At any rate, in PS, I can specify length and width dimensions in the supported PS units, including pixels. If I want something for a game texture, for example, it has to be in 2^x pixel dimensions such as 1024x1024. The 72 px per inch just constrains it to screen resolution which is helpful for things displayed on screen.
Hi Asha, I don't have Photo in front of me (on mobile here) so apologies if this is incorrect, but as far as I know the DPI should have no relevance at all if you are wanting to crop to exact pixels. It is only used as a way of determining pixel resolutions for practical measurements like Cm and In. A 2048x2048 texture is always going to be 2048x2048 regardless of DPI. You can crop to explicit pixels in Photo (I believe it's named Absolute Dimensions, just use pixels as your measurement). And I cannot test this at the moment, but if you are cropping to specific pixel dimensions in Photo, the document's DPI should not matter at all. It could be set to 72 or 300, but it should only influence the crop boundary if you're cropping to inches, centimetres, etc.
Hope that helps! Will be able to take a further look on Monday in front of Photo.
James
-
I agree. I frequently have to crop to specific ratios. Adding them as presets works, but once selected, the outline doesn't stay at that ratio unless I'm very careful when repositioning or resizing. Too often it changes and I have to begin all over again.
Could we have the outline "lock" to the selected ratio while resizing?
Hi Rory, I've tried adding a ratio as a preset and the crop boundaries stay constrained here regardless of which handle is used to resize. Are you up to date with the most recent App Store version?
I agree with other posts requesting actual size with pixels per inch as crop constraints. EG: 2400 px wide, 2400 px high, 72 px per inch.
It's not exactly what you're asking for, but if you change the working DPI of your document (using Resize Document, uncheck resample) then choose Absolute Dimensions as your crop method, you can input a size (for example 7 x 5 Inches) and it will produce the correct pixel crop based on your DPI. But yes, being able to specify an explicit DPI for metric cropping would be much quicker.
What you're referring to (2400px by 2400px by 72DPI) doesn't quite make sense; did you mean specifying physical size like Inches or CM? For example 8in by 10in at 200DPI.
I also don't like the way text fields work. Settings don't stick, and there's no highlight/backspace to clear the field.
I agree that the text fields could be easier to work, I don't quite follow the complicated routine of having to delete every character individually though. You can just do this:
- Highlight or (even quicker) double click the text entry
- Type your new value (the old one will be automatically overwritten)
You can do that for your Width entry, then hit Tab to highlight the Height entry and type your new height straight away (the old value will automatically disappear).
Hope some of that helps, given the discussion here there will likely be another cropping video that covers some of this in depth. Thanks for all your comments!
-
Hi Keith, apologies for the confusion. They are just the document tabs for each open image, the idea being to make the video flow smoothly as opposed to opening each file individually.
More recent videos are starting to take a different approach with multiple images, so in the future this will hopefully cause less confusion!
Thanks
-
Hi toyotadesigner,
You are talking about resizing an image to 49606 x 32952 pixels using the slowest resampling algorithm available. That's absolutely huge, about 1634 megapixels in size.
Are you sure the measurements are in centimetres? What kind of size are you aiming for? It would make more sense if the measurement should be millimetres, as that would get you close to A3 size.

Missing Tutorials
in Pre-V2 Archive of Affinity on Desktop Questions (macOS and Windows)
Posted
Hi, the tutorials are all still there; Vimeo has a 100 video limit for grabbing information via its API to display on the website and we're now at 103 for Photo. This meant there had to be an architectural change for how the videos were populated; essentially, multiple requests rather than one. We suspect what the issue is and hope to be able to fix it soon.
I would recommend checking out the forum thread Lee linked to above, as we're able to structure that more efficiently and make it easier to find the videos you're looking for.
Thanks!