Dmitri Rabounski
-
Posts
30 -
Joined
-
Last visited
-
 Nihilism reacted to a post in a topic:
Written Tutorials to download
Nihilism reacted to a post in a topic:
Written Tutorials to download
-
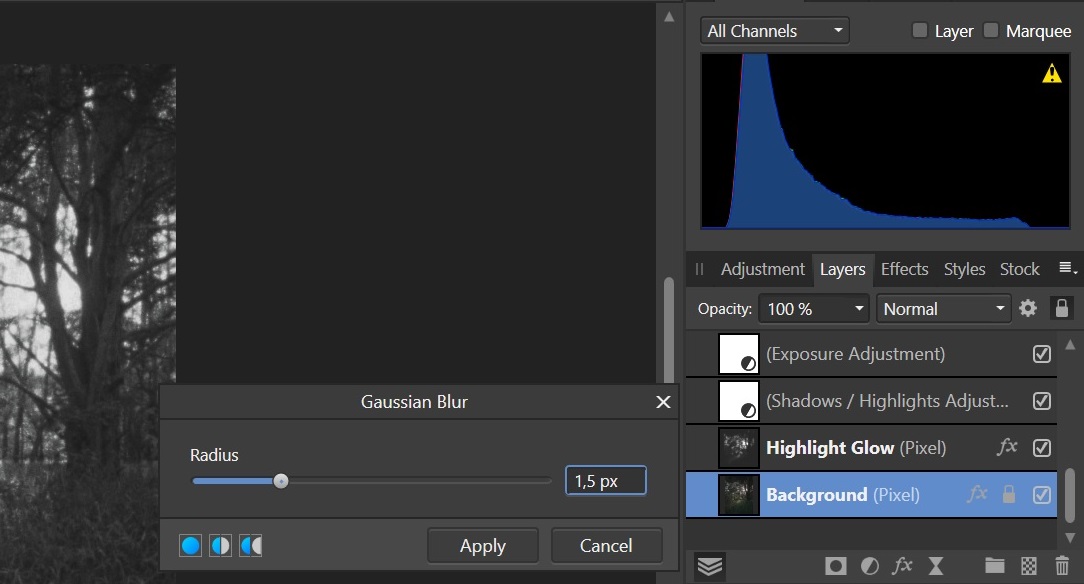
 I do actually the same as you do (with minor differences): 1. I enlarge the original image (+ all correction layers that appeared due to tonal development) to the required size, say, to 60 x 80 cm at 400dpi. 2. I apply Gaussian blur to the background image as a FILTER (the Gaussian blur option on my screenshot was showed only because it is impossible to show both the layer and the filter at the same time). 3. I enlarge the film grain image to the same size as the image (60 x 80 cm at 400dpi) along the short side. 4. Then I copy the enlaged film grain image to the file of the image over all development layers. 5. I also apply a Vibrance filter as a sub-layer to the film grain layer (or, optionally, to the entire image over all other layer), where I set up Saturation to - 100 that makes the film grain layer (or the entire image) free of colour. It is also possible to decolourize the film grain image in the way as you said, of course. 6. Then I switch off all lower layers, so that only the film grain layer is visible. 7. Then I apply Levels over the film grain layer. Because you see only the film grain layer (all other layers are switched off), you see the histogrsam of only film grain (it looks like a very high peak somewhere at the centre of the histogram). Setting up the Levels (say, 35 and 70), I choose the required contrast of the grains. Then I move the Level layer as a sub-layer to the film grain layer. 7. Then I switch on all the development layers and the background layer. That is all. Concerning the paper grain pattern. I does not play any role, because its very small granulation. In general, we apply film grain to an image only if the film grain is very large so that it plays an important role in the art work itself, that is, only when the proto image should consist of large grains. In all other cases film grain is unnecessary.
 -
 walt.farrell reacted to a post in a topic:
How to make an image consisting of film grains (using Affinity Photo)?
walt.farrell reacted to a post in a topic:
How to make an image consisting of film grains (using Affinity Photo)?
-
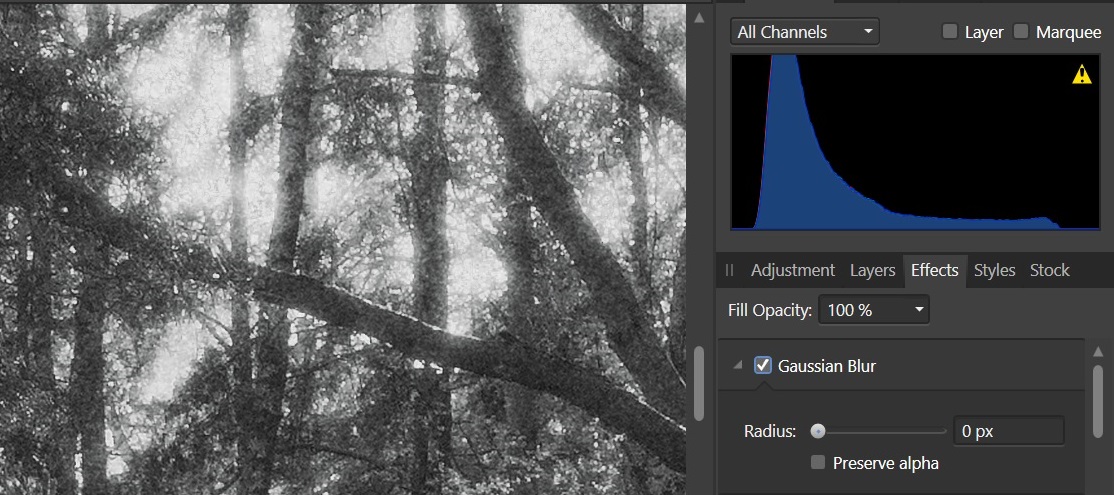
The Levels applied to the grain layer: Gaissian Blur 1.5 px applied to the image: The image before the Gaussian blur applied (100% view). It looks merely "pockmarked" because the grain layer is merely superimposed on the image (in the Overlay mode). This is NOT the look of a scanned film negative: The image after the Gaussian bur applied. Now, the image consists of grains (it is seen everywhere including the borders of tree branches), but looks blurry:

-
This is absolutely true. I glad to see a person who understands the problem in the core. Thank you. Of course, the unique tonal distribution of each individual film negative produces its unique grain pattern. Even more, when applying Dodge & Burn to the scanned image, we change this individual grain pattern as well. Another problem of digital images is that they all are smooth (to within the digital noise), while the superiposed real grain pattern is the same for all them. This is the evil that you have to put up with digital photography. Also, as a matter of fact that we should apply a blend curve (Blend Option) to the scanned grain layer so that the grain affect is very small in the shadows, maximum in the middle tones, and decreases to the highlights. In this case we will have a similar grain effect to the grain effect in scanned film negatives. Thank you very much, Old Bruce, for the reply and your understanding of other sides of the problem.
-
Yes, we use real film grain scan. We use Affinity Photo to superimpose the scan over photo images and then somehow making the images consisting of the scanned grains (how to make is the subject of my question).
-
Dear Lagarto and telemax, It seems that you, when recommended the use of various plugins and other film emulation software, did not understand that I mean. All film emulation software such as DxO, CaptureOne, Nik and others just EMULATE/IMITATE real film grain. Any film photographer looking at the pictures "grained" after the software would say "this is fake". This subject was examined dozens times over the last decade by many professional photographers. Only superimposing a scanned real grain pattern gives a real film grain look. The only problem is how to make such a picture consisting of film grains. Usually, we apply Gaussian blur to the image itself to make it containing NO details lesser than the suprtimosed grains. In such a case we really obtain a grain-constructed image. A lack is the loss of sharpness, in contrast to real scan of film. Therefore, I asked the Affinity Photo community on the mentioned subject: is there another way to make an image consisting of the overlayed scanned film grain pattern?
-
To make an image consisting of film grain, the following stack of layers is required (from up to down): 2. The film grain pattern (in the Overlay blending mode) with Levels applied to the grain layer (and no anything else, no blur, etc.). The close the black and white sliders to the histogram of the grain layer, the more contrast of the grain pattern. Say, Black = 30 and White = 75 produce a normal contrast, while Black = 35 and White = 70 make the grains more contrast. Sharpening must NOT be applied to the grain pattern. Anyone of film photographers, who watched many scanned film frames can say that a sharpened grain pattern looks poor, differentfrom a natural film grain. Only contrast (regulated using Lavels) does not affect the natural film grain effect. 1. Background image with Gaussian blur. P.S. 24 Mpx (4,000 x 6,000 px) HQ scans of 24 x 36 film grain patterns are available for free from Film Composite. P.P.S. It seems that two previous persons, who recommended the use of various plugins and other film emulation software, did not understand that I mean. All film emulation software such as DxO, CaptureOne, Nik and others just EMULATE/IMITATE real film grain. Any film photographer looking at the pictures "grained" after the software would say "this is fake". This subject was examined dozens times over the last decade by many professional photographers. Only superimposing a scanned real grain pattern gives a real film grain look. The only problem is how to make such a picture consisting of film grains. Usually, we apply Gaussian blur to the image itself to make it containing NO details lesser than the suprtimosed grains. In such a case we really obtain a grain-constructed image. A lack is the loss of sharpness, in contrast to real scan of film. Therefore, I asked the Affinity Photo community on the mentioned subject: is there another way to make an image consisting of the overlayed scanned film grain pattern?
-
telemax reacted to a post in a topic:
How to make an image consisting of film grains (using Affinity Photo)?
-
Does someone know how to make an image consisting of film grains in Affinity Photo? That is, we overlay a film grain pattern (scanned from a real photo film) on an image using the Overlay blending mode. In this case, we get just a "pockmarked" image. However we need to have the image CONSISTING of film grains (like any scanned real film image). If applying Gaussian blur, say, from 1 to 3 px, to the image, the image becomes really consisting of film grains, but becomes very blurry. Is there another way to make an image consisting of film grains, i.e., looking like a scanned photo film? Thank you.
-
Blueprint reacted to a post in a topic:
Written Tutorials to download
-
Thank you very much! Not all persons like video lessons, but prefer written help instructions like those embedded into Affinity Photo help. Your instructions are very welcome therefore. Contune the manuals as possible, please. Many thanks, again!
-
dmstraker reacted to a post in a topic:
InAffinity (400+ videos!) at the NEC Photography Show?
-
You produced very good video tutorials, especially in surveying special details. I found many interesting for my photo development. Thank you!
- 1 reply
-
- 1
-
-
Dmitri Rabounski changed their profile photo
-
To James Ritson, A HQ photo enlargement tutorial is required. So, this request targets both the desktop and iPad versions of Affinity Photo. You as a professional photographer, know this problem. In brief: 1. The final result is a high-quality print on an acid-free paper with carbon powder. Such prints live for 500 years or more without loss of quality as printed engravings by Albrecht Dürer. Whereas the practical lifetime even with high-quality chemical toners produced by Canon or Epson is no more than 7-10 years due to oxidation in air. 2. The size has meaning. When printing, say, a 75x100 cm artwork with the standard 400 dpi resolution (the digital carbon printing uses only 400 and 720 dpi resolution), we need to have a 130-150 Mpx image. 3. If merely using the enlargement algorithms accessed in Affinity Photo, Photoshop or any other image editor, we could NEVER get the necessary quality at such magnifications. This is the well-known practical fact known to professional photographers. Therefore, 3rd party enlargement software is used among which No.1 is Benvista PhotoZoom, while all others (Topaz Gigapixel AI and others) are at the 4th and lower places in the sense of the quality of enlarged images. PhotoZoom costs 160 GBPounds, but we purchase it because no other choice. And... there is no iOS version of PhotoZoom; the Benvista developers reject to create an iOS PhotoZoon arguing that this version will give a very little income. 4. If fact, we all understand that there is nothing contained in "S-Spline Max algorithm" used in PhotoZoom that would not be presented in Affinity Photo. Supposedly, "S-Spline Max algorithm" is merely a tricky combintation of the usual algorithms of enlargenent, sharpness and other that are presented with Affinity Photo. This is the same situation that with any other tricks and algorithms used in photo editors: we can repeat all these using Affinity Photo if we know how. A sample are many perfect video tutorials by James Ritson using which we can repeat almost all that is accessed with photo editors but using only Affinity Photo. 5. How about a video tutorial telling about high quality photo enlargement? I mean not banally using the algorithms accessed in Affinity Photo, simply using of which does not give necessary high quality. I mean something like “translating” the one-step complex algorithm of photo enlarghement used in PhotoZoom into the simple terms of a multi-step sequential process that can be done using the Affinity Photo tools. In the past, you released similar tutorials for other photo development processes. P.S. I posted this request to this thread. But the same is true about the desktop version of Affinity Photo, because using both iPad and a desktop computer. Supposedly, the tiutorial will be the same. I hope you understand the high impotance of such a tutorial (currently we have no competition for PhotoZoom, and there is no an iOS version of it). Everyone who printed high quality artworks with museum quality knows that I mean and that this problem is highly important. I hope you understand that I mean. Thank you in advance -- Dmitri
-
Is there a limit on image size?
Dmitri Rabounski replied to Dmitri Rabounski's topic in Pre-V2 Archive of iPad Questions
Thank you. In your case, Affinity Photo for iOS would surely strike when painting on a 12,000 x 12,000 px canvas using even a powerful 4GB RAM iPad Pro. This is as a matter. But this is NOT the case of photography. I asked for the following. Namely, --- 1. Fine art development of photo images is processed on the basis of their "small-megapixel" originals, I say 12 Mpx or something like this (after finme art cropping). Affinity Photo allows to edit digital photo images very fast on even any iPad Air having 3GB RAM. I saw how fast Affinity Photo works on iPad Air 2019. No problem. As a result, you have a finally edited 12 Mpx image (for example). 2. Then you need to enlage the final 12 Mpx image to, I say, a 8,400 x 10,800 px size in order to make a 70 x 90 cm fine art print with a 300dpi resolution. Enlargement is not a highly complicate procedure, in contrast to fine art tonal/contrast editing that needs many layers and instruments applied in dozens complicate steps. Enlargement is processed in three easy steps: a) enlarging the bitmap pattern, b) increasing sharpness of the image and c) inceasing its contrast. All these options are integrally applied to the image: no brushes, selections or everything else is used. A delay with the processing does not mean something important therefore. This should work on any modern iPad, not only iPad Pro. The only problem is the PHYSICAL LIMIT on the image size that we do not know (and that I cannot check by my own for yet because I only aim to move to an iPad as a COMPLETE replacement of my desktop and laptop computer). Only Affinity Photo staff knows the answer. I therefore repeat my question to the Affinity Photo staff: what is the maximum image size in pixels that I can process with Affinity Photo for iOS? -
My question to Affinity Photo staff. We know that iOS has some limitations on file size and image size, respectively. How does this affect Affinity Photo for iOS. Namely, -- what is the maximum image size in pixels that I can process with Affinity Photo for iOS? This question is significant when you want to prepare a greatly enlarged image (from a certain 12 megapixel source) for making a high quality 70x90 cm print, for example. Such an image, when prepared on a desktop version of Affinity Photo, takes more than 100 Mpx. So, having in mind to move the entire photo lab from the ageing laptop to a new powerful iPad Pro, I should be sure in the possibility to make high quality large prints. Thank you for your further answer.
-
Affinity Photo does not correctly interpret 16-bit floating point TIFF unfortunately. Only 16-bit integer TIFs are able to be developed. Contrary, iOS applications like Preview and Photos do read 16-bit floating point TIFF properly, which is how I know that the file is being written correctly. Add 16-bit floating point TIFF support to Affinity Photo desktop and iOS, please. Thank you!
-
I tried to download the iPad related videos from https://affinity.serif.com/tutorials/photo/ipad but did not find how to do it. Is this possible or not? Thank you.
-
Multi4G reacted to a post in a topic:
LEGACY: Official Affinity Photo (Desktop) Video Tutorials
-
Great tutorials. Very useful. Thank you very much! Continue your tutorials please.