DM1
-
Posts
5,609 -
Joined
Everything posted by DM1
-
Brush tool not painting
DM1 replied to Kaostream's topic in Pre-V2 Archive of Affinity on iPad Questions
Are you using your finger or an Apple Pencil? If finger, turn off Touch for Gestures only setting. -
New iPadpro exporting capabilities
DM1 replied to Aub's topic in Pre-V2 Archive of Affinity on iPad Questions
15600x30000=468Mpx.. You might need to leave it longer to render that size (assuming the iPads have sufficient ram). Do you really need 300dpi at that size? What is your viewing distance? -
Paint brush not working
DM1 replied to Firstoscartgrouch's topic in Pre-V2 Archive of Affinity on iPad Questions
Air2= no Apple Pencil. Touch for Gestures on = no brush paint applied. This is why the Touch for Gestures only should apply to ALL tools. It’s just too confusing having some tools work and others not work. A simple on screen toggle would be perfect. -
Another possibility... set a vertical guide. Tap on guide line with pen tool, tap again further along line and adjust node handle to provide deserve curve. Duplicate and flip. Reposition till top and bottom nodes snap. Voila... symmetrical shape. Join nodes/objects if required. Alternatively, you could turn on the grid and snap nodes to grid points. 4EE41EEA-B865-4793-BEB0-BEA856116F86.MP4
-
What format are your photos? Raw, tiff, jpeg? What app are you viewing them with? Documents (Readdle) can access the wd Wireless drive and preview jpgs and tiffs but I don't think ic an preview raw files. The WD Mycloud app can also preview tiff and jpg but not raw. The iOS Files app can preview many raw formats. As for quickly view.....
-
image export quality
DM1 replied to jeremyloo's topic in Pre-V2 Archive of Affinity on iPad Questions
1020 was typo (0&9 being side by side). I see a loss in the images you posted. I don't see a loss in the image I posted (my eyes are old though). If you find AP to be too lossy in jpg (and you insist on working in jpg rather than opening the raw file in AP), even given the advice regarding lossy jpg format, this thread (for me) has run its course. Maybe someone else can assist here. I recommend you move over to the bug thread (this is questions) and post a 'bug' report relating to loss of quality you are getting (compared to PS), when exporting jpgs. -
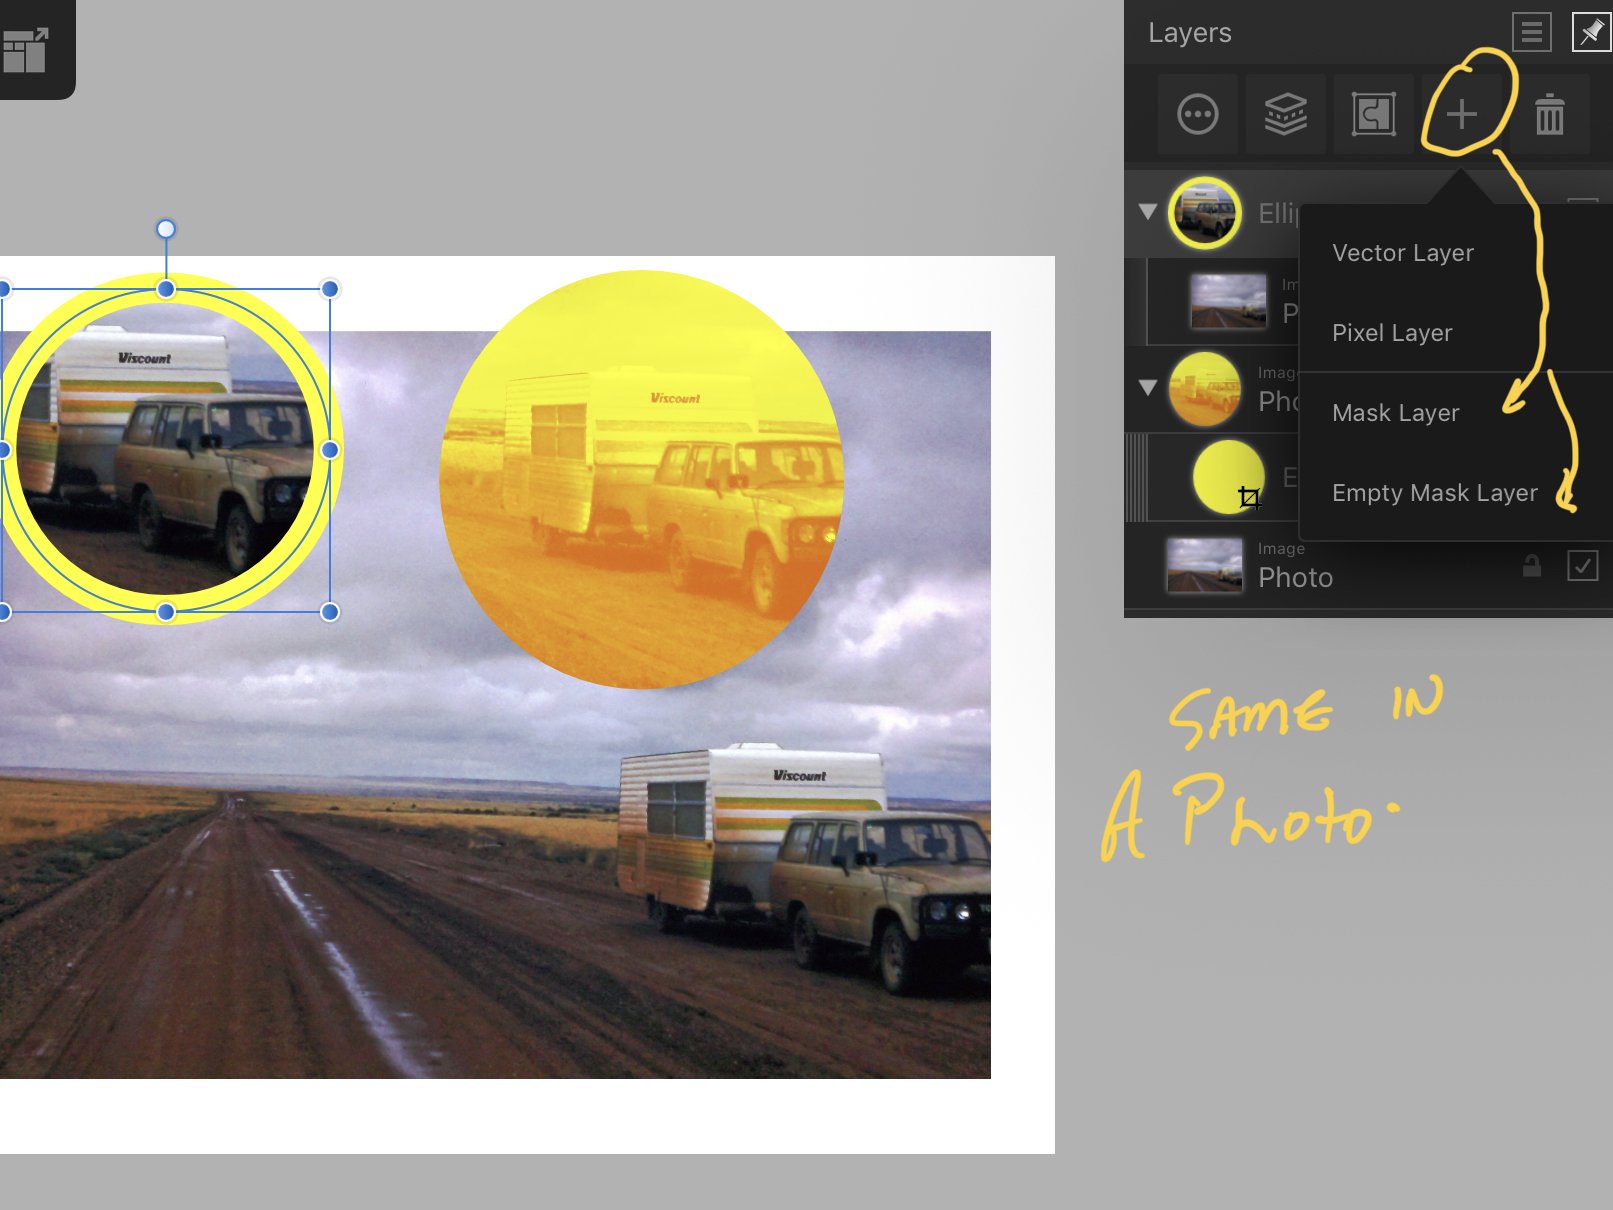
How to fill in multiple areas of a shape
DM1 replied to lukewarm74's topic in Pre-V2 Archive of Affinity on iPad Questions
57B5533A-24AB-4DE8-95A2-AA2270B14340.MP4 -
How to fill in multiple areas of a shape
DM1 replied to lukewarm74's topic in Pre-V2 Archive of Affinity on iPad Questions
Options include the fill tool or simply select each object layer and fill the vectors with desired colours then position or nest layers to show desired effect. -
How can I change the size and perspective
DM1 replied to ernestm80's topic in Pre-V2 Archive of Affinity on iPad Questions
I've been playing around with the file and having the same issue as you. When used as fill or style it doesn't scale as it is not a vector image, at least that is what I think is the issue. -
It appears that neither Affinity Photo or Affinity Designer (IPad) are unable to import brushes or styles from any local iPad setting. All files appear greyed out. The same files can be imported successfully from Cloud locations.
-
image export quality
DM1 replied to jeremyloo's topic in Pre-V2 Archive of Affinity on iPad Questions
Here is the comparison of developed raw with the exported jpg. Hard to pick a loss of quality?
-
image export quality
DM1 replied to jeremyloo's topic in Pre-V2 Archive of Affinity on iPad Questions
I took your initial image and imported it into AP. Then exported it as JPG, placed it back in AP alongside the original. I cutout the images and inverted the copy to allow them to be placed closer together for comparison. Given that the image used for the original was very poor quality (1020x1080px) the exported copy would be further compressed. The comparative point of view shows little difference.
-
@Bryce when you select CMYK Generic on Mac, what Profile is associated with it? Is it the US coated Swop2 or something else? I noted when exporting a CMYK as TIFF, the document format preset defaults to RGB not CMYK (which is available in drop menu). Choosing CMYK preset seems to sort out profiles again. Is this the issue you were seeing?
-
Although the menu layouts are different, the features and concepts (Personas and Studios) are the same. There are some features not yet available on iPad that are on the desktop version, but I suspect most of the tutorials shown could be completed easily on the iPad. The need to look for the 'equivalent' menu location on the iPad may even assist learning. Maybe complete a few beginner tunes to get a feel for iPad and use the workbook for learning 'advanced ' techniques.
-
Can,t find an app called FileBrowser Biz. Can you provide link.
-
Pic may help.
-
Perhaps someone on the Mac Affinity threads could check which of the profiles is being used when Generic CMYK is selected. It is probably one of the ones already available to you on the iPad.
-
@Blende21 True, I should have added the need to save as .afphoto so that the edits update the afphoto file. This is arguably a better workflow as editing jpgs is a lossy process. Afphoto editing is lossless and you can export jpg at any stage. The only issue I have with Documents is the current inability to import brushes/styles type files. Readdle support has been pretty good, investigating their end but unable to identify why. They think In is Affinities end. I tend to agree and will post a bug report. Other than that Documents and Affinity Interface beautifully.
-
You need to load the macro in AP. Go to Macro Studio right hands side near bottom. Looks like an empty triangle. Open studio and tap on the hamburger menu at top right. Select Import Macro and navigate to the .afmacros file. open the image that you want to select luminous areas. Make sure the layer is selected. Tap Macro Studio and scroll down till you see Luminosity Mask Macro category.Tap to open category and tap on macro in the list. You will see selections appear on the image.
-
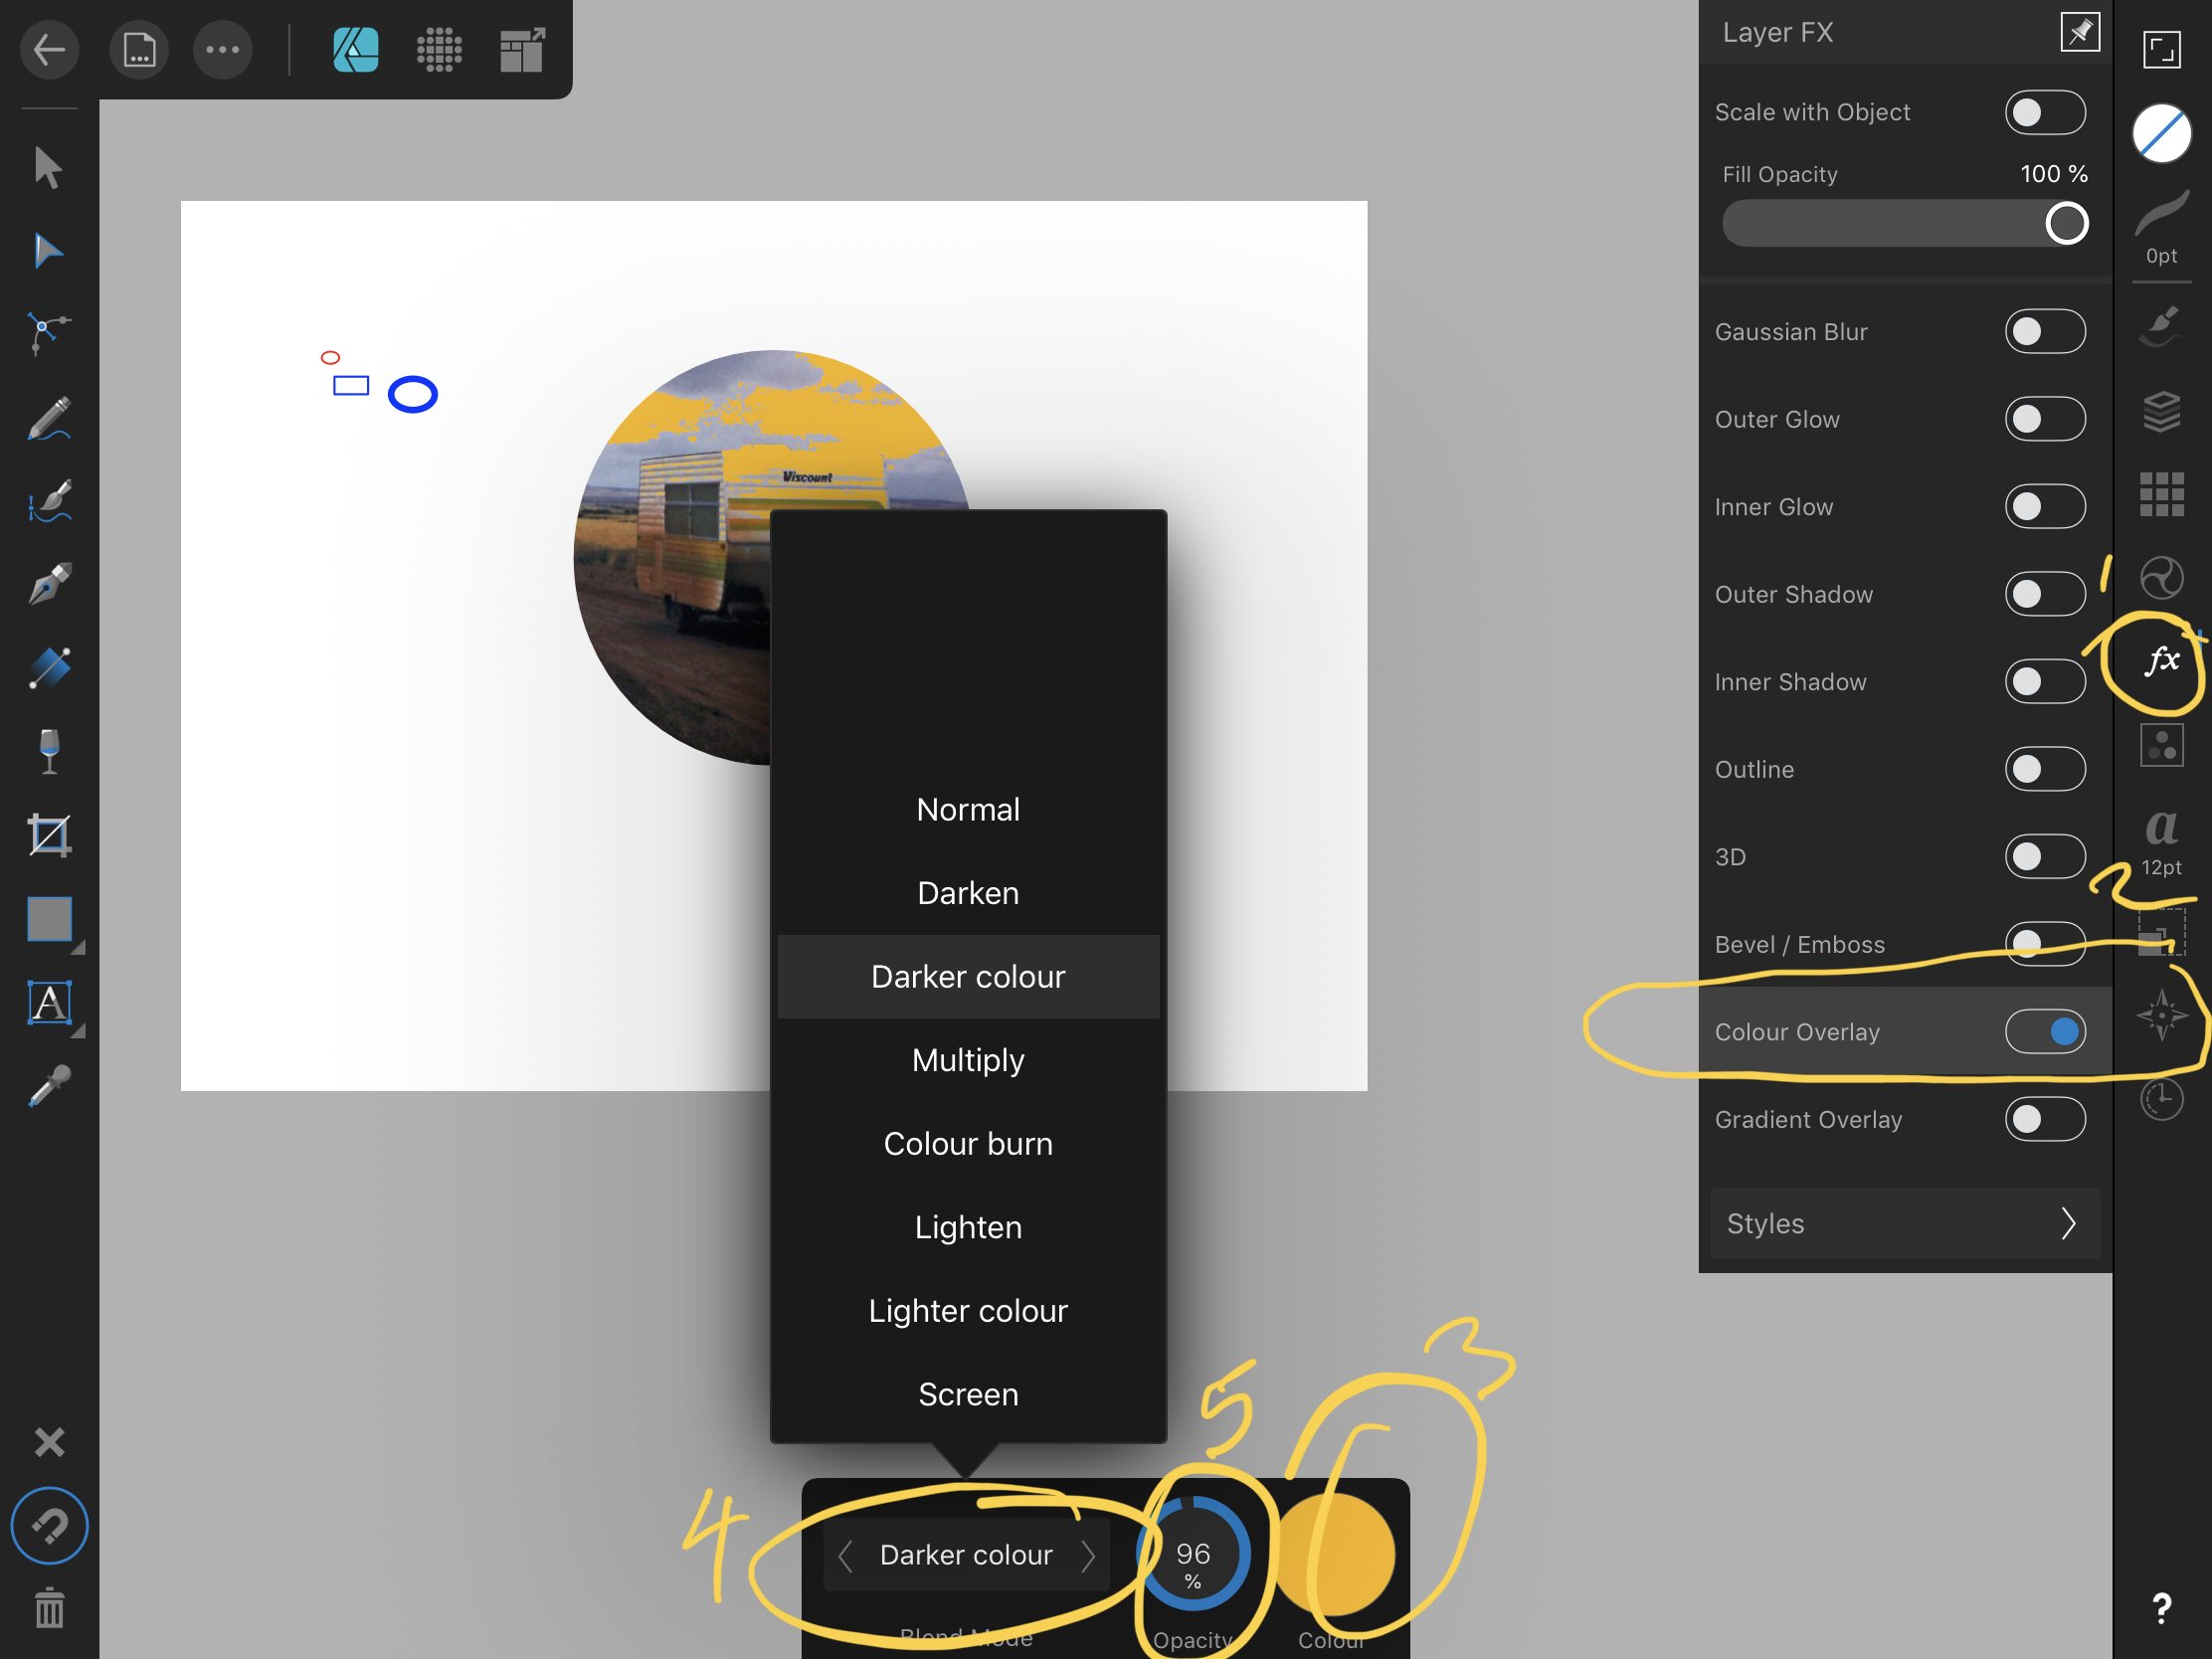
AD iPad fx question
DM1 replied to raywalston's topic in Pre-V2 Archive of Affinity on iPad Questions
Same as Desktop? Depending on how you imported the file you may have to Rasterize the layer first.
-
I realise you are working on a Mac but it is working fine here on iPad with AirPrint so I doubt it is anything to do with the actual .afdesign file. Might be print driver related?
-
image export quality
DM1 replied to jeremyloo's topic in Pre-V2 Archive of Affinity on iPad Questions
That tiff is only 1920x1080 resolution. Pretty low res for a photo. Can you attach the original raw or the LR jpg. Preferably the raw image. -
Questions about Transform and selection
DM1 replied to tsinghuazhu's topic in Pre-V2 Archive of Affinity on iPad Questions
@tsinghuazhu Imported picture? How was it imported? What does the layer label say? Pixel, image?....other? Sorry I'm not quite sure what you are trying to do. Convert to curves only works with vector shapes, not images/pixel layers. Try this.. Tap the layer with the image. Now tap the Selection tool (arrow head). Tap the image and you should now see nodes on each corner. Tap and drag any node too resize image. To reshape an image you need to use the Perspective filter. See below. A30A913C-1AF6-4B07-823D-70336EFE11A3.MP4 -
@J99 Use the pen tool. While the line is selected adjust the Po width in the context menu. For shapes, convert to curves and then choose pen tool to get context menu again. EAEA535F-988E-45C7-BDFA-528A11594B17.MP4 97F00ECB-BCBE-471C-A512-BE2DBAFDD4DD.MP4
-
Questions about Transform and selection
DM1 replied to tsinghuazhu's topic in Pre-V2 Archive of Affinity on iPad Questions
Make selection.in channel studio save selection. Reload selection when needed. See recording. EC7E0155-8B69-4C28-A333-C5D0F5D9C3D4.MOV