CedarHouse
-
Posts
88 -
Joined
-
Last visited
Recent Profile Visitors
1,508 profile views


-
 Callum reacted to a post in a topic:
Layer problem with Assistant and layer selection
Callum reacted to a post in a topic:
Layer problem with Assistant and layer selection
-
Layer problem with Assistant and layer selection
CedarHouse replied to CedarHouse's topic in V2 Bugs found on Windows
Sorry for above, got my layers in the wrong order for soft proofing to work. Had a break and came back after a while and immediately spotted my error in the selection and layer choices. Needed the Soft Proofing later above my HSL Layer and Curves Layer and the Group layer below the two adjustment layers for it to work okay.- 1 reply
-
- 1
-
-
Using Windows 10 and Affinity Photo version 2.5.7. Edited my image and then highlighted all the adjustment layers and assigned to a Group. Wanted to to a Soft Proof for printing etc. Selected Soft Proof from Adjustment layers and placed the Soft Proof layer above the Group Layer. Used Assistance to select insert layer based on Selection. Highlighted the Soft Proof layer and wanted to insert the layer Curves into the soft proof layer but it inserted above the Soft Proof Layer. Moved down the Curves layer in to the Soft Proof Layer manually. But the Curves layer did not act with the Soft Proof Layer. Tried with the HSL layer same happened and this layer inserted itself above the Soft Proof Layer even though the Assistant was set to (by selection). Moved the HSL layer into the Soft proof and again the HSL layer did not change anything in the Soft Proof layer. The grey areas in the Soft Proof did not change using Absolute Calometric when trying to adjust with either Curves or HSL.I was following exactly the process discussed by Robin Whalley in one of his You Tube videos titled Using the Soft Proof Tools in Affinity Photo.
-
Dan C reacted to a post in a topic:
Overlay adjustments not available in Photo 2.5
-
Overlay adjustments not available in Photo 2.5
CedarHouse replied to CedarHouse's topic in V2 Bugs found on Windows
Cancel that last comment. Restarted Affinity Photo and the Overlays are working this time.- 1 reply
-
- 1
-
-
Overlay adjustments not available in Photo 2.5
CedarHouse posted a topic in V2 Bugs found on Windows
Affinity Photo version 2.5 Develop Persona appears to have lost the ability to make adjustments when using the overlays. -
Do not know if this was previously reported but the White Balance appears at the moment to only function with the slider values by using the mouse. Cannot type in a white balance amount and the up and down arrows do nothing. The Tint is okay, and can be changed by the slider, direct typed value or use the up and down arrows. Do not use the crop tool in the Develop Personae as I in preference use the crop tool in Photo as one of the very last operations prior to exporting the image. Have found that the Units Button on the title bar that describes the camera and lens combination does work well to change the units in the Unconstrained crop. This button did not work in previous versions of the Photo Personae. just getting used to the slightly different options in Version 2.
-
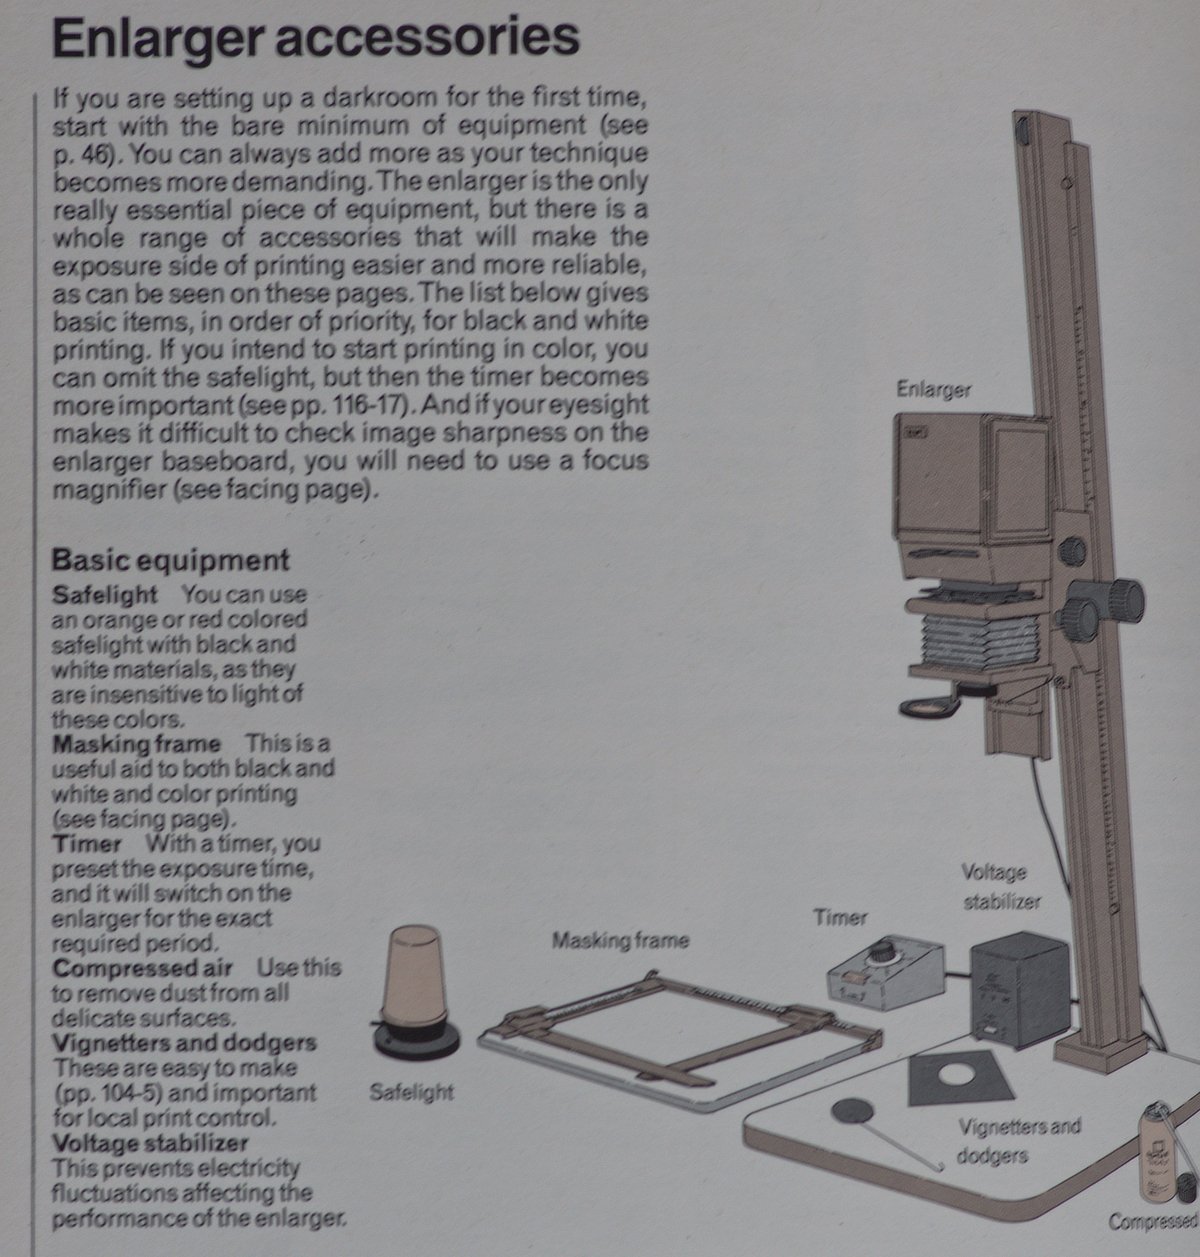
I am a photographer not a designer. I want to crop for printing not for the pixels on the PC screen. The paper I use is maximum size of16inch by 12 inch. I want a precise crop to allow a white border around the image just as one would do when printing film images projected through an enlarger onto a baseboard with a masking frame adjusted to the paper size. In darkroom photography the masking frame allowed one to hold the paper in place for the desired "crop" of the projected image. See Bimage attached for explanation. i do not own a photo printer but send images to a Photolab and always 16 inch by 12 inch. I use a 16 inch by 12 inch white canvas and past the cropped image by copy and paste onto the canvas suitably centred on the canvas to create a white border with an instruction to the lab to print directly as presented. The two paper sizes I used for printing in the film days was 10inch by 8inch and 16 inch by 12 inch and had masking frames in both sizes both fixed and adjustable. These allowed crops of images projected from the enlarger that could use a part of the film image or most of the film image depending on the height adjustment of the enlarger head. See Aimage attached. I have viewed an article on the web site "Life after Photoshop" by Rod Lawton and he has done a short review of Affinity Photo Version 2. His personal comments in the last 2 or 3 paragraphs regarding Photo being allegedly more biased to the Design Community rather than Photographic community. this may or may not be entirely correct; but on nearly every major update the crop tool seems to be the one that keeps getting messed up.

-
Had another look at this. Affinity photo version 2. Windows 10. Original image size from camera is 4950px by 3284px. Opened as RAW file in the Develop Module. Used Crop Tool and changed in Unconstrained the image size to 4200px by 3000px and repositioned the grid for effect and crop was completed. Cannot undo crop if one had made a mistake with the sizing. So pressed the develop button to go into the Photo Persona and image size is now 4950px by 3284px which is the original size of the camera image before I used the crop tool in the Develop Persona. In the Photo Persona the Unconstrained units are pixels only with the Units greyed out. The Resample keeps the original image size regardless of the size of the grid box. Unable to crop an image to a specific size or dimension. Other than using Document ---- Resize document to change pixel quantities in the Unconstrained to either inches or millimetres but is an unreliable method of sizing the crop.
-
In my post for June and July 2019 and version 1.7 the original name for Resample was Absolute. The term Absolute was confusing and on suggestion it was changed to Resample. Also in July the Affinity Dev indicated that they would unlock the units box in the Unconstrained crop. Now in Version 2 it has been locked. On Version 2 Custom Ratio is locked and the values for pixels are not relevant to the image displayed.
-
This issue last came up in June 6th 2019 and 9th June 2019 on the change to version 1.7.
-
Affinity Photo ver 2. Lost the ability to change the units in the Unconstrained mode. Having the ability to adjust the units rather than being locked to pixels only, was working just fine from version 1.8 to 1.10. Need to crop to a particular print size using either inches or millimetres. do not want to use a calculator to convert pixels to inches or millimetres every time I use the crop tool in the Unconstrained mode.
-
The sizing errors are affecting all parts of the crop tool in the latest update. Image size 4928px by 3264px at 300DPI. In Unconstrained changing the pixels shows the correct inches but then on attempting to change to 15in then the number changes to 4500 ins. In resample the original pixels 4928 by 3264 are directly changed to 4928 inches by 3264inches or 4928mm by 3264mm. In previous versions there was an occasional error when using the pull down menu to changes document size without resampling such as changing 96 DPI to 300 DPI with resample unticked that this was uncorrected in the unconstrained crop tool. The crop tool would show as 300PDI but the dimension size of the image would change to a larger size as though the setting was 96 PDI. Going to Resample and back to Unconstrained fixed the issue. Windows 10.
-
Mark Ingram reacted to a post in a topic:
Crop Tool Set
-
Have had a re-think over the last couple of days regarding the new "Resample" title. Think now that it is a reasonable title for the action of the crop tool set. Tried to see whether one can change the aspect ratio from within the "Resample" tool. Played around with many different options for increasing (up-sampling) an image. Used the canvas resize and selection method to change the width or height of an image and then resize. Also used the resample method to increase the size of the image in either pixels or unit dimensions. Tried to increase image size to different aspect ratios by just changing one dimension in either the height or in the width from the Camera ratio of 1.507 to 1.0 to different ratios such as 1.33 to 1, 1.25 to 1 or 1.618 to 1. Basically up-sampling images in either width or height to produce a different aspect ratio from the original ratio of 1.507 to 1. Some of these are in the presets, but the presets work in a different way. My original image was 4950px by 3284px so wanted to maintain the 4950px value but resize to different ratios in the height only. Came to the conclusion that I could do with a ratio box within the Resample crop tool to be able to change the image size by using direct ratio entry to get a different aspect ratio without having to resort to a calculator to calculate the change in height or width dimensions, whether pixels or unit lengths. Sometimes the new ratio selected made the crop grid go out beyond the image area and needed to be dragged back in. Not sure how this can be addressed to ensure the crop grid "rubber bands" back in to the image.
-
Jowday reacted to a post in a topic:
Crop Tool Set
-
Quite like current beta version .445 and crop choices available. Would it be possible to "rubber band" the crop grid boundary so that it cannot go past the edges of the original image particularly with reference to the newly named "Resample" cropping tool? I am not quite convinced that the term "Resample" is quite the correct term for this tool. Done a bit of a search of other photo editing software and common terms used elsewhere is A. "Original Ratio". B. "Original Proportions" and C. "Preserve Aspect Ratio". There may be other terms I have not come across as of yet. The other possible thought is in the new "Resample" tool is to include a box to adequately describe the Original image ratio. eg 4950px by 3284px could be also described as (1:1.507). The "Resize Document" does allow the size to change in relation to the aspect ratio when the padlock is locked. Just wonder whether a similar function could be available in the "Resample" tool when selecting a new size or resize greater than the original image size at the same time maintaining the original proportions of the original image or aspect ratio. For the image stated above at 4950px by 3284px why does the Custom Ratio then describe the ratio as 2475px by 1642px (50% of the original pixel count)? Could this tool set be used as the conversion tool to show the true custom ratio as 1:1.507 or similar. Other images could have different ratios and the "Custom Ratio" should be able to save the ratio in a more appropriate format to describe the aspect ratio as a fraction and save this for future use as a preset. There are other common ratios of say 3:2 but this is still not the same ratio as 1:1.507. End up losing a small strip out of the original image aspect ratio. Other camera sensor ratios may also have different aspect ratios.
-
I needed a bit of time to do a bit of research. I presume that the Absolute Size tool is a Digital Zoom. Quoting from Wikipedia. Digital Zoom is a method of decreasing the apparent angle of view of a digital photographic image. Digital zoom is accomplished by cropping an image down to a centered area with the same aspect ratio as the original and usually also interpolating the result back up to the pixel dimensions of the original. If only one had said this from the beginning I would have understood the function. Maybe the Absolute Size title should be changed to "Digital Zoom" or similar to describe more closely the function of the tool. Confused between the action in Affinity Photo 1.6 and the new version 1.7. Now I see the potential of this new crop method. The change of the apparent angle of view in the digital zoom, I presume is the equivalent of using a lens on the camera of a longer focal length but producing an image with the same aspect ratio and same size both in units of length and pixel sizes. (No need for expensive long focal length lenses?) Both edited images attached are from the same image, sized using the Absolute Size tool at 300 DPi - 16.43in by 10.88in and also 4928px by 3264px in both cases. These have also been down-sampled using Export to JPG from the original .afphoto file format.
-
Sorry to be a nuisance in this as I am a bit stuck with the limits of the current crop tools in Affinity Photo. Maybe as I have suggested previously the Absolute Size needs to change it's name to show the purpose of that particular crop operation. I find the term Absolute Size confusing as I had got it into my head that the Absolute Size was the pixel size of the original image (ex 4950px by 3284px) and as one cropped the image to a lower size of pixels say 4800px by 3000px then the image size in inches or millimetres should change according to the DPI changes. The Unconstrained works the way I want it to, but despite entering unit dimensions in inches etc it still only shows the image size in pixels. I would be very happy use the Unconstrained tool but would like to flip from inches to millimetres where I can just to check that I have got the correct size, without having to resort to a calculator. The old Absolute Size used to this up to version 1.6. But not now as I now need to go through a two stage process to get a cropped image size to a defined unit of measurement in inches or millimetres as long as I do not start changing the DPI value in the Absolute Crop mode.