aslusers
-
Posts
31 -
Joined
-
Last visited
-
File Order on Open
aslusers replied to Hangman's topic in Pre-V2 Archive of Desktop Questions (macOS and Windows)
I would like to add this maddening behavior I've been experiencing: -I hope 9 files -They open in random order - I move the windows into the order I need them (numerical by file number) - I open one more additional file - ALL THE WINDOWS GET MIXED UP AGAIN Why? Why!? I'm working on compositing images from the recent total solar eclipse, and I have had to reorder the windows so many times. PLEASE just have them open in file number order. I'll wait the extra few seconds for the processor to do this. -
THANK YOU for this - I came here looking for help because my masks stopped working... I guess I had accidentally turned on protect alpha. Glad I can get back to work now. Thank you!
-
 aslusers reacted to a post in a topic:
Masking does not work
aslusers reacted to a post in a topic:
Masking does not work
-
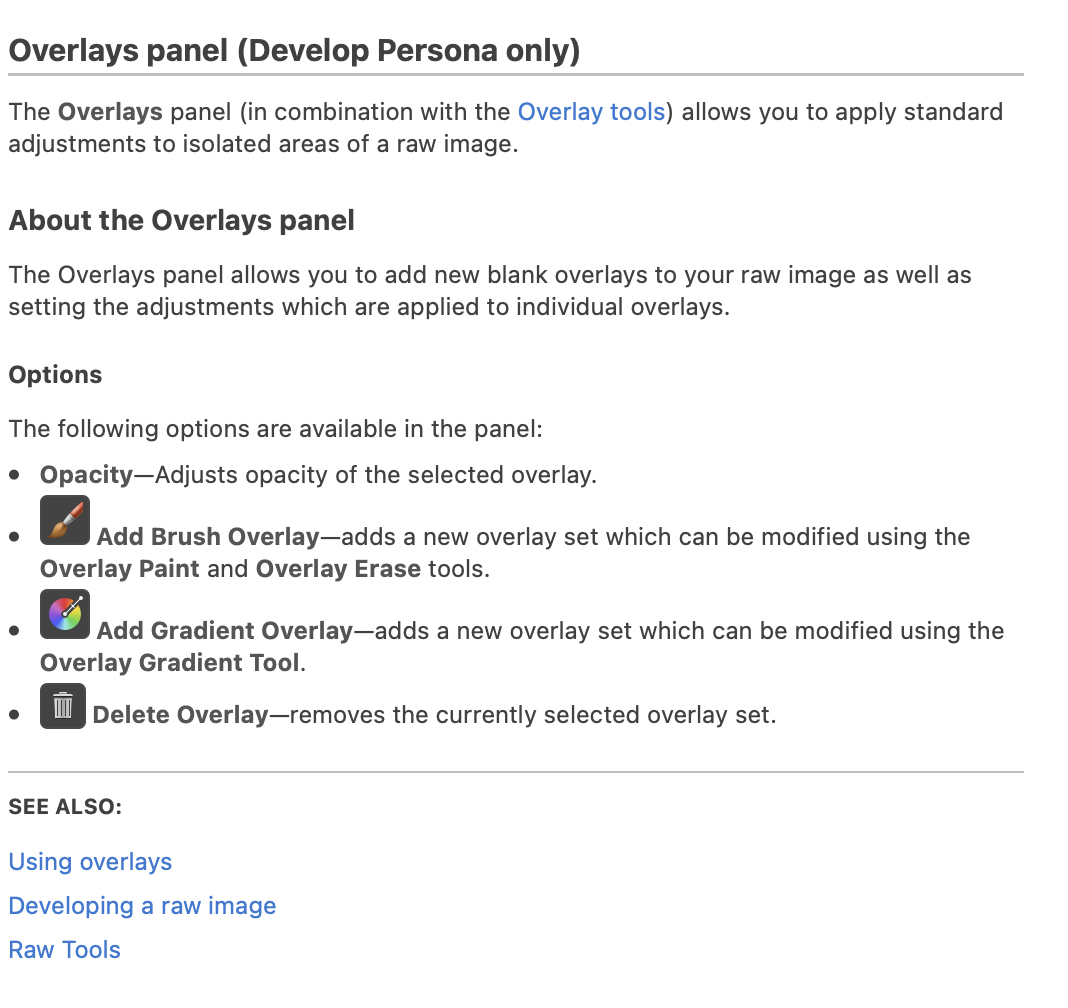
I believe there is a very similar equivalent to the Lightroom Radial Filter in Affinity Photo. It is available only in the develop persona. When opening a file in persona, you have two choices of overlays - the Brush Overlay (controlled by the overlay paint and overlay erase tools on the left) and the Gradient Overlay (controlled by the gradient overlay tool on the left). Once you create an overlay, it exists as a kind of layer which can be found in the Overlays tab on the right. I played around with it (after watching a Lightroom tutorial which used the Radial Filter) and it seems very similar in function, though not exactly the same. Until now, I typically achieve spot adjustments by making then masking adjustment layers. The advantage of the LR Radial Filter seems to be that you have access to all possible adjustments after you have limited the location of the affect by drawing the Radial Filter. The Affinity Photo Gradient Overlay seems to have similar function minus a few adjustments (clarity for example is dimmed), and the ability to continually adjust the radial selection size (using the control bars in the gradient on the image) as well as the opacity (in the Overlays tab). I typically do global adjustments in the develop persona and spot adjustments in the photo persona... so if I do adopt this tool it will be a change in my workflow.... but I'll try and see how I like it. As always, we can pop back into the develop persona after conversion, but I"m not sure if there is a loss of range or quality after the image has been converted from raw for these adjustments. (I would assume there is). I uploaded a screen shot of the Affinity Help info about this function below - Holly

-
Affinity Photo Customer Beta (1.7.0.99)
aslusers replied to Andy Somerfield's topic in [ARCHIVE] Photo beta on macOS threads
getting closer for Fuji .... I just downloaded the 1.7 beta posted above to see if the new Fui xt3 raw files are fixed... the problem files (those shot in "sports mode" and with electronic shutter on high speed) are still not working, but on a random "regular" image, the raw sharpening is noticeably better. I've attached a screen shot of the same image being processed by the current AP version (left) and the beta (right) with the same settings. Its a bit soft for my taste on the right (I will play around a bit more to try to improve it), but look at how much less noise there is. This shot is zoomed in quite a bit. This shot was in dim blue light at ISO 8000 1/40, f2.8 on Fuji xt3, 16-55 at 26.6mm. Screen Shot 2018-11-18 at 1.27.23 PM.pdf -
my Fuji Xt3 raw files load, but the color is wrong. I don't quite have my head around what is wrong, but I am unable to adjust to an accurate color image from the raw. Every image I've tested shows the pink/green slider in white balance to be far to the right at opening. Photo can open the files, but the new raw version is not reading correctly yet. I hope AP will get the raw converter updated asap! I don't want to shoot in JPEG only.
-
aslusers reacted to a post in a topic:
iPad vs computer tool function - Why different values?
-
Thank you for sharing this precious post. It certainly addresses the issue. I do wonder why this difference exists. It seems to unnecessarily complicate the user experience.
-
Hi everyone, I posted this question in a new thread, but thought maybe this might be a good place to ask it again After finally getting and iPad which can run Photo, I’m in the process of learning the iPad version. It’s surprising to me how many differences there are (unnecessary in my opinion!) For example, the unsharp mask options have completely different units/values/ranges. The adjustment options are labeled the same: radius, factor, and threshold, but the range is quiet different. For example, “factor” on the computer goes from 0-4, but on the iPad it goes from 0-100%. “Radius” on the computer goes from 0-100 pixels, but on the iPad it goes from 0-1024 pixels! What gives? It took me a long time to figure out good settings for this and other common adjustments (including noise reduction in the raw develop persona), and now I have to start over with many of them. Am I missing something obvious? What have you guys found works for conversions between the two versions of Photo? Lastly, is there a master list of these differences? Maybe someone has already made a conversion reference list to save us all time. Thank you all in advance. I do love this software. I feel on my computer it is and extension of my eye and brain. I’m looking forward to feeling that way on the iPad soon.
-
Hi everyone, After finally getting and iPad which can run Photo, I’m in the process of learning the iPad version. It’s surprising to me how many differences there are (unnecessary in my opinion!) For example, the unsharp mask options have completely different units/values/ranges. (See two photos) The adjustment options are labeled the same: radius, factor, and threshold, but the range is quite different. For example, “factor” on the computer goes from 0-4, but on the iPad it goes from 0-100%. “Radius” on the computer goes from 0-100 pixels, but on the iPad it goes from 0-1024 pixels! What gives? It took me a long time to figure out good settings for this and other common adjustments (including noise reduction in the raw develop persona), and now I have to start over with many of them. Am I missing something obvious? What have you guys found works for conversions between the two versions of Photo? Lastly, is there a master list of these differences? Maybe someone has already made a conversion reference list to save us all time. Thank you all in advance. I do love this software. I feel on my computer it is and extension of my eye and brain. I’m looking forward to feeling that way on the iPad soon.
-
Free Content included with 1.6 ('Till 16th November)
aslusers replied to MEB's topic in News and Information
You probably turned off the welcome screen (thats what I did). just got to HELP menu and select Welcome. Mine popped up after a second. -
Davisdtix reacted to a post in a topic:
Google Nik Collection is now free for everyone.
-
geraldbiawl reacted to a post in a topic:
Google Nik Collection is now free for everyone.
-
Davidfeach reacted to a post in a topic:
Google Nik Collection is now free for everyone.
-
Josephmt reacted to a post in a topic:
Google Nik Collection is now free for everyone.
-
MartinNum reacted to a post in a topic:
Google Nik Collection is now free for everyone.
-
MichxealLaw reacted to a post in a topic:
Google Nik Collection is now free for everyone.
-
Ardisser reacted to a post in a topic:
Google Nik Collection is now free for everyone.
-
Have 2 bugs to report and a request - these in the 1.4.3 retail version, but persist in the new 1.5.0 beta. 1) in the liquify persona - if I uncheck "show mesh" - the uncheck status stays each time I open the persona, but the mesh comes back. I have to check then re uncheck to turn off the mesh overlay. 2) in the crop tool - the rotate orientation keyboard shortcut (Shift + O) does not work. Orientation stays unchanged. 3) related problem (may be a programming decision rather than a bug?) - if I choose 5x7 crop mode from the drop down menu, my crop selection box becomes huge and all four handles are outside my work area and are inaccessible. Please change so that the resized crop selection aligns with the largest edge so it stays within my image and is more manageable. Thank you so much! Love this program and love you guys!
-
Google Nik Collection is now free for everyone.
aslusers replied to MEB's topic in News and Information
This video is very helpful.... thank you. However, I am stuck at the step where we add a "go to" folder for the plug in support folder. The Shift + Command + G combination produces the forward slash, but when I click "GO", my computer beeps angrily at me and nothing happens. Is there another option for adding the support folder?- 185 replies
-
- 7
-
-
- Nik Coleection
- (and 2 more)
-
I am barely following the conversation above, as I am new to the technology of focus stacking. However, I hope my experience/image might still be helpful. I stacked 12 raw shots using the new stacking feature and am very pleased with the resulting image. The processing took about 4 minutes (just guessing - didn't time it). I set my fuji xt-10 up with an old pentax 50 1.4 and about 8 mm of extension tubes. Lens was set at f/8. camera was on a tripod and I manually adjusted the focus between shots. After the stack was finished, I brought the final image into the develop persona and applied my recipe for Fuji sharpening, adjusted a bit of exposure then back in the photo persona I punched up contrast a bit and unpainted out some dirt on the gummy bears. For not paying a penny more, I couldn't be happier to have this additional function! Question - TheLostVertex - do you process each of your raw images before stacking them? (the new batch processing capability will surely help with that!) EDIT - trying to remember how to attach an image.... working on it.... Edit - well, i have a nice image to share but can't figure out how to load it into this message. If someone can explain how to upload a photo, I'll do it.
-
Thanks for posting this, rudyryk. The lighten color blend mode worked well for me on an infants skin. I had to fuss a bit with selecting the paint brush color, but it was easy and quick, otherwise. What a great fix for a tough problem!
-
Madame reacted to a post in a topic:
Noise reduction on RAW photo disappearing when I click 'develop' in Affinity Photo (with Sony SLT-A58 image)
-
UPDATE - after the recent 1.4.1 update, this problem appears to be gone. My noise reduction edits in the develop persona now stick and continue to look great all the way through to JPEG output. Thanks Affinity!
-
UPDATE - After the recent 1.4.1 update, the problem appears to be solved! Noise reduction adjustments in the develop persona now stick after developing... and look great all the way to conversion to JPEG. THANKS Affinity!
- 14 replies
-
- 1
-
-
- noise reduction
- raw
- (and 3 more)