jmoren
-
Posts
49 -
Joined
-
Last visited
Recent Profile Visitors
1,625 profile views

-
 dev.designer reacted to a post in a topic:
Photoshop layer styles -- any way to convert?
dev.designer reacted to a post in a topic:
Photoshop layer styles -- any way to convert?
-
PSD Mockup with smart objects: layer effects (fx) not imported
jmoren replied to jmoren's topic in V1 Bugs found on Windows
Great, I'll check it when available. -
Hello, thanks for answering. I forgot to enable 'Notify' for this thread , sorry. No, the images are local and embedded. I have upgraded to v.1.8, and re-saved the file, It still happens, but a lesser extent.
-
Hello. Any updates on this topic ? I understand that Affinity team can't just replicate every feature of PS, but some support to import layer styles & PAT files would be great. Regards.
-
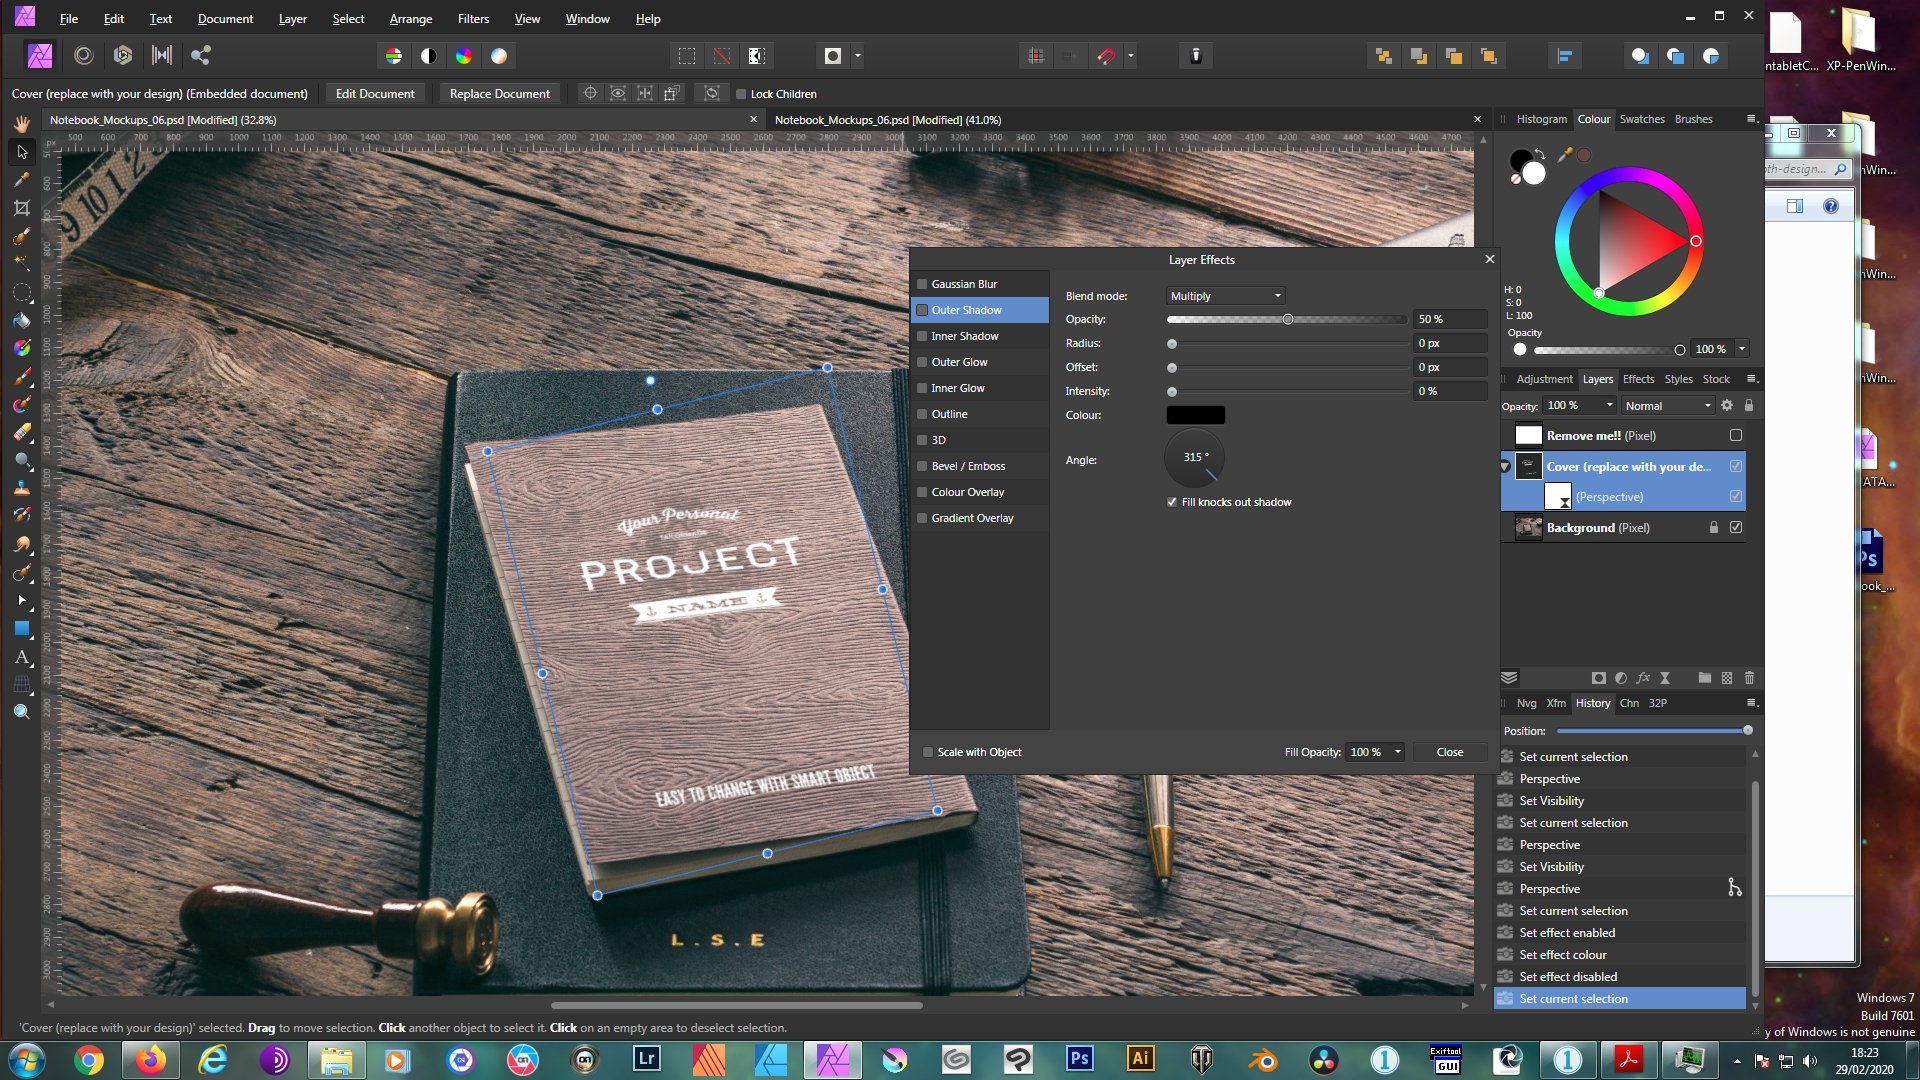
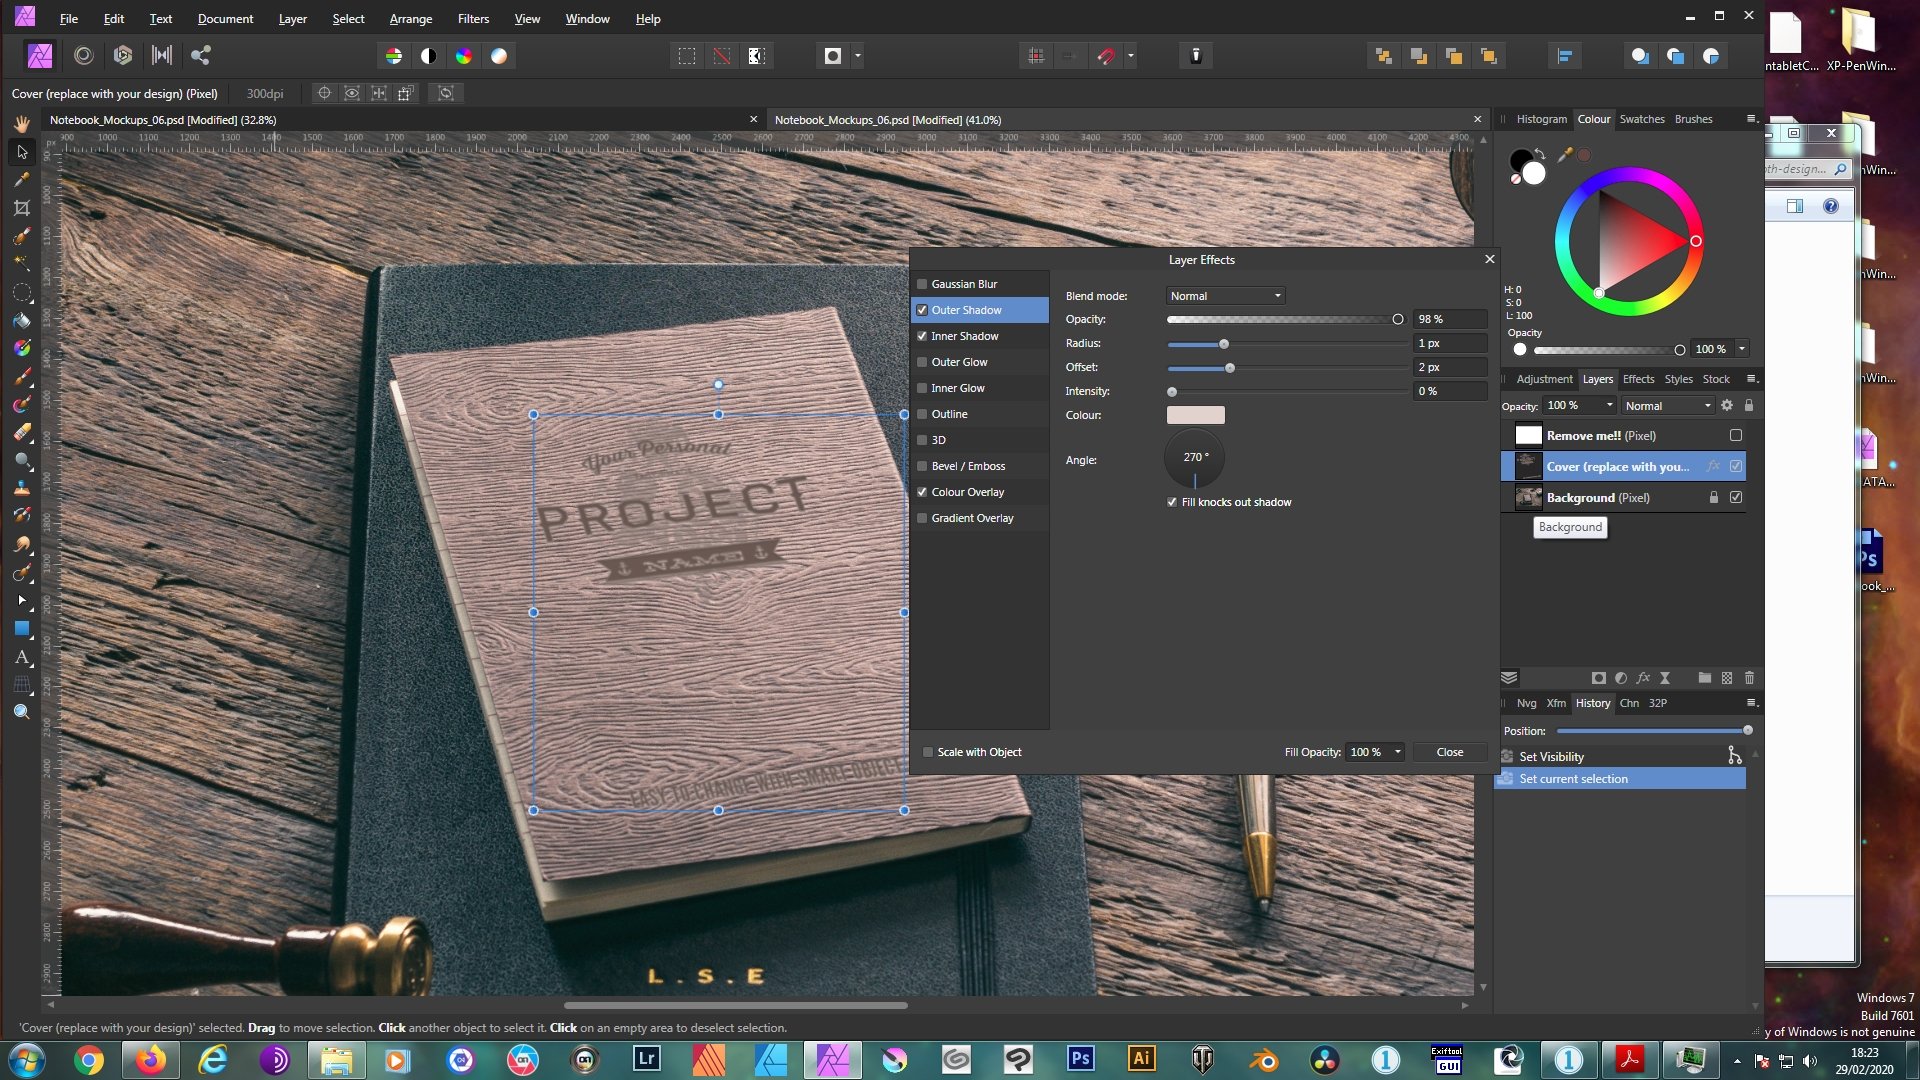
Hello. I've been looking at the new 1.8 version. I have Photo, Designer and Publisher, so it'll take a bit to review all the improvements. But I was interested in testing the PSD embedded support, because I have several PSD mockups that can be used now. I faced a problem when I was testing one of such mockups. I noticed that, if I import the mockup without setting the support for smart objects, the embedded file is imported as a rendered layer, but it keeps the original PS layer fx. Here is a pic ilustrating my point: But if I set the support for smart objects in APhoto, then I get a embedded file, but the layer effects are missing. Here you have the same file imported with smart objects enabled. Is it a bug, or am i missing something ? Thanks for reading.

-
Hello, I made a simple page design for printing 8 small images on an A4 page. I added some guides for cutting and some text on every image. Every image are put into an image frame. I load the same image on every image frame. I created a total of 5 pages like this. Once everything seems correct i saved the Publisher file. The problem comes now when I open the project again. So randomly, some images are not rendered correctly, I just see a blurry image. To fix this, I have to replace the image on the frames affected, and then I save the file again. The problem is that, everytime I open the file I get the same issue, some images at random places are not rendered correctly. How can I fix that file ? Maybe the file is corrupted some way? Sometimes, the file is opened correctly, but most of the time I get the issue. Regards.
-
Hello, This trick was helpful for me. A brief tutorial about the correct use of the 'Edit in plane' could be useful. So now, how can I find info about the new construction mode? Is there a tutorial in some place. Thanks. Regards. [EDIT] I found the help guide and now I have a better idea of how to use this mode. Great!
-
Offset path / contours tool in Desginer
jmoren replied to Malauch's topic in Feedback for Affinity Designer V1 on Desktop
+1 -
 Goetz reacted to a post in a topic:
How to find which brush?
Goetz reacted to a post in a topic:
How to find which brush?
-
zenmom reacted to a post in a topic:
Affinity Designer: measure line/path length
-
Has been fixed on Beta 1.6.5.123. Now you have a way to measure, in mm, the distance between two points in a image, finally! Great! But, I forgot to say, that only Photo has the Info panel, so this feature works only in Affinity Photo.
-
Affinity Photo Customer Beta - 1.6.5.123
jmoren replied to Mark Ingram's topic in [ARCHIVE] Photo beta on Windows threads
Great!, my bug is fixed, downloading... tested and working. -
Passed to development! Great customer service
-
Ok, I think that W H D only in pixels is a bug, so they should be shown in the same unit as X,Y position.
-
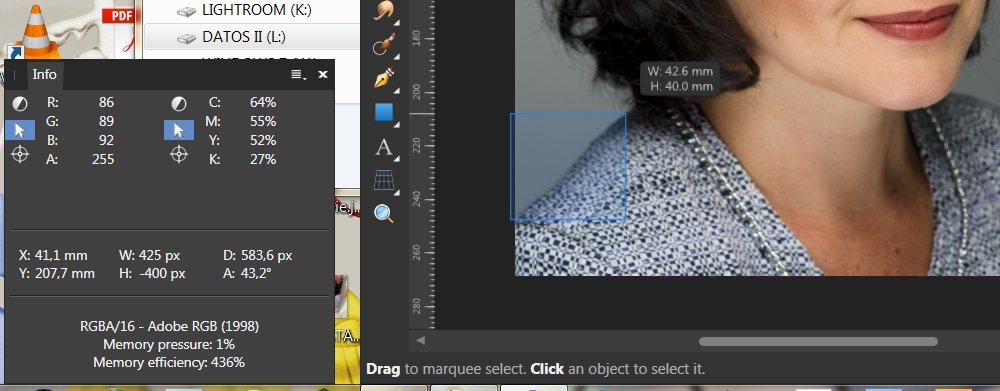
Hello, Just doing other things I have 'discovered' that there is a tool that can solve my problem: the info panel. Yes, if I just change the ruler to measure in mm (or your favorite unit) and use the info panel, you can see the X and Y values live on the info panel that gives you your position in mm (or any other measure). Then I noticed that I have also the W:, H:, D: and A: that usually are empty. Ok, so now just select the V tool, click on a starting point and drag to make a selection box, you will see that, over your cursor the W (width) and H (heigh) values just appear on your selection box, in mm (if you are into your canvas you don't see any selection box). On the info panel the W: and H: values also appear but in px, and also the D (diagonal) and A (angle) also appear. This is a really valuable info, because if I create a selection box starting on point A and ending on point B, the D(iagonal) is just the distance between such points. Also I have the angle of the diagonal (A:). The only problem is that, on the panel info, W H and D appear on px, not in mm (or the selected mesaure for the ruler). How can I change the info panel so the W H D values appear on the correct measuring unit? For me, the tool I need is implemented yet, I just need to see the values on the correct unit. Notice the atached image, I drew a box, starting from the outside of my image, so you can see the box, width and height on the main window, also you can see X Y (in mm) W H D (in px) and A(ngle) on the info panel. If I select a box inside the image I can't see any selection box on the main window, but I still see X Y W H D A on the info panel. So, for me, the D(iagonal) is the most interesting data, it's just the distance between two points BUT is measured in pixels, I need to mesaure in mm. SO => how can I set up the info panel, so the W H D is measured in mm? C'mon Affinity team..., just add it in a future release, all the work is done... Regards, Javier.
- 73 replies
-
- 1
-
-
- designer
- measurement
- (and 3 more)
-
Hello, There is an update for Nik Plugins. I installed and made a quick tests with Color Efex & Vivezza. => Origin photo aRGB 16-bit, converted to sRGB on Photo: * Color Efex OK at 100%, colors off other zoom levels * Viveza colors at 100%, even worse at other zoom levels => Origin photo aRGB 8-bit, converted to sRGB on Photo: * Color Efex OK * Viveza shows a bit more contrasty image AP & Nik Plugins aren't still working fine. bit depth and colorspace are causing issues. Regards.
-
PaulAffinity reacted to a post in a topic:
New NIK Collection Released by DXO
-
It's me again, more checkings mostly with the Viveza plugin: On AP I have the Adobe RGB as the default color space, Relative colorimetic rendering, convert opened files to working space and warn. A. I open a sRGB file The file is converted to aRGB, so I convert the profile to sRGB again, load the plugin and the colors seem ok, any zoom level. B. I open an aRGB file I convert the file to sRGB, load the plugin, colors seem more or less OK, but the image is a bit more contrasty, sharper and saturated. I didn't made any adjustment. The navigator doesn't show correct colors. If I choose to apply the plugin, nothing happens in AP. So the image is show near on Viveza, but not 100%. If I load Color Efex and delete all the conversions, the colors, tone, etc, seems correct. C. I open a Prophoto file The file is converted to aRGB, then I convert the file to sRGB (two conversions), load the plugin, same as B., more contrasty, sharper and saturated. Good on Color Efex. If I configure AP with sRGB as default color space, automatic conversions etc. A. To me is exactly the same B. & C. At minimum zoom level, the colors are off, but at 33%, 50% and 100% are OK. Colors on Viveza navigator are off. Color Efex is OK. Regards.
-
My apologizes Pedro. I checked the workaround with Adobe RBG because it is what I use, and I assumed that the same worked for Prophoto, but I was wrong, Viveza show wrong colors with prophoto as origin color space, no matter if you convert to sRGB. I'm going to try again, maybe there is a workaround for prophoto. I usually set my color space to Adobe RGB in AP. Regards.