jorismak
-
Posts
132 -
Joined
-
Last visited
Recent Profile Visitors
1,663 profile views


-
1.10.0 Affinity Photo much slower than 1.9.2
jorismak replied to jorismak's topic in V1 Bugs found on Windows
I get the feeling that Affinity Photo now uses OpenCL for even more tasks, and the problem is that the power of the HD6xx series is not strong enough to actually be a performance benefit. Or the shared memory is causing issues or slowdowns, something like that. -
 CLC reacted to a post in a topic:
1.10.0 Affinity Photo much slower than 1.9.2
CLC reacted to a post in a topic:
1.10.0 Affinity Photo much slower than 1.9.2
-
 Chimes reacted to a post in a topic:
1.10.0 Affinity Photo much slower than 1.9.2
Chimes reacted to a post in a topic:
1.10.0 Affinity Photo much slower than 1.9.2
-
1.10.0 Affinity Photo much slower than 1.9.2
jorismak replied to jorismak's topic in V1 Bugs found on Windows
Thanks! That at least explains why it _can_ be so much worse for _some_ users... Now to hope it'll be fixed somewhere in the near future :). -
1.10.0 Affinity Photo much slower than 1.9.2
jorismak replied to jorismak's topic in V1 Bugs found on Windows
Ok, so my Intel driver was still on v27 because that's the latest supplied by my device manufacturer. Did the DDU thing (did it before, I know how it works... downloading the latest driver and then killing the network is required, because otherwise Windows will install a new one automatically if you're not fast enough :P). Installed the latest official Intel v30 drivers. Performance on Affinity 1.9.2 seems worse now with OpenCL enabled, although still miles better than 1.10.0. Opening files is faster without OpenCL enabled on both versions. The display updates quicker without OpenCL enabled on both versions. But on 1.9.2 the difference between OpenCL enabled and disabled isn't that pronounced. On 1.10.0 the speed of updating the display / preview is _sooo_ much slower it's unworkable with OpenCL enabled. But... doing the 'motion blur > 800px' test, Affinity Photo 1.9.2 is actually quicker to update _with_ OpenCL enabled compared to OpenCL disabled. But 1.10.0 the same thing is _very_ sluggish and just as slow as doing the 800px motion-blur filter on the CPU alone. Opening a file (a .NEF or a .tif) also seems to 'freeze' the application for a bit, where the display window gets a bit corrupted and then updates again. This isn't happening on 1.9.2. Opening the NEF with 1.10.0 with OpenCL enabled also makes it very obvious how the file is loaded: You see the Develop persona without any tone curve applied, then the display corruption happens, then you see the image again, then the base-curve gets applied. If I then press 'ctrl+3' to zoom in a lot, you really see the tiles of the preview window being redraw. This all isn't happening with OpenCL disabled, but it's also not happening on 1.9.2 (OpenCL enabled or disabled). Trying to dial in the 'defringe' parameters is just plain impossible on 1.10.0 with OpenCL enabled. Sometimes it takes _seconds_ for the screen to redraw. You don't know if a change you made had no effect or you are just not seeing the updated preview yet. On 1.9.2 with OpenCL enabled the changes are _instant_ (if the defringe radius isn't crazy high) and moving the sliders is smooth and gives instant preview while you are dragging the sliders. @ATP Source? You don't have a marking of being Affinity staff, and from looking around not that much changed on the Windows side (but I can't look at the inside of course). I'll be back on 1.9.2 for the time being... -
1.10.0 Affinity Photo much slower than 1.9.2
jorismak replied to jorismak's topic in V1 Bugs found on Windows
Why would it work fine with Photo 1.9 then? -
1.10.0 Affinity Photo much slower than 1.9.2
jorismak replied to jorismak's topic in V1 Bugs found on Windows
Unfortunately, no, not this time. If I can still download them, I'm more than happy to try one by one until I found the one where the regression occurs :). Even loading a RAW file or a 16bit TIFF file is noticeably slower, and you now notice the window being 'redrawn in squares' (as in, you notice the window being updates in chunks). It's not just 'noticeably slower', it's pretty much unworkable. Just opening a RAW file in develop and then zooming in to 200% takes a couple of _seconds_ for the window to update to full resolution, while without OpenCL and on Photo 1.9 it's pretty much instant. -
1.10.0 Affinity Photo much slower than 1.9.2
jorismak replied to jorismak's topic in V1 Bugs found on Windows
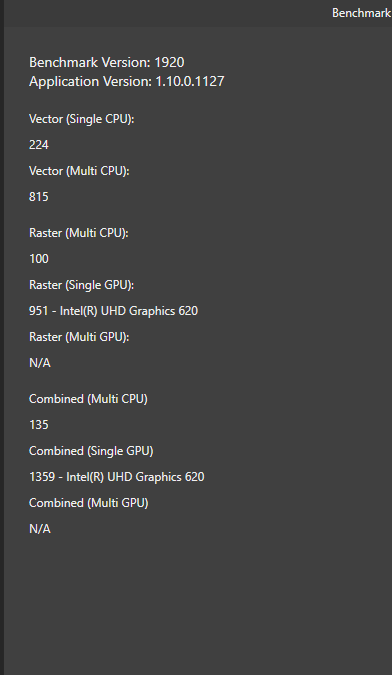
And after a few more runs (thermal limits kicking in):
-
Same thing here with an integrated Intel HD620. Affinity Photo 1.10 final is much slower in rendering and updating with OpenCL enabled than it was in 1.9. Disabling OpenCL made it quicker for me :(. My other machine with a GTX1060 (desktop) seems to run fine with it enabled though, although I have the feeling tha tit also runs a bit slower there than it did before. It's at least not slow enough to disable OpenCL. On a laptop like yours with two GPUs, maybe you need to flag in Windows that the Affinity Photo app is supposed to use the 'performance' GPU. Or in the Nvidia panel, you can say that the application should run on the dedicated GPU. Maybe you are using your HD630 behind the scenes and running into the same issues as I (and others) have with an Intel HD6xx and Affinity Photo 1.10.
-
1.10.0 Affinity Photo much slower than 1.9.2
jorismak replied to jorismak's topic in V1 Bugs found on Windows
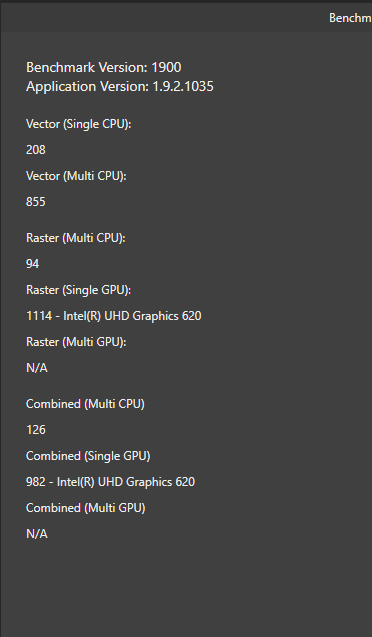
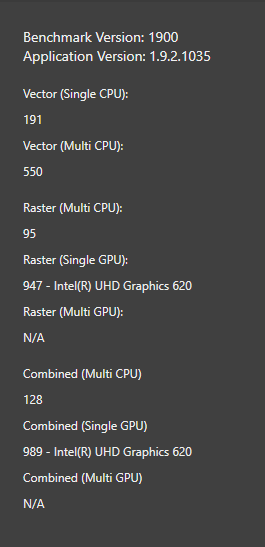
Just tested again with Affinity 1.9.2, with OpenCL enabled. Much better / much faster. -
Hi, I installed 1.10 (after reading about it on some other site?!) and I noticed that just opening a RAW file and trying to zoom and move around in it, the display is really slow in updating (I also really notice it's updating in 'tiles', you see pieces of the photo being updated as you drag the exposure slider around for example). Just zooming in by using the '200%' shortcut makes the pixels very... well, pixelated. And I have to wait _a couple of seconds_ for the real file detail to come. So at first I'm looking at the file with 'fit to window'. When I then zoom in, it seems like those pixels on my screen get zoomed in (so I'm looking at a +/- 1900x1000 image zoomed in immensely) and then after a couple of seconds the rest of the pixels from the RAW file load, and I'm looking at the full detail the raw file has. Now, here is the thing: This also happens with a regular TIFF file, although it _is_ faster. But something is clearly slower in updating the display. Also, when I'm zooming in and out real fast, it seems like it suddenly freezes for a few seconds and then catches up again. A YouTube video that is playing on another monitor is then also freezing for a bit. The moment I turn _off_ OpenCL, everything is much faster! Zooming and moving around is fluent and instant. But I guess filters run slower? I don't remember having to turn that option off in 1.9. I know it's just a little integrated Intel CPU on an ultrabook, but from the benchmark it seems things should be quicker and more importantly: If the GPU would be slower, it shouldn't try to use it, but I also didn't have this on previous Affinity Photo versions.
-
Just discovered the Reflect mode, and I want to know how to do the same effect in Imagemagick / Vips / G'mic, so I want the formulas :). I'll take a look at the links posted here to see if I can figure it out. What I discovered: If I take the luminance of my 'source layer', create a new layer filled with a yellow warming color, and use the luminance of my source layer as a mask, the reflect blend mode at 20% seems to do basically the same as Nik's very nice Color Effex 'Skylight' filter. It warms things up in a subtle way but also adds some saturation, but not so much in the shadows. Gives a very nice warming effect if your image was shot with clouds or pure in the shadows, or an auto-whitebalance made it 'too neutral / cool'. Way nicer than just adding a warming color with 'Soft Light', Photo Color Filter or other tricks.
-
(getting the thread back alive) Maybe I can turn the question around into the problem he seems to be _really_ having: The 'soft proof' for Affinity Photo gives very different results to the soft-proof of Photoshop. Particularly, the blacks seem to be at least gray with my printer-profile in the soft-proof, while Photoshop still displays a pretty-much-black. So both are set to 'relative' intent, and both with black-point-compensation, yet the result is clearly different. Also, if I enable the 'gamut warning' in Photoshop, I can push the saturation of the image _way_ higher before Photoshop starts giving out-of-gamut warnings.. but if I check 'gamut check' in Affinity Photo, it gives a lot of gamut-warnings almost straight out of the box, and I can't push the saturation at all without getting more gamut warnings... This is all on the same (Mac) machine, with the same display-profile loaded and with the same printer ICC profile. Particularly the out-of-gamut warnings which seem to be given waay to early make it impossible to do any real soft-proofing with Affinity Photo on my setup.
-
Google Nik Collection is now free for everyone.
jorismak replied to MEB's topic in News and Information
DxO still host the last free version I was told. It should be somewhere on the site . It's here https://nikcollection.dxo.com/nik-collection-2012/ Requires an email to download though . -
Really ? That can't be true.. I would consider that basic functionality, specially the blend modes..
-
I decided to give Affinity Photo another go .. my workflow keeps changing / evolving so I thought to just try it to see if it's more usable these days compared to the early 1.5 beta's. I'm running into a few things where I'm thinking that I'm just missing it, or there must be another 'affinity-way' to do it. I can't seem to find a way to set the levels overlay to a specific blackpoint by sampling the image. Like the basic 'black, mid and white point' droppers in the levels-dialogbox. I only need black-point for now, but can't seem to find any of those. Now, I need to open the info tab, add a color sampler to a specific point (maybe even add a blur-fx underneath if I want average values, because the color sampler doesn't seem to have a size control.. the color-picker does, but not the color sampler). I drop it on the point, and I can get RGB values in the 0 - 255 range. But the levels-overlay takes values in percent.. so I need to convert the values from the color sampler to percent by doing (x / 255) * 100, and enter those values manually in the R, G and B channels in the levels-overlay... quite a bit of work! The other thing that I can't seem to find (and must surely exist somewhere) is the 'Divide' blending mode. I hovered over all the blending modes but none do what I expect from 'Divide' , so it doesn't seem to be a simple naming-difference. Now, I have to duplicate a channel and use 'Apply image' with another layer and enter 'DR / SR', 'DG / SG' and 'DB / SB' in the formulas to divide one layer by another layer. Not as slow as the levels-black-point but still a lot harder than just selecting the Divide blend mode and keep on going... Where are those functions in Affinity (I'm on 1.6.5.112) and / or what are they called because I can't seem to find them.
-
Delineated reacted to a post in a topic:
Very bad JPEG compression with Affinity Photo
-
I believe this is because the cropping (And other stuff) can be 'non-destructive'. Pick the layer you're working on / working with, right click it and try 'rasterize'. See if the picture 'received' by Color Efex now matches more.