Gear maker
-
Posts
1,605 -
Joined
-
Last visited
Everything posted by Gear maker
-
Ooh that could be really handy. I never thought of having the program do that before I've always just tried to calculate it or eyeball it. Great idea!
-
So that's why sometimes I can't get certain objects to become a candidate. Next time I run into this problem I shall need to check the lock status. Thanks Alex. I frequently use the lock to signal that I am done with an operation that I am doing to many layers. Sort of a place mark.
-
Callum, Miguel's picture is exactly what I see when at about 25 to 35% zoom. I appreciate it guys. Sometimes it doesn't make a difference, if it's got a similar color behind it, but other times...
-
The attached drawing is part of a large drawing. It's large enough that it won't fit on my screen at 100% zoom. In this portion of the drawing there are several shapes with a fill and a stroke. Both are shades of gray. The shapes are set to fit snugly against each other. Then the stroke is centered. So the strokes overlap. There is a red background. As I zoom out the strokes turn transparent. It doesn't seem to matter if the stroke is inside, outside or centered. The color of the stroke makes little difference. How can I stop the strokes from turning transparent when zoomed to 25% or less? Thank you. Test30.afdesign
-
Eyedropper Tool
Gear maker replied to DreamThinkLive's topic in Pre-V2 Archive of Desktop Questions (macOS and Windows)
DreamThinkLive, Note that the "bottom line" being referred to is not visible when AD or AP is operated in Separated Mode. Mike -
Shared Affinity assets folders
Gear maker replied to ronnyb's topic in Older Feedback & Suggestion Posts
Ronny, outstanding idea! -
BNoolean operation
Gear maker replied to jackamus's topic in [ARCHIVE] Designer beta on macOS threads
MBd, I thought I was the only one that didn't use the non-destructive operations. Knock on wood, I have never regretted that practice. :rolleyes: They seem great, but still... -
Hi Callum, In this case the objects happen to be stroke only, with no fill. So that wasn't part of the problem, I could see splitting these would be nice. This time it was just that the stroke was hidden behind the blue line AD uses to show the path. I'd just like to add that to use the live blending mode properly the path indicator/bounding box would need to be hidden more than a second or two. At least I'm not fast enough to evaluate the results in 2 seconds always. The AD team has done a great job of getting rid of the path indicator in many of the instances, but a toggled "hide" is really necessary. I appreciate it. Mike
-
Does anyone have a suggestion of how to efficiently set blending modes of a stroke? AD has the great feature of live viewing of the blending modes as they are changed but the blue line showing the path covers the stroke. Holding down the space key stops being able to change blending modes. So the live mode is useless. Again this program would be so much better/easier/friendly with a command to hide the bounding box and path indicators.
-
Ben, this looks really great. Can't wait to use it in a project.
-
Moving curve nodes
Gear maker replied to jackamus's topic in Pre-V2 Archive of Desktop Questions (macOS and Windows)
Jackamus, FYI I fairly frequently have 2 or even more curves selected when adjusting control handles. If I have a couple shapes that share a common portion of the curve and I need to tweak them then I do a cmd + A to get all handles on all selected shapes visible so I can adjust all to keep the path identical. -
Aligning gradients and transparencies
Gear maker replied to jackamus's topic in Older Feedback & Suggestion Posts
jackamus, yes this is always a frustrating problem. I have put in 2 requests for a way to control the angle of the gradient other than dragging a handle and trying to get such a minute change. In one of the requests Alex (A_B_C) suggested overlaying (and aligning) a small rectangle with the long narrow shape then snapping the long gradient to the edge of this shorter rectangle. A - If the ends of the long rectangle are not perpendicular (or maybe the long sides aren't parallel) then the idea of creating a small rectangle and snapping the gradient to the edge of the small rectangle, then deleting (or hiding) the small rectangle works well. But aligning the rectangle is a nuisance, but still a lot easier than aligning the gradient. B - Carrying that thought further... If the ends of the shape are perpendicular, which I find is more often the case than not, then turn on the "Snap to shape key points" or "Snap to object geometry" and have snapping turned on, then create the gradient at one end of the long rectangle and drag it snapping to the corner nodes on very end of the shape. C - Another trick that I have found sometimes handy is frequently the long shape was created originally as a long rectangle that was either horizontal or vertical, then rotated to the final angle and maybe modified so the ends are not perpendicular. AD remembers the original orientation of the shape, so if I create a new rectangle that is closer to being square, but with the original orientation of the long shape. Create my gradient in that new rectangle where I have room and perpendicular sides, then do a cmd + C on the rectangle and a cmd + shift + V on my long shape to copy the gradient into it. The gradient is fit into the long shape at the same relational angle as it was in the new rectangle. Hopefully the pictures will help explain this better. I am totally in agreement with you that we need better control of the angle of a gradient, but hopefully these work-arounds will help you until then. They have made it easier for me. Mike Long gradient.afdesign
-
MEB, thank you. You're right it did get it all then. Really had me confused.
-
Yes this is possible. Click on the Gradient tool, then in the context toolbar click on Type and select solid. Hope that helps.
-
I have a text on a path that is making me pull my hair out. Attached. I have a set of numbers in Text on a Path next to the ellipse saying "26.5 x 10⁵-15". I can click and place the cursor anywhere in the "26.5 x " but it totally ignores my attempt to place the cursor in the "105-15". What did I do wrong? I'm trying to select the 105, how can I do this? I also want to add text to the end, how can I do this? Can anyone explain what this is doing? This was created using beta 1.3.4.26925 Test25.afdesign
-
OK, I am in serious need of some help here...
Gear maker replied to justwilliam's topic in Share your work
justwilliam, great start. Seeing as you are doing this in AD do I assume you want to do everything in vectors? That's definitely more complicated on some of these desires. Especially hair, metal and marble. You're wanting to do the body in marble? The metal is that the clock face and frame? If so... For the frame try an fx playing with the 3d and bevel & emboss. The clock face I'd try a conical gradient centered on the center of the hands. Or if you are after more of a chrome look check out https://forum.affinity.serif.com/index.php?/topic/10038-layer-styles-enthusiasts-read-on/ The marble I'd try a white/off-white background then dark areas drawn in the using an fx gaussian blur to make them indistinct. Assuming the marble is for the body I'd make the appendages separate so I could add a linear gradient to give them some shape with highlights and shadows. Good luck. -
A double-click alone finds the top layer but enters into the node tool. So in your last sentence do you mean double-click or opt + double-click? I'm going to just have to pay with this as I'm getting very mixed results. Sometimes it's getting stuck on one layer, I think it might be because there is a bounding box handle for the selected item at that location. And in other areas I opt + click or opt + double-click it seems to be skipping a layer. Then as I step down it gets to the bottom group and just steps through the layers in that group until I do a cmd-click to just to the top layer again. Anyway now I have the chance of finding the layer.
-
They are inside several groups. So a single click finds the next inside the same group, the double searches for another group. Got it. Thank you.
-
Hi MEB, you came through again. Except I needed to double click with the option down. But it worked. Thank you. This will be most handy.
-
In a large drawing I end up with one layer on top of another, on top of another, etc. If I do a click or a cmd + click on a spot AD finds the top layer. How can I find the layers below the top layer? Is there a modifier that goes to the next layer existing in that spot? Or is there a way to get a selection of layers that exist under the cursor?
-
Many thanks Hokusai for the explanation. I guess I never used that feature in other packages. So it's a separate visibility from the layer visibility. It could be handy. I have many more questions but to keep this short I will abstain from asking them and wait until the feature is available. I appreciate the answer. One of the last steps in my workflow is to go through the layer groups and delete all the "just in case" layers. It's saved me a lot of work having them. Mike
-
Hokusai, I'm curious about using the show all/hide all. As I remember it the problem I used to run into was if I had a sprinkling of hidden layers in a large project, you know layers that were used to create areas and I just wasn't ready to delete them so they were hidden. Then when I used the hide all and the show all, the layers I had hidden also became visible so I had to go back and find the ones I didn't want to see and hide them again. It got to where I gave up using the show all. Since then I have tried to use a hierarchy groups so I could easily hide areas without touching others. And I could have a sprinkling of hidden layers mixed in with no problem about their sate changing. How did you handle this? Or do you just attack it from the other side and never keep layers "just in case"? I realize it's probably a bad habit, but... Maybe I'm a layer hoarder! Mike
-
Have you done this yet?
Gear maker replied to justwilliam's topic in Pre-V2 Archive of Desktop Questions (macOS and Windows)
Good suggestion. Done. -
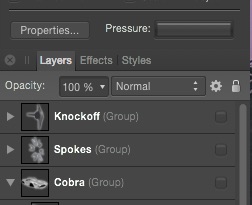
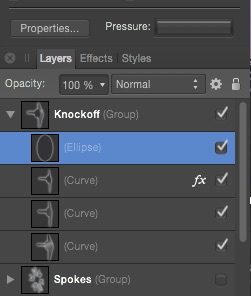
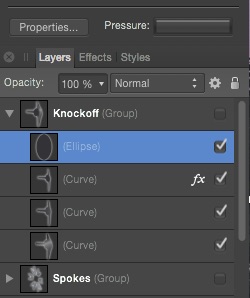
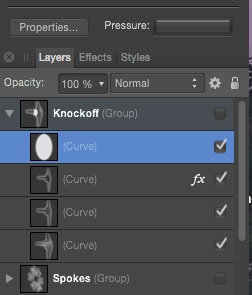
I've seen emails about not being able to tell which layer is selected, above is a note I wrote earlier. I just found the same situation again and did some playing. This drawing has over a hundred layers in it and after creating a shape I noticed that the top level of the group in which I had just created a shape was not highlighted. I tried playing with hiding and unhiding the layers in the group. With no change. So I kept watch to see when it started being highlighted. It happened when I clicked on "Convert to curves". I can use the history to go back and forth, the top layer highlights and then unhighlights. I notice in the example I listed in June, the layer I'd created was an Ellipse when not highlighting and a Curve when it is highlighted. Just like in this example. Somehow that seems to trigger the highlighting/non-highlighting of the upper level layer. Have you been able to find out what's causing this? Not having the top layer highlighted really makes it hard to locate a layer that's buried.
-
Madame, hey that looks fantastic. Processes like this adds to the fun of AD. I could see the developers adding this as an extension to the fx features. Enjoy.
- 23 replies
-
- 1
-

-
- layer styles
- styles
- (and 2 more)