h_d
-
Posts
1,626 -
Joined
-
Last visited
Everything posted by h_d
-

How do I scale an object in Affinity Designer?
h_d replied to bobdobbs's topic in Desktop Questions (macOS and Windows)
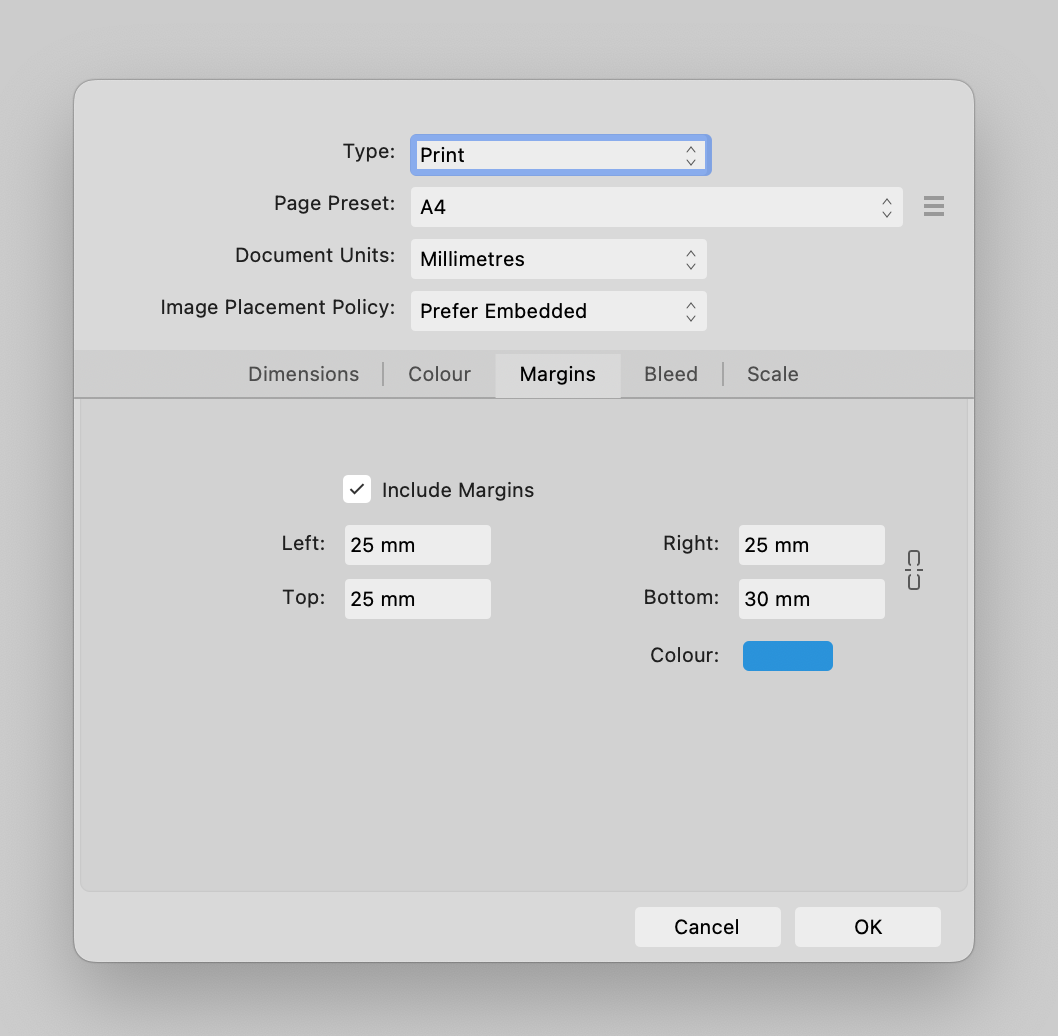
Could it be the margins? If so, you can remove them or resize them via File>Document Setup>Margins, or show and hide them via View>Show Margins. HTH
-
Like this? Turn off text wrap.
-
How select and blur the selection
h_d replied to enginestar's topic in Desktop Questions (macOS and Windows)
Depends what you want to achieve. You could instead use the Freehand Selection Tool (aka the Lasso), or the Selection Brush. You could then use the Refine button to tighten up your selection. You could adjust the Feather in the Contextual Toolbar (or in Select - Feather...) to help merge the edges of the blurred selection more smoothly into the unblurred areas of the image. And you could choose Layer - New Live Filter Layer - Blur - Gaussian Blur to give you a non-destructive, re-adjustable blur. But essentially you're not missing anything 😀 -
fill vector object with image in designer v.2 ?
h_d replied to iaffinities's topic in Desktop Questions (macOS and Windows)
Make sure the ellipse has an empty fill - it doesn't matter if it has a bevel effect or not. Place the image, then drag the image thumbnail over the ellipse layer (the full layer, not the thumbnail): Screen Recording 2023-03-11 at 18.44.20.mov This will clip the image to the ellipse. It's worth tracking down some of the many YouTube videos about clipping and masking in Affinity apps to get a sense of exactly how the different options work. -
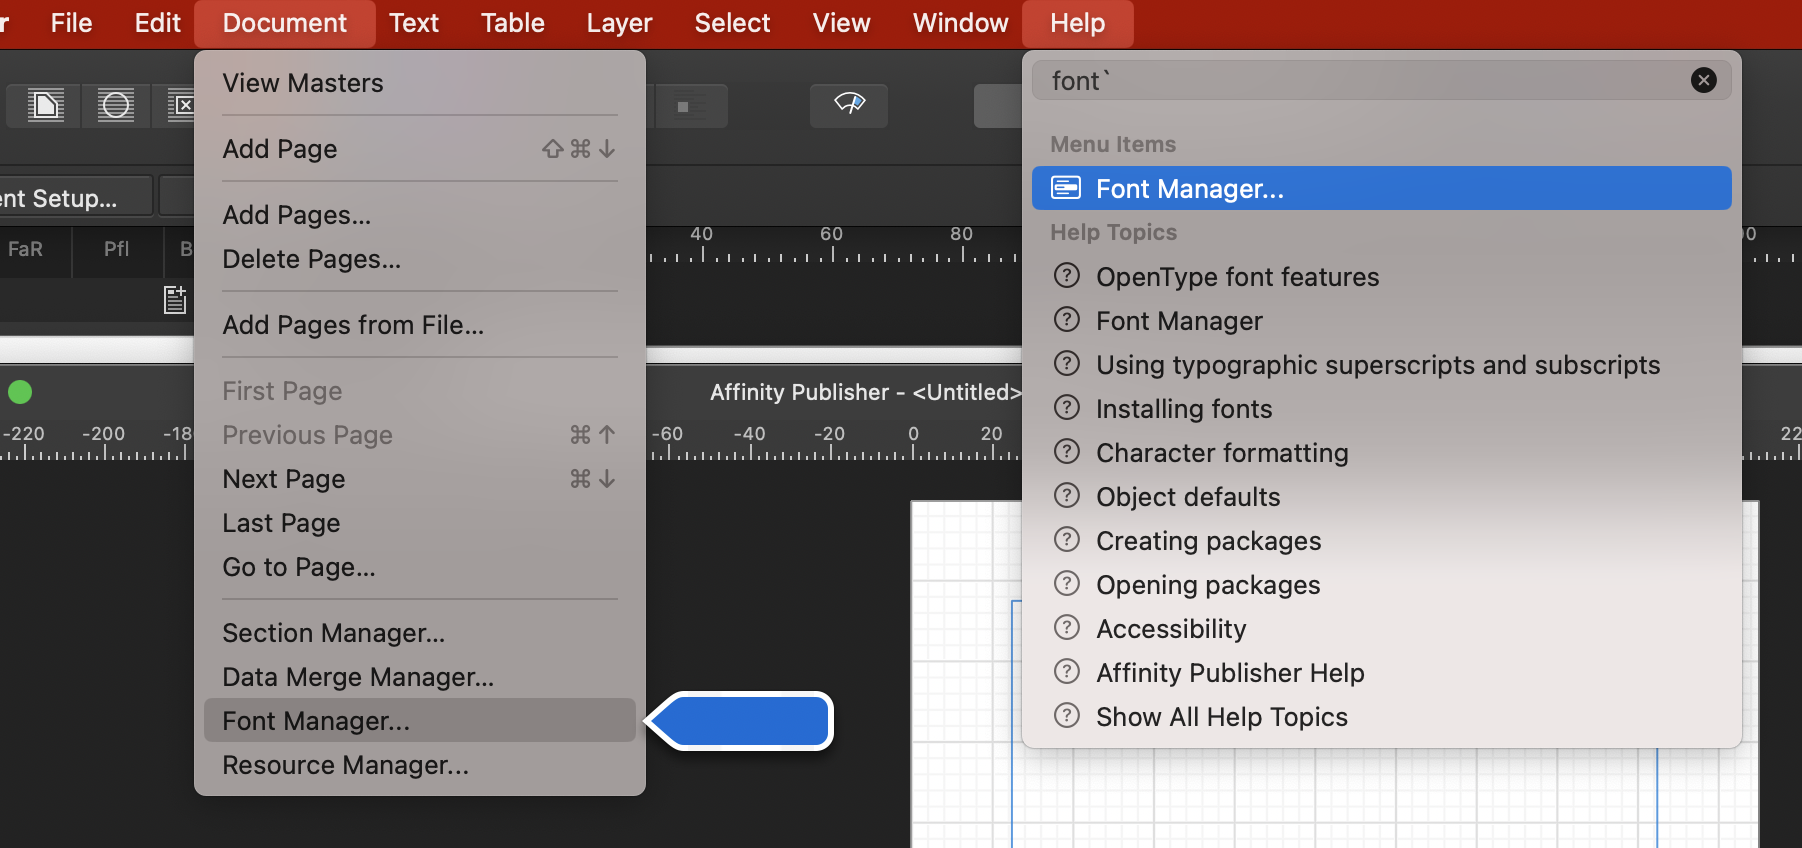
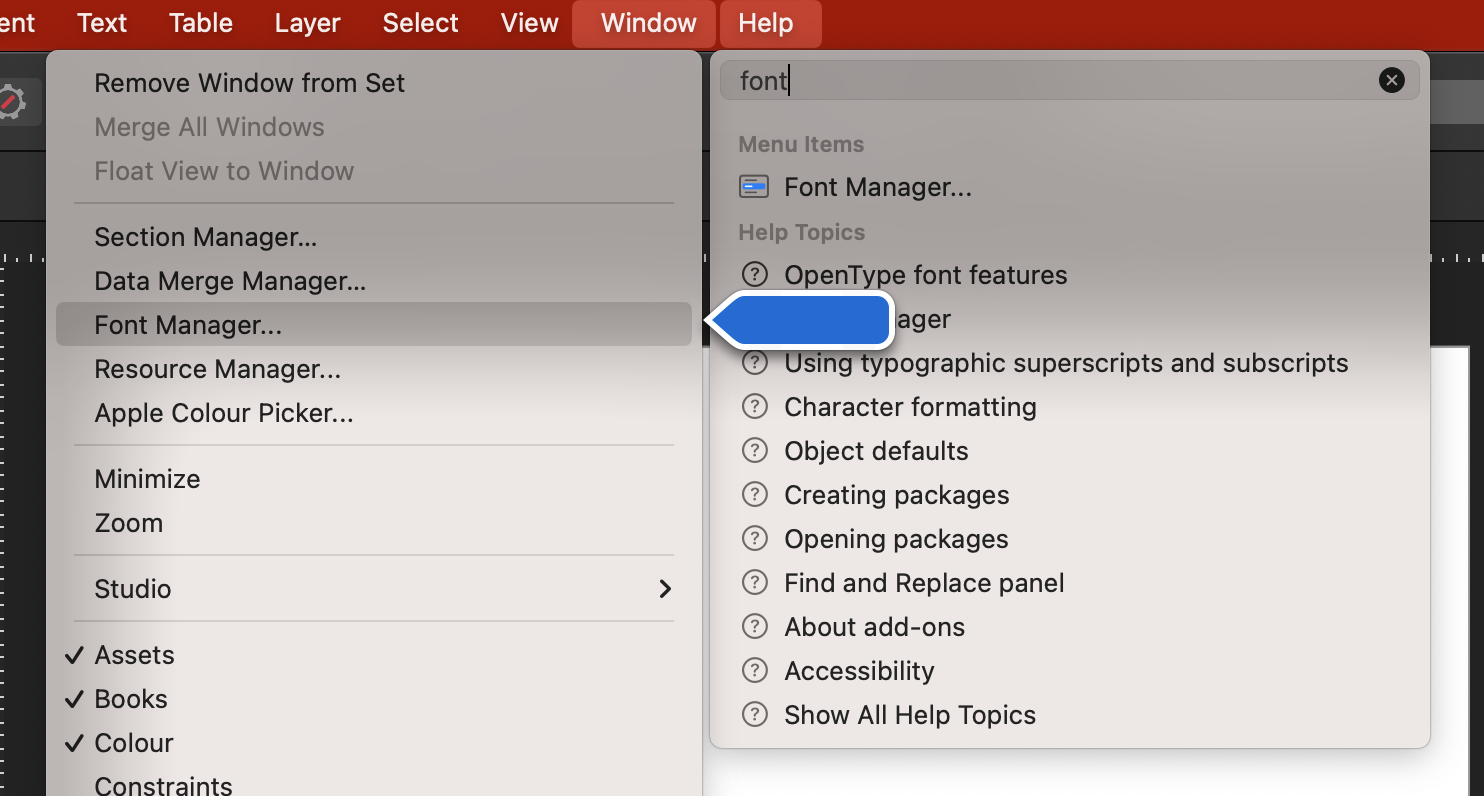
Where is the Document Menu?
h_d replied to Humbucker's topic in Desktop Questions (macOS and Windows)
In Affinity Publisher v1, Font Manager is indeed in the Document menu: But in Affinity Publisher v2, Font Manager is in the Window menu: This is from the v2 help file: Sounds like you're reading instructions for Affinity Publisher v1 and applying them to Affinity Publisher (or Designer?) v2.
-
Good call...
-
It may be a Finder thing: in List view I see generic icons (for all apps, standard .jpgs and .pdfs too, not just the Affinity suite). But if I switch to Icon view or Column view I see the full icon preview. This is in macOS Ventura. ADD: Alternatively there's some useful advice at MacRumors. I can't see how re-installing the Affinity apps is going to help.
-
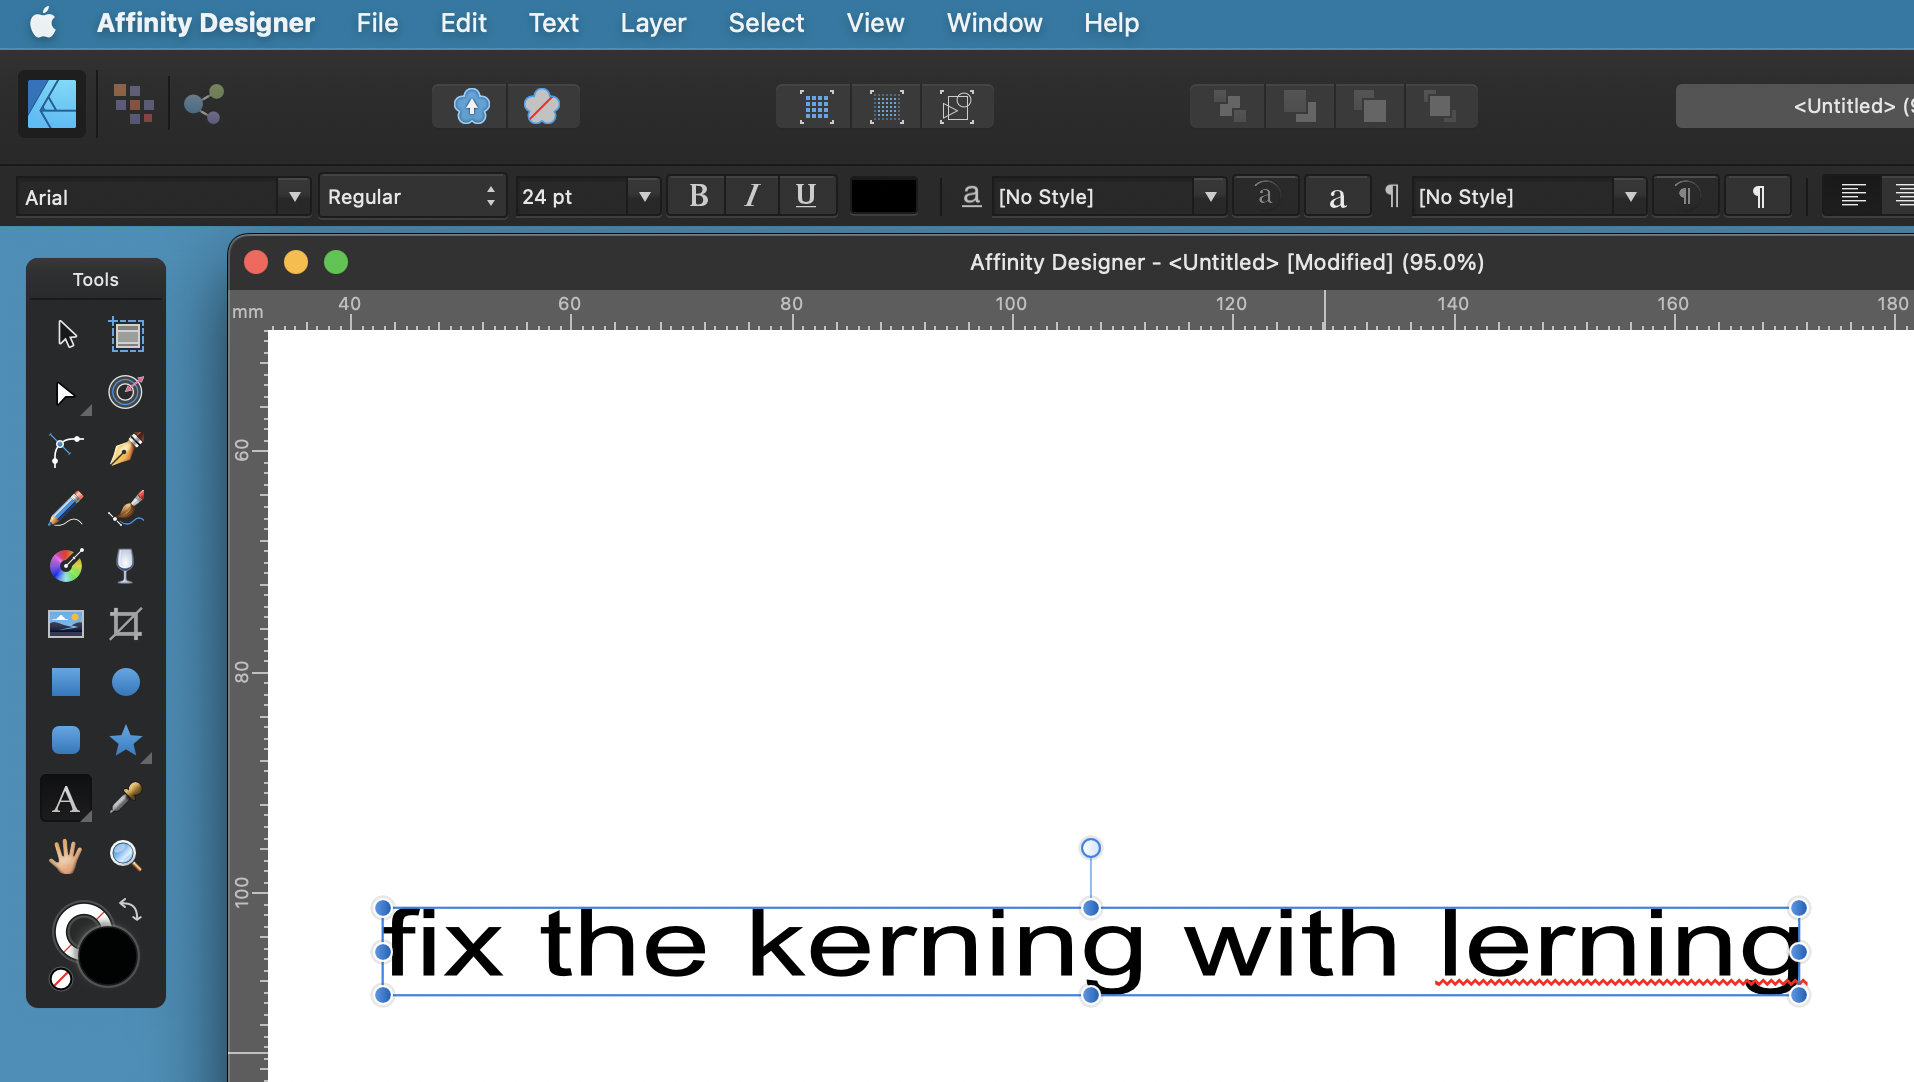
Auto correct thinks "Kerning" is not a word?
h_d replied to Jeff Kratzer's topic in Desktop Questions (macOS and Windows)
Works ok here: but I think spelling dictionaries work differently on macOS and Windows. Can you right-click on the word and choose Learn spelling?
-
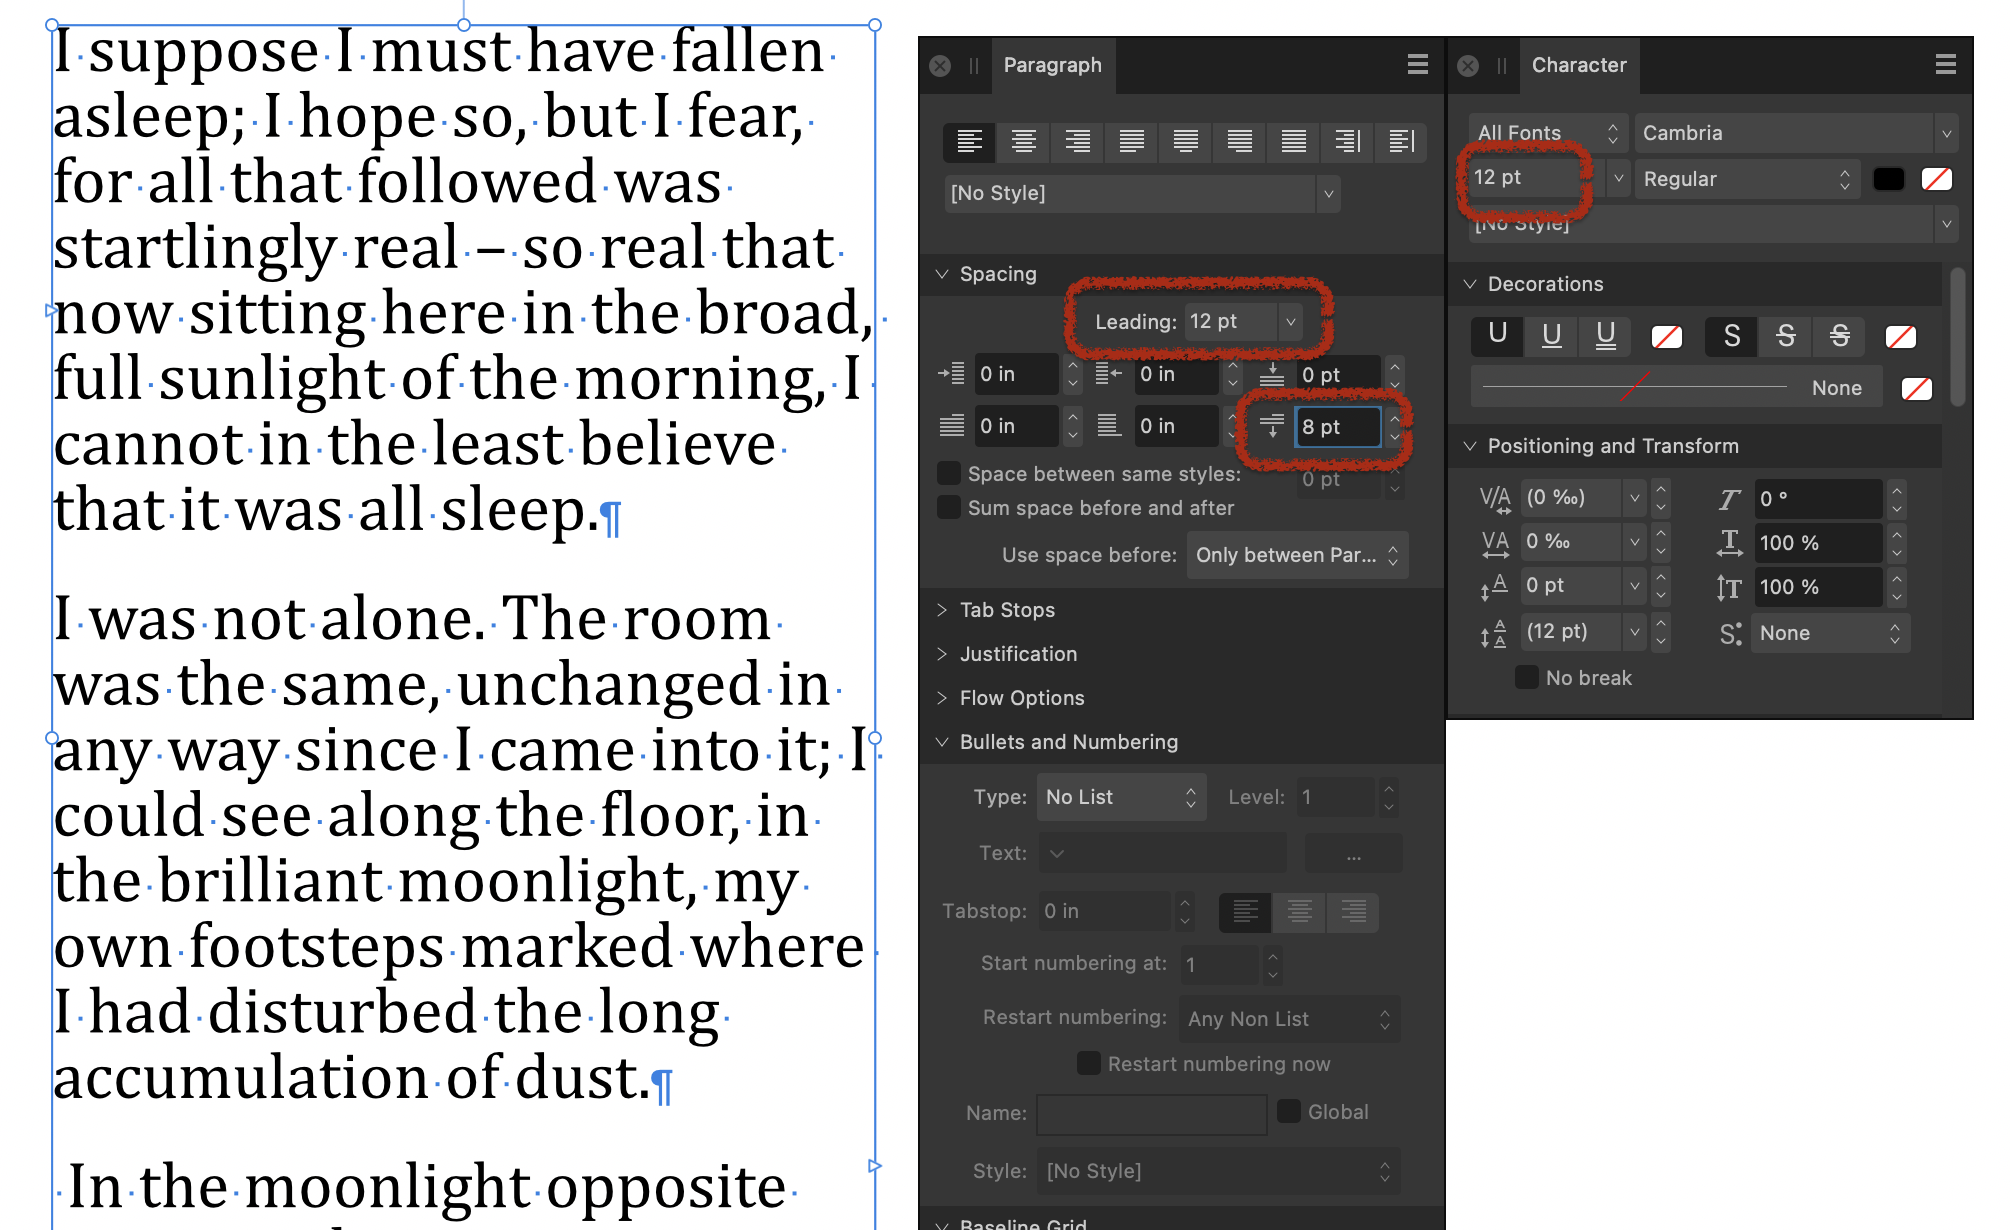
Character panel - Size 12pt Paragraph panel - Leading 12pt Paragraph panel - Space After Paragraph: 8pt I have displayed the paragraph end characters for clarity. Save these settings as a style with your chose font.
-
No histogram with curves channel
h_d replied to CogPsyence's topic in Desktop Questions (macOS and Windows)
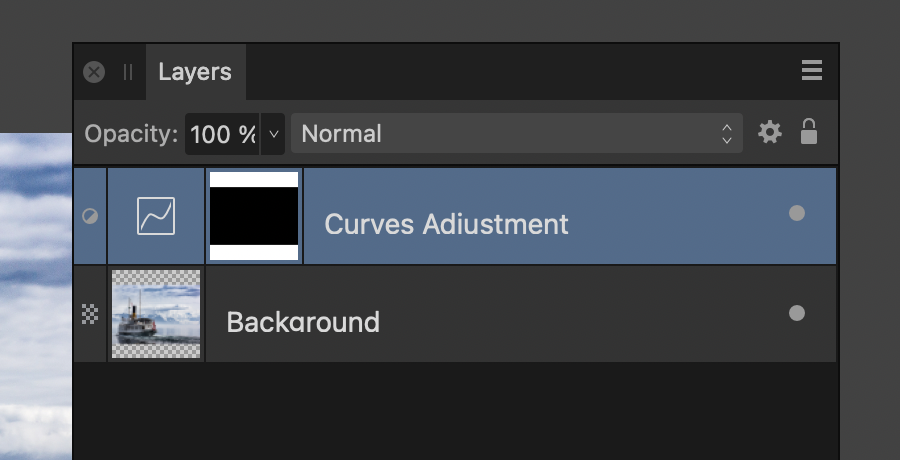
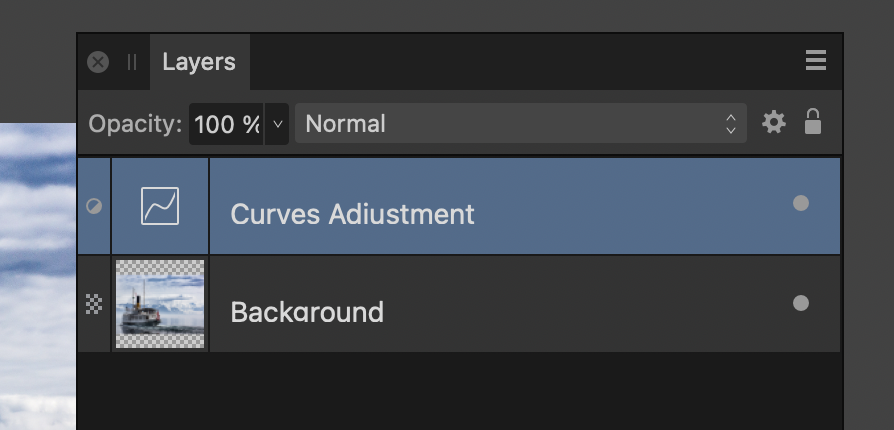
I don't have an answer, just some observations. When you create a new Adjustment Layer you get this: If you then invert it, you get this: If you invert the Adjustment Layer a second time, you get this: This arrangement is only temporary, though - as soon as you make any change to settings in the Layers panel (eg Opacity or Blend Mode), the white thumbnail disappears and the Adjustment Layer reverts to its original state. What @CogPsyence has seems similar to my third screen grab (no nesting indicator, the Adjustment icon to the left of the Layer thumbnail), but with an apparently permanent, transparent thumbnail. I don't think there's an additional pixel layer, just a mask. Which doesn't make a lot of sense, as an adjustment mask should range between white and black. I've tried quite a few ways of making the thumbnail/adjustment layer transparent, without any success. It may well be a bug, but I'm not sure if it's readily repeatable. Perhaps the easiest solution for @CogPsyence would be to delete the original adjustment layer and try again. (Or alternatively upload the .afphoto file to the Forum so others can investigate more fully.)
-
Creating star with pointy tips but not weird
h_d replied to panjakrejn's topic in Desktop Questions (macOS and Windows)
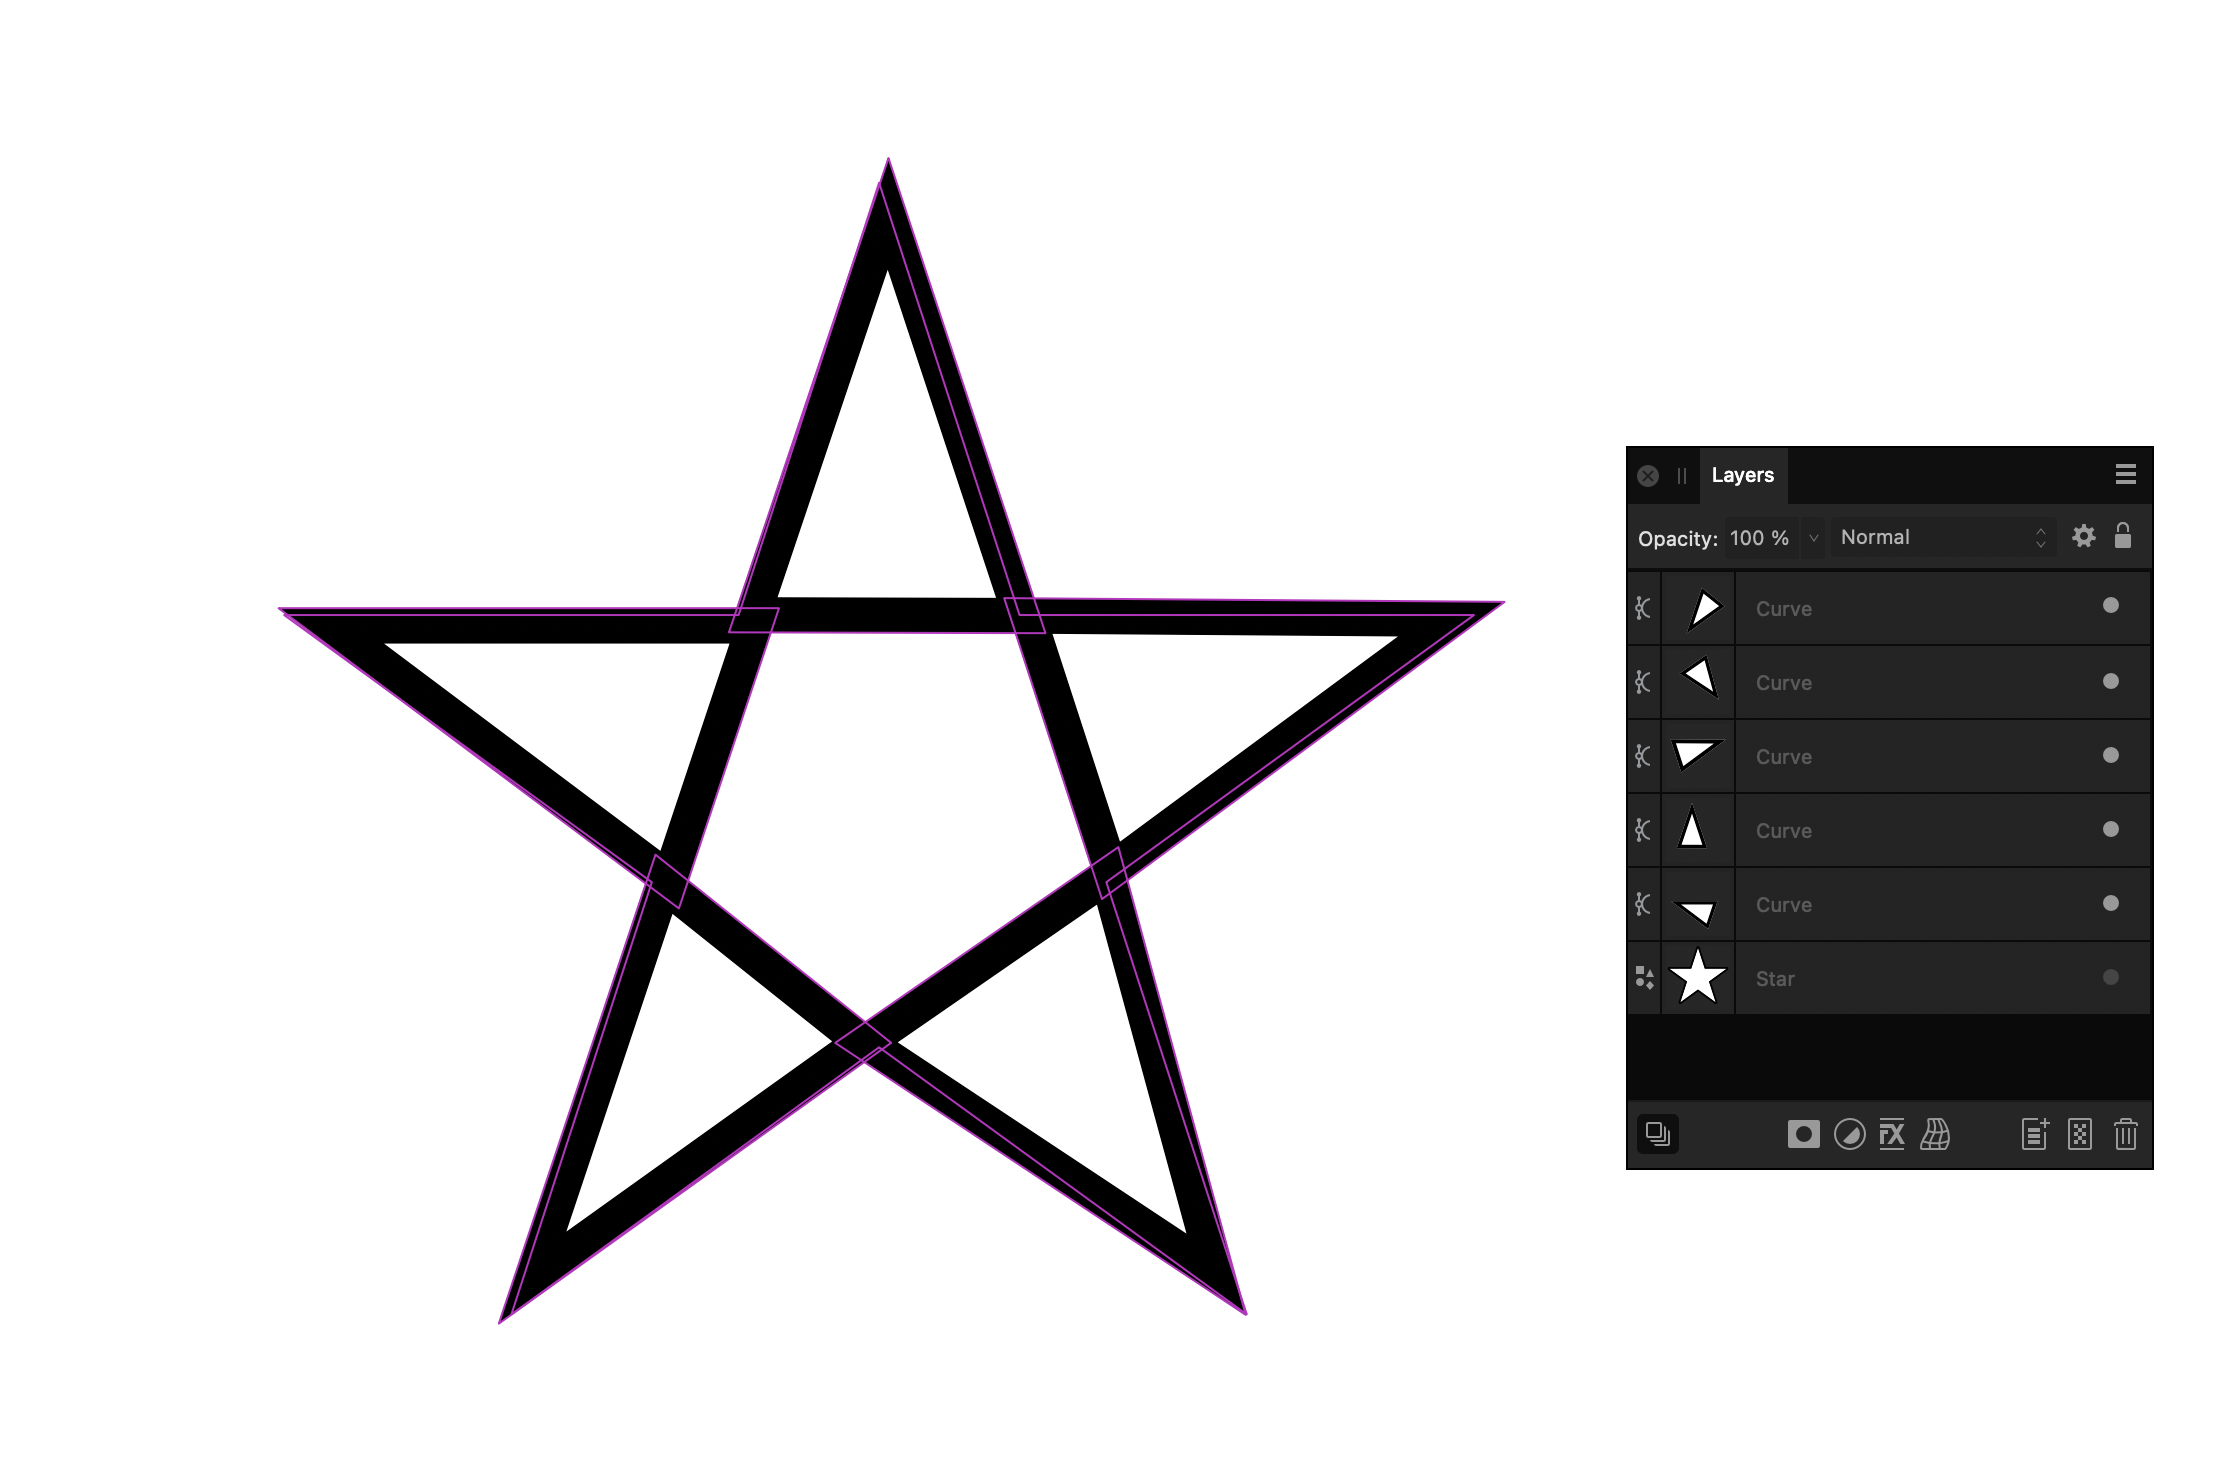
My humble effort (a triangle traced over one point of the original star and then converted to curves and duplicated over the other points): (Needs a lot more tidying up...) star.afdesign
-
Creating star with pointy tips but not weird
h_d replied to panjakrejn's topic in Desktop Questions (macOS and Windows)
How did you draw the original star? -
Using clone brush in a pattern layer
h_d replied to Rhodomazer's topic in Desktop Questions (macOS and Windows)
After you've cropped, rasterise. That should avoid a fresh save. -
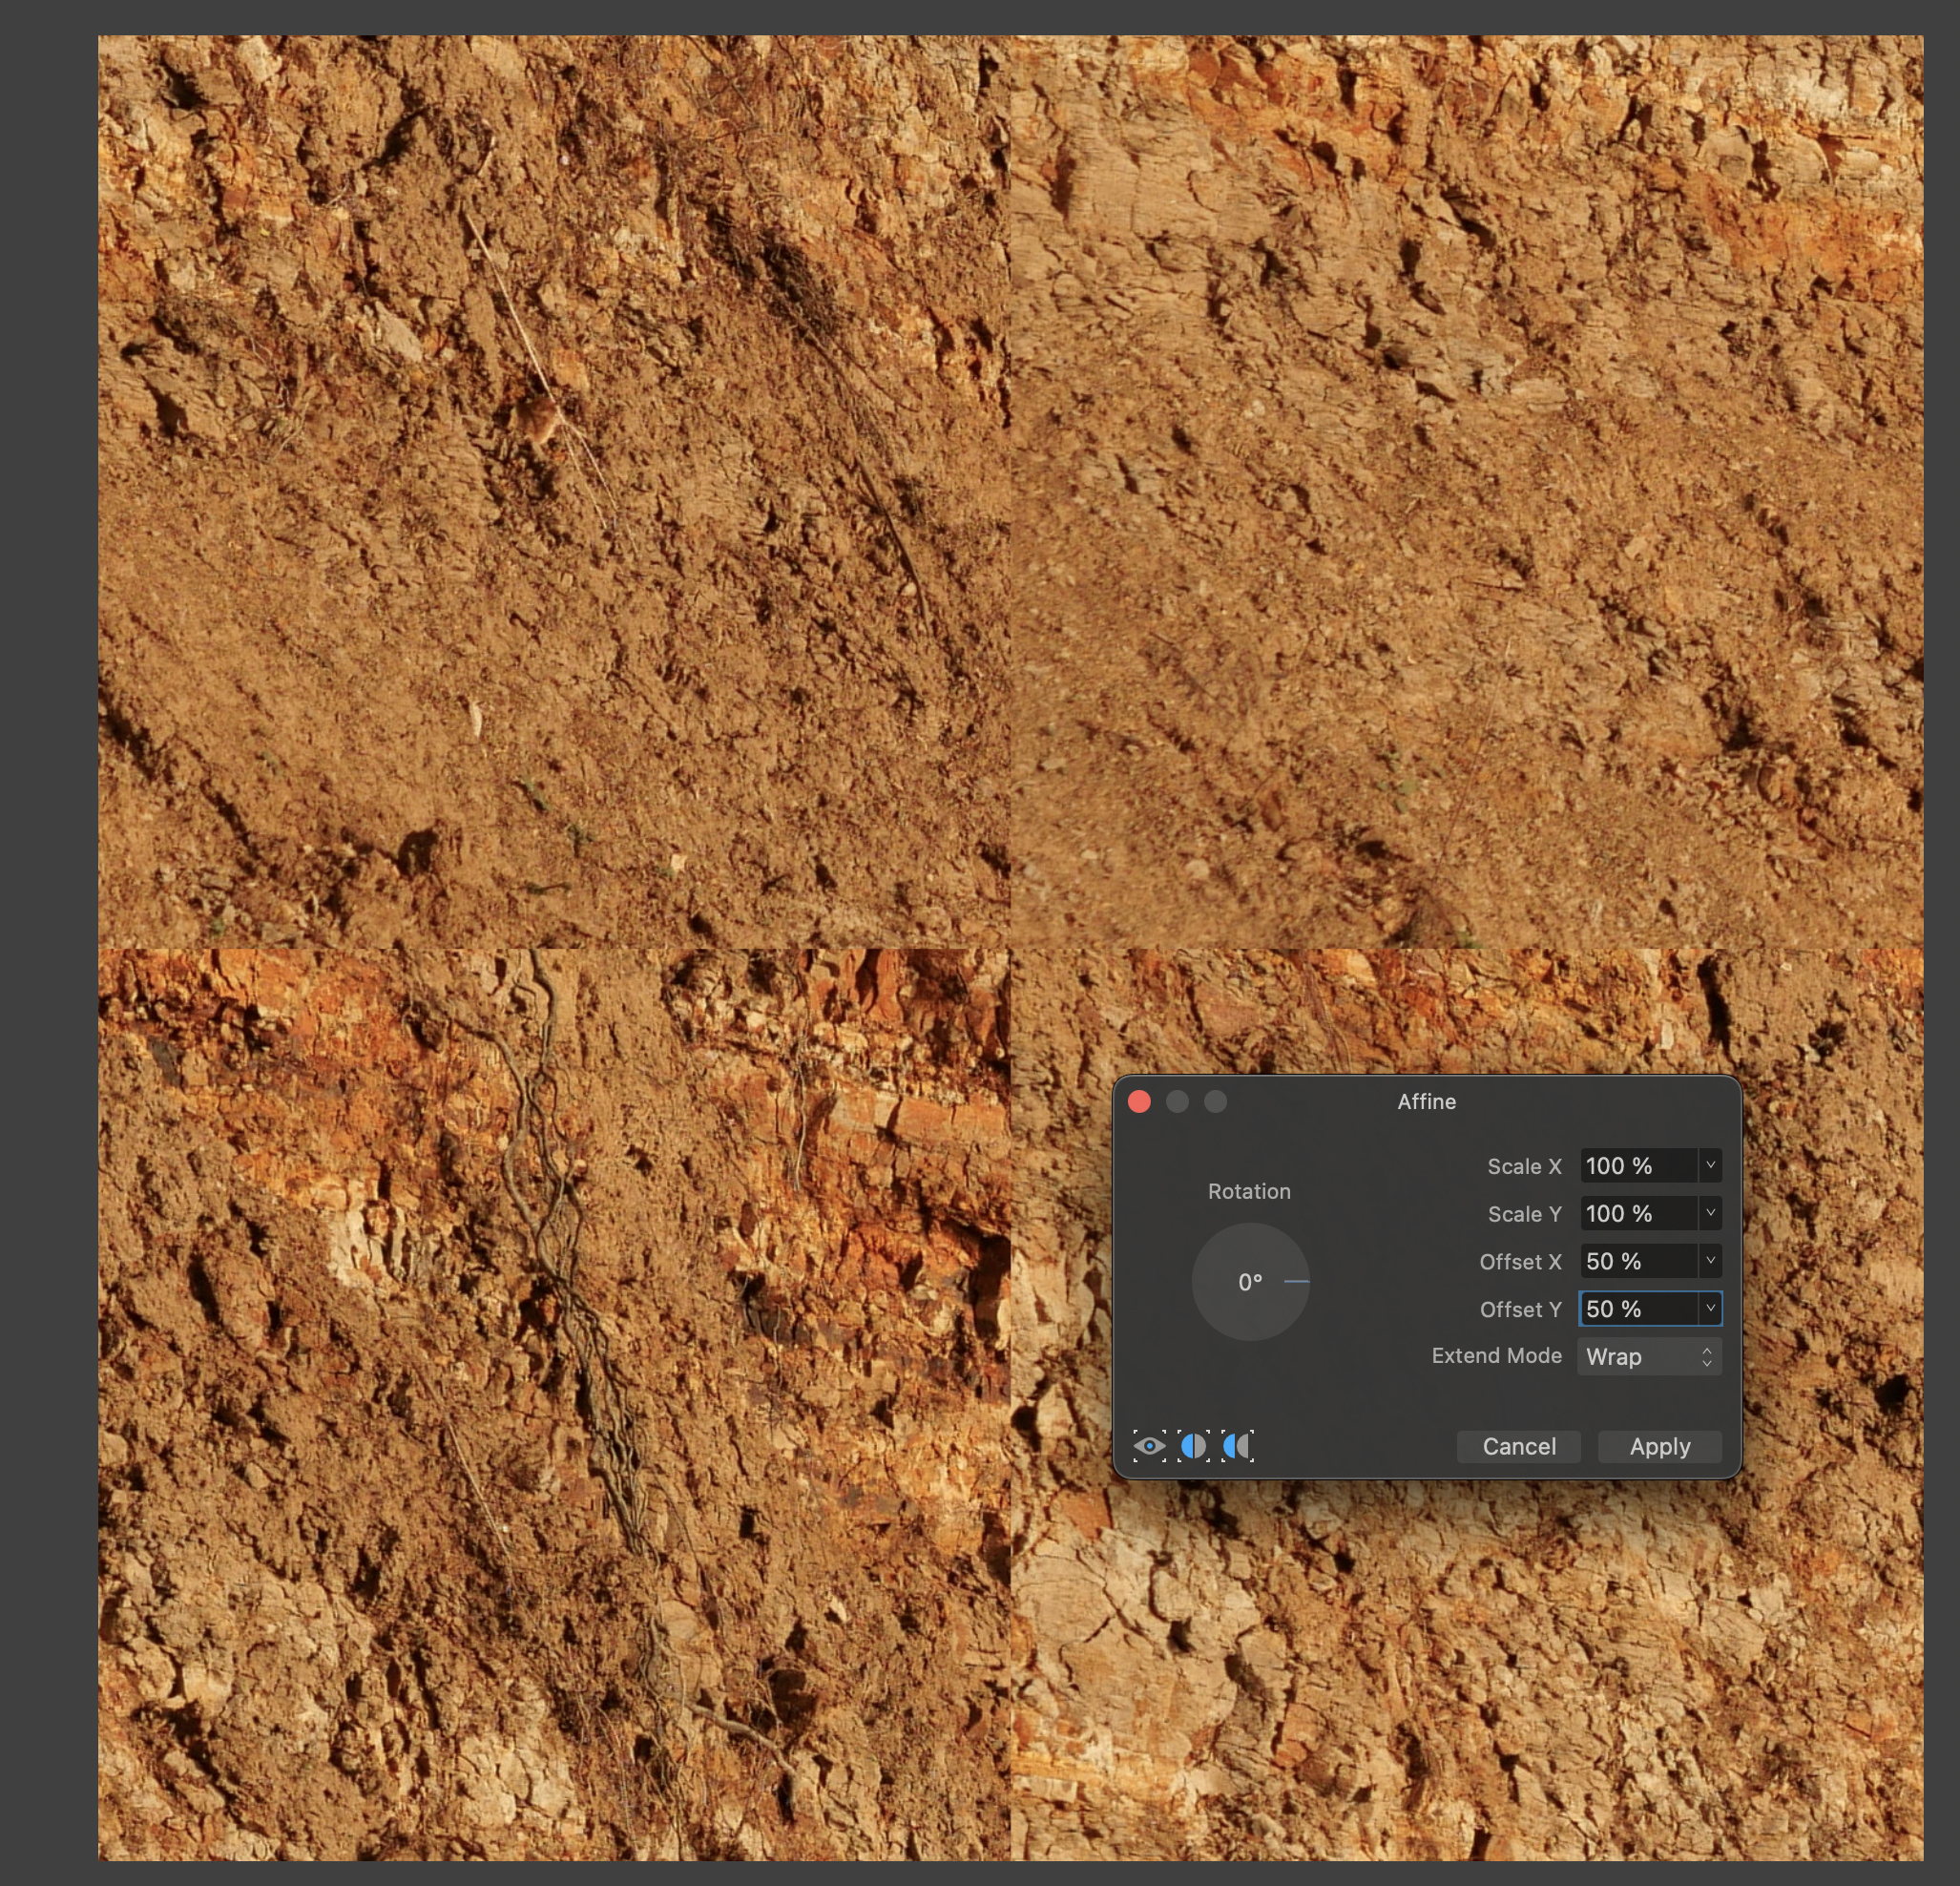
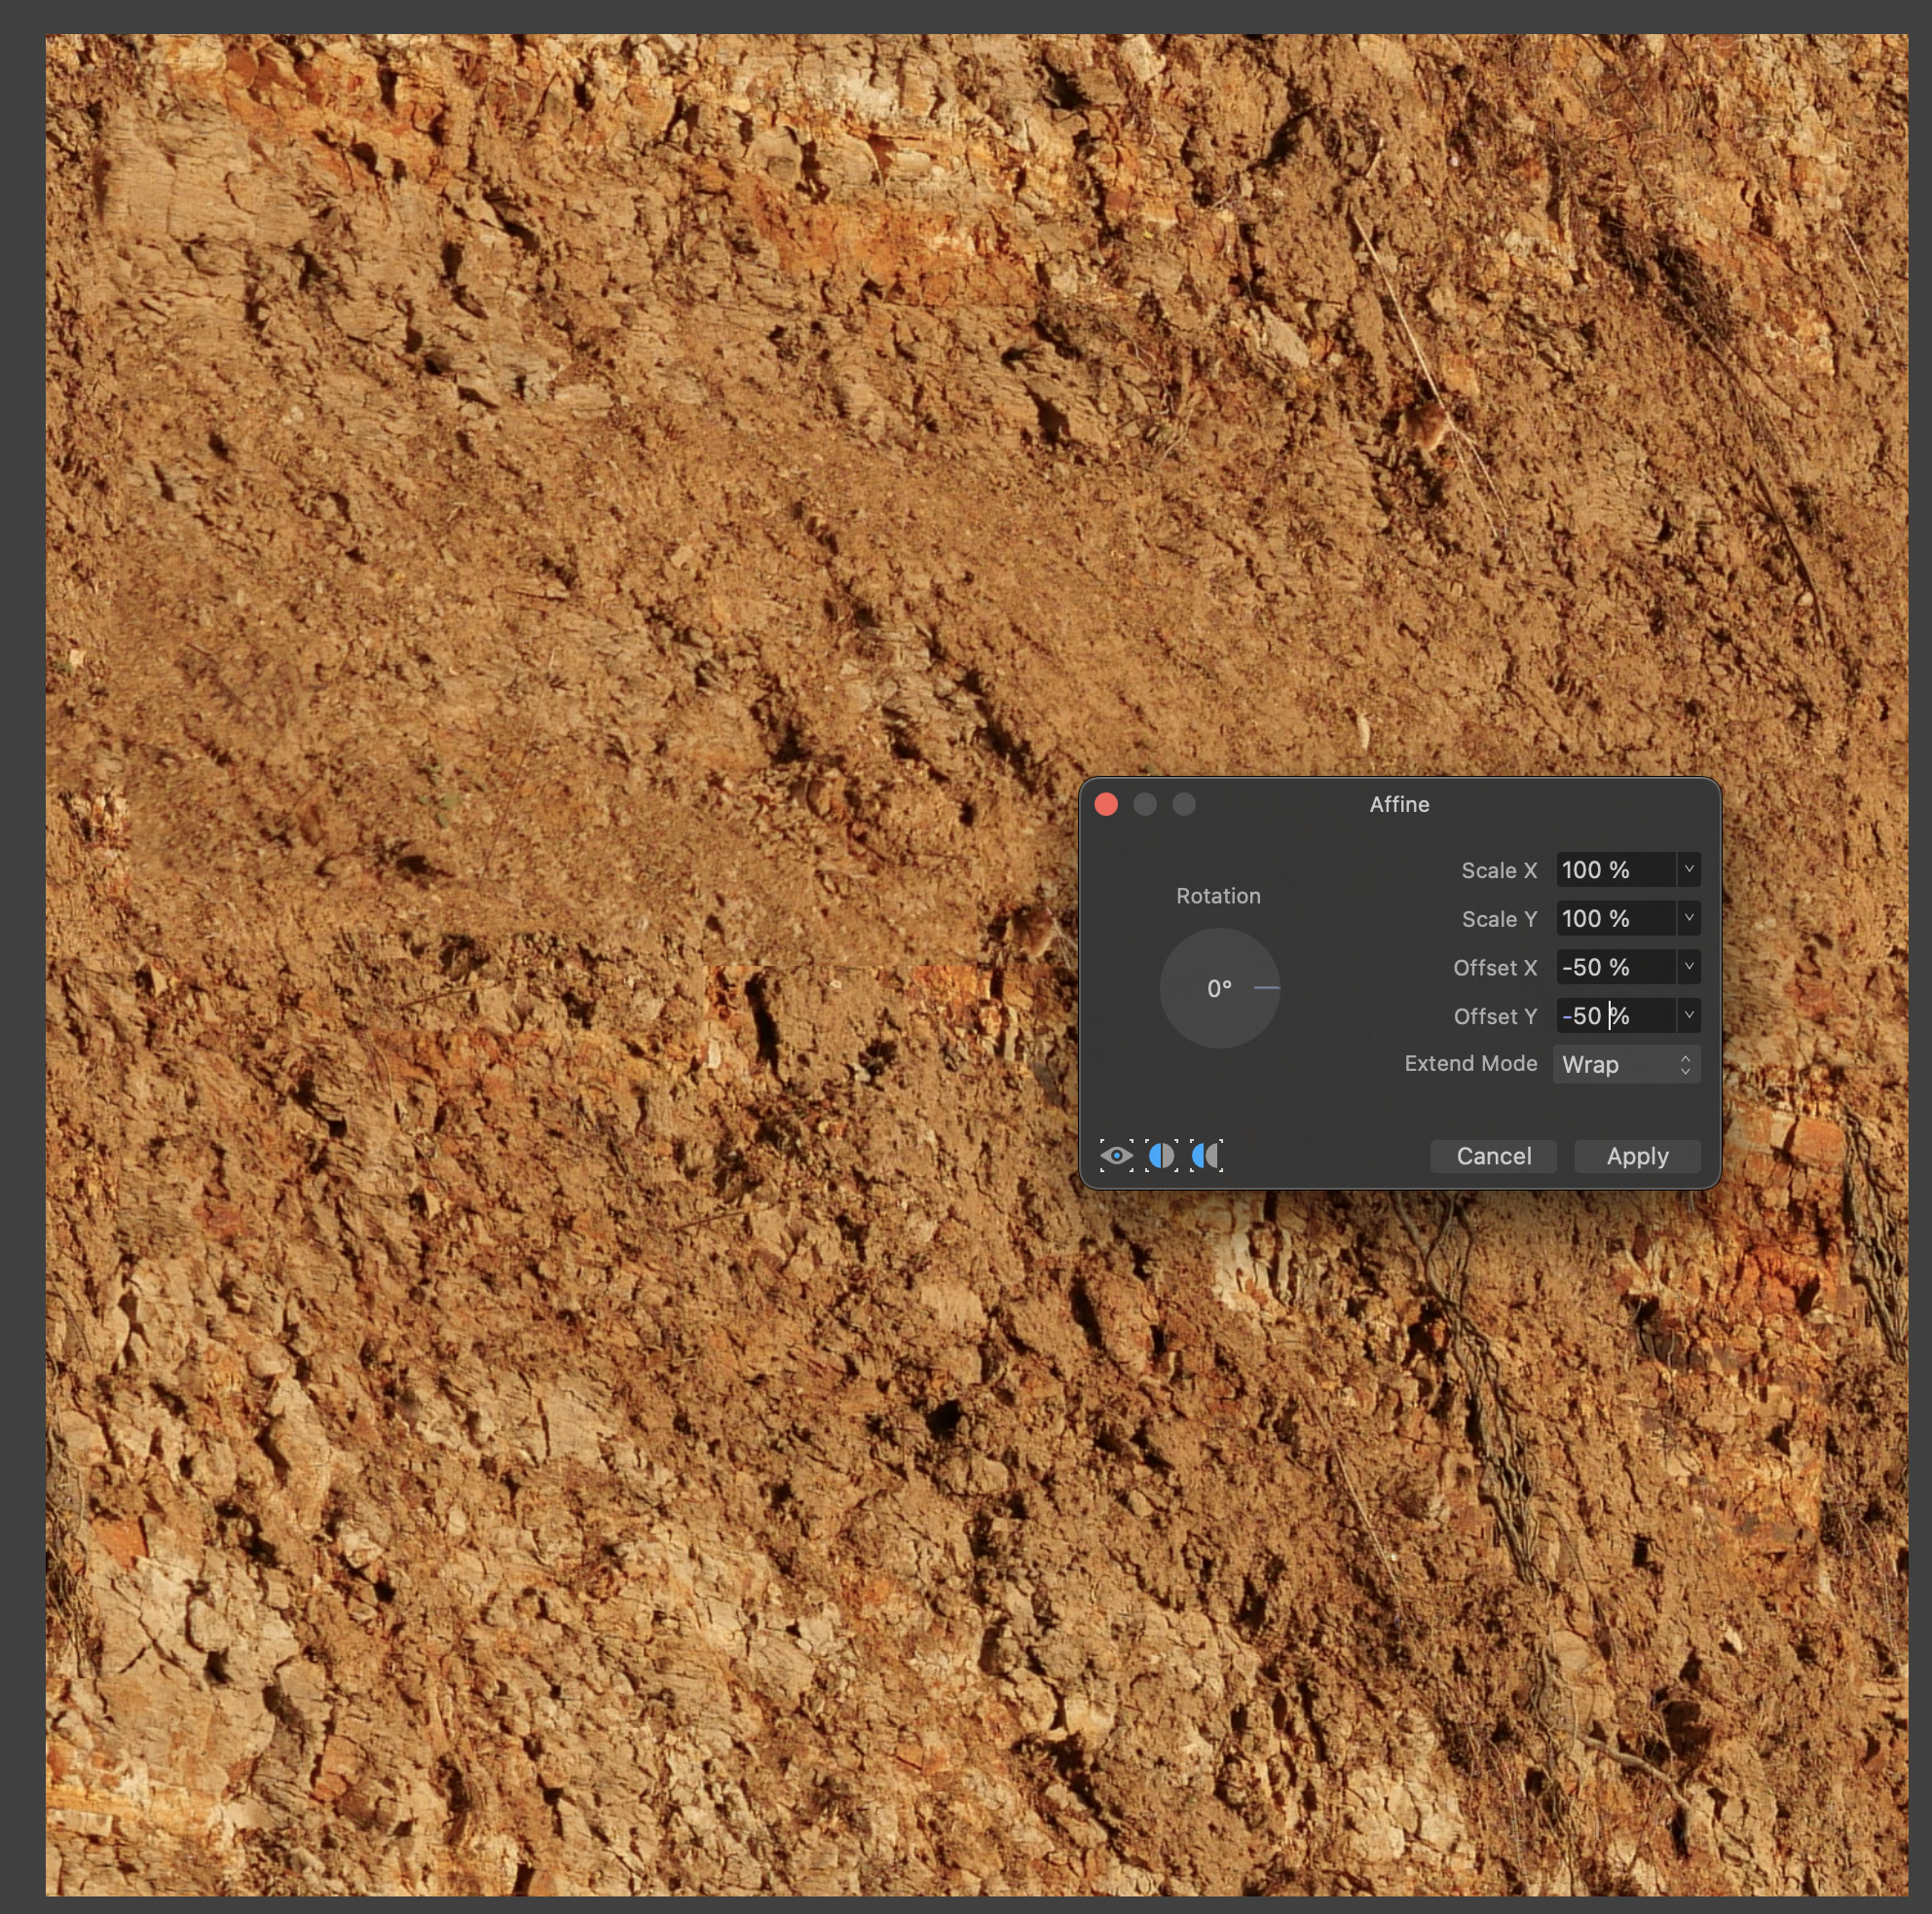
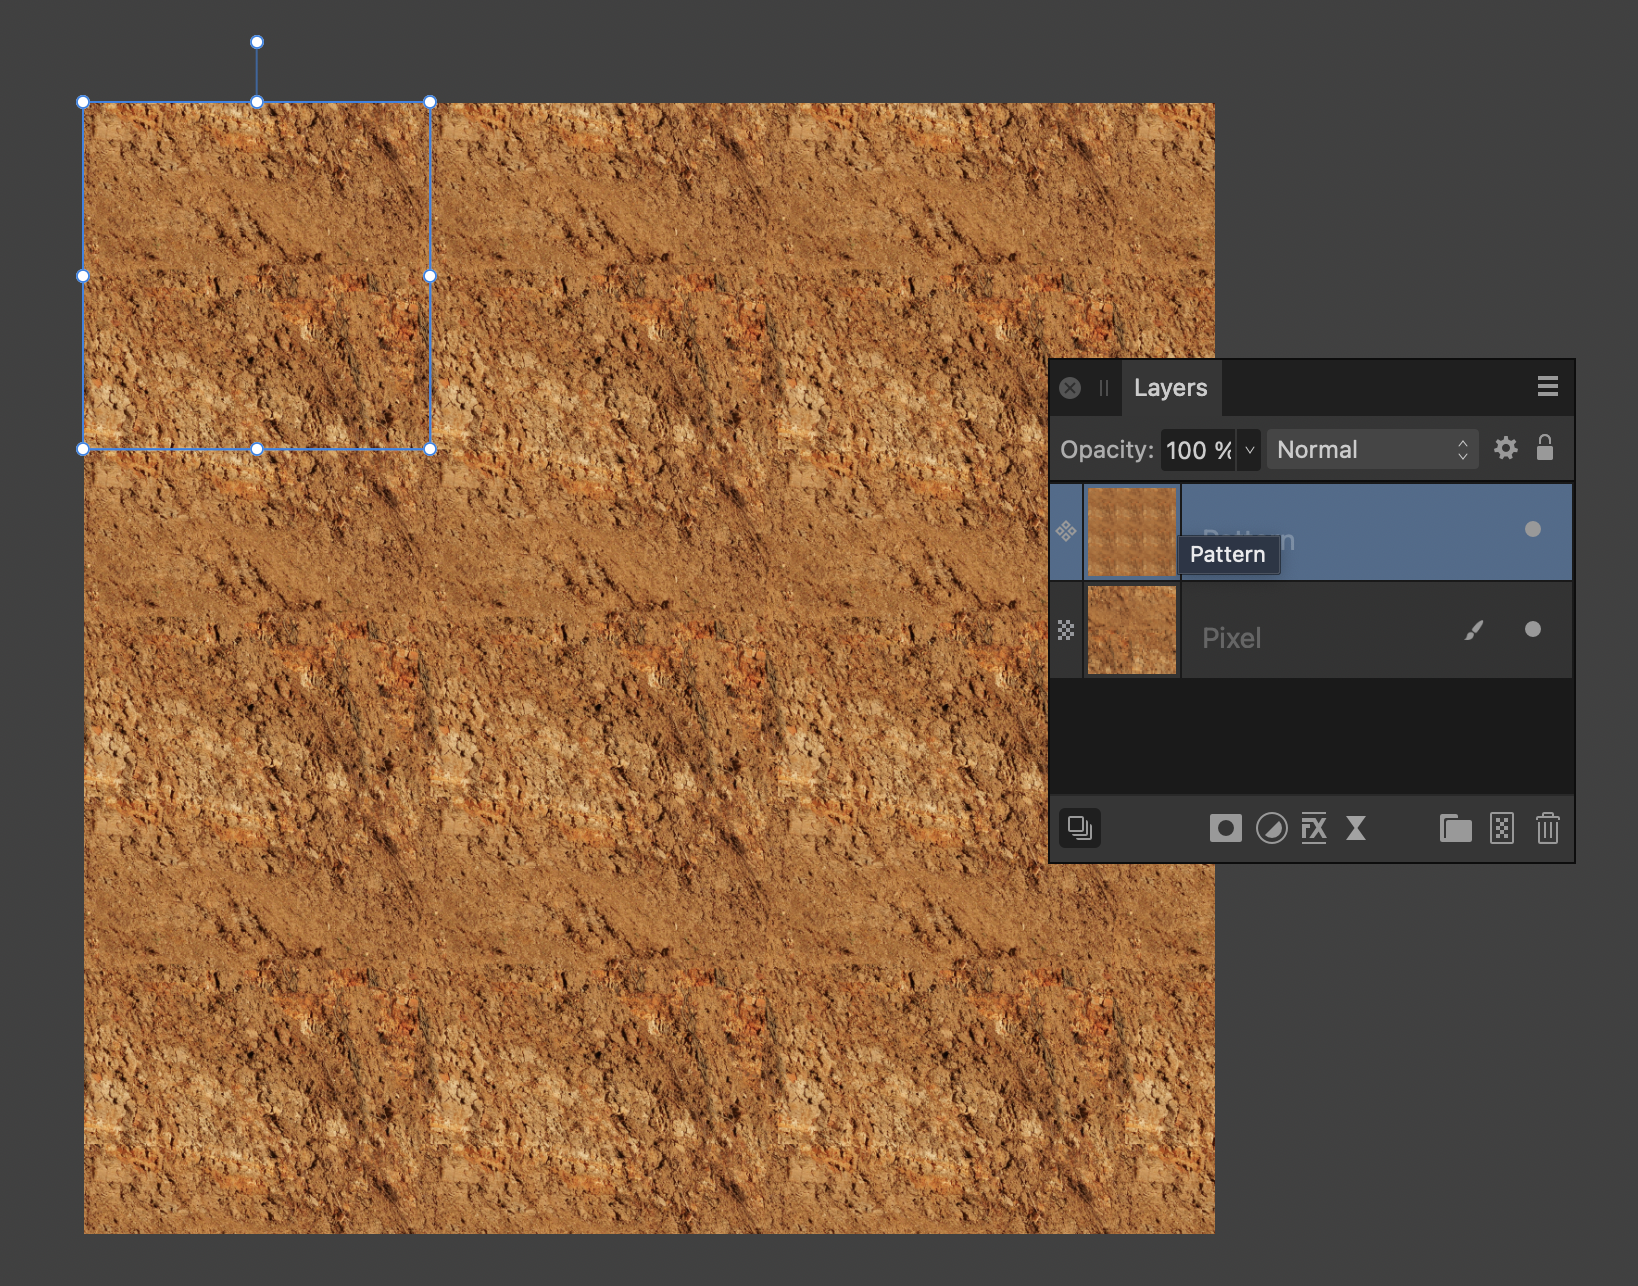
Using clone brush in a pattern layer
h_d replied to Rhodomazer's topic in Desktop Questions (macOS and Windows)
Can't remember where I learned this technique but I most definitely didn't invent it... Start with a suitable image - it must be square. Go to Filters - Distort and choose Affine. Set both Offset X and Offset Y to 50%. Extend Mode must be Wrap: Click Apply. You'll now have an image with a noticeable division into quarters (as above). Use the Clone Brush to clone over the quartering boundaries, sampling from areas away from the boundaries themselves. As you do so, the visible boundaries will disappear. Now go to Filters - Distort and choose Affine once more. With Extend Mode still set to Wrap, set both Offset X and Offset Y to -50%. Click Apply. You now have an image which can be used as a seamless tile in a pattern layer. (Mine doesn't look ideal because there's a lot of tonal and textural variation in the original. You'll be more successful with grass.) I must have picked up this technique either from an Affinity tutorial or a previous post on these forums. No credit to me except for remembering what to do.
-
Batch job to upsample images?
h_d replied to Ken Hjulstrom's topic in Desktop Questions (macOS and Windows)
I think you'd need some fairly fancy scripting to achieve what you're looking for, and unfortunately neither Photo nor Publisher support scripting, plain or fancy. -
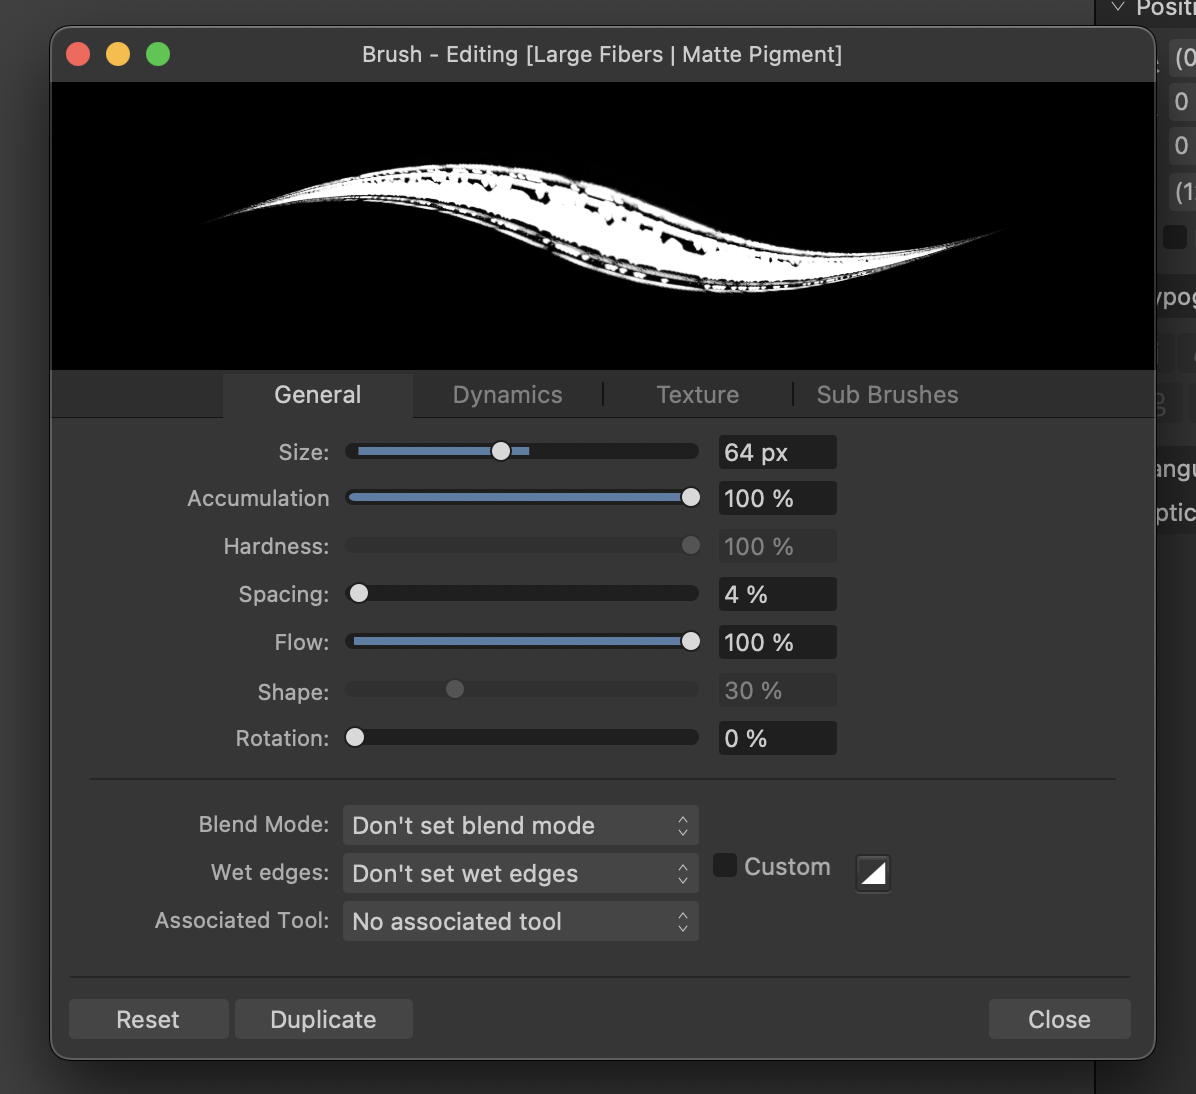
Hardness function in Brush
h_d replied to Adrian Wood's topic in Desktop Questions (macOS and Windows)
I'm pretty sure you're right. I just dipped back into V1 and with a couple of exceptions only the Basic brushes are affected by changes to hardness. In the brush editor, the Hardness slider moves, but its 'track' is blank (all the changeable settings below have a blue 'track'): Changing the Hardness has no effect on the appearance of brush strokes in the document. In V2, editing the same brush, the slider is immoveable at 100% and its button (and that of other non-changeable settings) is greyed out: This to me seems a better approach.
- 9 replies
-
- 1
-

-
- paint brush
- drawing
- (and 1 more)
-
Default to cms for Document Units?
h_d replied to Clare M's topic in Feedback for the Affinity V2 Suite of Products
Hi @barbBear and welcome! Yes, units are set on a per-document basis. So if you create a new document using one of the ISO 'A' or 'B' preset formats in any of the Affinity apps, the units default to centimetres. If you start with one of the US page formats like Letter, the units default to inches. And if you open a image in Photo, the ruler units default to pixels. This makes some sense as these are the 'native' units for the different page formats and for images. I guess the problem comes if you want to open an image and have the units default to cm or inches. -
If you're on macOS you can use the default-installed Grapher application to create a sine wave graph (and much more complicated stuff) and export it as an image (tiff/eps/pdf/jpg). You can then place the exported file in whichever Affinity application you choose. I may be wrong but I suspect it's unlikely that Serif will develop or introduce this sort of functionality any time soon - their emphasis is on graphic design, image manipulation and desktop publishing. But as @R C-R points out, it might be worth posting in the Feedback and Suggestions section of this forum.
-
At the risk of sounding pompous... When you buy an Affinity application licence from Serif you enter a legal arrangement in which you agree, among other things to the following: a.) You have no right (and shall not permit any third party) to copy, adapt, amend, reverse engineer, decompile, disassemble, attempt to derive the source code of, create derivative works of, decrypt, modify, distribute or make error corrections to any aspect of the Serif Software in whole or in part; (My italics.) It does make me chuckle that someone should post on Serif Software's own forum asking how to hack the software.
-
Working with selections in Affinity Designer v.2
h_d replied to Narvaez's topic in Desktop Questions (macOS and Windows)
It does - as an .afselection file. -
Working with selections in Affinity Designer v.2
h_d replied to Narvaez's topic in Desktop Questions (macOS and Windows)
Ahhh... I was actually looking at @Hangman's screen grab. (Engage brain before tapping keyboard... ) But it may still help the OP, who is asking for help with Designer not with Photo. EDITED: In Designer, I can't copy and paste a selection from an Image layer but I can from a Pixel layer. -
Working with selections in Affinity Designer v.2
h_d replied to Narvaez's topic in Desktop Questions (macOS and Windows)
@Narvaez your placed image is on an Image-type layer. In Designer, Pixel Persona, you need to right-click on the layer and choose Rasterise to convert it to a Pixel-type layer. You can then either copy your selection, and create a new Pixel layer and paste the selection to that, or indeed select File-New from Clipboard to create a new Designer document. -
I see exactly the same if I open an exported pdf in Adobe Acrobat for macOS and then click a hyperlink to a local file. This is down to Acrobat, not Publisher. My link is to a .jpg and the linked file is opened in my default web browser rather in Affinity Photo. You could check through Acrobat's settings/preferences to see if there is an option to change the default application it uses for opening your .smmx files It might be in there somewhere! I also tried clicking the link in macOS Preview but it was blocked. This is probably down to System Settings/Privacy and Security. I'm not sure how this could be changed.
-
Does Affinity 2 have colour seperation?
h_d replied to DooneC's topic in Desktop Questions (macOS and Windows)
@DooneC do you mean CMYK screened separations from a full-colour original (as for offset printing), or do you mean separations for multiple custom/spot inks (which I would have thought more likely for woodblock printing)?