panjakrejn
-
Posts
40 -
Joined
-
Last visited
-
Thank you.
-
 panjakrejn reacted to a post in a topic:
Truly hanging indent on bullets on Affinity Designer V2?
panjakrejn reacted to a post in a topic:
Truly hanging indent on bullets on Affinity Designer V2?
-
I want some (left justified) bulleted text to look like this: * This is some text, but when it wraps around, the second following lines indent more. How do I do this?
-
h_d reacted to a post in a topic:
Creating star with pointy tips but not weird
-
Alfred reacted to a post in a topic:
Creating star with pointy tips but not weird
-
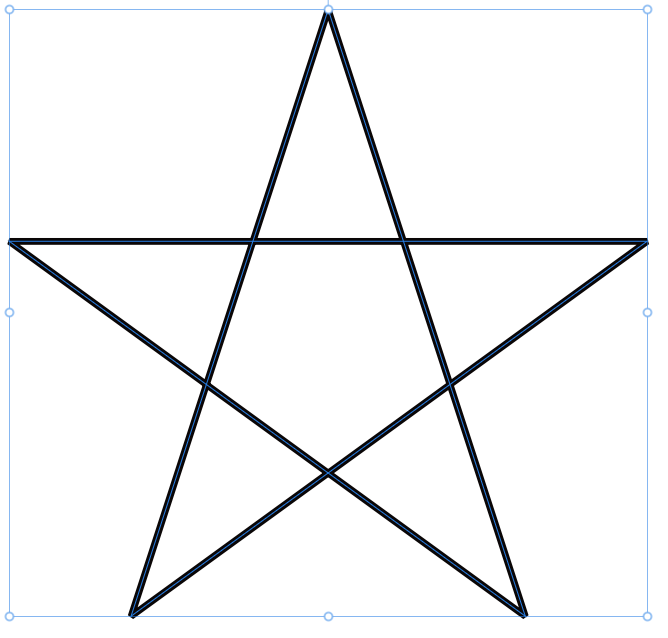
I get it! Using the Align Stroke to Inside was a red herring, I see now that what I should have done to get sharp points is the Miter Limit instead!! Learn a few new things every day!
-
OK, that will work, and I will probably wind up doing that (the bottom one), but I would still like to know why such a hack is necessary? Why can't I just draw five lines that cross with sharp points and no funky stuff in the middle?
-
I am trying to make five pointed star with sharp tips and crossed lines. when I make it normally I get blunt star tips, so I go to Stroke Alignment and choose "Inside" and I get the pointy tips, but then it screws up the lines so it looks like five smaller triangles rather than 5 straight lines. How do I keep the lines crossing as in the first image, but get the pointy tips as in the second?

-
That's fantastic! Never had much call to tweak baseline before so I didn't know about that. Thanks!!
-
How do you set text baseline? Does that work with Artistic Text? Will it still follow the curve?
-
I am creating a simple design for some circular tokens. I have gotten as far as you see below. What I want to do is flip the letter of the bottom "LEVEL" so they are right side up, BUT I need to keep the letter on the OUTSIDE of the curve, or else they bunch up. I've tried combinations of reversing the text path and flipping it, but it never gives me what I want. How do I get text on a curve so that the TOP of the letters are on the curve, not the bottom?
-
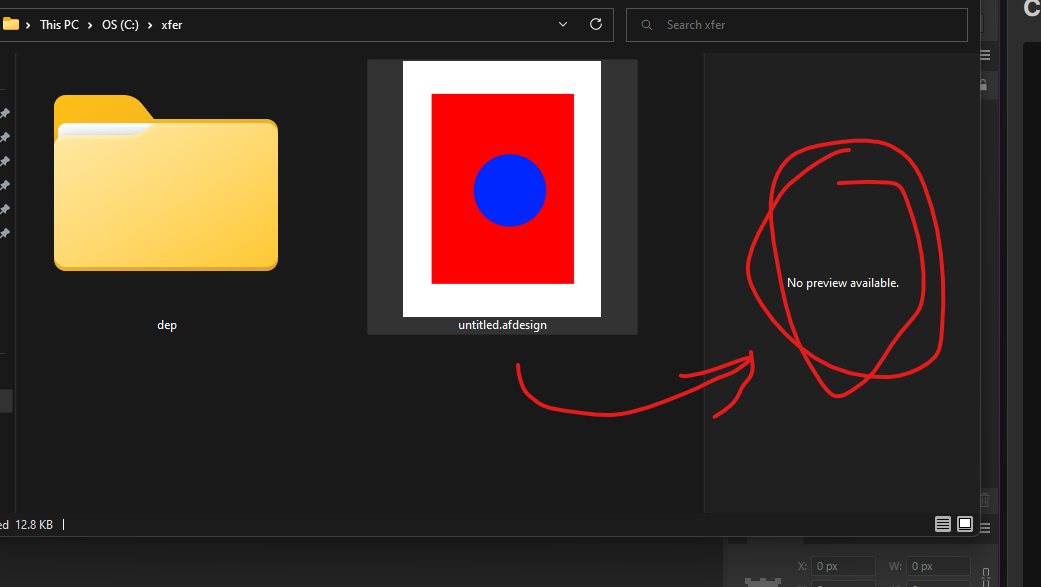
I fixed it myself. After much trial and error, in order to get file preview to work I had to install Affinity Designer V1 (ONE!) and then install V2 over that. Seems that whoever coded the V2 installer left out something that the V1 installer took care of. If I were you guys, I would figure out what that is (probably registry settings) and FIX it!!
-
With Affinity Designer V1, whenever I selected an Affinity Designer file (*.afdesign), I would get a preview of the image in my Windows 11 preview pane. Note: this is not a problem with thumbnails, which are working. But ever since upgrading to V2, the Preview Pane has stopped working. This is CRUCIAL to my workflow, I need support to get the afdesign files to preview properly in the windows preview pane the way they used to under V1. Thanks. PS: This directory is not connected to OneDrive, which I have already uninstalled from my computer anyways. HELP.
-
Wow, so many awesome options! Thanks everybody, this has really helped - I now have a sliced torus! Thanks again.
-
Thanks, I now understand the donut tool is another way to achieve my desired shape, but I would rather learn the technique of actually having a torus like this and slicing it into two or more parts. Assuming Designer can do that.
-
I tried using the knife tool, it did not go well. Pressing the shift key made my cut straight, but also wouldn't let me use an arbitrary angle. Let me simplify, how to I arbitrarily cut this torus into two shapes, one of which resembles a capital C?
-
I appreciate the tip to achieve my intended results more easily, but I am also trying to get better at using this tool, and I think that if Designer has a way to actually slice one shape into several, I would be best served by learning it, for the future.
-
Wouldn't that create segments with gaps between them, ie I would be missing the parts that the narrow rects were covering? I really want to learn how to do this the right way (if Designer has a way) that let's me take any shap and slice it up into multiple shapes.