stuck
-
Posts
171 -
Joined
-
Last visited
-
Problems printing processed photos
stuck replied to Jhjennings's topic in Desktop Questions (macOS and Windows)
Some superficial searching suggests the Canon G7020 can produce good photo prints so don't give up yet. You will not get anywhere if your monitor is not displaying accurate colours so, even if you buy a new one, you need to get it calibrated and profiled. Once your monitor is set up as best it can be you, can edit your image to your liking. Once you are happy with your edits, you can add a soft proof layer to the top of your layer stack and: select the 'proof profile' that corresponds to the paper in your printer. set the rendering intent to 'Perceptual' tick the 'black point compensation' box Now toggle the soft proof layer's visibility on and off and watch how the image on screen changes. With the soft proof layer active, you can make further edits to try and further enhance the image but remember, you're not going to get an exact match to what you see when the soft proof layer is inactive. Once your happy with your edits, turn off / deactivate the soft proof layer. Now you are ready to print (an earlier post by me in this topic gives you the steps you need to take once you click File | Print). NB You can experiment with different rendering intents but in the first instance keep it simple and stick with 'Perceptual'. Use a Canon photo paper in your Canon printer, at least in the first instance, because the profiles for Canon paper will have been installed as part of the printer setup whereas (and I may be wrong here) unless you previously had an Epson photo printer installed on your machine the profiles for Epson paper will be not be on your machine. -
Problems printing processed photos
stuck replied to Jhjennings's topic in Desktop Questions (macOS and Windows)
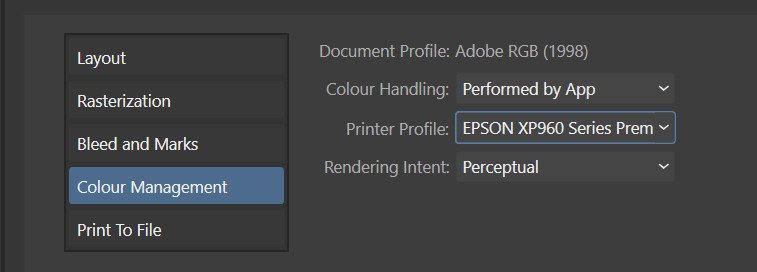
@Jhjennings as already stated several times, it's not simple. Having said that I can get a good match between what I see on screen and what comes out of my (decent but not pro) printer as follows: Calibrate and profile my monitor to its native gamut, which covers 100% Adobe RGB. NB as part of that process, the brightness of my monitor is set to 80 cd/m2, i.e. not very bright. Set Photo's working colour space to 'Adobe RGB' (Edit|Settings|Colour 'RGB Colour Profile: Adobe RGB 1988'), i.e. I match Photo's working colour space to the gamut of my monitor. Process an image to my liking. Click File | Print and in the 'Colour Management' section select the options as shown in the screenshot below. Note that the 'printer profile' chosen is the one for the paper in my printer. Also note that because 'colour handling' is set to 'performed by app' I must click on the 'printer properties' button (in the top half of Photo's print dialog) and in the printer properties find and turn off 'colour management' and OK out of that dialog to return to Photo's print dialog Only then do I click the 'print' button. I'd also suggest you simplify your workflow by using Canon paper in your Canon printer, not Epson paper, at least until you get the hang of printing and can get prints that match your screen. I hope this helps.
-
Linking to Affinity Photo
stuck replied to Martin_1's topic in Desktop Questions (macOS and Windows)
If you can't locate it, that means you have installed the MSIX version of Photo. You can either continue to use the MSIX version and use the aflaunch.exe utility: Or you can uninstall the MSIX version and install the MSI/EXE version. -
Change photo taken with wide angle lens
stuck replied to davidbjames's topic in Desktop Questions (macOS and Windows)
If you have a version of Nik Collection that includes Nik Perspective or DxO ViewPoint (which is what Nik Perspective actually is) you might find that will do what you want if you experiment with the volume deformation options. -
 stuck reacted to a post in a topic:
Convert Format / ICC Profile
stuck reacted to a post in a topic:
Convert Format / ICC Profile
-
Convert Format / ICC Profile
stuck replied to boelens218's topic in Desktop Questions (macOS and Windows)
I may be wrong but I've always understood that using Document>Convert did as it implies, it converts the colour space from one profile to another BUT in the export dialog, selecting a different ICC profile would simply assign that new profile to the file, where 'convert' and 'assign' as as defined here: -
In years gone by DxO have always discounted all their software over the Black Friday period. What they won't tell you is whether or not this year's discount will be more than the 20% on offer via this freebie.
-
One thing to note is that although Nik Perspective is part of Nik Collection 6 and is installed as part of this freebie, it is not available as a plugin in AFP. It does work as a stand alone application though.
-
That's not a problem for me, this v6 freebie will be more than I need for a while. I bought the first version of Nik released by DxO (in 2018??) but have never bothered to update it as I found the only plugin I was using was Silver Efex so it just wasn't cost effective to upgrade. I've now installed this freebie on both my desktop PC and my laptop. The activation code has worked in both cases. That's another result!
-
h_d reacted to a post in a topic:
Using Nik Software v4 - specifically Silver Efex Pro 3 - with Affinity Photo 2
-
Old Bruce reacted to a post in a topic:
Using Nik Software v4 - specifically Silver Efex Pro 3 - with Affinity Photo 2
-
'appear' is the key word there. I too followed the link, entered my email address and nothing seemed to happen, except ending up at the DxO Shop. I too thought, "Oh well, nothing ventured, nothing gained." That was then but... Today I got an email, all in German, with a link to download Nik 6. The email also included an activation code. The first thing the installer Did was to ask for the language I wanted to use,but English seemed to be the default. It then recognised my Photolab an Affinity Photo installations. It completed without error and when I opened Photo, all the Nik 6 plugins were available within Photo. Result!
-
Ldina reacted to a post in a topic:
Using Affinity Photo tools on scanned black & white images
-
Old Bruce reacted to a post in a topic:
Using Affinity Photo tools on scanned black & white images
-
You'll get a better starting point if you explore the options in the scanner and get it to produce TIFFs, rather than JPEGs.
-
emmrecs01 reacted to a post in a topic:
Faststone cannot open image with Affinity Photo
-
Faststone cannot open image with Affinity Photo
stuck replied to Olympian's topic in Desktop Questions (macOS and Windows)
That will be OK until the next update of Photo. When that happens the location will change, meaning you will have to do this all again. The suggestion by @Pšenda to use the MSI/EXE version of Photo rather than the MSIX version will avoid the need to repeat this after the next update. -
It also works for Canon .CR3 files.
-
The instructions work on Windows (10).
-
Affinity support for Nikon Z5ii NEF/RAW images
stuck replied to KenLow's topic in Desktop Questions (macOS and Windows)
I'd strongly advise you to keep your original RAW files. -
If you are on Windows then it sounds like you have installed the MSIX version. Read about that here: