

NathanC
-
Posts
4,437 -
Joined
Posts posted by NathanC
-
-
Thanks, from reviewing the event logs this is indicating it's an OS/System issue based on the eventID, therefore I'd suggest running through solutions 1-3 (Clean Boot, SFC/DISM scan, .NET Repair) detailed on the article below to see if there's any impact.
https://ugetfix.com/ask/how-to-fix-net-runtime-error-1026-in-windows/
Failing that, your .NET version is on 4.0, so I would try updating to 4.8 via the download link below and then seeing if the app can launch.
https://dotnet.microsoft.com/en-us/download/dotnet-framework/net48
Let me know how it goes.
-
5 minutes ago, Topcat 729 said:
Have sent screen shots of the file with structure and the two error logs.
Much appreciated, I can see from the screenshot you have only a log.txt file in the directory, do you mind also uploading that file to the dropbox link?
Many thanks
-
Hi @medwayboy welcome to the forums,
I can see that there is a 30 day Universal License trial registered against your Affinity ID, you should be able to download the apps from the store page below:
https://store.serif.com/en-gb/account/licences/
From here you should be able to view your license and then download and install the apps. After installing and launching the apps you will be prompted to sign in to activate the trial when they are first launched, and from that point your trial period begins and you can start using the apps.
-
19 hours ago, Blake_S said:
So the question is then - why a file exported from Publisher shows a wrong color in preview, despite the fact that object inspector shows that the object has correct color?
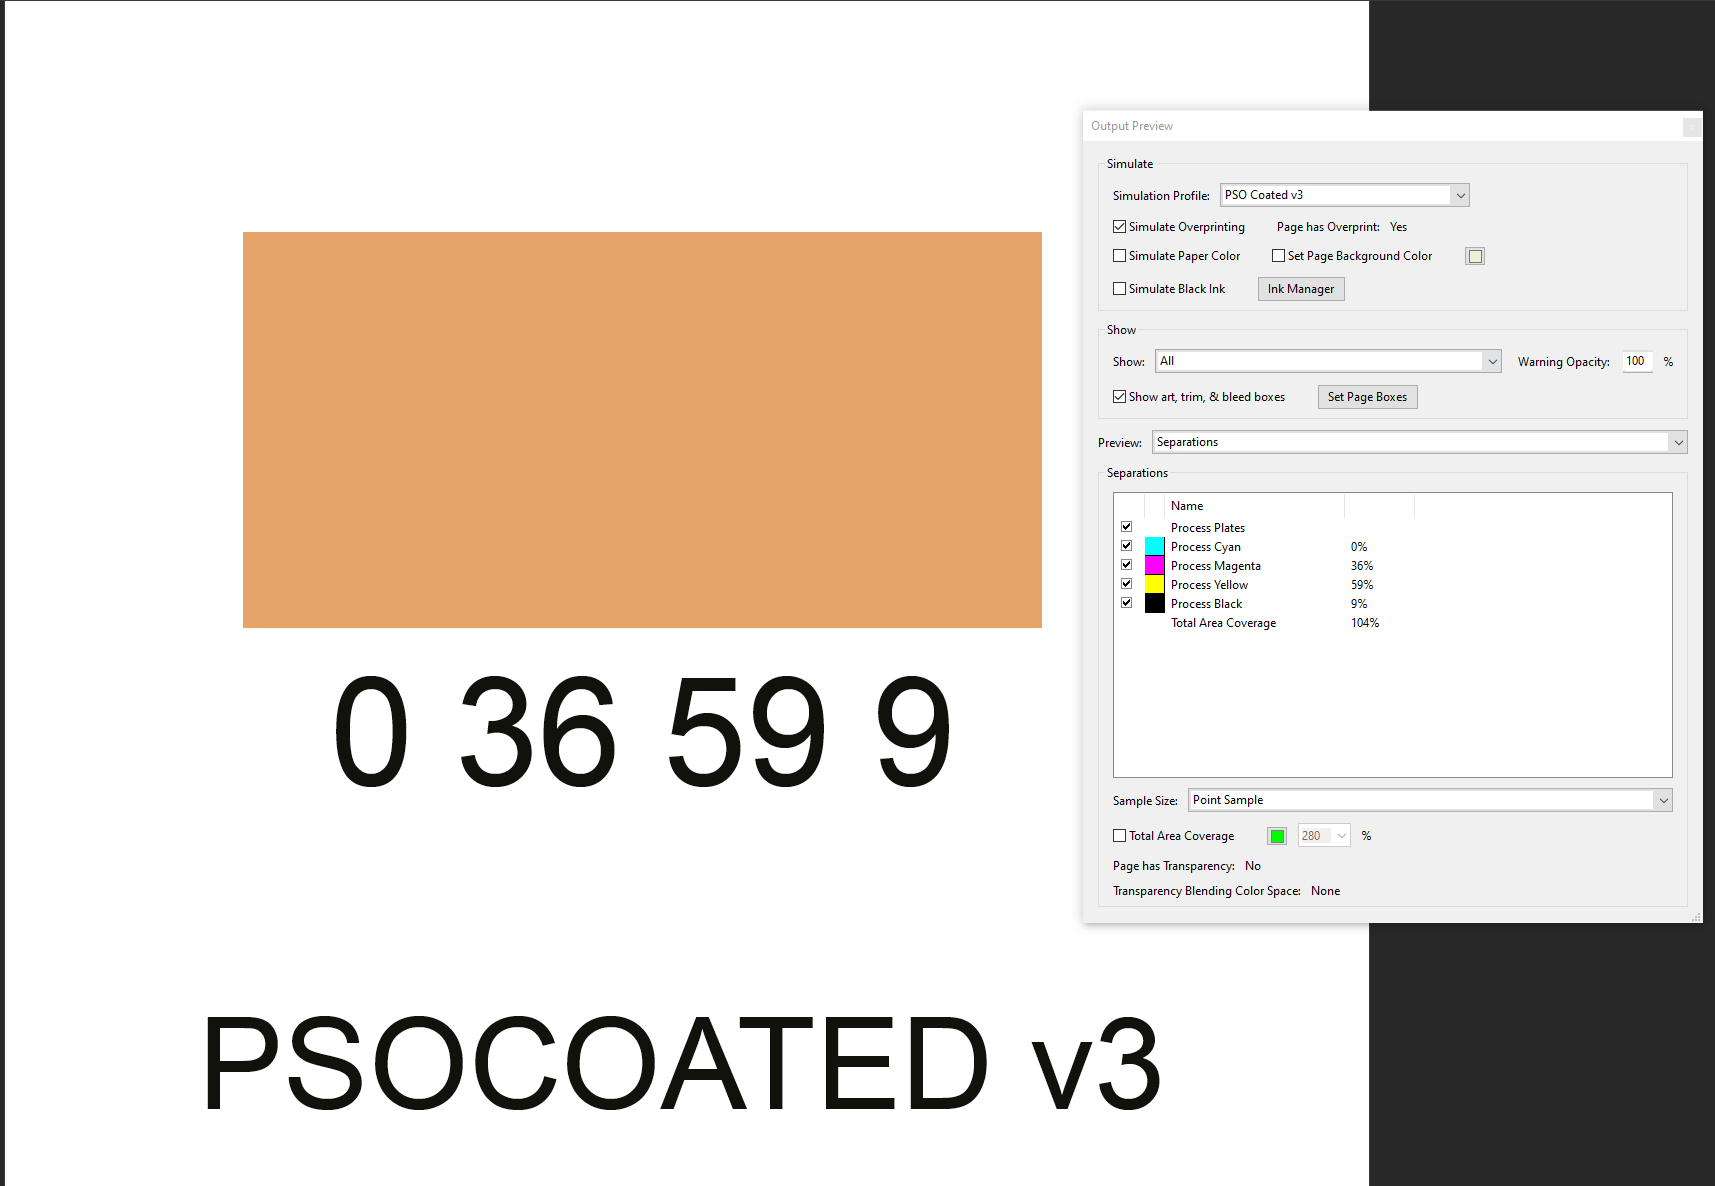
To be honest I'm not sure in this specific case, but the problem does appear to relate to this specific colour profile and output preview. If you try this same test with a different CMYK profile it all appears to work as expected, in the example below I exported the same colour values from Publisher using the PSOCOATED V3 profile, everything matched up as expected in acrobat and matched the object inspector values.

Comparing an export from Illustrator vs Publisher using the FOGRA51 (EFI) shows identical results with the object inspector, it's just Publisher's PDF separations appear off but the object inspector and pre-flight tool show everything's correct. I'll do some more digging and get back to you.
-
Based on your screenshot is looks like the assets used were just standard curve objects, if they went missing on the canvas is it possible that the file was overwritten with an earlier version? If not, could we perhaps see a copy of the file? If it was not originally saved with history it might be difficult to track exactly what happened for these curves to be dropped from the file but it may give some indication. From your screenshot it does look like that specific curve asset was used in other areas of your design so the fact that they're assets may not be related. I've provided a private upload link below:
-
12 hours ago, Topcat 729 said:
%appdata%\Affinity\Photo\2.0\
Is there anything contained within this folder or is it completely empty? As Walt mentioned it would be great if you could provide a screenshot of this folder in file explorer so we can see it's contents. If you're not sure how to take screenshots on Windows, I've linked a brief guide below on using snipping tool.
It sounds like the app is not even getting as far as creating the local resources/settings before closing if this folder is empty and the crash reports folder doesn't exist, so we might need to look towards Windows event viewer to see if that can provide any indication of the problem. Could you provide us with a copy of the application and system event viewer logs (.EVTX) files? The FAQ linked below details how to do this, once you have saved both the application and system .evtx logs if you could upload them to the private dropbox link below that would be great.
Upload link: https://www.dropbox.com/request/xFpywLatNJKxRafe4e7W
-
Hi @Blake_S,
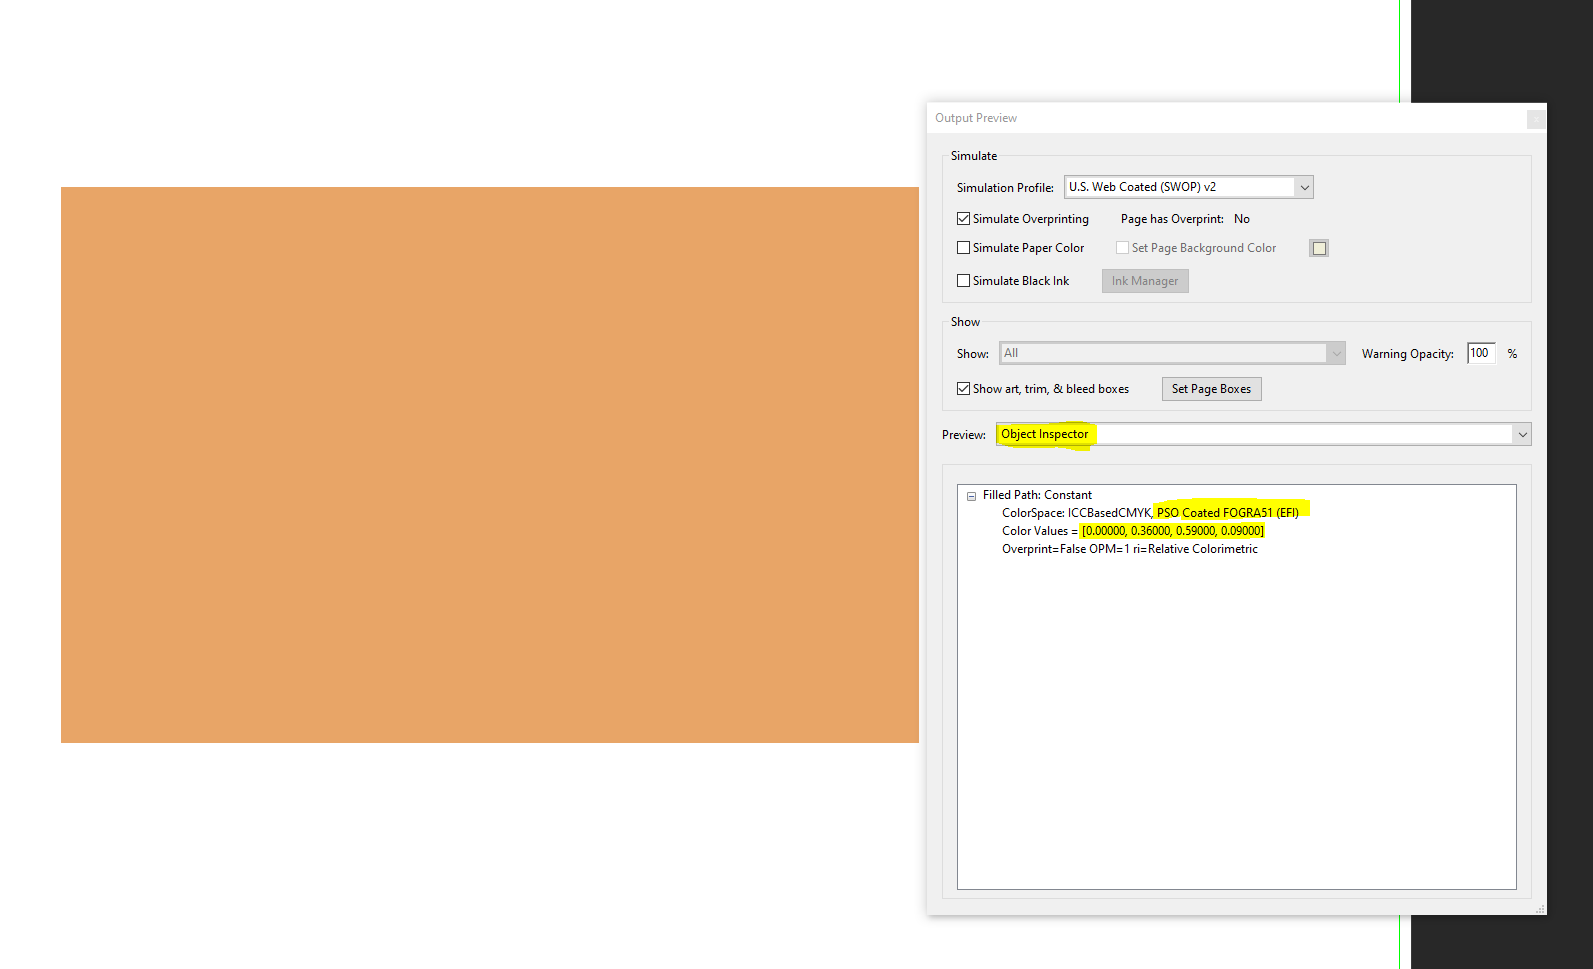
I also don't have the FOGRA51 (EFI) colour profile used in your document, so when I open acrobat's object inspector the simulation profile defaults to Web coated SWOP V2, which will give different CMYK values due to the profile difference.
However, If I use the object inspector tool and click into the rectangle, I can see that the correct colour profile and values (0/36/59/9) are associated with that object as shown below:
-
It could be that an antivirus/3rd party app is interfering, have you tried limiting the number of background applications running and temporarily pausing the protection on any antivirus software and then trying again?
If not, to help rule out any local user environment issues, try creating a temporary new windows user and then launching Photo 2 from that new user account. Guide: https://support.microsoft.com/en-us/windows/create-a-local-user-or-administrator-account-in-windows-20de74e0-ac7f-3502-a866-32915af2a34
Is there definitely no crash reports being generated? Now you're using the MSI version of the app, they can be found in the following directory: %appdata%\Affinity\Photo\2.0\CrashReports\reports
-
Hi @Topcat 729,
If you have since installed the MSI/EXE version, then the aforementioned command will not work as it is a different path and method for the MSI/EXE installed apps, instead try the below:
To use the flag, press the Windows Key + R on your keyboard to open the Run dialog and then type CMD and press Enter. This will launch Command Prompt.
*Presuming you have the app installed in the default location, type in cd "C:\Program Files\Affinity\Photo 2\" and press Enter. Now type Photo --no-ocl and press Enter - the app will now launch.
*If you installed the app to a different location or you're using Affinity Publisher or Designer, please update the location to point to correct folder.
-
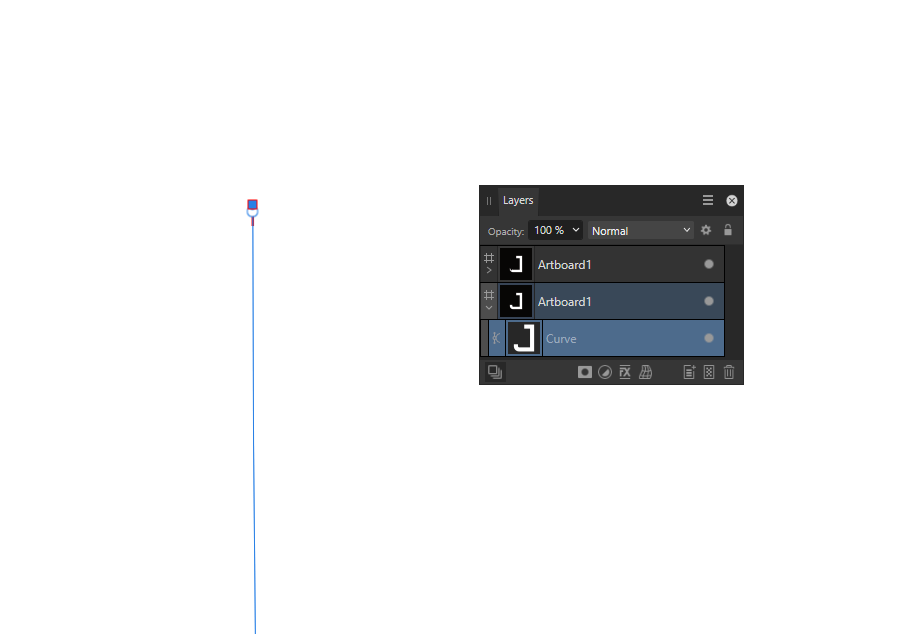
The expand function appears to be having issues with the two overlapping nodes highlighted below at the end of the 'J' curve:
With the node tool selected if you shift click to toggle the node selection and then select the sharp/square node, delete it and then expand stroke again, it will work as expected. This shouldn't be a requirement for it to function so I'll log this sample with the developers.
-
Hi @Topcat 729,
Since you're using the MSIX version of Photo, have you tried following the below to disable OpenCL?
To use the flag, press the Windows Key + R on your keyboard to open the Run dialog and then type CMD and press Enter. This will launch Command Prompt.
- Affinity Photo: Type in %LocalAppData%\Microsoft\WindowsApps\AffinityPhoto2.exe --no-ocl and press Enter - the app will now launch.
If it still fails to launch, since the CTRL runup didn't work earlier try renaming the local .affinity folder to .affinityOLD by going to Win + R and entering in the following: %USERPROFILE% once in this folder, rename the folder and then try launching the app, this is essentially the same as factory resetting.
If it still fails, try uninstalling the MSIX version of the app via Windows Settings > Installed apps and then install the .EXE (Aka the MSI) version of Photo 2 from the link below (Press on the 'also available: EXE' download button to download this version) and then see if it works via the standard MSI.
-
Hi @Heriberto Reinoso Gallegos,
Unfortunately I've not been able to deduce much from the crash reports as the errors are fairly generic and vary greatly between the dmp files. You mentioned in your original post that when you went back to version 2 it's now working again, do you mean you rolled back from 2.1.1 to 2.0.0? Does disabling Hardware acceleration under Edit > Preferences > Performance and then restarting the app have any impact? At what point are you seeing these crashes, is it as soon as the pen tool is selected or are you able to draw a curve before it closes?
-
Hi @Tommie,
I'm not able to replicate an issue with this on a Monterey MacBook Air, as soon as I use the crop tool and hover the cursor over the outer edges of the images I'm presented with the option to rotate the image relative to the cursor's position, this was done with a trackpad. If possible, if you try this with a mouse does it make any difference? Could you possibly provide a screen recording which demonstrates the issue with rotating? Also, what version of MacOS are you running?
Screen recording guide:
Many thanks!
-
Hi @MmmMaarten,
As Return mentioned issue 2 is fixed in the 2.2 beta, however in regards to issue 1 i'm not aware of the insert hyperlink function in the panel behaving intelligently dependant on the text content, for me it just remembers the type of my previously created hyperlink. So for example if the last hyperlink I inserted was an email, when I go to insert another hyperlink it remembers the previous type was an email and has this selected by default, unless i'm missing something?
-
Hi @znids,
If you have a text frame selected or you're actively editing the frame it is expecting a text file format (E.G .txt, .doc, .rtf) to be placed into the currently highlighted/selected frame. On Windows this is a little more obvious as file explorer indicates what type of file(s) can be selected.
However, Publisher does allow you to place an image with a text frame selected because of the Pinning/Inline feature, Photo doesn't have access to this therefore it isn't possible to place an image directly into a text frame and finder prevents these formats from being selected.
I hope this makes sense!
-
Welcome to the forums @Tamla,
Prior to exporting to PDF, you can untick 'Facing Pages' under Document Setup > Model to swap to single pages. Alternatively, in the PDF export settings change the 'Area' to 'All Pages'.
-
-
Hi @josbin,
Just focusing on your sample .afphoto file, it looks like the opacity of the outer shadow is set to 46%, If I set your document to have a transparent background to make the brush transparency easier to see and then sample from the outer shadow i'm given the CMYK values 13,68,67,24. This matches the CMYK values of the Outer Shadow FX adjustment exactly.
If I create a new pixel layer and brush onto the canvas with the sampled colour it will look different to the outer shadow as the opacity doesn't match, but If I adjust the opacity to 46% in the colour panel to match the outer shadow and then brush again, the colour on the canvas is the same as the outer shadow colour.
Since the sampled colours in this example match the original FX shadow colour correctly, could this be the case of an opacity mismatch? I did open your PSD file to compare, but it doesn't appear that the outer shadow FX layer is present on layer 6/layer 6 copy for me.
-
Hi @Ashcat,
Was it perhaps the below video guide for creating a repeat pattern on Designer iPad?
This is possible to do in V1 designer with the use of symbol layers, I've linked the help guides below for more info.
https://affinity.help/designeripad/English.lproj/pages/SymbolsAssets/symbols.html
https://affinity.help/designeripad/English.lproj/pages/Panels/symbolsPanel.html
-
Hi @Anton Ditrikhs,
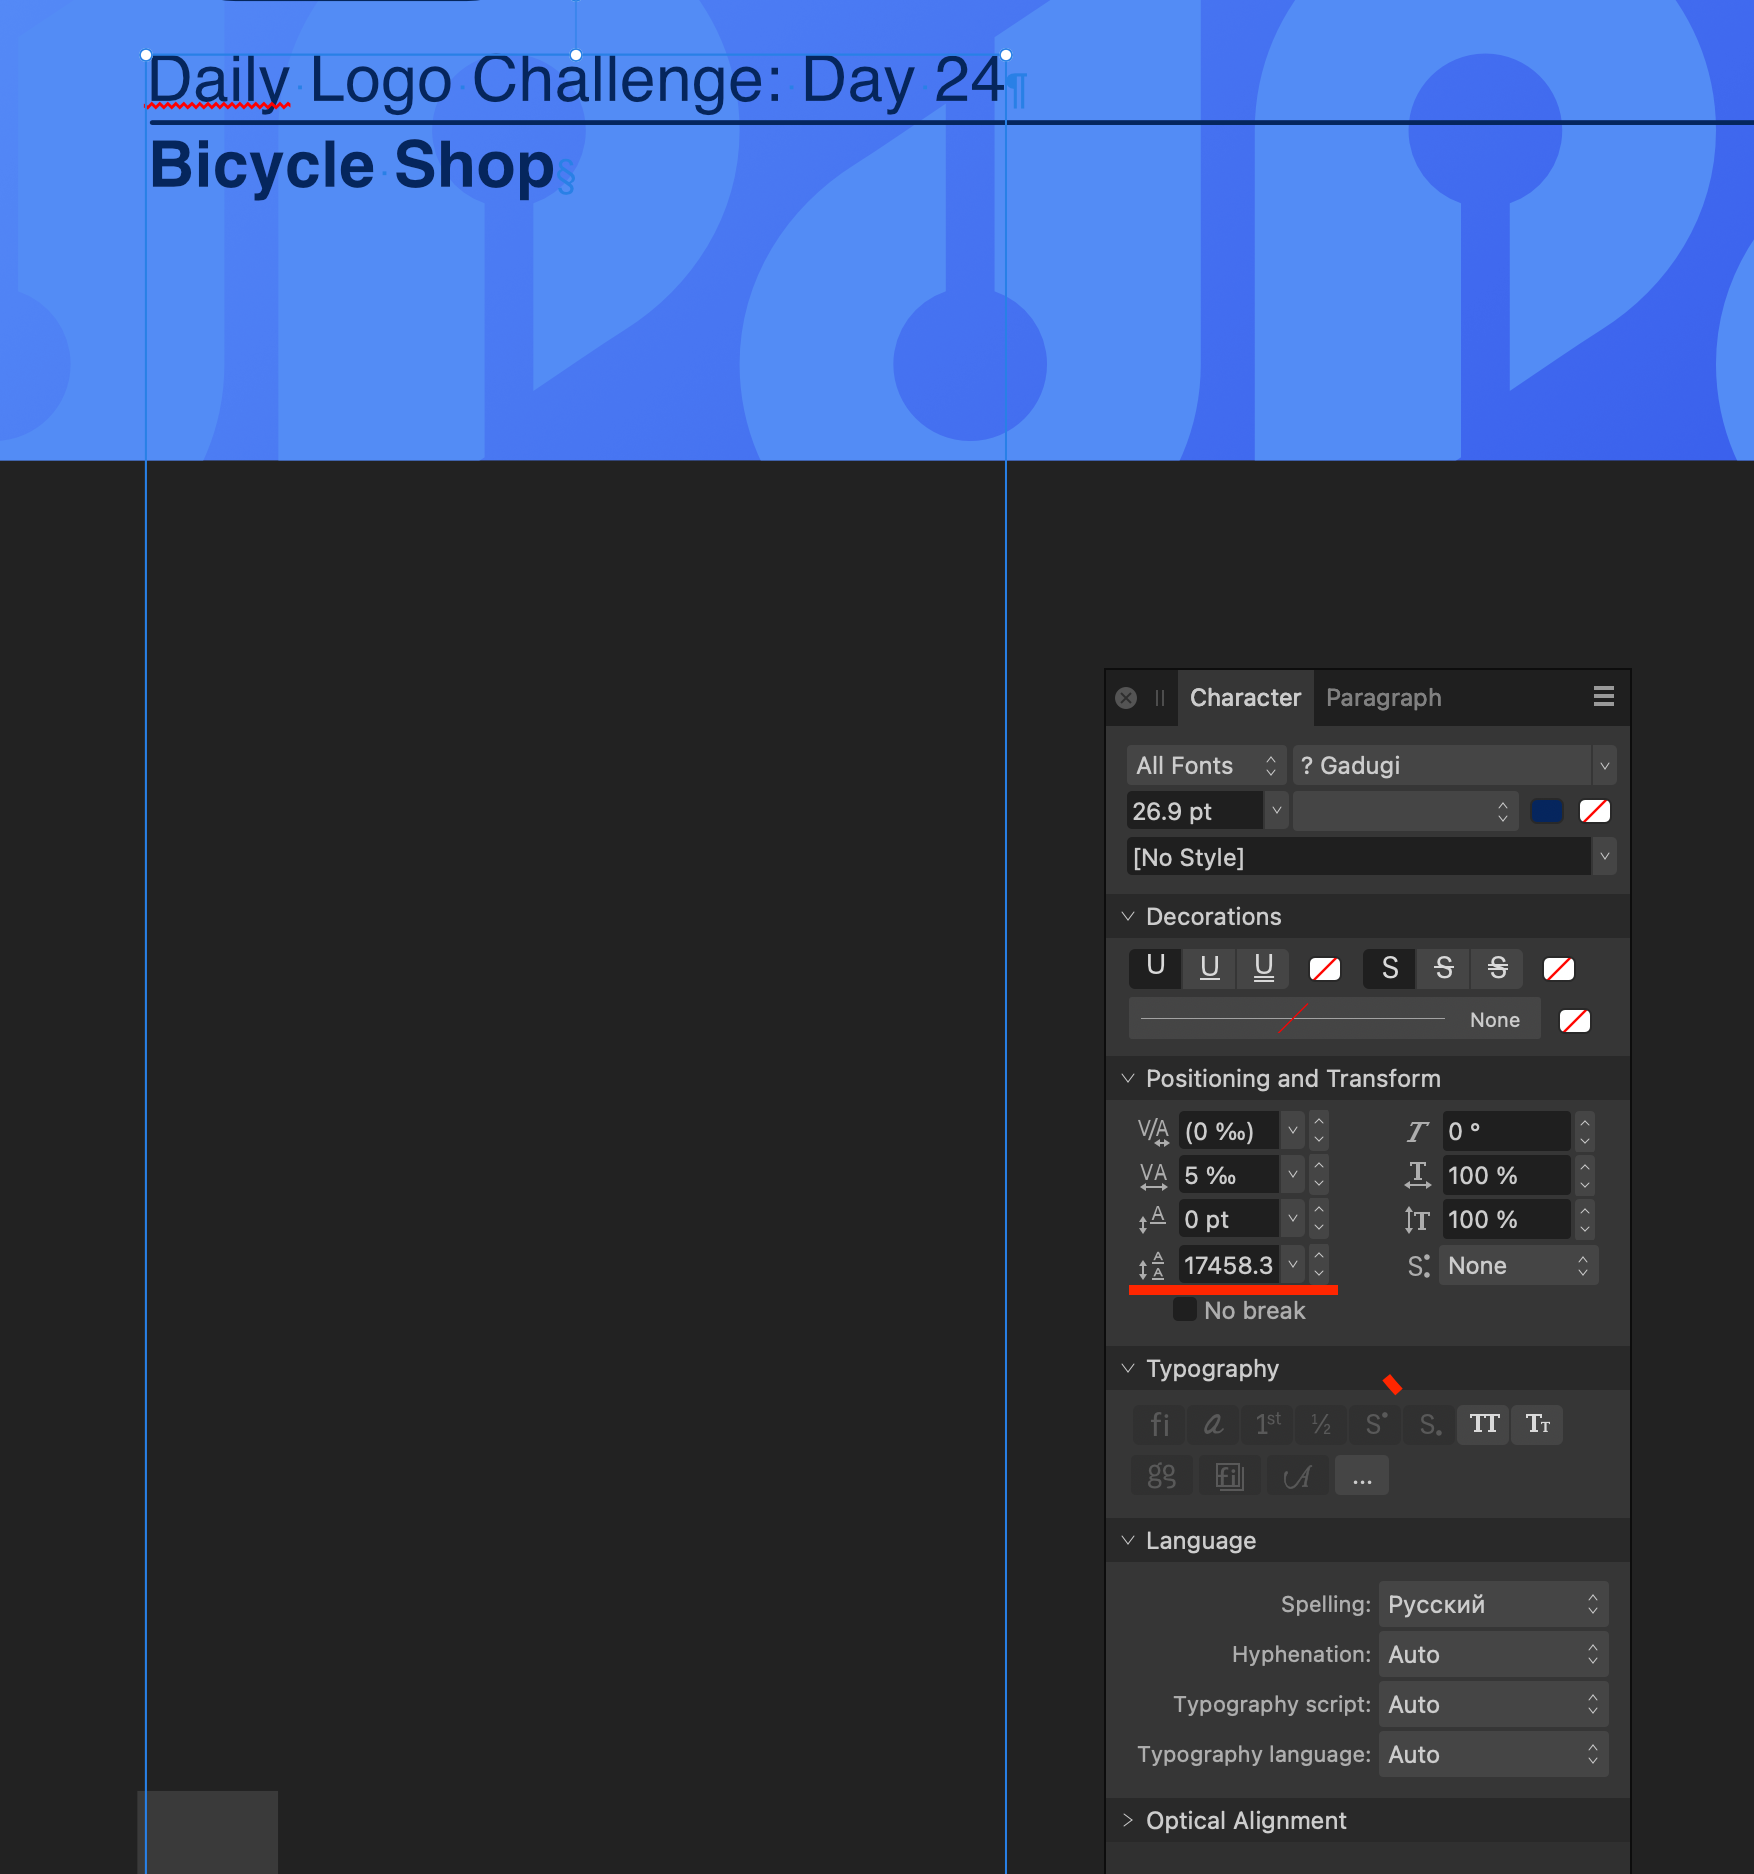
Thanks for following up with your file, it looks like this is an issue specifically with the 'Daily Logo Challenge: Day 24' art text layers, artistic text layer's bounding boxes are constrained to the text content only which is why your selection appears off, however if you convert these art text layers back to text frames via Layer > Convert to Text frame the previously invisible bounding box will then appear, i've attached a screenshot of this below.
The height of the text frame is huge and extends way beyond the boundaries of your working area. This is because the frame contains a few paragraph breaks and the leading override in the Text > Character Panel is set to 17458pt!
As a result of these huge paragraph breaks, when you click below this art text it will still select them as they are a part of the text. An easy way to fix this without converting the frame to a text frame is to put your text caret at the end of the text, hold down shift and press the right arrow key ~4 times and then press delete, this then remove the huge paragraph breaks and prevent any accidental selections going forward.
-
Hi @Hangman,
This issue is one that has been logged previously but needed updating to reflect the latest versions, I've now updated it and bumped it with your report. It can also happen without enabling the 'Vector' Checkbox, if your search term is broad/large and you scroll far enough it will eventually error.
-
Hi @Russ2,
Plugins require that an RGB Pixel layer be selected before they become active, from your screenshot it looks like you're working on a developed RAW image. In the layers panel if you right click > rasterise your image and then try launching the plugin from the dropdown menu again, does it then work?
Photo 2 introduced non-destructive RAW development, allowing you to return to the develop persona and continue editing where you left off, this creates a separate layer type which Plugin's won't accept. To prevent this going forward, you can set the RAW output in the develop persona to Pixel so the output from the develop persona is a pixel layer.
Info: https://affinity.help/photo2/English.lproj/pages/Raw/raw.html
-
Hi @Anton Ditrikhs,
It's possible that if you clicked in what looked like a free space there was an object bounding box there, an alternate method to clear your active selection easily is the CTRL + D or Select > Deselect command rather than looking for an empty space to click.
If you click in an empty area and it selects a completely random object, if you could capture this behaviour on a screen recording that would be great. I have provided an FAQ on screen recording below. If you also have a sample file where the issue can be replicated that would also assist us in replicating the issue.
Many thanks
-
Hi @Anklebuster,
I've provided some additional info below along with some help guide links for reference.
21 hours ago, Anklebuster said:New Document Setup
Could you perhaps expand on what info you're specifically looking for in regards to the document setup so we might better be able to assist?
21 hours ago, Anklebuster said:Color Profile
In New Document/Doc Setup this determines the global default colour profile that will be embedded in your document (so long as the option is checked on Export, PDF/X forces it on) and it determines the working document profile for objects and pixel layers, however a placed Image layer can retain it's own colour profile independent of the documents embedded colour profile so long as it's kept as an image layer.
https://affinity.help/publisher2/English.lproj/pages/Clr/ClrProfiles.html
21 hours ago, Anklebuster said:Adjustment Layers
We might need a little more information, what specifically are you looking to know/understand?
21 hours ago, Anklebuster said:Embedded Images that contain color
As mentioned previously, Embedded/linked image layers can retain their own colour profile independent of the document's working colour profile in the final PDF, in the PDF export settings you can also opt to convert image colour spaces to your working document profile on export.
https://affinity.help/publisher2/English.lproj/pages/Layers/layerImage.html
21 hours ago, Anklebuster said:Conversion of color images to Grayscale
If you have access to Photo 2 you could do this with the image opened in Photo 2 by going to Document > Convert Format / ICC Profile > Convert to Greyscale and then save and export the image to a format which supports this colour format, such as .TIFF. You could also do this with a recorded macro to convert the image colour space/profile and use the macro as a part of a batch job to process multiple images concurrently.
Or, as you've mentioned you could use a B&W adjustment layer which has been clipped to your image layer(s), non-destructive adjustment layers are not a compatible layer type with PDF files so this would result in the image layer being converted to your Document's working colour format but it would still apply the adjustment effect. If you globally applied a B&W adjustment to all elements on the page instead of just clipping it to images, this would rasterise all the contents of the final PDF on that particular page.
Another option is to use the 'K Only' function along the context toolbar on placed image layers, if your document colour format is set to CMYK this option should be come available with an image layer selected, this will ensure that the image layer exports as a K only B&W image.
21 hours ago, Anklebuster said:Why PDF/X doesn't like Greyscale D50 color profile
Not too sure on the specifics on this one, sorry. Looks like a limitation/restriction of the PDF/X standard.


Designer freezes when I select text boxes
in V2 Bugs found on Windows
Posted
Hi @Camila Medeiros welcome to the forums,
This is a known app lockout issue when double shift + clicking in a blank area with text frames selected, this bug has been fixed in the current 2.2 beta, if you wish to try the beta apps for yourself I've provided a link to the signup page below. (Note: be sure to backup your documents before opening them in 2.2, as once they have been saved they can't be opened in the release apps again.)
https://affinity.serif.com/en-gb/affinity-beta-program/