MikeTO
-
Posts
9,299 -
Joined
-
Last visited
Everything posted by MikeTO
-
 The orange lines (which are green in v2) simply mean the object is on a master page and not on the document page (the actual page). The dashed line means that you have modified the master page object on the document page - in your case, you modified the master page picture frame by adding a picture to it. So the orange/green lines are nothing to worry about. You can't apply an object style on a document page to a picture frame that is on a master page. You can do that only on the master page unless you use Edit Detached which is probably best left for a later time as that is getting more complicated. Just go to the master page and apply the object style to it there. If you really want to apply the object style to the picture frame on the document page rather than the master, then choose Layer > Master Page > Edit Detached. Make the changes and then click Finish in the bar at the top of the window. Good luck
 -
There is a workaround for those who encounter the same bug but it will require work if you've used your TOC anchors as cross-reference targets. Delete the main TOC. Deselect Include as PDF bookmarks for all of your secondary TOCs. Insert the main TOC again. It will be badly formatted but your TOC style isn't gone so you just have to choose the TOC style again. Now re-target every cross-reference that had targeted the TOC's anchors. This may take a while because you can't search for anchors or type the first letter to jump to them in the edit cross-reference dialog.
-
I've attached a 2.1.1 test document that crashes in 2.2 beta 1986 when I click into either of the two TOCs at the top of the page and turn off Include as PDF Bookmark. Doing the same thing doesn't crash in 2.1.1. toc test 3.afpub Affinity Publisher 2 Beta-2023-09-06-135010.ips If I deselect Heading 1 in the TOC panel's style list for TOC 2 before clicking Include as PDF Bookmark it won't crash. It does in my real document and I'm still trying to figure out why it only crashes in that one. The reason I want to turn off Include as PDF Bookmark for the secondary TOCs is that if TOC 2 has Heading 1 turned off, then Heading 2's PDF bookmark won't be nested under Heading 1. So any book with multiple TOCs needs to turn this off or it will break the PDF bookmark hierarchy.
-
Cross References
MikeTO replied to Ash's topic in [ARCHIVE] 2.5, 2.4, 2.3, 2.2 & 2.1 Features and Improvements
A minor but confusing bug in beta 1986. Create two cross-reference presets, #1 with hyperlink and #2 without. Create a xref and choose #1. Click OK. Edit that xref and choose #2 - hyperlink won't show as disabled. Click OK Edit that xref again and it will show as disabled which is good. Choose #1 - hyperlink won't show as enabled. Enable it and the preset will show as modified even though it's not modified. Click OK. Edit that xref and hyperlink will show as enabled and the preset won't show as modified. -
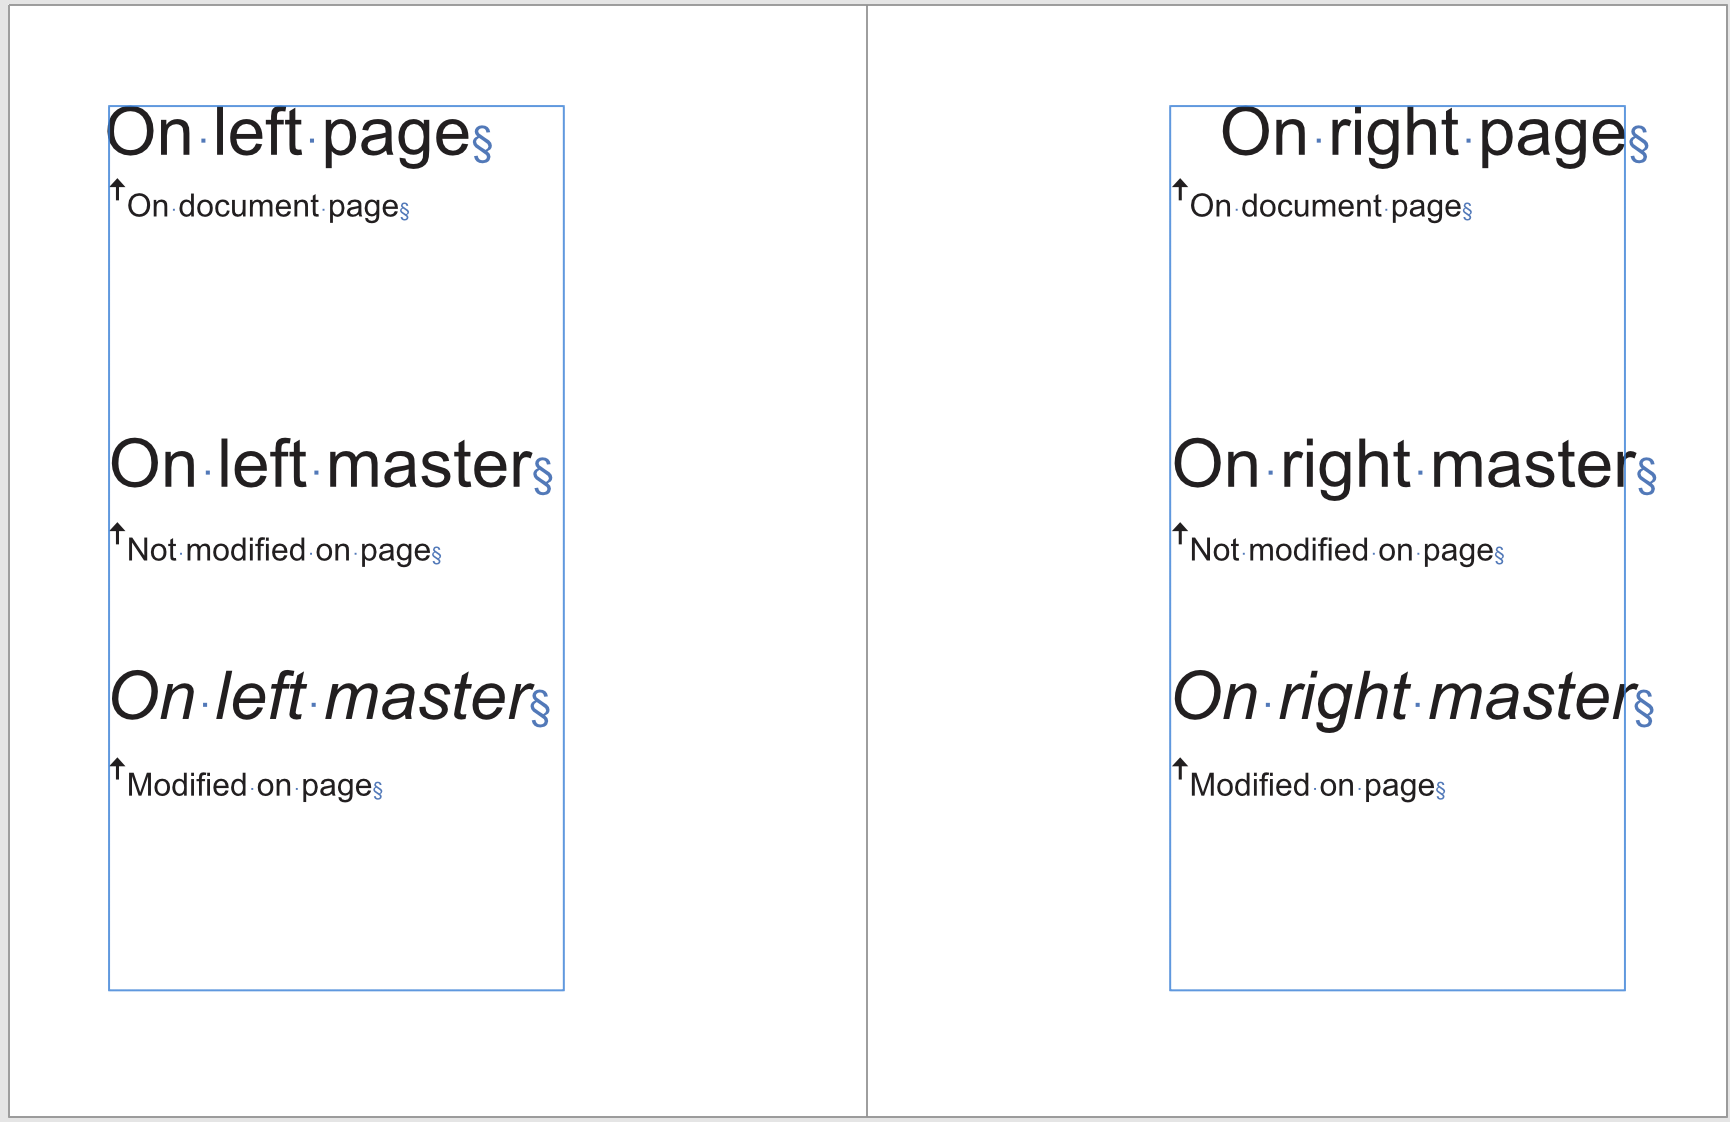
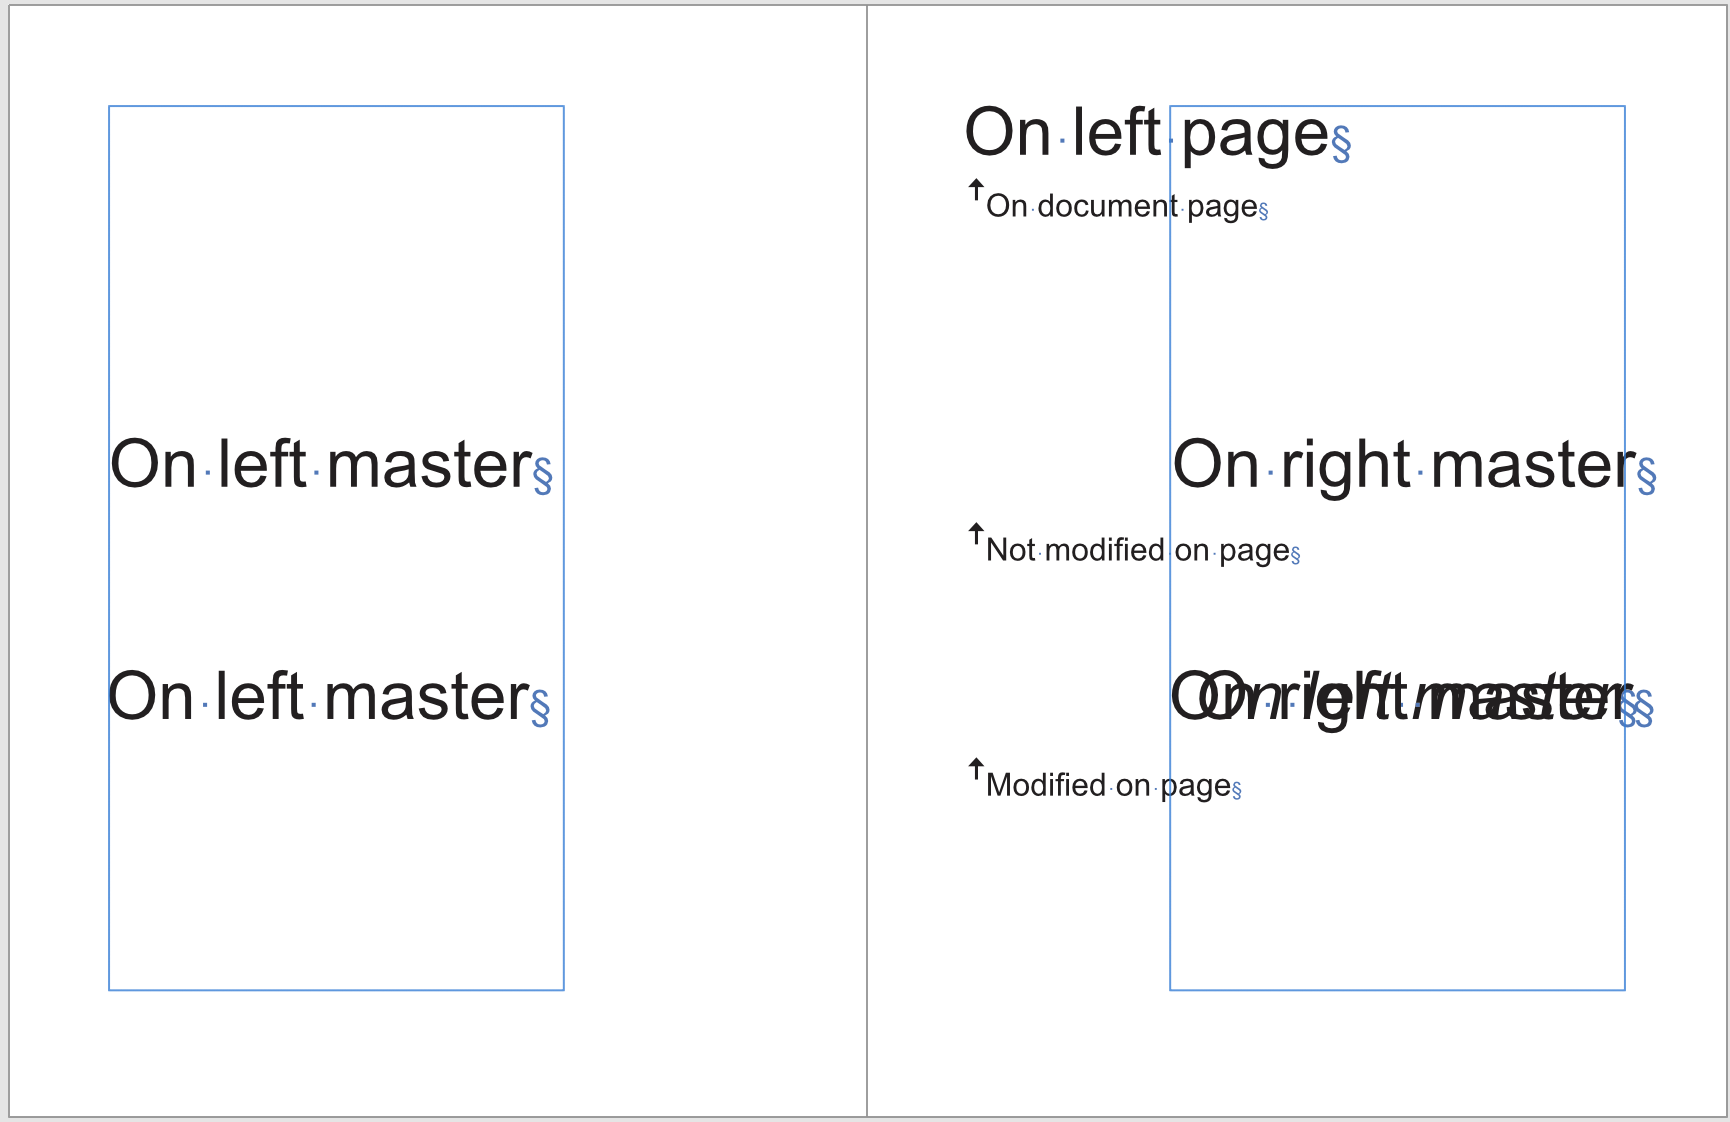
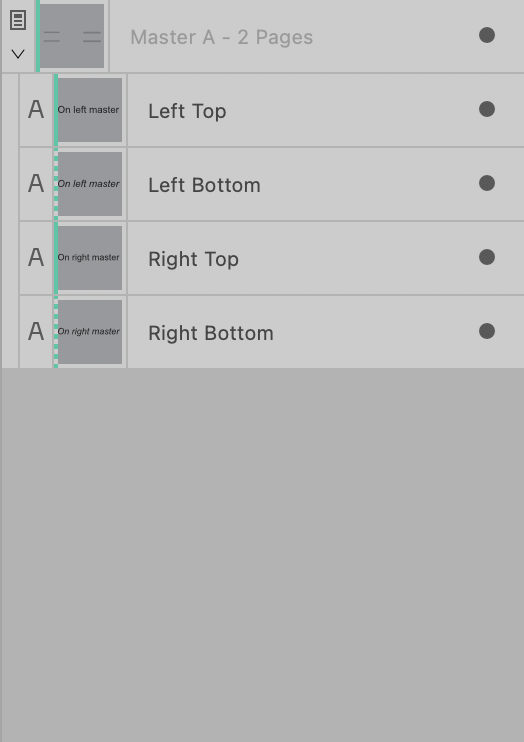
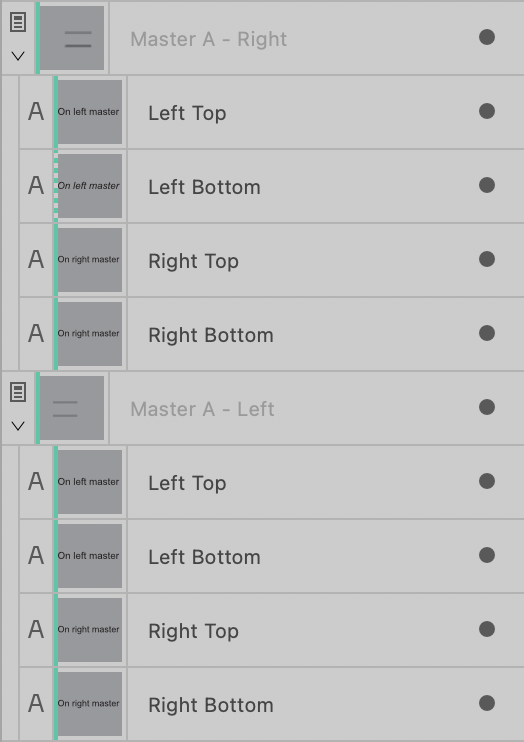
@NathanC Even if I understand it, the results aren't what I'd want because the master is applied separately to both sides of the spread, presumably because I could have inserted a page based on a different master. As you pointed out, we can solve this by re-applying the master but perhaps this could be done automatically? Maybe modify the Add Pages dialog with an additional checkbox below Master Page named "Apply to entire spread" that would default to selected? For a facing-pages document only of course. Here's a test document that I made to remind myself of how it works. As Bruce pointed out, it's good to label master objects to keep things straight. facing test.afpub Not counting the labels, the spreads 2-3 and 4-5 have 3 art text objects per page. The top ones are on the document page and work fine. The middle and bottom ones are on the master, but just the bottom ones are modified on the document page. Master A is applied to both sides so there are 4 objects on the master layer. After I insert a single page after page 1, Master A is applied separately to the left and right sides of spread 2-3 so now there are 8 objects. While the overlapping modified Left Bottom and Right Bottom objects on Master A - Right are a big problem, even the unmodified objects are doubled up. Spread 4-5 is okay but page 6 is similarly messed up with Master A - Left applied on it own but with 4 objects and the left and right ones are similarly overlapping.

-
One tiny change that would make the Anchors panel easier to use for me would be to add Collapse Nested Anchors and Expand Nested Anchors commands to the panel menu. Currently, if you collapse all the nested anchors so you can see them at a glance more easily, they all expand back out on the next change.
-
Here's a little test file for the zero width space / en space issue that shows the same thing as you described. If you add a zero width space before the en space in Between Items the index entry will break better. The text frame above that shows how an en space is non-breaking and glues words together. index test.afpub
-
I don't think that's the issue, I think it's that en space is non-breaking so Publisher is breaking at the first zero width space which is a discretionary line break. En space, em space, hair space, sixth space, all of those spaces are non-breaking in Publisher (and InDesign) so by using comma+en space in Between Items, you're gluing everything together and Publisher is breaking at the zero width space in that first range. So just change your Between Items and add a zero width space before the en space to solve the issue. After Topics does not appear blank in the panel after changing the value on macOS so this must be a Windows specific issue.
-
Hi and welcome to the forums. These pages might be good places to start: https://affinity.help/photo2ipad/English.lproj/contents.xml?page=pages/Workspace/interface.html?title=Interface Visual Reference https://affinity.help/photo2ipad/English.lproj/contents.xml?page=pages/GetStarted/homeScreen.html?title=Home screen https://affinity.help/photo2ipad/English.lproj/contents.xml?page=pages/Workspace/quickMenu.html?title=Quick Menu https://affinity.help/photo2ipad/English.lproj/contents.xml?page=pages/Workspace/onscreenModifiers.html?title=Using on-screen modifiers Cheers
-
I was testing importing footnotes from MS Word to try to understand the formatting issues. These are with MS Word's default style sheet and this test file is for the first 3 issues: note2.docx Footnotes that are referenced from Normal text and formatted as the default Footnote Text paragraph style import okay but in addition to Footnote Text, they have Footnote Reference applied to the note body which isn't right and they have individual attributes applied. They import as: footnote text + footnote reference + Font size: 10 pt; Space after: 0 pt; Default tab stops: 0 in Footnotes with the default Strong character style applied import strangely. They import as: footnote text + Strong + Font size: 12 pt; Superscript; Space after: 0 pt; Default tab stops: 0 in. I don't know where the 12 pt is coming from, Strong in Word is just bold. But a footnote with a more detailed character style applied imported better. I defined Style 1 as Caslon 15 underline and that's what it looked like after importing, although it imported as: footnote text + Style1 + Superscript; Space after: 0 pt; Default tab stops: 0 in. It seems that Publisher doesn't like Word character styles that don't include a text size. Footnotes that are referenced from Heading 1 (which is blue in Word) import strangely - they have blue note bodies. They import as: footnote text + footnote reference + Font size: 10 pt; Character fill: R:47 G:84 B:150; Keep with next: 1; Space before: 12 pt; Space after: 0 pt; Default tab stops: 0 in. It seems like note bodies inherit some of the attributes of the marker. Sometimes a footnote with a different para style applied in Word appears to be invisible after importing but it's really just tiny. [EDIT and the text is lost] This other test file has 3 notes and the first one imports as 0.2pt so it's essentially zero height and invisible. In this test the first footnote has a paragraph style named Clone of Normal and it is literally just a style based on Normal with no attribute changes. If you go to the note reference and click the Go to Body button in the panel, you'll see what it imports as - I pasted it further below since it's so long. The para style didn't survive the import. The strange thing is I then defined another style named Clone of Normal plus Bold and applied it to the following note and that one imported much better as: Clone of Normal plus bold + footnote reference + Space after: 0 pt; Default tab stops: 0 in. [EDIT: of course the solution to Word footnote importing is to use Revert All Footnotes to Document Settings. After choosing this command the footnote will appear but without any text. The text "This one is based on Normal with no changes" from Word was deleted during import.] footnote issue.docx For #4, footnote 1: Font: Arial; Font weight: Normal; Italic: Off; Font width: Normal; Font size: 0.2 pt; Character spacing: 0 ‰; Baseline advance: 0 pt; Default kern: on; X offset: 0 pt; Y offset: 0 pt; Kern: 0 ‰; Scale X: 100 %; Scale Y: 100 %; Font shear: 0 °; Leading override: 0 pt; Underline: None; Strikethrough: None; No superscript/subscript; No caps; Leading override: auto; Typography script: Auto; Typography language: Auto; Optical alignment: None; No break: off; Spelling language: None; Hyphenation language: Auto; Character fill: R:0 G:0 B:0; Character outline fill: none; Character outline: none; Character transparency: none; Highlight colour: none; Underline colour: none; Strikethrough colour: none; Optical alignment values; Hyperlink: None; OpenType: reset; Align paragraph: Left; Leading mode: % ideal; Start: Anywhere; Keep with previous: Off; Keep with next: 0; Keep together: Off; Prevent widows: Off; Prevent orphans: Off; Align to baseline grid: On; Auto hyphenation: Off; Hyphenate minimum length: 5; Hyphenate after first: 2 letters; Hyphenate before last: 2 letters; Maximum consecutive hyphens: Unlimited; Only between Paragraphs; Use space between same styles: Off; Use larger of space before and after; Leading: 100 %; Leading: 0 pt; Left indent: 0 in; Right indent: 0 in; First line indent: 0 in; Space before: 0 pt; Space after: 0 pt; Default tab stops: 0 in; Minimum word spacing: 80 %; Desired word spacing: 100 %; Maximum word spacing: 133 %; Minimum letter spacing: 0 %; Desired letter spacing: 0 %; Maximum letter spacing: 0 %; Minimum hyphen score: 0.0; Hyphenation zone: 0 in; Hyphenation zone capitals: 0 in; Hyphenation zone last word: 0 in; Hyphenation zone across columns: 0 in; Last line outdent: 0 in; Space between same styles: 0 pt; Tab stops: None; Paragraph decorations: off; List: None; List bullet string: "•\t"; List character style: ""; List tab stop indent: 0 in; List alignment: Left; Drop cap: Off; Drop cap height: 3; Drop cap characters: 1; Drop cap auto characters: On; Drop cap align left: Off; Drop cap scale descenders: Off; Drop cap text distance: 0 pt; Drop cap style: ""; Initial words: Off; Initial words count: 3; Initial words end characters: .?!:; Initial words style: ""
-
@Sean P I think that might be it. I don't trigger it that way but it's probably the same. And I agree that it has something to with inline objects being selected.
-
Hi @A Legge Up and welcome to the forums. This is a known bug so the good news is that Serif is already aware of it and it's on their list to be fixed.
-
https://affinity.help/publisher2/English.lproj/index.html?page=pages/Panels/notesPanel.html?title=Notes panel On the Notes panel page, the descriptions in Positioning from Min Gap Before to Short Note Gap are specific to footnotes. Endnotes uses a subset of these and they're mostly the same anyway, but Width and Distance from Frame are specific to sidenotes and aren't documented. This isn't a big deal because these two fields are pretty obvious in their purpose.
-
I started looking into the German tooltip issue but it's the same issue in English. On macOS it all seems to work correctly except for the tooltip. When the app launches and there is no document open the tooltip for the Create Custom Field button is "Default Format" which isn't right and it's not clickable anyway. When a doc is open it is "Create Custom Field". If you close the doc it will remain as is but if you first create a custom field and then close the doc the tooltip for this button changes to "Edit Custom Field".
- 5 replies
-
- 1
-

-
- custom fields
- panel
- (and 5 more)
-
APub: Navigate next/prev section
MikeTO replied to GeirSol's topic in Desktop Questions (macOS and Windows)
Here's a workaround you could use for now. On the first page of each section, draw a text frame and type in something short that you don't use elsewhere in the document. For example, you might type s1 for section 1, s2 for section 2, etc. If the last frame in section 1 is linked to the first frame in section 2, pin this frame into the text so it moves with the text. Hide the frame so it won't be visible or printable. When you want to jump to section 7 quickly, just press Cmd+F (ctrl+F on Windows), type s7, and press Return. -
@PimentonMedia Please see this post
-
Oh my mistake, I misunderstood the purpose of that pattern. Sorry. I could swear I was seeing the reverse yesterday, that those with UK English couldn't get BST, but I can't duplicate it now so I must have been confused. Sorry. At least I got one right. I thought that's what it should do and I've now figured out the steps. If you insert the current date & time field into a text frame on a document page it will update correctly but if the same field is inserted into a frame from a master layer it won't update - you can customize the formatting but not update the value. Thanks, Mike
-
Custom text variables
MikeTO replied to Ash's topic in [ARCHIVE] 2.5, 2.4, 2.3, 2.2 & 2.1 Features and Improvements
I must have missed that you could copy/paste a frame with a custom variable. That's great, thanks for pointing that out to me! Cheers -
@NathanC Thanks and sorry to have caused so much work for such a minor thing. I wouldn't normally pay attention to this field except I was testing custom date formatting yesterday and used Created as my test field until I realized there was an issue with it. Cheers
-
Thanks @Hangman for clarifying the conditions. Do you have it now @Sean P? My gut feeling is that these issues and the stuck issue (https://forum.affinity.serif.com/index.php?/topic/190960-publisher-wont-change-to-text-frame-tool-stuck-on-move/) I reported are all linked. In addition to these issues, there is a stuck mouse pointer issue I haven't reported because it's just the pointer, clears up easily, and I haven't figured out the steps yet, but all of these seem to have started at about the same time. Thanks
-
Hi, I'm late to the date formatting party but I tried all the formats today in English US, UK, Canada, and Australia and found a few small issues. I can't get k/K to work in any language. If it's 6 pm and I enter "h H k K" I get "6 18 18 6". Should it give me "6 18 19 7"? For "z" (lowercase) and language set to English UK I get GMT+1 instead of BST and GMT-4 instead of EDT. For English US or Canada it gives me BST or EDT as stated in the help file. Is UK English supposed to work that way? The formatting window for date & time (the general one, not the created, saved, or printed ones) has an Update button when opened in a dialog from the context menu but for me it does nothing. Also, should the button be included in the popup version opened from the panel? The help page for "B" states" Possible values are in the morning, noon, in the afternoon and at night." The list is missing "in the evening". The help page for "x" states that x will result in +01, -0930 but it actually results in just +01. I don't think that the code is wrong, but the unicode and iso documentation is confusing. It might be worth noting in the help page that non-alpha characters don't need to be enclosed in apostrophes. I believe this (k) is for referring to 00:30 as the 1st hour of the day and 11:30pm as the 24th hour. Cheers
-
Custom text variables
MikeTO replied to Ash's topic in [ARCHIVE] 2.5, 2.4, 2.3, 2.2 & 2.1 Features and Improvements
In the meantime it might be nice if custom variables were imported with Add Pages from File. I sort of assumed that if I used a custom variable on a page and then imported that page into another document then the custom variable would come with it. I can see that a variable did get imported because the character count went up by one but it's not associated with a variable defined in the document. This would be a useful workaround for Books because variables aren't synced across chapters. Thanks -
@Sean P This is unrelated to fields but there's a more common scenario in the beta that can lead to a non-blinking cursor and result in the loss of the entire frame when you press delete. Perhaps they have the same cause or can be fixed together. Create a doc and draw a text frame Type some text - the cursor is blinking Save the doc - the cursor will no longer be blinking Press Delete - the text frame will be deleted This is a regression from 2.1.
-
Cross References
MikeTO replied to Ash's topic in [ARCHIVE] 2.5, 2.4, 2.3, 2.2 & 2.1 Features and Improvements
It happens with unlinked frames for me. Screen Recording 2023-09-03 at 10.45.28 AM.mov IMO it's an oversight. I can expand a field in a frame on a master layer, I just can't edit it. I can edit a date field on a master page layer, just not a cross-reference field. -
The Created date for one of my projects is stuck and refuses to change when I use Save As. It changes for all of my other documents. The Saved date and Save Count do change correctly. Here's a test file saved from 2.1.1. test.afpub Here are before and after screenshots of using Save As in 2.1.1 on my oldest backup. Saved and Save Count are reset but not Created. Here are screenshots of using Save As in 2.2 beta 1971 on the latest version of this project. Same as above. Here are screenshots of a working project for comparison, using Save As in 2.2 beta 1971 which resets the Created date to today's date.