MikeTO
-
Posts
9,284 -
Joined
-
Last visited
Everything posted by MikeTO
-
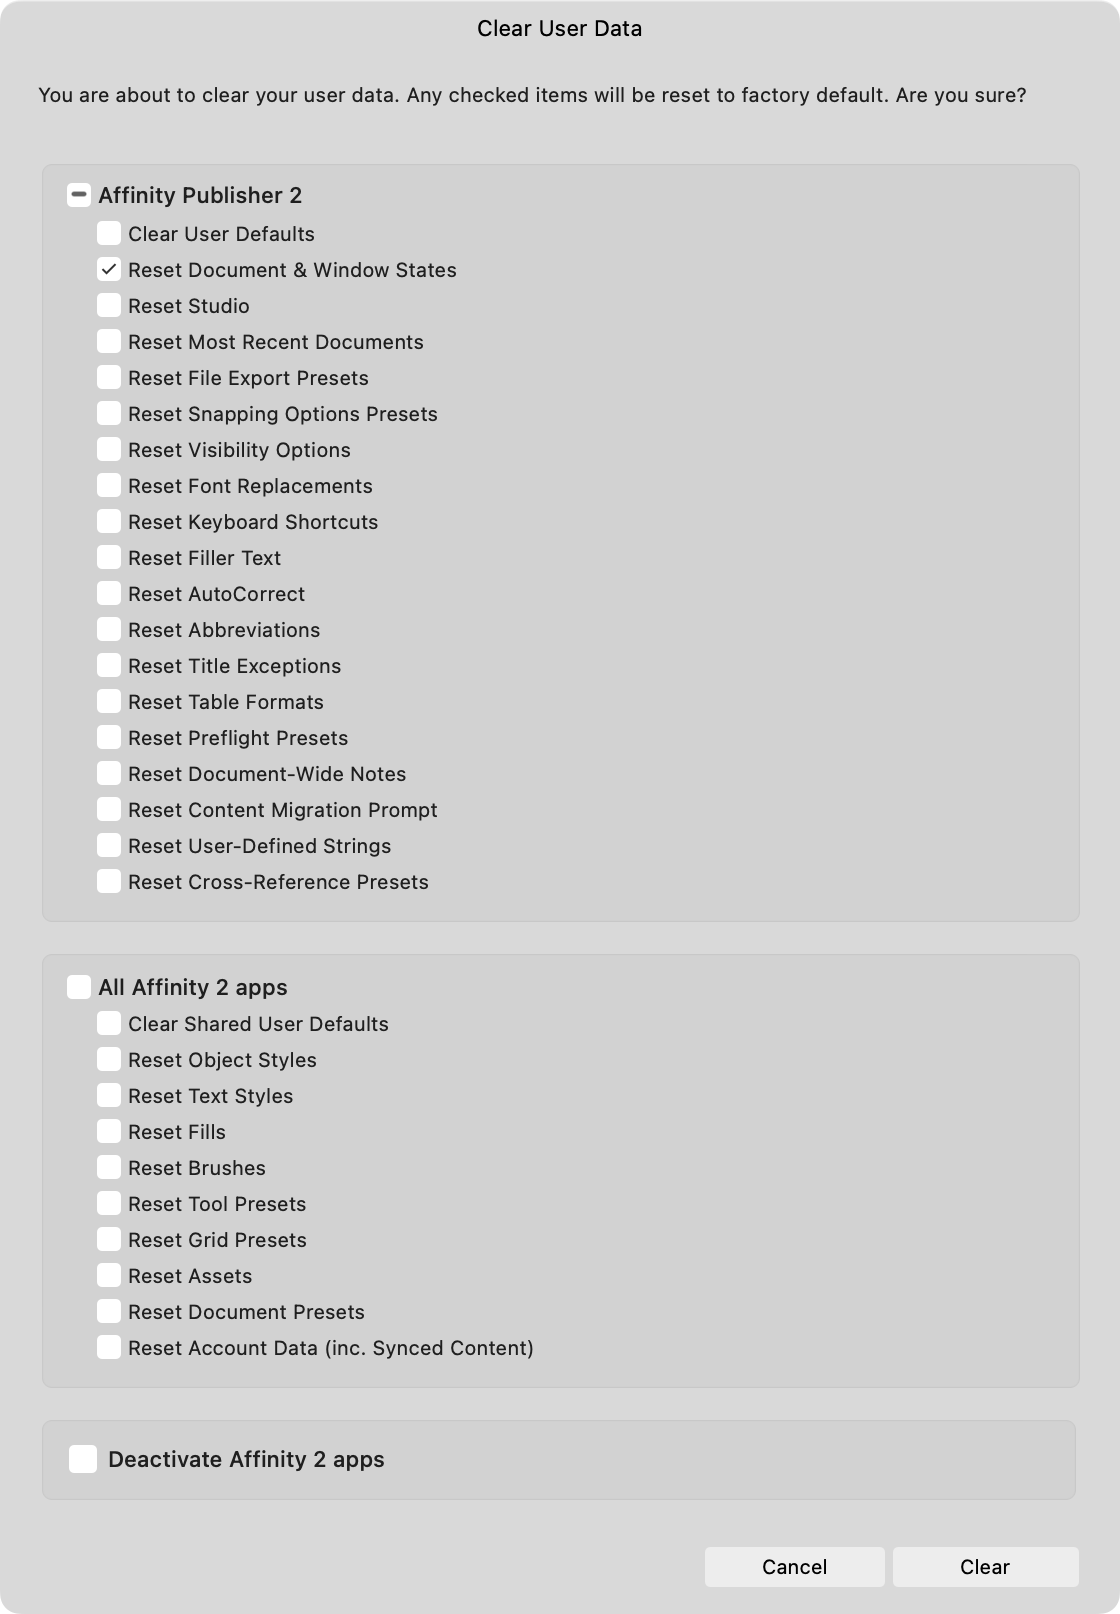
 It's a requirement for Mac computers, too, but it happens. If you don't want to lose your studio (panel) setup while clearing user data, save your studio set up as a preset with Window > Studio > Add Preset... first. If clearing user data doesn't solve the problem, you can reload your studio preset. The main checkbox, Clear User Defaults, clears text formatting defaults, all of your preferences settings, including all of the independent options listed below. It's a big deal to clear all your user data. You can lessen the impact by saving your keyboard shortcuts first. Good luck!
 -
Arrow shows instead of tool - fix?
MikeTO replied to bwackv's topic in Desktop Questions (macOS and Windows)
If the tool is really selected - choosing the Rectangle tool draws a rectangle even if the mouse pointer is shaped like an arrow - the issue may be due to a conflicting utility that you've installed. I've seen reports of this problem with other apps over the years and the root cause is usually some utility or some adware. Do you have any utilities installed that might make use of the mouse pointer location? If not, find a tool to scan your computer for adware (which is a good idea anyway). Good luck.
-
Yes, you can do this. Just add an anchor to the graphic with Text > Interactive > Insert Anchor... This command works on objects as well as in text. Then add a cross-reference to the object anchor as you would to a text anchor, it works for all anchors. Cheers, Mike
-
Hi, I believe this issue has been around since 1.x and somebody else reported it again during the beta. It's not specific to Publisher, but once your studio get into this state in one of the apps you can keep experiencing this sort of issue in that app. I recommend fixing your Publisher studios by choosing Window > Studio > Reset Studio, setting up your studios again the way you like them, and then saving that as a preset by choosing Window > Studio > Add Preset... Cheers
-
I had no problem opening the Section Manager with your document. What might be happening is that the Section Manager is opening off the screen so you can't see it, something that can happen occasionally, especially if you've ever switched monitors or switch between a laptop screen and a monitor. To resolve it, start Publisher while holding down Ctrl (press it immediately after clicking the icon). The Clear User Data window will appear. Deselect Clear User Defaults and Reset Studio, leaving just Reset Document & Window States selected. I think that will solve it but if it doesn't try it again and leave all three of the checkboxes selected. Good luck.
-
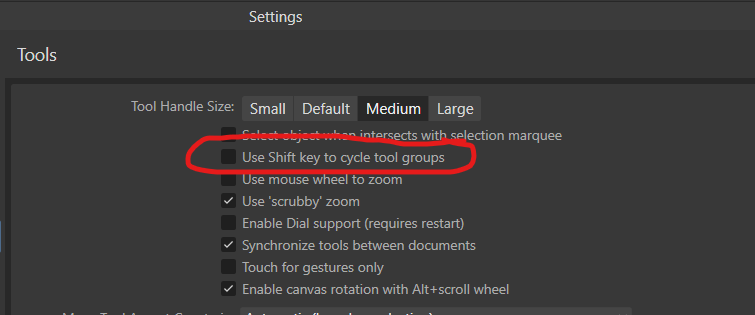
There's no need to click Clear All Shortcuts. You can resolve the problem by restoring the default shortcuts. On macOS, choose Affinity Publisher/Designer/Photo 2 > Settings, click Shortcuts, and then click Serif Defaults. On Windows, choose Edit > Preferences, click Shortcuts, and then click Reset. But to fix just this one shortcut without resetting all your shortcuts, change the shortcut for Edit > Delete to the Delete key.
-
Move data entry
MikeTO replied to Ash's topic in [ARCHIVE] 2.5, 2.4, 2.3, 2.2 & 2.1 Features and Improvements
If there isn't I'll write a script to do this when scripting is available. Last week I was checking what the limit was for guides (you can create 105, not 48 as was previously reported) and it wasn't much fun to create that many guides. I suggested to that person that if they really wanted more than 105 guides they could create text frames on the master and lock them to use as guides so you could use that idea to take advantage of Move Data Entry. Just draw a text frame the height or width of a page, make it very narrow or tall as applicable so it's effectively 0 (Affinity won't let you make it exactly 0 so enter something like 0.0001, depending on your measurement units). Then use the new Move Data Entry feature to make lots of evenly-spaced duplicates (or use Power Duplicate). Then lock the text frames and with Show Text Flow turned on you'll have a bunch of nice guides. Because they're locked you won't be able to click into them by mistake and they won't interfere with anything. Cheers -
Updated for Publisher 2.5 (May 2024) This free in-depth manual is filled with steps, tips, and recommendations for: Documents, Pages, Master Pages, Sections, and Baseline Grid Character and Paragraph Formatting Text Styles (paragraph and character) Text Frames, Text Flow, and Stories Images and Picture Frames Books and Chapters Cross-References, Table of Contents, and Index Notes - including Footnotes, Sidenotes, and Endnotes Fields - including Page Numbering, Running Headers, and Custom Variables Anchors and Hyperlinks Printing and Exporting Settings New for this edition: Getting Started, Variable Fonts, a Dutch, Polish, and Ukrainian terminology dictionary, and more This manual does not cover other types of objects, path and photo editing, or the other artistic features. You can find the 335-page PDF manual in the Tutorials area of this forum:
- 20 replies
-
- 10
-

-

-
Hi, the Delete key shortcut was broke in 2.1.1, I tested it yesterday and clicking Serif Defaults (Reset on Windows) erased the Delete key shortcut. 2.2.0 fixes this, clicking Serif Defaults/Reset works properly now. But if you were missing the Delete shortcut in 2.1.1 before upgrading it's likely that you'll still be missing it. It's easy to fix. Either click Serif Defaults/Reset which will change all your keyboard shortcuts, or change the shortcut for Edit > Delete to the Delete (backspace) key. Good luck.
-
Art Text doesn't display leading spaces by design but if you want some leading space, just type a character and assign no fill.
-
Hi, I just tried a couple of the colour wells (swatches) and they worked properly for me. Which one are you clicking that doesn't seem to be fully clickable? Maybe one was missed.
-
I thought that's what you meant and I think we're likely talking about the same key. I referred to it as Delete because the backspace key is named Delete on Mac keyboards while the delete key is named Forward Delete.
-
I'm unsure. I just intended to explain the Books feature since it's so difficult to know if it's the right choice for your project until you've broken your book into chapter files. And if it turns out it was the wrong choice, it's hard to put the chapters back together again. I need to get back to my other book project but I imagine I'll expand this a bit in the future when I feel an itch to document a feature. I added the section on keyboard shortcuts yesterday while waiting for the release of 2.2. Thanks for catching this. If I had been sending this to print I would have engaged proofreaders but since this was a free project I knew there would be some copy/paste mistakes like this. Here's what the first example should have been, I will change this in the first update. Will do, thanks.
-
Version 2.1.1 didn't actually have the Delete key assigned as a shortcut for Edit > Delete. If you upgraded from a previous version the shortcut was there but if you used the Serif Defaults button or Apple Defaults button on macOS, and presumably also the Reset button on Windows, the Delete shortcut was, um, deleted. Installing a new version doesn't typically change your existing shortcuts, except for the rare addition of a new shortcut, so installing 2.2.0 might not add the Delete key as a shortcut for Delete if you had previously deleted it by clicking Serif Defaults/Reset. So is this a bug? From your perspective it probably is but I think the issue is just fixed, although you might have to use Serif Defaults/Reset or manually restore your shortcut. For others with this issue: If the Delete shortcut is okay and you're not having any other problems with your shortcuts, especially the text input shortcuts, then just manually add the Delete shortcut instead of resorting to Serif Defaults/Reset.
-
Updated for Publisher 2.6 (Feb 2025) Publisher Manual Feb 3 2025.pdf This free, 390-page manual is filled with steps, tips, and recommendations: Everything you need to know about documents, pages, spreads, master pages, text formatting, text styles, text frames, picture images, books and chapters, sections, cross-references, tables of contents, indexing, footnotes and endnotes, page numbering, running headers, fields, anchors and hyperlinks, printing and exporting, and customising settings New sections for multi-page spreads, the reading order panel, guides, grids, snapping, and other features This manual does not describe the illustration and photo editing features Q&A Is this really free? Yes, it's copyrighted only to prevent others from publishing it as their own Is there a longer manual I can purchase? No Is there a version for Designer or Photo? No, but many of the features are the same so it will still be relevant Is there an iPad version? No, the steps and screenshots are for the macOS and Windows versions Why does it use a print layout if it's a PDF? It's a demonstration of how to use the features it describes to create a print book You might also like: Special Characters Quick Reference Chart: https://forum.affinity.serif.com/index.php?/topic/176386-special-characters-in-affinity-quick-reference-chart/ Terminology Translation Dictionary for Dutch, Polish, Ukrainian, Swedish, Norwegian, Danish, and Finnish: https://forum.affinity.serif.com/index.php?/topic/209953-terminology-translation-dictionary/ Previous 2.5 edition for those who still want it: Publisher Manual May 23 2024.pdf
-
FYI you can also lock the selected layer(s) with Cmd+L (Ctrl+L on Windows) and unlock with Shift+Cmd+L (Shift+Ctrl+L) on Windows. You can customize these keyboard shortcuts in Settings (Preferences) so if you spend all day drawing and not typing you could even change them to something as simple as L and U, whatever works for you.
-
In 2.2.0.2005 for macOS there's a "Send To..." menu command listed under Settings > Shortcuts > File that doesn't correspond to a command in the File menu. Is this supposed to be there? It's not in 2.1.1's shortcuts list.
-
Index Markers in Document Not Being Recognized
MikeTO replied to tpauly's topic in Desktop Questions (macOS and Windows)
I can't figure it out from the PDF but perhaps you could upload a test document with a page or two with the index marks in question. If not, Serif might provide you with a private link later so they can review the file. Good luck -
Help outdated for PDF Bookmarks > Export PDF
MikeTO replied to MikeTO's topic in V2 Bugs found on macOS
Yes, I pasted the wrong URL. Sorry. The page with the outdated text is: https://affinity.help/publisher2/English.lproj/index.html?page=pages/Workspace/customizingToolsPanel.html?title=Customising the Tools panel -
Index Markers in Document Not Being Recognized
MikeTO replied to tpauly's topic in Desktop Questions (macOS and Windows)
Hi, were they index topics or index references? If you click the + icon you're creating a topic and there is no marker, so generating the index will result in a blank index. You need to click the bookmark icon to the right of the + icon to insert a topic and reference at the same time. Alternatively, you can insert topics first and then position the text cursor and double-click the topic in the panel to insert a reference to it. You can remove as many index topics and references at the same time as you want by Shift+clicking them in the panel and clicking the Delete icon. If you want to select everything, click the first one and then Shift+Click the last one. Cheers -
Help outdated for PDF Bookmarks > Export PDF
MikeTO replied to MikeTO's topic in V2 Bugs found on macOS
Thanks Nathan. Here's one more: https://affinity.help/publisher2/English.lproj/index.html?page=pages/Workspace/contextBar.html?title=Context toolbar In the last topic, it states: "If the number of columns is two or more, the Tools panel will also display colour selectors. These are similar to those which appear on the Colour panel and Swatches panel." In v1 Affinity didn't show a colour selector when Tools was set to a single column but the colour selector is always shown in the v2 Tools panel, although in a more compact fashion and without the None swatch if there's only a single column.- 12 replies
-
- 1
-
-
- helpia-614
- helpia-615
- (and 1 more)
-
This is rather minor, but if you have two studio presets, one with the Toolbar on and one with it off, the Toolbar will be drawn over the Context Bar when you switch to that preset. Until you quit the app that is, then it accounts for their space but if you switch to the preset that doesn't include the toolbar the app window can't be dragged to the top of the screen so you might as well have the Toolbar open. It's hard to describe but it's like there's an invisible barrier at the top of the screen where the bottom of the Toolbar should be.
-
Publisher - can't open important file
MikeTO replied to iceritchie's topic in Desktop Questions (macOS and Windows)
Did you try: Making a copy of the file and trying to open the copy? Placing one page of the file into a blank document of the same size using File > Place? Adding pages from the file using Document > Add Pages from File? Try a couple of single pages if the whole thing doesn't work. Good luck