kirkt
-
Posts
440 -
Joined
-
Last visited
Everything posted by kirkt
-
Affinity Photo Customer Beta (1.9.0.196)
kirkt replied to Andy Somerfield's topic in [ARCHIVE] Photo beta on macOS threads
Ok - makes sense. Thanks! kirk -
Affinity Photo Customer Beta (1.9.0.196)
kirkt replied to Andy Somerfield's topic in [ARCHIVE] Photo beta on macOS threads
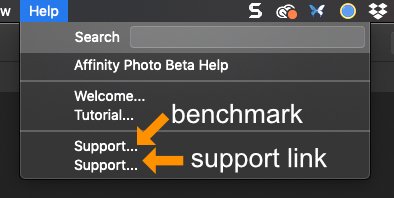
You all have been busy! beta v 1.9.0.196 - the menu entry for the CPU/GPU benchmark is labeled "Support..." as is the actual link to the web page support. The first (top) menu entry is the benchmark. kirk
-
What problem is being caused by your OCIO config file? It is pretty much used only for the OCIO adjustment layer and the display preview in the 32bit Preview panel. kirk
-
I just opened a Canon RP .CR3 file (a sample from imaging-resource.com) in v 1.8.4 on my MacBook Pro, using both the Apple Core Image Raw library and the Serif raw library. Running OS 10.15.6. Kirk
-
You can add an adjustment layer (like curves) and set the blend mode to Screen. You do not need to do anything to the curve. Invert the layer mask (just select the layer and CMD-I or CTRL-I) to hide the screen effect and then use a white rush with low flow and 100% opacity to gently brush in the screened layer. You can also clone the catchlight from the right eye onto the left eye. Kirk
-
I think we both agree that AP's curve dialog could use some additional tools, although the fact that the user can change the input range is pretty great, especially when editing 32 bit per channel, HDR data. Numerical input would be a great addition. I was also trying to kludge together the max/min reversed curve adjustment layer with a procedural texture live filter to invert the output of the curve, but even when the document is in Lab mode, the live filter version of the procedural texture only permits equations in RGB, including presets made in Lab. Boo! Kirk
-
I think we both agree that AP's curve dialog could use some additional tools, although the fact that the user can change the input range is pretty great, especially when editing 32 bit per channel, HDR data. Numerical input would be a great addition. Kirk
-
@KentS When you open a new curve layer, try inverting the input min and max values - that is, enter "1" for the minimum value and "0" for the maximum value. See if the correction curves in his book translate one-to-one with this set up. I don't have Professional Photoshop in front of me right now to test it. It may not be enough though, as you probably need to inert the output axis too. Kirk
-
In looking through the lensfun database, the lens is not characterized yet. You can go to the Lensfun homepage and read up on how you can request support for a lens and help contribute to the database. Once the database is updated, you can manually add the new data for your lens to AP for your install of the app. Kirk
-
Yes - there are two ways to nest one layer into another. See this video for a clarification on what each one does, although the differences may not be obvious for a specific context:
-
@Lorox - that's why I suggested just converting to a pixel layer, but if all you need to do is a quick adjustment with alpha enabled, that is the ticket. kirk
-
@Haitch You can edit masks as if they were pixel layers, but it takes a couple of extra steps, unfortunately. That's how life works sometimes. When you create a mask, the Channels panel will display the thumbnail of the Mask Alpha if you select the mask in the Layers panel. Just right-click on the Mask Alpha channel and select the "Create Grayscale Layer" from the contextual menu that pops up. A new grayscale pixel layer will be created in the Layers panel that you can adjust will all of the image editing tools, adjustment layers, etc. that can be applied to any pixel layer. Once you are satisfied with your adjustments to the pixel layer that you want to use as a mask, right-click on it in the Layers panel and select "Rasterize to Mask" and then nest that converted mask layer into the layer that you intend to mask (you will have to delete the previous mask that was nested in that layer). If you need to adjust the mask further, just repeat the process. So, in your example where you like to use the background image as a starting point for a mask - 0) Create an adjustment layer above the background - make it something obvious, like an HSL layer with settings that make the effect obvious when applied to the background (like Saturation Shift set to -100) - hide the layer for now (turn it off so its effect is not visible). This layer is just a test layer so that you can apply your mask to it and see the results as you edit the mask. 1) Duplicate the background layer. 2) Right-click on the duplicate layer and select "Rasterize to Mask" - nest the newly created mask into the HSL layer and make the HSL layer visible to see its effect, modulated by the luminosity mask created from the background image. In this example, if you set the HSL Shift adjustment layer Saturation Shift to -100, then areas in the original image that are shadows will retain their original saturation (i.e., the mask is black and the HSL adjustment has no effect) and highlight areas will be completely desaturated (the mask is white and the HSL adjustment has 100% effect). 3) At this point, if all you need to do is paint on the mask with a regular paint brush, then Opt-click (Mac) or Alt-click (PC) on the Mask layer and the grayscale mask will appear and be available for painting. I have found that the brush only paints in "Normal" blend mode (that is, you cannot do things like define edges using Overlay blend mode with the paint brush while painting on a mask). 4) If you need to make adjustments, for example adding contrast or choking a mask with a Levels adjustment, then, with the Mask layer selected in the Layers panel, go to the Channels panel and right-click on the Mask Alpha channel and select "Create Grayscale Layer" - this will create a new grayscale pixel layer of the mask that you can edit will all of the AP pixel editing tools and adjustment layers. 5) When you are finished your editing, right-click on the grayscale pixel layer that you want to transform into a mask and select "Rasterize to Mask" - this step will rasterize all of the adjustments (adjustment layers, etc) that you used to edit the pixel layer and convert the pixel layer to a mask layer. Then drag the new mask layer and nest it into the HSL layer and delete the previous mask. Etc. One thing to be aware of - adjustment layers have their own mask already built into the adjustment layer. If, in the above example, you click on the HSL Shift adjustment layer, you will see a channel called HSL Shift Adjustment Layer. This alpha layer is different than the mask alpha layer that you added to the HSL layer. You can right-click on this one too and make it a grayscale layer if you choose, giving you two masks to manipulate without having to use the PS hack of creating a group out of a single layer to add an additional mask. The process is a little kludgey compared to Photoshop's masking approach, but it really does not take that much more effort once you understand how to access and work with masks in AP. As a side benefit, it preserves the previous mask (in the Mask Alpha that you used to create the new grayscale layer that you are currently editing) in case you need to start over from the previous mask. AP is different than PS and there are probably reasons why the designers implemented masking this way - maybe you will find that AP's method for masking will create new opportunities for your workflow. I hope this explanation is helpful. Kirk
-
It often helps to have the background you ultimately want to composite the model into in mind while you are shooting against the green screen. This way, you can match lighting, camera position and focal length, color palette of costume and set, etc. to the shot of the model. Blending the model into the background plate will involve not only a good extraction of the model from the green screen, but additional attention to details that integrate the model into the background, such as color grading, light wrapping and edge softening to match the background, etc. Try picking a background plate and then envisioning how the subject needs to be lit, shot and treated before you take you first shot. Humans can often identify when something does not look "quite right" even if they cannot explain exactly what the problem is - try identifying what does not look right in your first attempt to see if you can methodically correct those issues with lighting, color, camera settings, etc. Have fun! kirk
-
You’re welcome! kirk
-
Try using Print-Tool: https://www.quadtonerip.com/html/QTRprinttool.html I use it to control printing of color targets for profiling a printer, etc., where you need explicit control of color management. For $39, it’s worth every penny. They offer a 30 day free trial kirk
-
Ruler - Scale .75" = 1Ft?
kirkt replied to 56_kruiser's topic in Pre-V2 Archive of Desktop Questions (macOS and Windows)
Because AP lets you type math into the size fields, you could work at scale that way too. Set up your final size document and type <size>x<scale> into the width and height field each time. Klunky, but workable. kirk -
Ruler - Scale .75" = 1Ft?
kirkt replied to 56_kruiser's topic in Pre-V2 Archive of Desktop Questions (macOS and Windows)
In the New Document dialog, you can specify the units for the document (you can choose feet) and the size of the document (in the units you choose - so, for example, you could choose 50 feet by 30 feet as the size of your document). When you establish the units, the Transform panel will show you the location (X, Y) and size (W, H) of an object in the units you have chosen. For example, you can make a rectangle shape that is 8 ft by 10 ft just by typing those units into the Transform W and H fields. So you are essentially working in native units to make your document. In any dialog field, you can type in values in real units and AP will do the conversion to pixels or points, etc. Let's say you make a rectangle that is 8 ft x 10 ft and you want the stroke to be 6 inches wide - in the stroke width field just type "6 in" and AP will do the conversion to points for you. Grids and rulers will also be in feet and you can enable snapping to the grid and guides to help place and align objects precisely. When rulers are displayed, you can right-click in the upper right corner of the ruler area (where the unit name is displayed) and a drop-down menu will appear with alternate units, if you need to switch to pixels, for example, to measure something. When you do this, the units displayed in the Transform panel will be switched to those units. When you are finished, you can resize the document to establish the working scale - this will just require some simple math to figure out the final size of the document, in pixels, and the PPI (pixels per inch) to get a real, printed inch in the final output to be whatever you want that length to represent in the drawing. In your case, you want one real, printed 3/4" to represent one foot at the final scale (1 real inch = 1.33 ft). You can include a scale rule on the drawing, in feet, to check your scaling for final output. This is a little bit of a different process than working at scale - you are working in real units (ft) and then scaling the master document to its final scale for final output. You have to do this because AP does not work with scales, but does work with real units at the working resolution. *** As an example, let's say you make a new document that is 20 ft wide by 10 ft high at 200 PPI (pixels per inch). This will generate a document, with a scale in feet, that will be 48000 pixels wide by 24000 pixels high. You can work in real units of feet to lay out your objects, etc. When you are ready to scale the drawing to 3/4" real inches (i.e., printed inches on the paper) equals 1 ft in the drawing, you will need to scale the drawing by: 0.75 (in/ft) / 12 (in/ft) = 0.0625 In the Resize Document dialog, you can type "48000*0.0625" in the width field and AP will do the math. The result will be a document with one printed inch equal to 1.33 ft, or 3/4 printed inch equal to 1 ft. If all of your objects are shapes (i.e., vector objects) then they will all scale nicely for print. Kirk -
Short answer - you cannot emulate a smart object in AP with a raw file. That being said, a gamma-encoded 16bit RGB image usually has enough dynamic range (and "gamut" if you choose a large working space like ProPhoto RGB) to get the job done. You can still use the Develop module to tweak the gamma-encoded (TIFF, for example) RGB image that is rendered from a raw file, if you prefer the Develop persona interface and controls. Another alternative would be to render your raw file to a 32bit RGB file and then use OCIO adjustment layers to transform the linear 32bit image data to something that gives you as much latitude as the raw image (i.e., working in linear or log with ACES color, etc.). Because the OCIO adjustment layer is nondestructive, you can always go back and change the transform to something else, and the linear 32bit RGB file preserves your ability to make exposure and channel adjustments as if you were operating on the raw data. You can make these adjustments on the layer stack prior to the OCIO transform (ie., on the linear data) and let the OCIO transform convert the linear data to gamma-encoded or log encoded nondestructively higher up in the stack, for further editing. This workflow can be onerous if you are not familiar with moving in and out of a traditional color managed workflow - with OCIO, you do the color management explicitly with the transforms you use and then, when you are ready to commit the edits, you assign the appropriate output color profile. Also, you really want to keep your raw data "raw" - that is, do not necessarily try to perform highlight reconstruction, etc. Again, this kludge of a workflow is not really practical and I think you will be better off just doing a gentle conversion of the raw data to 16bit in a reasonable RGB working color space (maybe bring your white and black points not to the edge of the histogram, keep low contrast and conservative saturation during the conversion and add all of that once the conversion is done). Kirk
-
360 Images - edge matching
kirkt replied to Adrian Wood's topic in Pre-V2 Archive of Desktop Questions (macOS and Windows)
^^ correct. you need to mirror the edge pixels if you are going to make any corrections to the full 360 image that involve local pixel operations. You can make a macro in AP that will do the expansion of the canvas and the copying/pasting and mirroring. If you do not want to go through all of that trouble, you can use the Affine transformation to offset the image so that the seam that gets created at the edge of the image while you make local corrections is in a less conspicuous location in the image. Kirk -
Deconvolution?
kirkt replied to dmstraker's topic in Pre-V2 Archive of Desktop Questions (macOS and Windows)
The Photoshop plug-ins "Focus Magic" and Topaz "In Focus" both utilize deconvolution and both run in AP as a plug-in (at least on my Mac). They both do deconvolution sharpening and motion blur reconstruction. Kirk -
I. AM. DONE.
kirkt replied to Nita Reed's topic in Pre-V2 Archive of Desktop Questions (macOS and Windows)
I read through your previous posts - strange that no one asked what OS and graphics card you are using, and if you have tried disabling GPU acceleration (Preferences > Performance > Hardware acceleration). If you are on a Windows machine, are your drivers for your video card up to date? Try disabling GPU/hardware acceleration and restart the application. Maybe this might help narrow down the scope of your issues. I'm sure it's frustrating. If you choose to continue with AP, you might want to consider watching the tutorial videos about masking and nesting adjustment layers - it appears that some of your screenshots have some strange nesting of layers and masks with nothing to mask, etc. Masks and Channels in AP are different than in Photoshop and some other pixel editors and it can be little confusing at first to adjust your thought process to completing a specific task. Kirk -
In the MacOS, you can also right-click on the file and select Get Info from the contextual menu, or select the file and go to the Finder menu File > Get Info. Kirk
-
You might get a better result converting your black and white image to Lab, and then painting the brown body color of the car onto the a and b channels directly (they will be shades of gray in the a and b channels, but will combine to make the brown color in the composite). You can make a color patch in the document with the correct brown color and then, when you view the a channel for example, sample the patch with the dropper tool to get the correct grayscale tone that is present in the brown color and paint into the body area of the car. To make the job easier, create a mask on the brown body paint layer that isolates the painting to just the body work, then you do not have to be too careful with your painting. You can even just fill the a and b channels of the layer with the correct gray tone and then apply the mask. The idea is that the detail in the black and white image is pushed into the L channel, and the color is then applied to the a and b channels to get the composite look you want. Kirk
- 4 replies
-
- 2
-

-
- automobiles
- refinement
- (and 1 more)
-
You do not need to type a capital I - I just clarified that because the forum uses a sans serif font that could also look like a lower case “L”. kirk
-
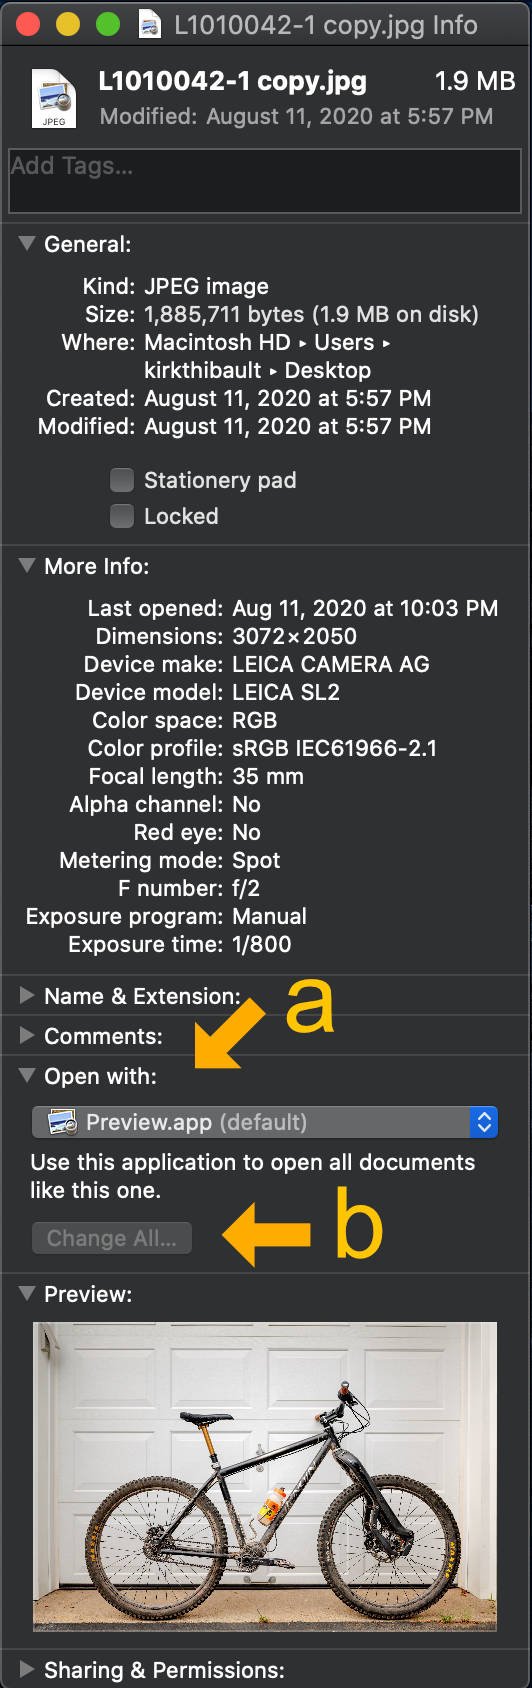
Which OS? On a Mac, you can click on one of the files and use the keyboard shortcut CMD-I (capital i) to "Get Info." In the Get Info panel that comes up, you can select the default application ("a" in the screenshot) to open these types of files (based on their extension, essentially). Once you choose the new default application, the option to change this setting for all files of this type will be enabled ("b" in the screenshot). On my Mac, I have JPEGs set to use the Preview app, which displays their thumbnail as their icon within the OS. Kirk