Canticleer
-
Posts
7 -
Joined
-
Last visited
-
 MaxStirner reacted to a post in a topic:
Ability to set default view in Affinity Photo (100%, fit to screen etc.)
MaxStirner reacted to a post in a topic:
Ability to set default view in Affinity Photo (100%, fit to screen etc.)
-
Thank you Kirk, I'll have a look at it.
-
Thank you all for your replies, I appreciate it very much. I'm not a colour management expert myself but I'm not a novice neither. And I know how the different rendering methods work. My initial question concerns the fact that the rendering methods you can set in soft proof in Affinity Photo aren't present in the print dialog. When you translate an image from screen to print, you switch from a screen profile (that you ideally created yourself with appropriate hardware) to a printer/paper profile (that was offered by the paper manufacturer or created by yourself too). In that process you re-render the colours. But since the gamut of these two profiles will never match perfectly, you possibly get (a slight) colour shift and, more importantly, this rendering will try to correct or redirect the colours that fall out of gamut of the printer/paper profile. Basically there are two methods to control this rendering. You can let the printer driver decide how to convert the colours from your monitor profile into the printer/paper profile or you can do the colour management yourself. I have to admit that in the first method the Epson driver does a great job and delivers pleasing colours most of the time. But while you can set a bunch of parameters, you can't expect the print to match the colours on screen perfectly. In the second method you control the way the software renders the monitor colours to the print colours yourself, and you aim to match the print as close as possible to the image on screen. That's where soft proofing comes in. It's no more than a tool that simulates on screen how the print will look like, given the chosen printer/paper combination and rendering intent. So in soft proof you can experiment with colour intent en black point compensation to see what gives you the best result (and do some extra editing when needed). Once you decide what combo suits your image best, you mimic this settings in the printer dialog and print. My issue is that Affinity Photo offers the opportunity to try out different rendering intents and to switch black point compensation on or off, so you get a simulation of how the print will look under these variables, but it doesn't offer the same possibilities in the print dialog (at least not on a Mac). Furthermore in my experience the rendering methodes aren't absolute, they are dependent on the software that you use. I mean that the Relative Colorimetric rendering of Photoshop is not exactly the same as the Relative Colorimetric rendering of for example Capture One Pro or Mac OS ColorSync. So when you rely on what you see in the soft proofing of one software title doesn't automatically translate well into the rendering set in another title. Until now my workflow exists of raw conversion in Capture One Pro, opening the full size image (tiff or PSD) in Photoshop to resize, perform output sharpening, soft proof - set the rendering intent - (do some final editing when needed) and print. I was hoping to ditch Photoshop and use Affinity Photo instead. And while AP does a great job at resizing and sharpening, it falls short on printing. And that's a shame, because I really like the program.
-
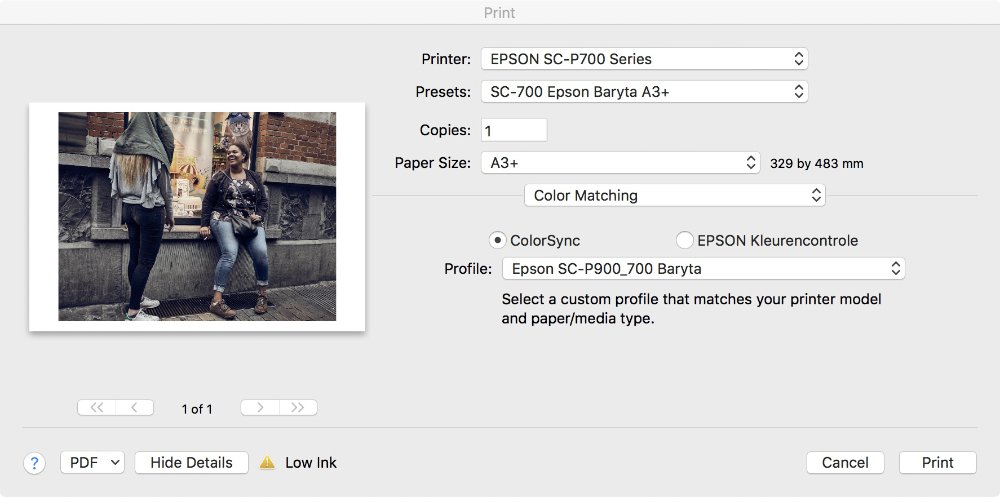
It is for Windows but not for Mac. The rendering intent I choose depends on the image and the colours it contains. One image is served best with Perceptual, the other with Relative Colorimetric. First the print dialog window on Mac for printer controlled colour management and then for ColorSync. These are the only two options.

-
Hi, I’m trying to incorporate Affinity Photo in my workflow lately and I’m quite happy with the results so far, except for printing. When I print colour images I’d like to keep colour management under control and not let the printer decide on how to render colours. And while in Affinity Photo we can set rendering intent en black point compensation in soft proofing, there is no way to do the same thing in the print dialog window to match the simulation in the soft proof. Al least not on a Mac. I know we can set rendering intent in the preference pane of Affinity Photo, but I guess this only applies to converting newly imported images which have a different colour space than the one set in Affinity Photo. Are there any plans on changing this in future updates? Thanks, Ivan
-
Count me in, I'd like that too.
-
Canticleer reacted to a post in a topic:
Ability to set default view in Affinity Photo (100%, fit to screen etc.)
-
PHOTO:choosing print rendering intent
Canticleer replied to keypix's topic in Feedback for Affinity Photo V1 on Desktop
I second that, Lefthand. Printing is the only reason to go back to PS for me. Sadly the rendering intent is still missing in 1.8.3. Otherwise, l really love the program thus far (I'm a fairly new user).