kirkt
-
Posts
440 -
Joined
-
Last visited
Everything posted by kirkt
-
Color question
kirkt replied to larsh's topic in Pre-V2 Archive of Desktop Questions (macOS and Windows)
As @anon2 states, the colors measure the same, if one takes the screenshot image and places color sampler points on both of the images. This is how color management should work. If you intend to print the images that you lay out (with Blurb, etc.) then soft-proofing and checking the gamut of your images with an ICC profile for the print device is also a tool you can use to ensure that your printed output resembles your images on-screen within the limits of the print device. You might want to unify your viewing conditions across your applications (make the background color of the workspace the same) and see if this alleviates the change in perception of the image brightness when switching between applications. Kirk -
I added your ICC profile to my ColorSync folders (Mac) where ICC profiles are supposed to live. I restarted AP and, while attempting to assign the profile to the Datacolor test image, noted that the ICC profile does not show up on the list of profiles that I can assign. When I ASSIGN the Datacolor test image your scanner profile in Photoshop and then soft proof in PS with your printer profile, the only area of the test image with OOG color is the upper left corner of the image, with the CMYK color ramps and the red peppers - some areas in this sub image of the test image are OOG. Kirk
-
Can you post your Color Checker ICC profile here for download? Thanks, Kirk
-
To check the soft-proofing adjustment layer and how it responds to your printer profile, make sure you use a test image that certainly contains out-of-gamut (OOG) colors - test images available here: http://www.northlight-images.co.uk/printer-test-images/ will give you a variety of options for examining documented OOG colors and how AP's soft-proofing responds to them. This way, you are not adding another unknown (the scanner profile assignment) into the mix and you are using a known reference that has OOG colors. The test image from Datacolor, for example, is about 40% OOG across the entire image for your HP printer profile when using a soft-proof adjustment layer. I tested this on the Mac version of AP, v 1.8.4. Kirk
-
E-Paper Floyd-Steinberg 7 colors
kirkt replied to masevein's topic in Pre-V2 Archive of Desktop Questions (macOS and Windows)
The seven RGB colors in the color table are: (R,G,B) 0,0,0 0,0,255 255,0,0 0,255,0 255,128,0 255,255,0 255,255,255 You can perform Floyd-Steinberg dithering in ImageMagick using the following command: convert original_image.png -dither FloydSteinberg -remap colortable.gif dithered_image.gif where "original_image.png" is the full-color image you want to dither, "dithered_image.gif" is the dithered output of the operation, and "colortable.gif" is a gif image that contains 7 patches of color with the listed colors above - it instructs the algorithm to reduce the original image to a dithered one using only those colors. I have attached a gif (4px wide by 28 pixels tall) of these 7 colors for your use. I will say that the results appear more "dithered" than the same results in Photoshop with the n color ACT color table in the link you provided. Reducing the original image to one with 7 colors will not perform dithering, which is an inherent part of the process to maintain the overall appearance of image brightness in the dithered output. Even if you try to "Posterize" the image to 7 levels, there will be more than 7 colors in the resulting posterized output. See more here: https://legacy.imagemagick.org/Usage/quantize/#dither in the section entitled "Dithering using pre-defined color maps." Kirk
-
At full res (3000x3000 pixels) and 50% JPEG export compression in AP the resulting file size is 436kB. The image looks pretty much identical to the original when opened side-by-side. You could also try running the original through some noise reduction or median filtering to smooth larger areas of tone so that the compression algorithm is not trying to preserve the small variations in these large uniform areas because of noise. If you apply the Dust and Scratches filter at a radius of about 3-4px and compress with JPEG at 50%, the resulting file size is 276kB. Kirk
-
Affinity Photo Customer Beta (1.9.0.199)
kirkt replied to Andy Somerfield's topic in [ARCHIVE] Photo beta on macOS threads
@R C-R The Spare Channel is blurred, but it is not doing anything in the document until you use it for something. For example - after you blur it and make the background layer active, right-click on the Spare Channel and select "Load to Background <select any channel>" - this will load the now blurred Spare Channel into the Background layer's channel of your choosing, where you will see the effect. You can also make a new pixel layer, for example, and load the Spare Channel into the R, G and B channels of the new pixel layer. Now you have a grayscale layer that you can rasterize to a mask. You can also make a new Curves adjustment layer, for example, and load the Spare Channel into the Alpha channel of the Curves adjustment layer, masking the Curves layer. kirk -
Affinity Photo Customer Beta (1.9.0.199)
kirkt replied to Andy Somerfield's topic in [ARCHIVE] Photo beta on macOS threads
In the attached screen capture, I select the Red channel and make a Spare Channel out of it. I then select the new Spare Channel and apply a Gaussian Blur to it. Kirk Screen_Recording_2020-10-07_at_9_41.52_AM.mov -
Affinity Photo Customer Beta (1.9.0.199)
kirkt replied to Andy Somerfield's topic in [ARCHIVE] Photo beta on macOS threads
@R C-R - create the spare channel from whatever source you like. Then simply click on it in the Channels palette (it is named "Spare Channel" by default) - it will now appear in the document window as a grayscale image. Select, for example, a Gaussian Blur filter from the Filters... menu. It will apply the filter to the spare channel. Kirk -
Affinity Photo Customer Beta (1.9.0.199)
kirkt replied to Andy Somerfield's topic in [ARCHIVE] Photo beta on macOS threads
Right now, it appears that you can apply destructive Filters to the spare channel (the pixel operations in the Filters menu) - because it is not a layer, you cannot apply adjustment layers or live filter layers to the Spare Channel. Unlike PS, AP does not have a Levels or Curves adjustment that is a destructive adjustment (similar to PS, Image > Adjustments ...) that one could use in such a case, i.e., when the narrator in the above video instructs the viewer to "... open the Levels window with CTRL-L...." Also - remember that once you create the mask that will make the graphic look weathered (the mask from the high-contrast channel of the rusty background image) you can adjust that mask with a Levels adjustment layer. That is, you use create Spare Channel to extract the high-contrast channel from the rusty image*. You use whatever technique you would like to make that into a pixel layer and rasterize it to a mask. Then apply that mask to the graphic you want to make look like it is scratched, etc. Then apply a Levels adjustment to the mask and select the Alpha channel from the dropdown menu in the Levels dialog window. In other words, you are adjusting the contrast of the mask once it is in place, and you are doing it non-destructively as well. Kirk *You can create a pixel layer from channels in an active layer using Apply Image... and Equations. Lets say you wanted to make a pixel layer out of the red channel in the rusty image. Make a duplicate of the rusty image layer and make it the active layer. Select "Use current layer as source" - enable Equations (RGB) and use the equations: DR = SR, DG = SR, DB = SR. This will result in a grayscale image that replaces the duplicate rusty image - it will be a grayscale representation of the red channel because all three "Destination" color channels have been set to the original "Source" red channel. In the equations, "D" represents Destination and "S" represents Source. -
Affinity Photo Customer Beta (1.9.0.199)
kirkt replied to Andy Somerfield's topic in [ARCHIVE] Photo beta on macOS threads
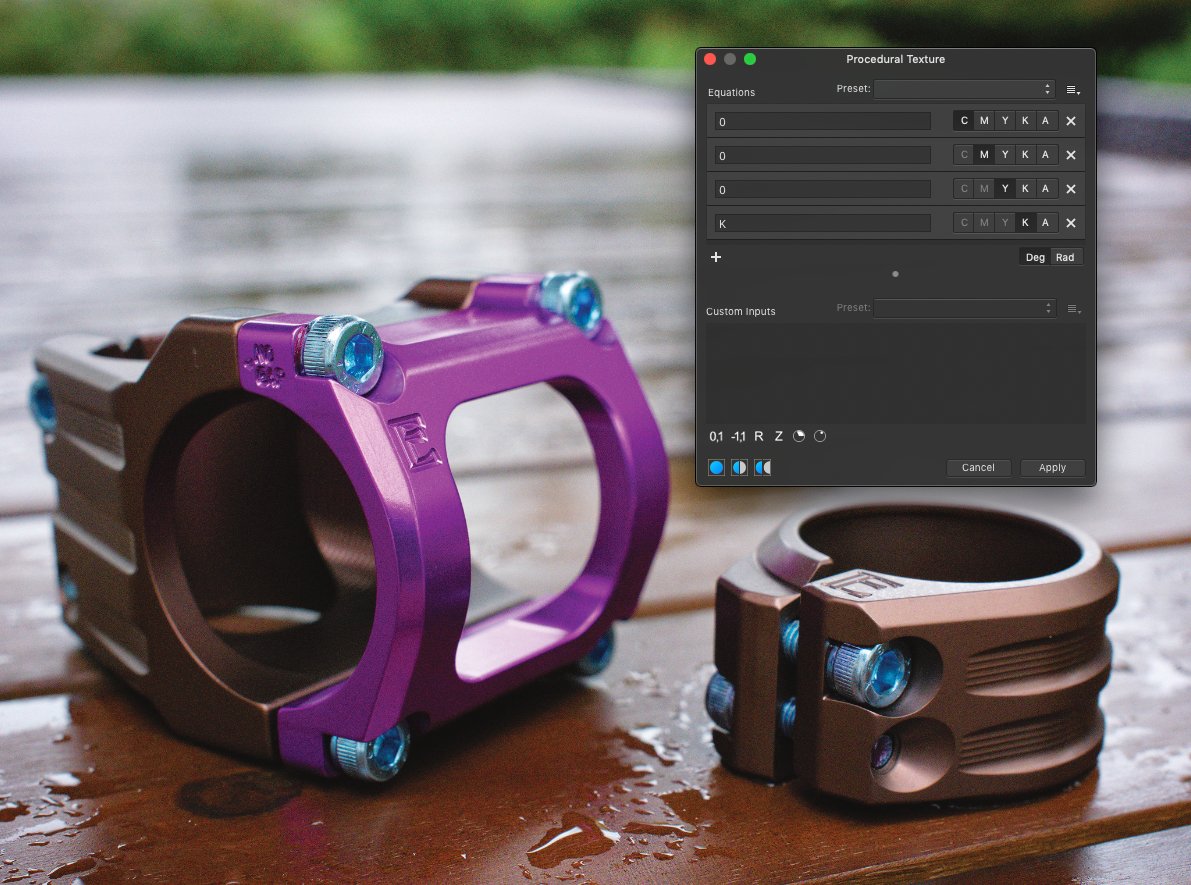
A bug (?) that is present in the current release version (1.8.4) and the current beta (1.9.0.199): in the Filters > Colors > Procedural Texture ... When operating in CMYK and targeting all color channels, if you enter "0" for the C, M and Y channels and "K" for the K channel, you get the full color image, not the K channel. See first screenshot. Perhaps I am doing something incorrect, but when you do the same for each of the C, M and Y channels (all others set to "0" and the channel of interest set to itself) you get a representation of just the channel of interest (second screenshot). The third screenshot is just the image displayed with only the K channel enabled in the Channels palette - I assume this is what I should see as a result of the first Procedural Texture equation. kirk
-
Depending upon the size and bit depth of the images, and how many you want to stack to get your final output, you can imagine that the file size of the resulting .aphoto file that includes all of the source images would be unmanageable for many systems running AP. An alternative might be one in which the user put all of the source files in a folder and AP loaded those source images into a stack and then produced XML instructions that recorded the alignment and segmentation of the sources. The XML instructions could be included in the .aphoto file, or as a sidecar - either way, the source images would be LINKED to the .aphoto file, not EMBEDDED. If you needed to go back and make edits, you could invoke the "Edit stack..." button that does not yet exist, and the XML instructions would reload the original source images and alignment and segmentation/depth map for you to tweak accordingly. This would essentially make the workflow non-destructive to the source images. The same thing could be implemented with the HDR Merge and the Panorama modules as well, effectively creating a semi-Smart Object like workflow without creating an enormous .aphoto file. This approach would require keeping the .aphoto file and its XML instructions linked to the source files. If the link is broken (maybe you moved the source files somewhere else) then a prompt when loading the .aphoto file to locate the source files could pop-up, for example. You could also have an option to EMBED the source images too, if you do not mind the potentially large file size. Kirk
-
The macros that John provided to change pixel dimensions employ the Equations filter cleverly, combined with selecting the empty space in the resulting image canvas and clipping it away. It is a kludge, but the Equations filter permits the macro to record the actual equation, not the resulting value. Well done! Glad you got it all working. Kirk
-
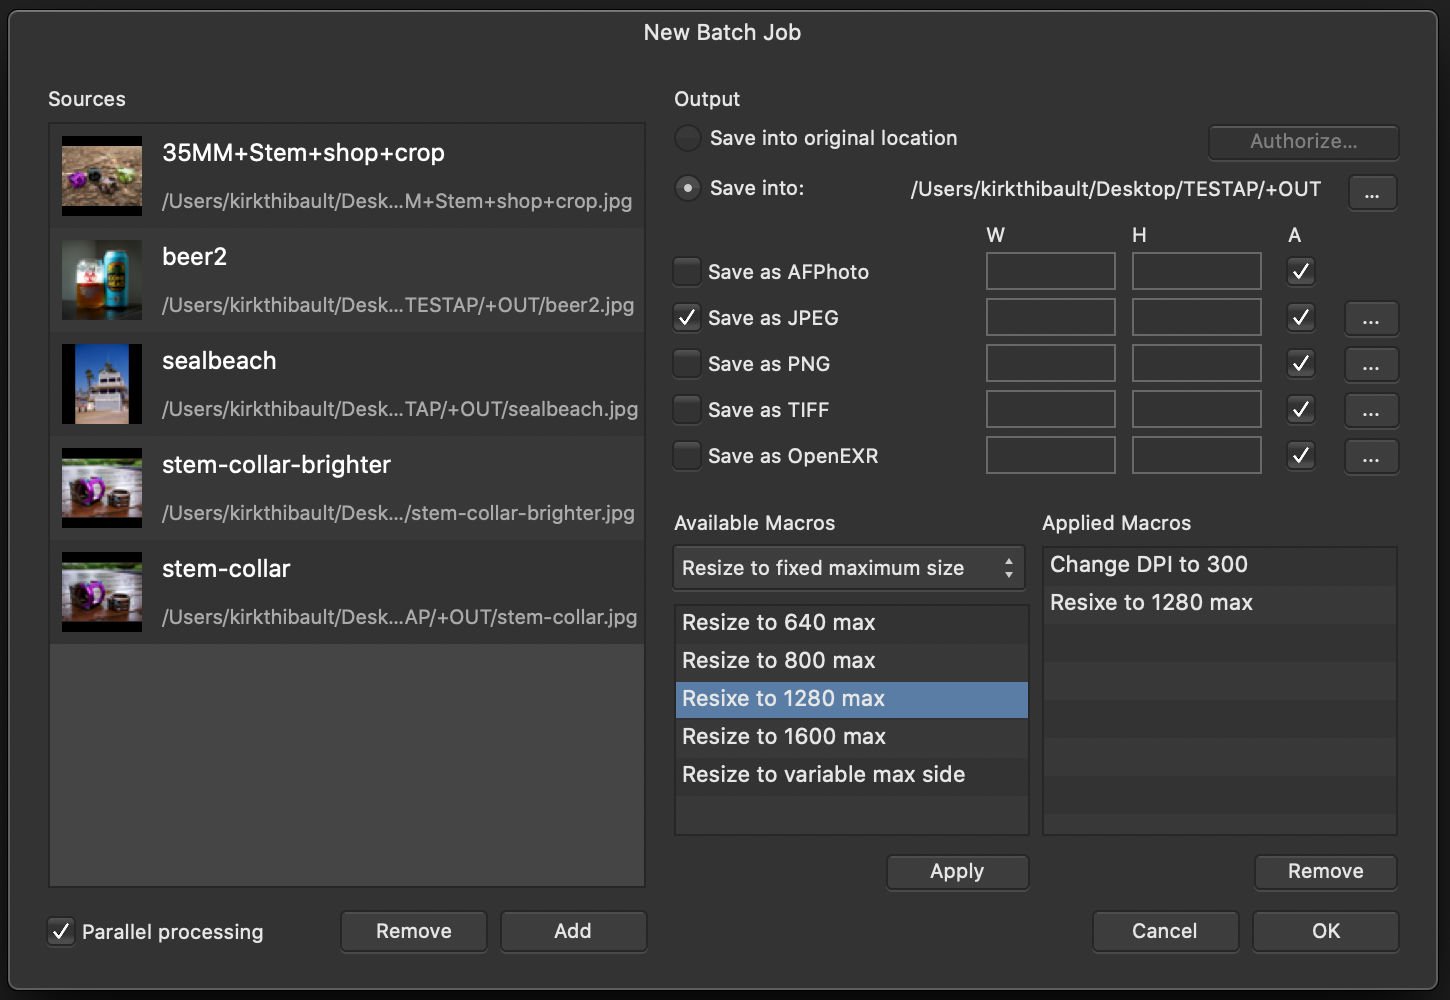
You can stack the Macros in the Batch Job dialog - for example, if you want to convert a set of images of different long edges to a max long edge of 1280px and set the resolution to 300 DPI and save as JPEG, you can set up a Batch Job where you add the files you want to resize, set the destination folder and then apply the two actions from John's set. This way you can plug in any combination of macros to get the final size and resolution you want. There's nothing stopping you from applying this to an individual image also, from the macro Library. See screenshot. Kirk
-
When you resize a document, there are two options - 1) scaling and 2) resampling. It is important to understand the distinction. The "DPI" value is simply a metadata tag that is used in situations where the image will take on actual physical dimensions, like printing. When performing scaling, you alter this tag to be whatever you want (300 DPI, 72 DPI, whatever) WITHOUT CHANGING THE PIXEL DIMENSIONS OF THE IMAGE. In contrast, resampling actually will change the pixel dimensions of the image to accommodate the new pixel dimensions that you enter into the W and H fields in the Resize dialog. You can perform both scaling and resampling simultaneously, and AP will increase or reduce the required number of pixels accordingly by creating (upsampling) or combining (downsampling) pixels to achieve the final pixel dimensions at the specified DPI. In PS, if you want to record an action that will change the dimensions of any image you feed it by a specified percentage, you can do this by changing the units in the Preferences to Percent prior to recording the action. Then, every time you run the action, the image you feed it will be reduced by the given percentage with the aspect ratio of the image maintained. This is what AP appears to be lacking because it appears that AP records the absolute pixel values of the W and H fields when recording the macro instead of the relative expression that generated those values. That is, it appears that AP permits the user to enter expressions into the W and H boxes in the Resize Document dialog (like "50%" or "<original_dimension>*0.5") but does not record these relative measures (the expression itself) in the macro - it appears to record the resulting value, not the expression that generated that value. Maybe I am missing something, but it appears to me that this is how AP currently works. Kirk
-
Has this object that has the bright outline after USM been cut out of an image and placed against a new background? The bright pixels are from the contrast at the edge of the object being being accentuated (that is what USM does). If you cut the object out of another image (that had a bright background, for example) and there are some stray pixels at the edge that are much different than the new background, that difference will be enhanced by the USM operation. If this is the case, then you need to refine the edge of the cut out before comping onto the new background and applying USM. Maybe a tool like Filters > Color > Remove White Matte might help get rid of that edge of pixels before composting the object onto the new background. Otherwise, you can apply USM as a live filter and mask the adjustment to affect just the object - the live filter has a mask by default that is all white. Invert that mask (to all black) and then paint white onto the mask to reveal the USM effect just where you want it (the object). Kirk
- 1 reply
-
- 1
-

-
Have you verified that the lens model contained in the EXIF data of the raw file itself is actually correct? It appears that it is not. Manually selecting a lens correction profile will not change the EXIF data for the lens. Is the firmware for the camera and lens up to date? You can use EXIFTool to change the lens data in the raw file manually to the correct lens and then see if AP will detect it and automatically apply the correct lens profile. Kirk
-
You can also ask your print shop if they have an ICC profile of their printer-paper combination that you can use to soft proof your image in AP. kirk
-
Light-shadow filter APhoto
kirkt replied to crealively's topic in Pre-V2 Archive of Desktop Questions (macOS and Windows)
filter menu... Kirk
-
Also - when working with a large sequence of images (more than 4 or 5, for example) it is a lot easier to test the waters by working first with reduced-size JPEGs of the source images to test how the stitch will go before trying to jam all of those 16bit TIFFs down the stitcher's throat. PTGui permits the use of templates to do just this thing. Use smaller proxy images to set up the stitch, make a template from this set up, and then swap in the full-res 16bit TIFFs and let the template render the result from those large files without having to use the large files to solve the stitch. Kirk
-
It is not entirely clear to me how AP handles some issues that all panoramic image stitching apps need to handle, if the scene demands it. For example, when shooting a set of images that one ultimately wants to stitch into a single panoramic image, the easier case is one in which the image sequence contains a scene that is far away from the camera, like a landscape. Even with a relatively wide field of view, the image maps to a small portion of a spherical projection and there is little parallax to deal with because all of the objects in the scene are essentially at the same depth relative to the camera (far away). Even if you shoot this sequence hand-held and rotate (not about the no-parallax point) and translate the camera, you still get a pretty decent result. Even in this situation, there may be an issue with the EXIF data in your source images that is causing AP not to be able to read the orientation of the image. I wonder if this might affect the result. Once you start introducing parallax and angles of view that take up significant portions of a spherical projection, for example in a living room of a house, all bets are off, even with good image overlap. I use PTGui to deal with challenging panoramic sequences, and shoot with a panoramic tripod head that ensures the optical system is rotating (panning and tilting) about the no-parallax point to remove parallax from the image sequence. This permits full spherical panoramic images to be made with little intervention from the user (automatic control point generation and alignment is successful). If you are trying to shoot a wide scene or a tall scene that can be covered in a few images, you might also get good luck with a perspective control lens or adapter that permits shift movements of the lens. Hugin is a free version of the same tools that PTGui uses - maybe Hugin might make working with difficult scenes easier. Kirk
-
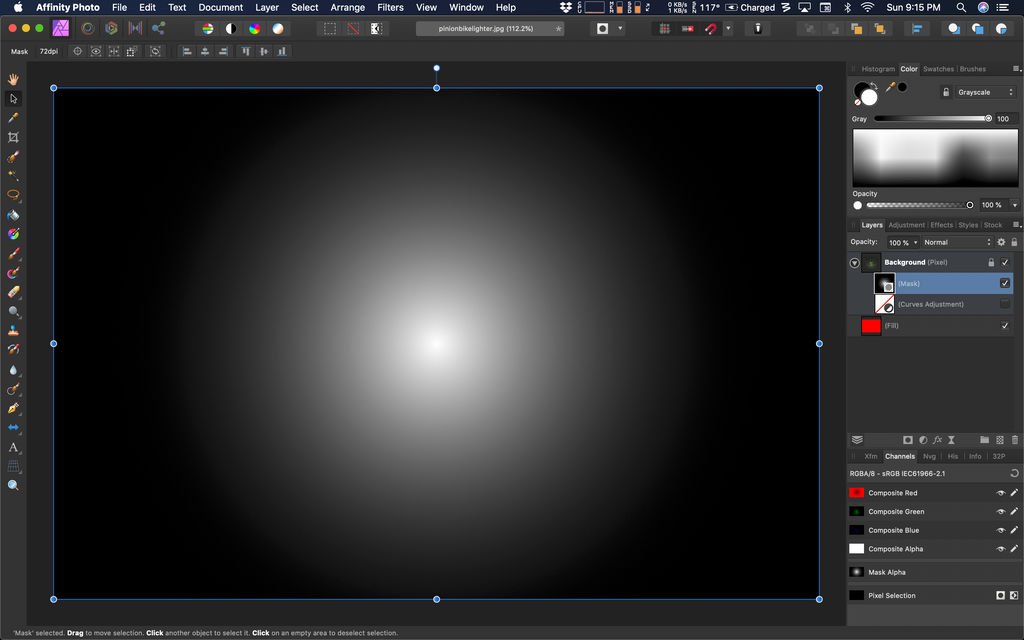
You can create your mask, rasterize it to a mask and then apply an adjustment layer like a curve to the mask to choke it, etc. In the attached images, the image of the bike is layered on top of a red fill layer. The mask applied to the bike image is a radial gradient with a feathered fall-off. The curves adjustment layer applied to the mask creates a harder edge to the fall off by adding extreme contrast to the mask - NOTE: to make the adjustment layer operate on the mask, you nest it with the mask layer but you must also choose the curves layer to operate on the ALPHA from the curves dialog drop down menu (yellow arrow). Kirk
-
RGB Channel equivalent
kirkt replied to KTrotter's topic in Pre-V2 Archive of Desktop Questions (macOS and Windows)
You can also work in Lab color mode, where color and luminance are separated by the color model itself. Kirk -
Fuji GFX50R
kirkt replied to Tonym191's topic in Pre-V2 Archive of Desktop Questions (macOS and Windows)
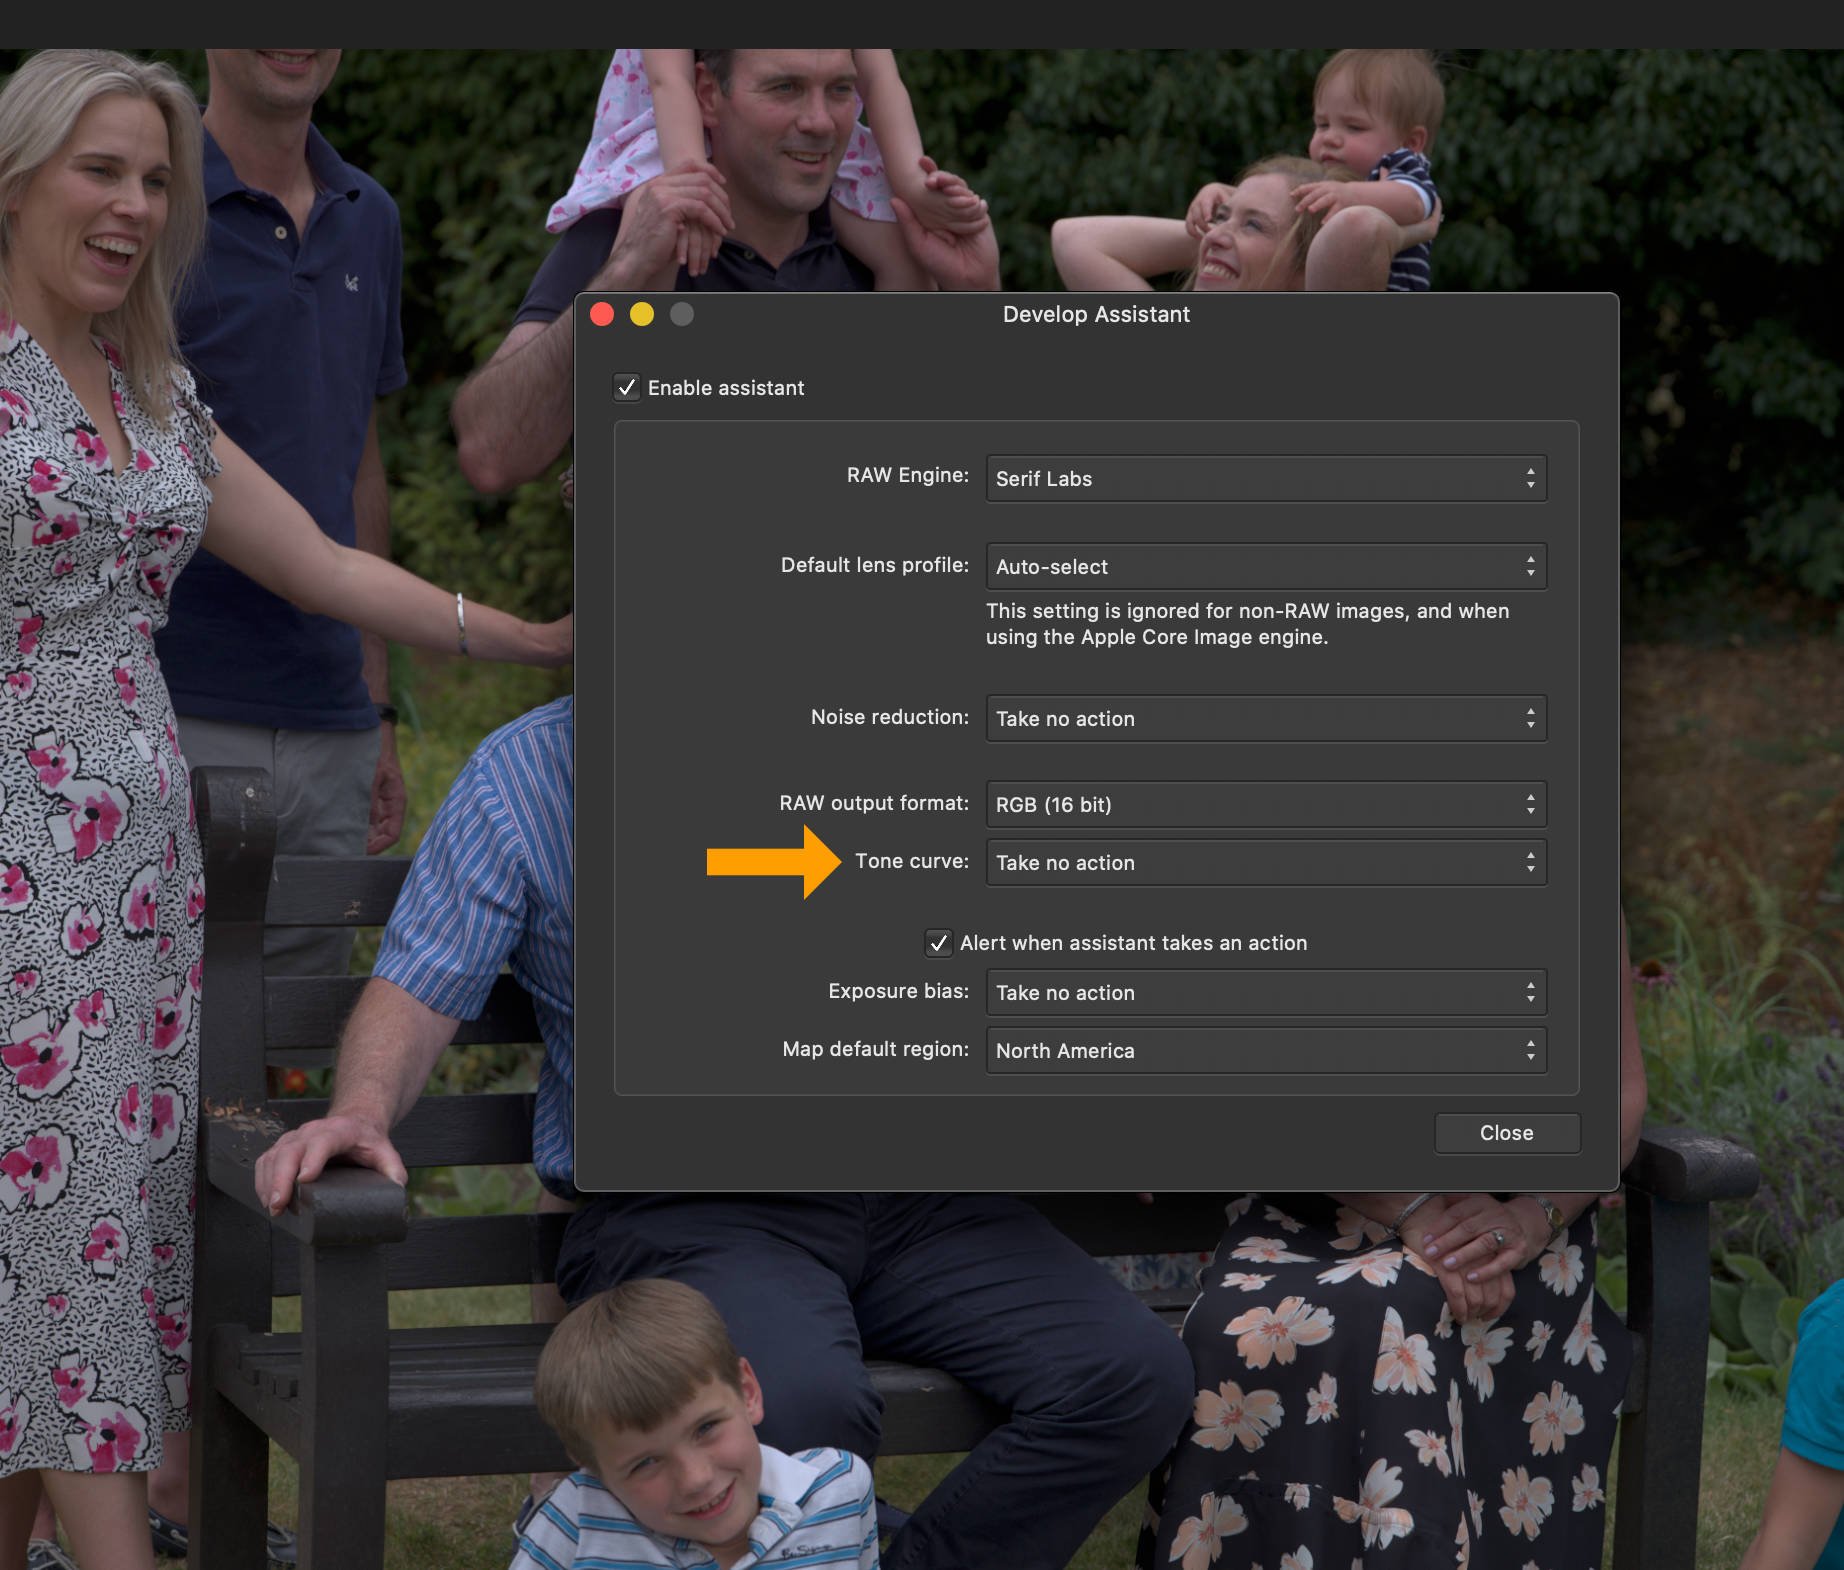
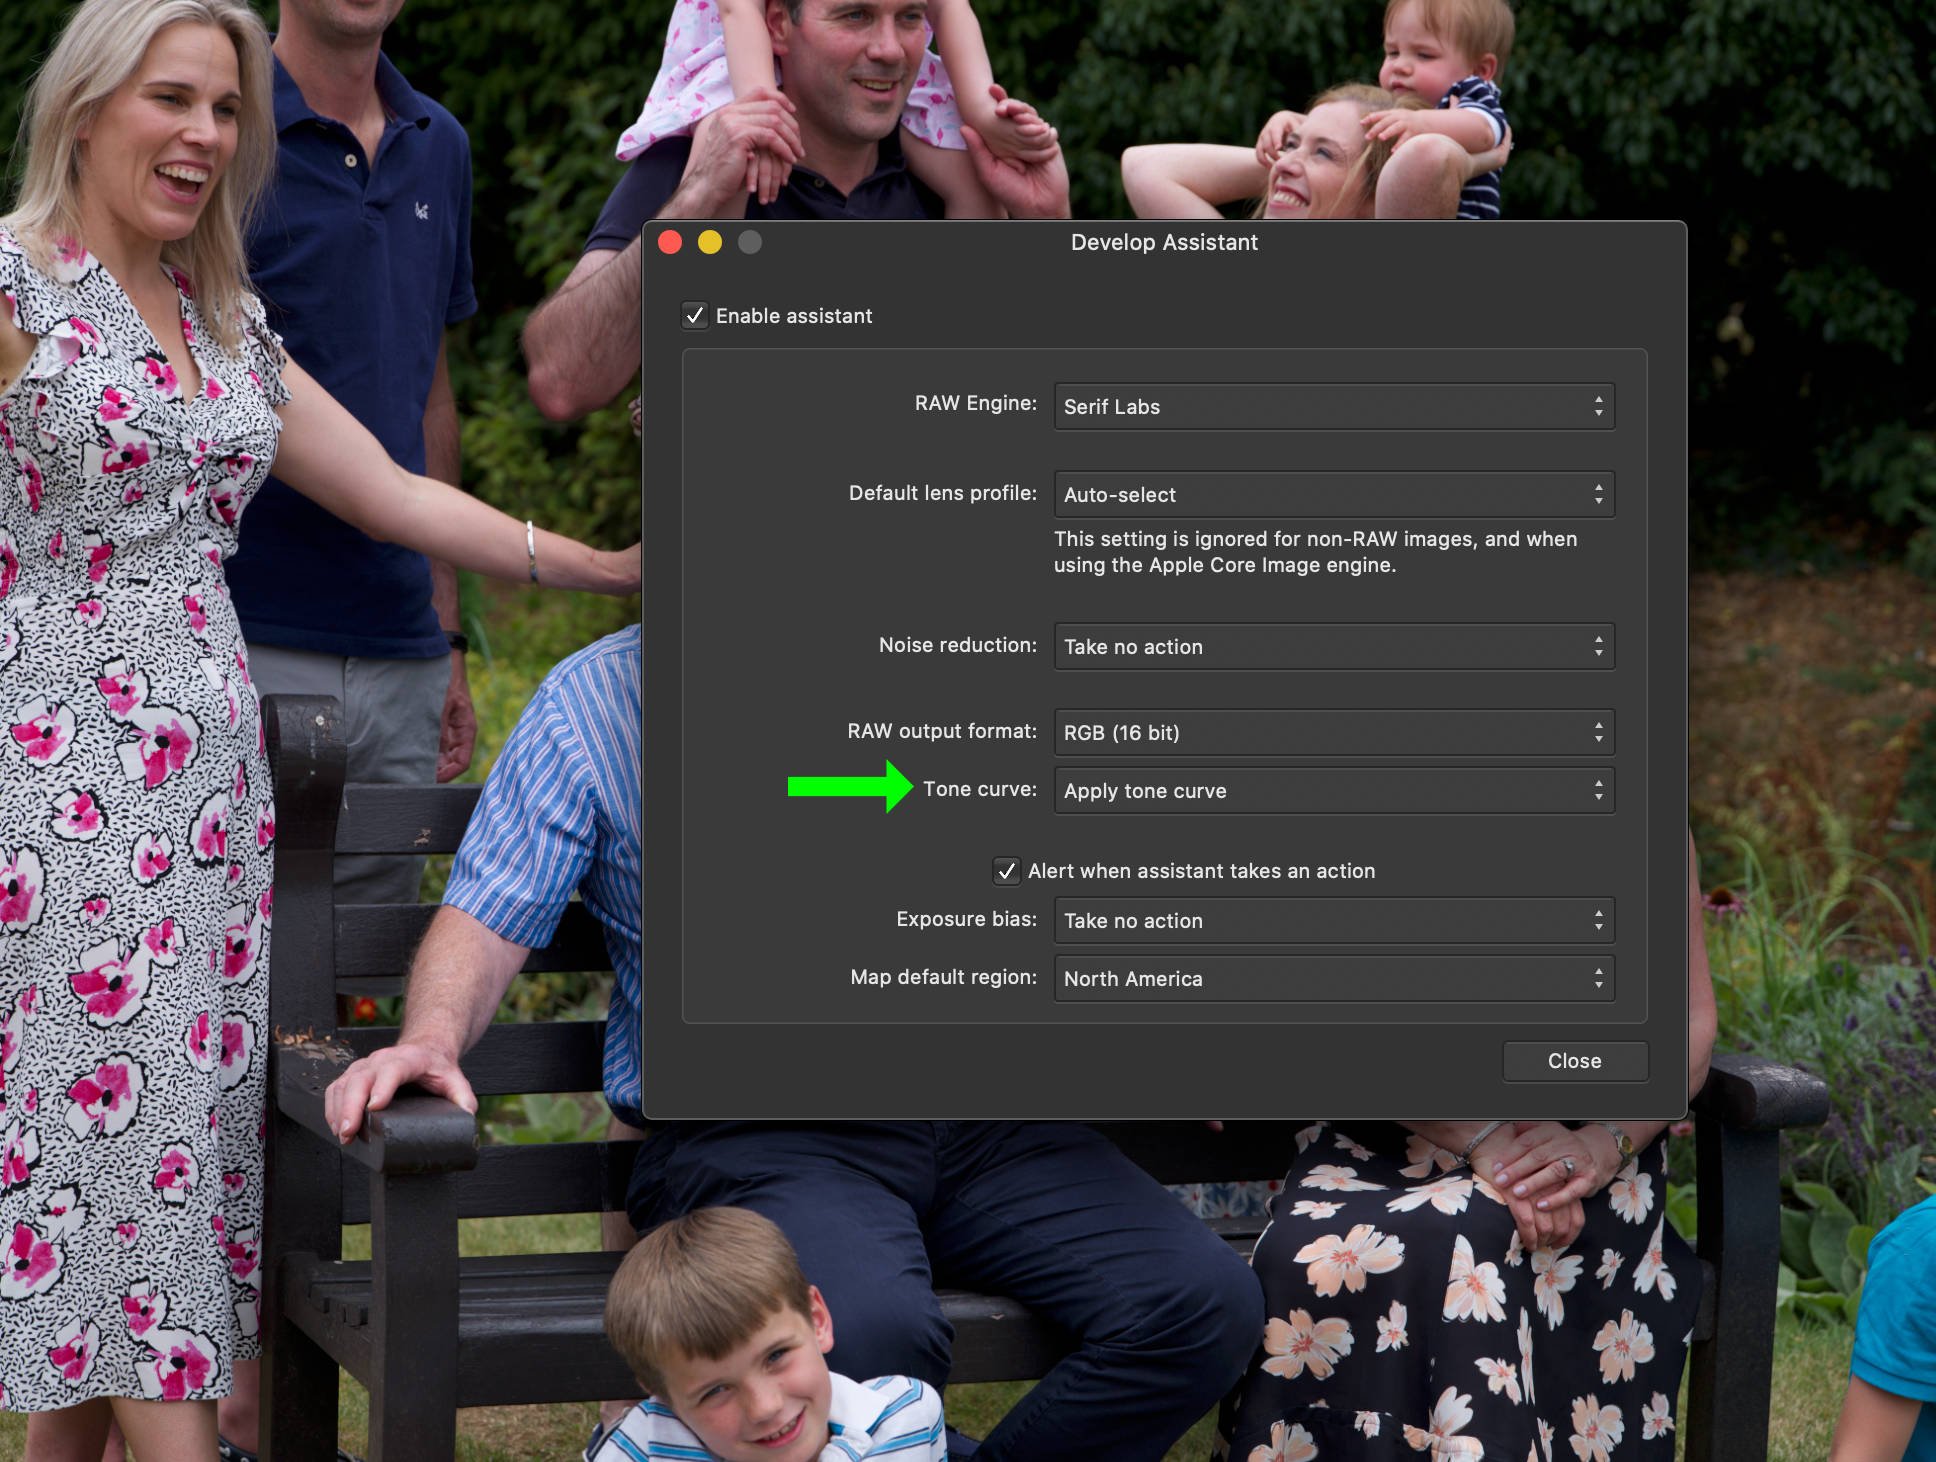
Check your settings in the Develop Assistant - there are choices there for applying a tone curve or taking no action, as well as applying an exposure bias. Perhaps you have the Tone Curve option set to "Take no action." Kirk
-
I downloaded an X-T4 raw file from imaging resource: https://www.imaging-resource.com/PRODS/fuji-x-t4/XT4hSLI00160NR1.RAF.HTM and opened it in AP v1.8.4 on my Mac, running OS 10.15.6 using both Apple Core Raw and Serif Raw. No problems. Working in v1.8.4 with my Fujifilm cameras (X100V and X-Pro3) - no issues with their RAF files either. Are these raw files that you have opened previously in AP or another raw converter? Trying to rule out a bad card reader or similar corruption of the raw file itself. Kirk