kirkt
-
Posts
440 -
Joined
-
Last visited
Everything posted by kirkt
-
32 bit ACES to srgb web
kirkt replied to Tsiky's topic in Pre-V2 Archive of Desktop Questions (macOS and Windows)
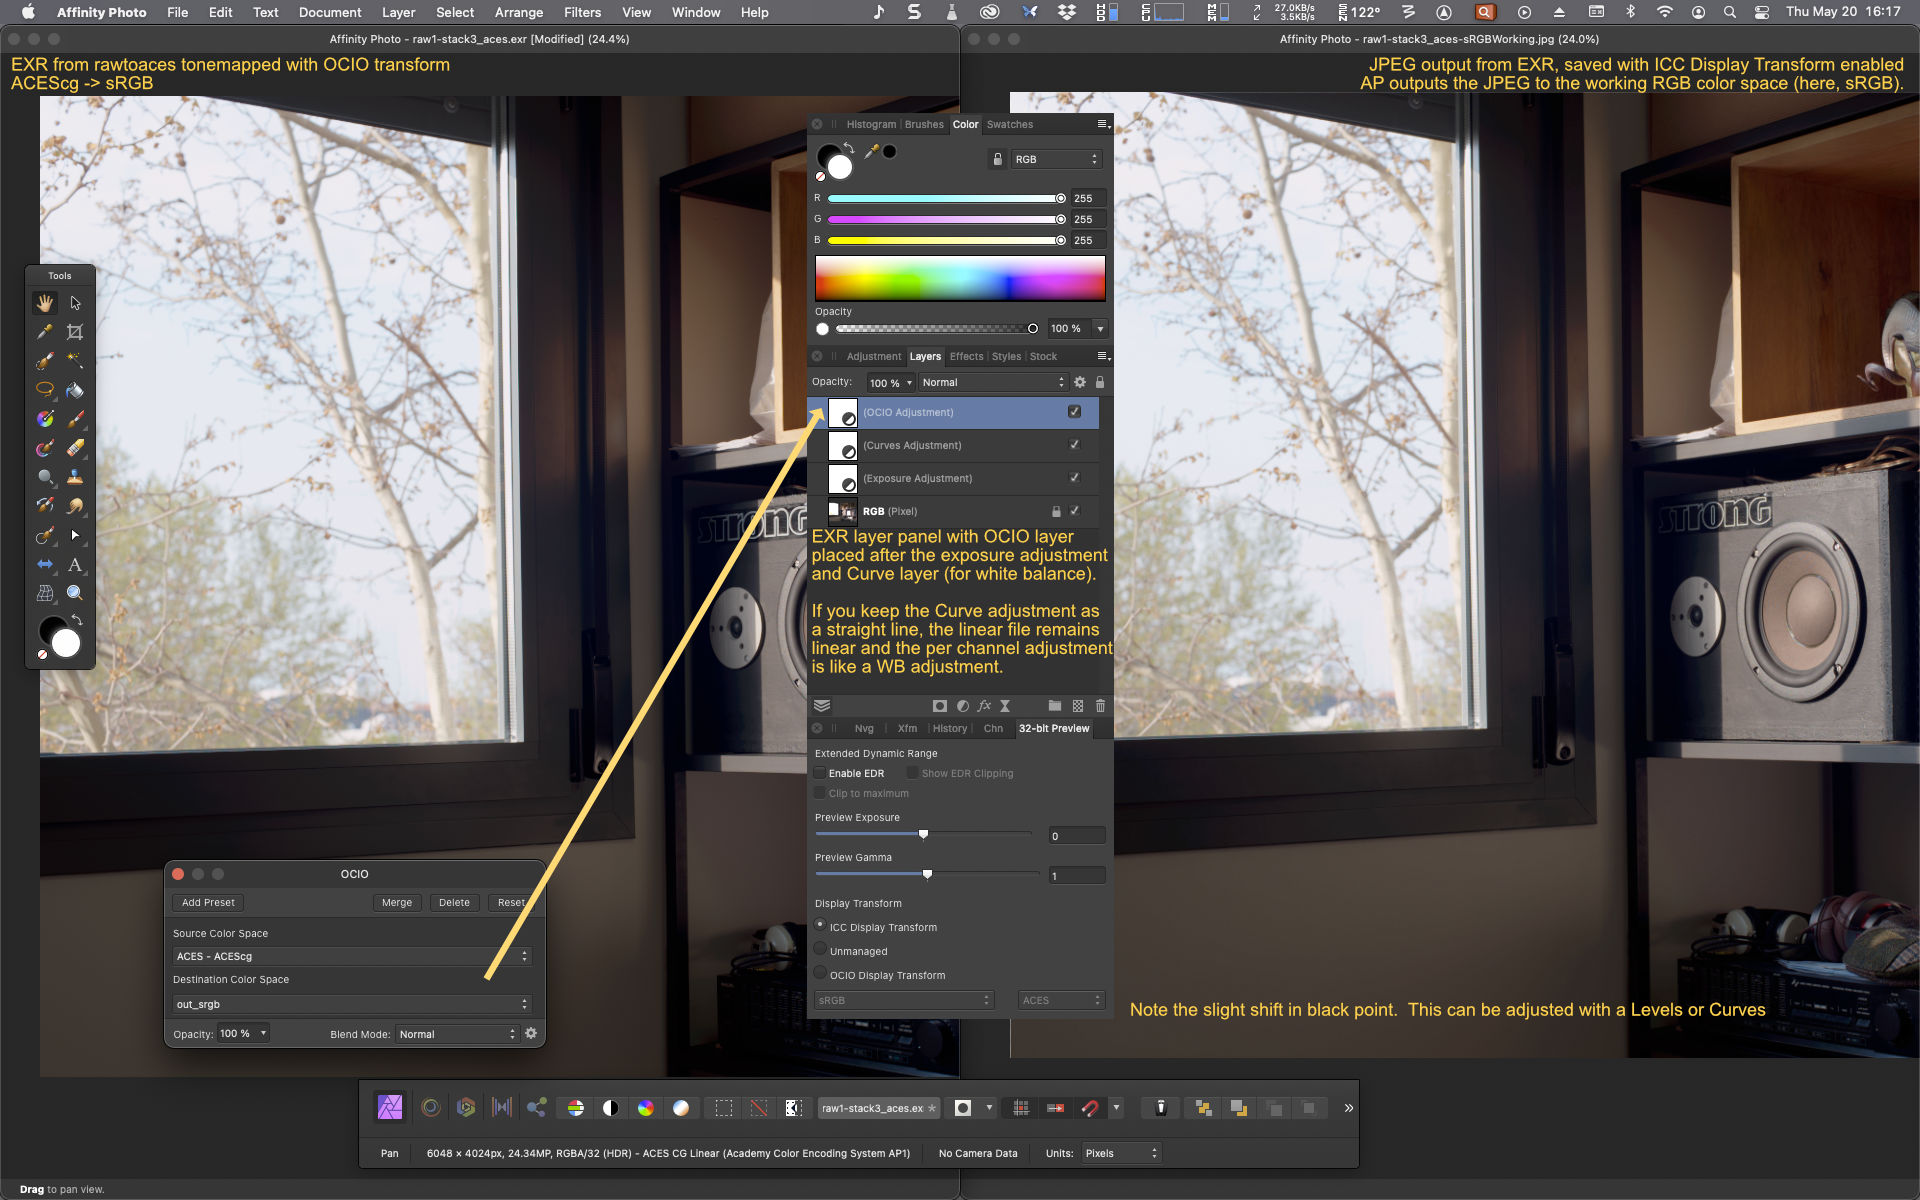
@Tsiky - Here is an example, using the ACES command line utility called rawtoaces to make an ACES EXR file - rawtoaces converts a raw camera image file (like a .CR2 or .NEF file) to an ACEScg linear EXR file. The actual raw file I converted is an HDR raw file created with some interesting computational merging techniques similar to the Adobe Camera Raw HDR DNG. In other words, it is a true HDR file, not just an EXR made from one raw exposure. see: https://github.com/ampas/rawtoaces for more info on rawtoaces. In this example, I simply opened the EXR file that comes out of rawtoaces in AP - in my Preferences, I have designated ACEScg as my 32bit working color space in AP, and sRGB as my RGB working color space. I added an Exposure adjustment layer to adjust the unbounded exposure of the data prior to the OCIO transform. I also added a Curves adjustment layer to adjust the White Balance - if you simply drag the highlight end of a channel's curve downward, it is like decreasing the exposure of that channel - the curve just has to remain linear in shape (no other adjustment points on the curve except for the two endpoints) for it to act like an exposure adjustment - at least this is how Photoshop works. Then I applied the OCIO transform of ACEScg to sRGB. This tone maps the image using the ACEScg to sRGB transform. Now the file's numbers are in sRGB. To get things to output properly to gamma-encoded output like a JPEG you need to do two things: 1) The working RGB color space specified in your preferences needs to be sRGB. 2) The 32bit Preview panel's Display Transform needs to be set to ICC Display Transform. Now, when you export the JPEG, it will be in sRGB (the JPEG is written to the working RGB color space) and it will look like the preview that you see when you enable the ICC Display Transform. This is essentially what the video to which I linked specifies near then end. In the attached screenshot, the EXR displayed as a Preview is on the left, the output file, opened in AP is on the right. Note that it appears as if there is a very slight shift in the black point in the JPEG, but it is otherwise pretty much the same as the Preview - examine/compare your output at 100% to see if this is a real shift, or just a Preview rendering issue - in my output, the files look identical at 100% zoom. Kirk
-
32 bit ACES to srgb web
kirkt replied to Tsiky's topic in Pre-V2 Archive of Desktop Questions (macOS and Windows)
Take a look a this tutorial by James Ritson: - although it is about using OCIO and LUTs in the context of Blender filmic tone mapping, it is probably directly relevant to what you are trying to do. Note in the video that you must enable ICC Display Transform in the Preview panel to get the transforms you apply in your layer stack to render the gamma-encoded output correctly to the output file (this is covered at about 9:00 in the video). kirk -
Work in Affinity Photo with ACES
kirkt replied to Dmi3ryd's topic in Pre-V2 Archive of Desktop Questions (macOS and Windows)
I believe the ACES and ACEScg profiles ship with Adobe products (I want to say Premiere or After Effects perhaps). Therefore, they are both included in my systemwide profiles. Here is a Github project with precompiled ICCs of various flavors and gammas: https://github.com/ellelstone/elles_icc_profiles Download the ZIP of the code and take a look at all of the profiles in the Profiles folder to see which might work for you. kirk -
Also - "applying" a profile should not change the underlying RGB numbers, just how those numbers are interpreted to display them. In contrast, "converting" with an ICC profile will change the numbers of the pixels to preserve the original appearance of the color in the new, destination color profile space. Kirk
-
@Tyler Bay It's not clear what you are trying to do - when you convert from 32bit to a lower bit depth, is your intention to end up with an image that is in ACES but at the lower bit depth, or are you also converting to another color space? What ICC profile are you forced to rely upon instead of ACES? What does this mean? What OCIO transform are you using to get to your desired output? What are you trying to "bake in" to your image? Also - how is your color set up in the Preferences? Is ACES CG your 32bit working space? What is your Display Transform set to I the 32-bit preview panel? it would be helpful to describe your workflow and the desired result (ie., "I want to end up with a linear 16bit image with the ACES color preserved") more explicitly. Kirk
-
Cinematic crop?
kirkt replied to RichardMH's topic in Pre-V2 Archive of Desktop Questions (macOS and Windows)
You’re welcome! kirk -
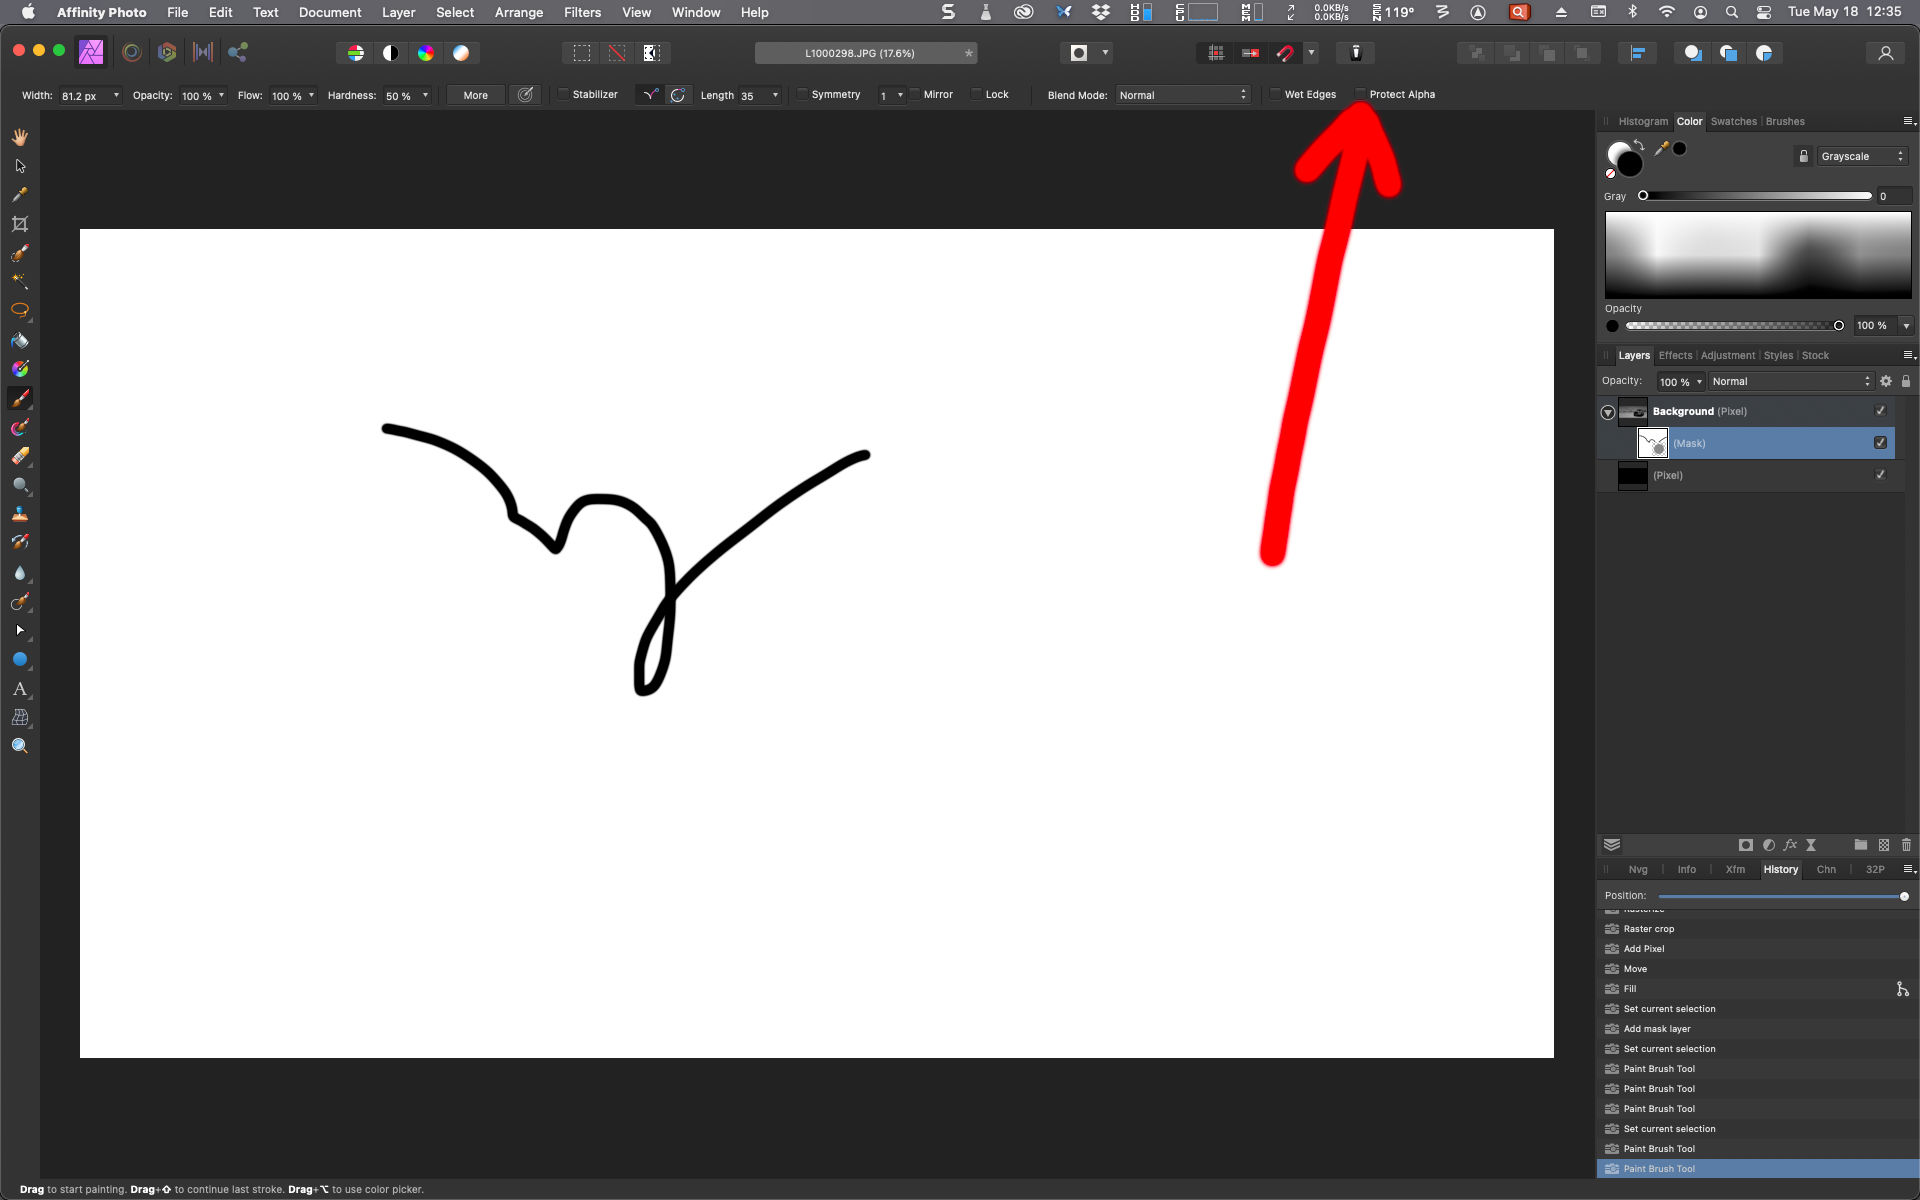
On the brush toolbar across the top of the application window, make sure "Protect Alpha" is not checked when painting on the mask. Also, you can Option-click (ALT-click) on the mask layer so that it becomes visible when you paint - this is an easier way to see the precise effect of the brush on the mask compared to the composite result painting on the mask should produce. kirk
-
Cinematic crop?
kirkt replied to RichardMH's topic in Pre-V2 Archive of Desktop Questions (macOS and Windows)
Here is a screencast of the process: kirk -
Cinematic crop?
kirkt replied to RichardMH's topic in Pre-V2 Archive of Desktop Questions (macOS and Windows)
@RichardMH The Crop tool, by default, preserves the pixel information that you crop away - that is why, after you crop in at 2.35:1 and then try to expand the crop area to 16:9, the pixels that would normally be revealed as a black letterbox just reappear. 1) crop to 2.35:1 using the crop tool with the preset (Crop tool > gear icon - cinematic ratios). Reposition the crop area to get the composition you want. Hit "Apply" to apply the crop. 2) right-click on the newly cropped layer in the layers panel and select "Rasterize and trim..." - this will commit the crop and actually remove the pixels from the image that are outside the crop border. 3) using the crop tool, select the 16:9 preset and drag the handles on the vertical edges of the crop area horizontally outward (NOT THE CORNER HANDLES!) - this will keep the crop area centered on the image and expand the area horizontally to the edge, also expanding the top and bottom to generate the letterbox area (assuming a landscape oriented image). 4) make a new pixel layer under the image and fill it with black to create the letterbox. Try recording a macro to see if this process can be automated with a single click (you may have to rasterize and trim from the menus when recording the macro). Kirk -
Affinity Photo Customer Beta (1.9.4.242)
kirkt replied to Andy Somerfield's topic in [ARCHIVE] Photo beta on macOS threads
The language localization thing has affected betas in the past, including menu items, etc. Always keep it in the back of your brain when troubleshooting the interface. kirk -
No curves histogram
kirkt replied to Simons Astro's topic in Pre-V2 Archive of Desktop Questions (macOS and Windows)
@Simons Astro My guess is that, because most of your image is composed of black background pixels, there is a spike on the left edge of the histogram that is immediately adjacent to the left edge of the histogram frame (so it looks like the frame itself). The large number of these black pixels are dominating the histogram's vertical scale (frequency) so all of the other pixel frequencies have very small appearing peaks relative to the large peak of the black pixels. There is probably also a spike on the white end too, from the clipped stars, etc. Unfortunately, although you can change the range of X values that the curve affects when you make an adjustment, you cannot change the scale ("zoom in") on the histogram. See attached screenshot for a visual interpretation of what I am trying to describe. I just mocked up an astro-like image for reference. Can you post link to download your image file (is it 32 bit per channel?). Kirk
-
This usually happens when the raw file is interpreted with the incorrect sensor saturation level, resulting in areas that are clipped in one or more channels to be rendered with magenta highlights. kirk
-
a stupid question
kirkt replied to urbain's topic in Pre-V2 Archive of Desktop Questions (macOS and Windows)
Apply Image in AP works differently than in PS, so be prepared to undo your PS way of thinking. Equations are your friend. Kirk -
Start with a grayscale version that has the highest contrast between the lines and the rest of the colors - the red channel is a natural candidate here because most of the colors are red or reddish, so they will be lighter in the red channel than the darker outlines. I used the Apply Image dialog to pull the red channel out of the image and put it on its own layer. You can separate the black outline from the rest of the image using a couple of Levels adjustment layers and placing the black and white points strategically. The first adjustment will eliminate most of the areas that had color and drive them all to white, with the lines moving to black. The second adjustment will remove the darkest colors from the black outlines. The higher the resolution of the source image, the better the lines will look and the larger you can print the result. As you apply the adjustment layers, note that the preview (the on=the=fly rendering of the effect) will cause the lines to look jagged - stamp the layer stack (merge visible) and the result will be smoother. Kirk blackandwhite.afphoto
-
What is really convenient about AP is that your image does not need to be in Lab mode to do this - you can leave it in RGB mode and just specify Lab equations in the Apply Image dialog. All of the computations and conversions are done on the fly without needing to convert back and forth from RGB to Lab back to RGB. Kirk
-
You will also probably notice that the result is slightly different in AP than in PS - I think AP handles Lab slightly differently than PS, so the colors are shifted slightly. Kirk
-
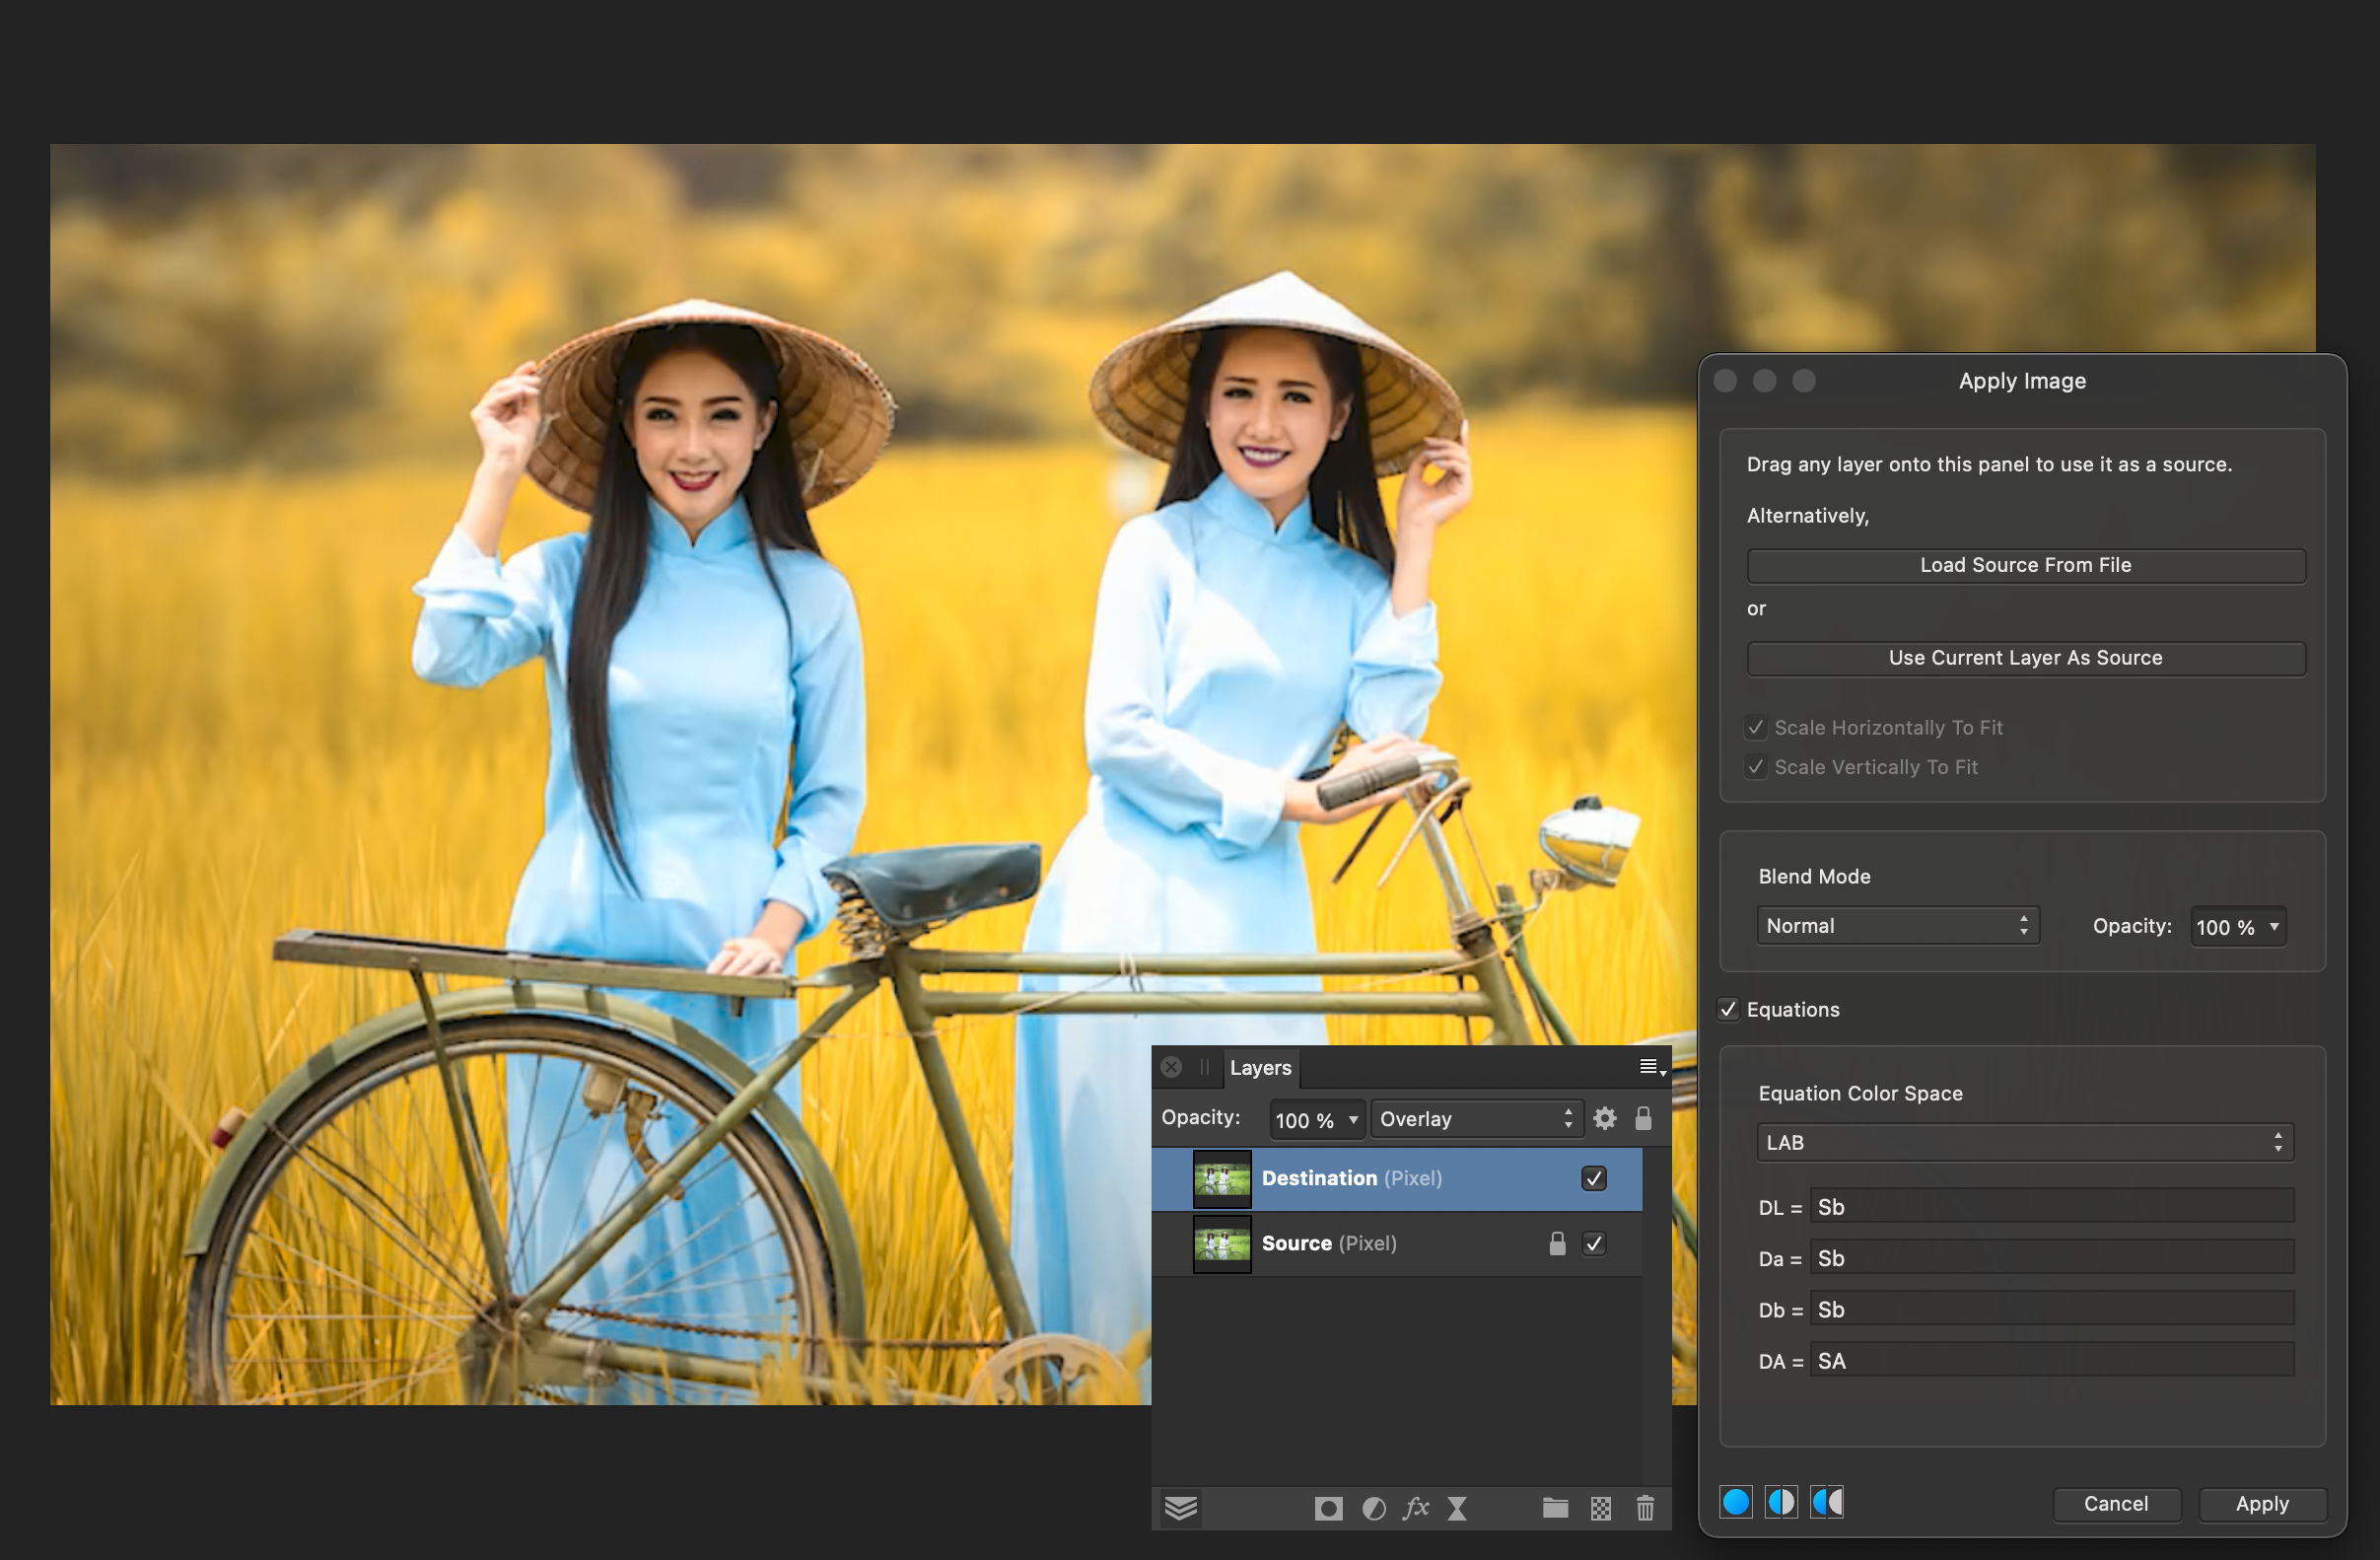
@SCarini - Apply Image works a little differently in AP compared to PS. For what you want to do, you will need to use Equations in the Apply Image interface. 1) The base image (the green image) we will call "Source" (S). Duplicate the Source (CMD+J) and rename that duplicate "Destination" (D). 2) Set the blend mode of the Destination layer to Overlay. 3) Make the Destination layer the active layer (target it b clicking on it in the Layers panel). 4) Choose Filters > Apply Image... Here is where you will apply the b channel in the Source layer to the L, a and b channels of the Destination layer. 4a) Drag the Source layer from the Layers panel onto the Apply Image dialog - this tells the Apply Image dialog that you want to use the Source layer as the SOURCE (S) for the operation. 4b) Check the box next to the Equations header toward the bottom of the Apply Image dialog - this tells the Apply Image operation that you will be performing operations on the Destination channels by using equations. In Equation lingo, S denotes the source channel and D denotes the destination channel. In the Equation Color Space dropdown menu, choose Lab. 4c) Input the following equations: DL = Sb Da = Sb Db = Sb DA = SA (the alpha channel does not matter here). What this is telling the Apply Image operation to do is put the Source b channel into the Destination L channel (DL = Sb), put the Source b channel into the Destination a channel (Da = Sb) and put the Source b channel into the Destination b channel (which is the same thing). 4d) It appears that when you use Equations in the Apply Image dialog, the blend mode specified in the Apply Image dialog is not relevant. Therefore, once you apply the Apply Image operation, the resulting layer will have to have its blend mode changed to Overlay - you already did this in Step 2 above, so the result you see after the Apply Image operation should be what you expected. Repeat this exercise without changing the blend mode in Step 2 and see what I mean - the Apply Image result will look wildly different, but all you have to do is change the blend mode of the Destination layer to Overlay, and all is well. Have fun! If you ever want to perform an Apply Image operation where you want to change only one channel, just enter an equation for the other channels (the untouched channels) as: D(channel) = D(channel) That is, the Destination channel (the result) is equal to the Destination channel. Kirk
-
Lab sharpness
kirkt replied to Tony77's topic in Pre-V2 Archive of Desktop Questions (macOS and Windows)
Something that is odd in AP that should not occur when converting your image from an RGB color space to Lab is a noticeable shift in the shadow tones. The video to which Greyfox links above (https://www.youtube.com/watch?v=6IjI6eT_VvU) also shows this phenomenon and the author of the video incorrectly states that the contrast and color change when converting to Lab because of its larger gamut compared to sRGB - the color should not change at all if the conversion is done properly, that is the whole idea of converting from one color space to another, preservation of color appearance. As far as sharpening goes, it is not clear when working on a Lab document if sharpening is applied to all three channels, as one would expect, or some variation of them. Presumably the default method should be sharpening all channels equally, L, a and b. If you want to sharpen L only and not disturb the color data in a and b, then you can do that too, but my guess is that AP does not simply sharpen L only by default. In other words, it is unclear what the utility of sharpening in Lab is without further understanding how AP performs the sharpening. Conversion to Lab prior to sharpening does give you access to L, a and b channels, not only for masking the sharpening, but for choosing to sharpen only the L channel. EDIT - I just opened an image in Lab in AP. I used a Live Filter layer USM to add a lot of sharpening. L, a and b were all sharpened, as expected. I then made this sharpened result a pixel layer and used Apply Image to apply just its L channel to the original image, to add sharpened L to the original color. This gives you more control over contrast and color than RGB sharpening, typically, but the type of image and the sharpening you are trying to apply may make the differences obvious or hardly noticeable - maybe the technique is not worth the trouble for some images, whereas for others it may make a huge difference. As far as using an inverted L mask to modulate the sharpening, if that's where you want to the sharpness to be (shadows and dark midtones) then that is an easy way to do it. One problem is that, with digital photos, you are targeting the areas of the image where the most noise is hiding with most of your sharpening. You probably do not want to sharpen noise. It is troubling though that the image color and contrast shifts noticeably when converting to and from Lab - this should not happen and may, ultimately, explain what you are noticing in your images. Kirk -
Lab sharpness
kirkt replied to Tony77's topic in Pre-V2 Archive of Desktop Questions (macOS and Windows)
I downloaded your aphoto file and looked at the three layers in it. The histogram shows a difference between the original image and the first variation of it - namely that the red channel gets shifted slightly toward the shadow end of the histogram. The third image (presumably the conversion of the Lab image back to AdobeRGB) is identical in the histogram to the second image, as expected. Visually, all three images (layers in the document) look identical on my calibrated and profiled EIZO Color Edge display; however, if you boost the shadows significantly, you can see that the upper half of the background gradient is shifting color between the original image and the converted ones. This may simply be the effect of quantization errors when doing the conversion, even if one converts the 8bit image to a 16bit image before the conversions to Lab. Here, the errors are occurring in very dark, gradient tones, where there is little information to begin with and the entire upper half of the image background reads somewhere between 0 and 2 in the L channel. You may want to dither the gradient in the background of your image before the conversion and see if it helps smooth the conversion. It sounds like the sharpening you are attempting to do is supposed to target shadow tones - that is, you use an inverted L channel as your sharpening mask (and targeting the shadows in the image in your aphoto file makes no sense, as there is nothing to sharpen except noise). As such, if there are any changes to the image resulting from the operation and the subsequent return back to RGB, they would happen in the darker tones; however, the changes would likely be minimal in real life and, while they appear on the histogram, they are not visible on a display device that can render the file accurately until you crank up the shadows. In this particular case, you may simply be seeing errors because of the nature of the very dark tones and little separation between them (especially prevalent in your CG render, instead of a photograph) - your display may also be struggling to display the very dark shadows, amplifying the effect. kirk -
@Visin I do not know - try opening the raw file directly from your local drive via AP's Open... (or drag it from your drive into AP) and see if the problem lies in trying to pass the raw file from Photos into AP is the problem. It probably is, but I do not use Apple Photos so I can't really answer your question. How exactly are you passing the raw file from Photos into AP? Are you using the AP Develop Extension in Photos? Or "Edit in Affinity Photo" extension? If I pass the raw from Photos into AP using the Edit in Affinity Photo, the EXIF data and lens correction works as expected (on the same raw file I used previously). Kirk
-
@Visin - I downloaded a sample raw file for the D3500 from imaging-resource.com. I opened the raw file in AP v1.9.2 on my MacBook Pro running Big Sur. The file opened in the Develop persona, as expected, with the EXIF data intact (including the camera model and exposure settings) and the lens profile automatically applied (see screenshot). To have the lens profile applied automatically, you can enable this by going to the Develop assistant and choosing the "Auto-select" option from the Default lens profile drop down menu. RGB images (i.e, non-raw images) will not have a lens profile applied in the Develop persona. Also, AP does not write XMP or other sidecar data into or next to the raw file, so no settings made in the Develop persona are saved for Automatica application the next time you open the raw file in AP. Check you Develop assistant settings to make sure you lens profile default action is how you want it to work. You should also check to make sure your lens is supported by AP and has a profile available to be applied. AP uses the Lensfun database to provide lens profile corrections - a listing of their supported lenses can be found here: https://lensfun.github.io/lenslist/ Good luck! Kirk
-
The video presenter talks about shooting with a flat profile (presumably in his Canon camera) - this will only affect the JPEG from the camera. He also talks about converting the original raw file using a Technicolor profile, but this could have been as a result of a raw conversion in other software because AP will not perform this kind of conversion in the Develop persona - note that the color profile of the color rendition (at ~4:42 in the video) is in sRGB. Likely the raw conversion has been done outside of AP and brought into AP as a color sRGB image. The Cinestyle .pf2 file, for example, is for Canon cameras and is an in-camera flat profile (Canon calls these profiles "picture styles") that alters your JPEG files (and video output) at time of shooting (in camera). It does not affect the raw file and is not used during raw conversion in software on your computer. kirk
-
There is some crosstalk in the discussion here about profiles. Firstly, the profile referred to during raw conversion is a profile that is meant to translate raw camera color into a specific color rendition - this profile is typically made by shooting a color reference target and then running that DNG file through software to output a DCP (Lightroom, ACR or similar software) or ICC (Capture One, etc.) file for use during raw conversion. AP does not permit the user to specify such a profile for raw conversion at this time - it uses the internal LibRaw profile to generate the raw file as far as I know (Mac users can also switch to the Apple raw engine). In AP's Develop persona there is a dropdown list at the bottom of the Basic palette called "Profiles." This dropdown list permits the user to select the ICC profile for the color space into which the raw file will be converted as an RGB image leaving the Develop persona. This is similar to the selection of the color space in the Lightroom/ACR output dialog or any other raw converter's output controls. This does not affect the look of the raw conversion, it specifies the color space into which the raw file is converted and it tags the output file with that color space so a color-aware application can display the RGB numbers in the file correctly, according to that color space. If you do not specify a profile here, AP will convert the raw file into AP's working color space, as specified in the Preferences. If you have custom log or cine camera profiles that are supposed to be used at raw conversion time, you will not be able to use them in AP because AP's raw conversion interface does not support custom/user-specified camera profiles. Once the file has been converted into an RGB file and opened in the Photo persona, it exists in the specified color space (from the selection of the Profile in the Develop persona) or in the default working color space (if no Profile was specified in the Develop persona). Here you can CONVERT to a different color space via an ICC profile, or ASSIGN a new ICC profile to the existing image data. When you CONVERT, the RGB numbers in the current color space get changed to preserve the original appearance of the image in the new color space; when you ASSIGN, the original RGB numbers are preserved and the colors change according to their new interpretation in the new, assigned color space. In terms of printing, usually one edits in a working color space that contains a large enough gamut to comfortably work with the gamut of the output device. At print time, the print driver will do the conversion into the printer's ICC profile color space according to your instructions - the printer interface also permits the user to select the rendering intent of the conversion so that the printer driver knows how to handle out of gamut colors. You do not need to assign a printer profile to the image in AP. You can, however, use the printer ICC profile to soft-proof the image in AP prior to printing. This is performed with the Soft Proof adjustment layer, a non-destructive operation that lets you visualize the printed output through AP's simulating its appearance for the selected profile (usually a printer+paper combination). Of course, soft-proofing is a simulation of a reflective medium (ink on paper) on a transmissive device (your display), but once you print enough, you can usually anticipate how the print will appear on paper compared to the soft proof. To recap: convert your raw image into a color space that is large enough for your editing workflow (let's say ProPhoto RGB). Do your edits. CONVERT the image, if necessary, into the output color space (let's say sRGB for web display) or print the image and let the print driver do the conversion using the printer+paper ICC profile that you specify. One workaround for color rendition following raw conversion is to use a LUT that you create that takes the default raw conversion output from AP (using AP's camera profile) and alters it like a custom profile would. You need software that will permit you to make such a LUT from a color target, for example (3D LUT Creator) - then you can convert your raw image into your working color space with AP's default rendering and apply the custom LUT to get the color rendition you really want after the default raw conversion. Another workaround, especially for using LUTs etc. that require a log input file, is to convert your raw file into a 32bit linear file from the Develop persona. Then you can use OCIO transforms to take the linear output (a raw file is just linear data) and transform it into the correct log format for your cine looks. Have fun! Kirk
-
Nice! You can also do this by placing any adjustment layer on top of the image and setting its blend mode to Screen (or whichever you choose to accomplish the task). Then you can use the Blend Options (ranges) interface to target the tonal range you want to lighten. This way you do not need to select the tonal range ahead of time (for example, the highlight selection you made) and you can always alter the targeted tonal range after you inspect the effect of the lightening. Also, there is no need to copy and paste a duplicate pixel layer. I usually use a curves layer as the lightening layer because you can alter the lightening by adjusting the curve too. Same applies for darkening highlights, only set the blend mode to multiply. Once you have lightened the shadows, you might find that you have lost contrast in those areas - you can add another adjustment layer and set its blend mode to overlay or soft light and blend some contrast back into the image. You can always apply all of these adjustments locally by painting on the adjustment layer's mask, and with layer linking you can propagate the mask to all of the adjustment layers at the same time so the masked changes are consistent across layers. The adjustment layers are just dummy layers to affect the blend mode change, you do not need to make any actual adjustments (for example, to the curves or levels or whichever adjustment layer you place in the stack). Here is the AP tutorial about the Blend Ranges interface and how it works: kirk
-
FITS file format
kirkt replied to John Schnupp's topic in Pre-V2 Archive of Desktop Questions (macOS and Windows)
As a temporary kludgey solution to open a single FITS file, you can make a new astro stack to access the astro stack dialog, add a single FITS image file to your Lights group, hit the stack button and then open the stack, which will be a single file (the single FITS you put in your Lights list). Kirk The attached shot is the original FITS file in the first post of this thread, opened via the above method.