Pntrguy
-
Posts
22 -
Joined
-
Last visited
-
 nodeus reacted to a post in a topic:
Picking Colors and Brushes on the Fly
nodeus reacted to a post in a topic:
Picking Colors and Brushes on the Fly
-
VirginiaL reacted to a post in a topic:
Picking Colors and Brushes on the Fly
-
Aammppaa reacted to a post in a topic:
Picking Colors and Brushes on the Fly
-
Smudge Tool
Pntrguy replied to Pntrguy's topic in Pre-V2 Archive of Desktop Questions (macOS and Windows)
Thanks for the tip! I look forward to seeing if that makes a difference. I also found that working in a particular file of mine, the smudge tool somehow functions perfectly, even with a brush that gives problems in other files. But then, by opening a brand new file and beginning work in there, the smudge tool issue rears its ugly head again. On the other hand, by duplicating the file that “works,” and using that “offspring” file as a new workspace, the smudge tool again works perfectly. I have no idea what’s set differently in that one file that makes it a golden solution to this problem. Duplicating that file isn’t an ideal way to have to start a new project every time. But it’s been getting me by so far. -
Frozen Death Knight reacted to a post in a topic:
Picking Colors and Brushes on the Fly
-
Hi Affinity, I’d like to please make a suggestion and request for two important features to be included in future (hopefully near future) iterations of Affinity Photo. I likely express the opinion of many illustrators and digital artists in sharing this request. Painting in Affinity Photo is wonderful. But a significant drawback is the lack of ability to pull up a color wheel immediately while working with a tablet and stylus, wherever the cursor happens to be at the time. This feature would allow the artist to choose a new color on the spot (without having to reach over to the color wheel in the controls). The color wheel would need to pop up quickly, allow rapid choosing of a new color, and likewise disappear easily with the release of a key. Being able to use a keyboard shortcut to instantly access the color wheel and choose a new color is a great workflow advantage in other software. I know it’s currently easy to switch to the eyedropper tool and choose an existing color in the image. And that’s super important too. But in my opinion there also needs to be an immediate way to easily access and pick colors, of any hue and value, from the full color wheel. Similarly, being able to pull up a full menu of the brush tips available (including those created by the user), wherever the cursor happens to be, and to pick a new brush right then and there, would also be a huge asset to workflow. This too exists in other software by simply clicking the stylus button when hovering the pen over the drawing tablet. Affinity’s lack of quick access features for choosing both color and brushes on the fly is currently holding back Affinity Photo’s efficiency. Working without these abilities feels strange when many of the app’s painting features are otherwise so robust. Please seriously consider these suggestions. Adding these features would really help round out Affinity Photo’s power as imaging software. Thank you for your consideration.
-
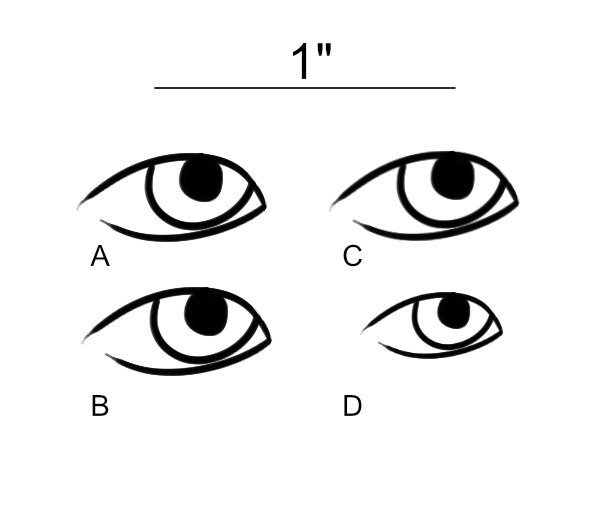
Hi Stokerg, Sure, thank you. Attached is a file showing my tests (all created at 300 dpi), including a line to show scale (approximately 1"). Image A is the original created with the Brush tool. The copies were made using the Move tool, and then transforming using anchor points. Image B is a direct copy that was simply moved around, showing not much, if any, blurring. Image C is a copy of the original which was rotated a few times, resulting in noticeable blurring. The blurring begins with even one rotation of a few degrees. Image D is a copy of the original which was simply reduced to about 2/3 original size, showing some blurring (I realize some detail does get lost when reducing - this reduction actually looked blurrier in Affinity Photo itself than it does in this jpeg file). I could have done some other transformations, showing the effects of skewing for example. But I think this file probably shows sufficiently what's going on. Comparing image C to image A probably best shows the concern. It may be subtle, but there's a noticeable change in sharpness. I think A & C should appear identical in sharpness, even after any number of rotations. This is a serious problem. It's very difficult trying to build and edit detailed artwork, knowing that simply needing to transform an area will result in noticeable loss of image quality and consistency across the artwork. Imagine if A & C were eyes on the same person. That wouldn't look good. Thanks again! Further help on this is welcome.

-
Chris B reacted to a post in a topic:
Paint Brush Adjustments at Any Angle
-
Thank you for addressing this, Chris B, and also for the apology! It's ok. As advanced as Affinity Photo is, I realize it's still somewhat a work in progress. I'm very glad this significant issue has been noted, and that you've updated the report. And yes, here's hoping it can be corrected in the near future. Thanks again!
- 2 replies
-
- 1
-
-
- brushes
- affinity photo
- (and 3 more)
-
Thanks for the suggestion. I just checked and there are two options for "View Quality" under "Performance." They are "Bilinear (Best Quality)" and "Nearest Neighbor (Fastest)." Bilinear had apparently already been selected by default, and yes it's showing the blurring behavior with Bilinear selected. I sure hope there's a solution. It's troubling that a function as essential and commonly used as Transform is so destructive to the object being transformed. Any more insights on this would be welcome.
-
Hello. I’m struggling with transforming selected areas of designs in Affinity Photo. When changing the size of a selected object, even a little bit, the edges of the selected object become considerably blurred with an “anti alias” look to them. Same thing occurs when rotating a selected object to a new angle, even without changing its size. This ruins the original integrity of the selected object, changing crisp-looking edges to blurred. Trying to fix the blurring by hand afterwords is a huge interruption to workflow. In Snapping Manager, I already have “Force pixel alignment” checked and “Move by whole pixels” unchecked. This seems to prevent the blurring problem when simply moving a selected object. But otherwise transforming selected objects still creates the blur. Hopefully there’s a setting I’m just not aware of to prevent this from happening. Could someone please let me know?
-
Yes, as ladlon explained very well, a Revert feature would indeed have a welcome place in the software, even with the History and Snapshots still in full swing.
-
Thanks, Old Bruce! That's a great panel I didn't know about. While I still think a Revert feature might be helpful in its own right, Snapshots allows way more flexibility and stages to be able to "revert" to at any time, even after the document's been closed and reopened! Powerful stuff. I'd still be happy to see a Revert feature come into play, but definitely not at the expense of Snapshots! Thanks for pointing it out. Amazing.
-
As an Affinity Photo user, I agree it would be great to have an actual Revert feature, either as a menu item or easily accessible in some other way. Putting a "saved" marker in the History would be good but still wouldn't be enough in my opinion. If one wanted to go back in the History prior to the marker to try some edits, then changed his/her mind and wanted to revert to the saved version, wouldn't the marker be gone at that point, and the person would have to settle for closing and reopening the document? Maybe there's something I'm missing with that scenario. But it seems like a Revert option would be the way to go in certain cases.
-
faedri reacted to a post in a topic:
Rotate Artboard Feature Needed
-
Pntrguy reacted to a post in a topic:
Disable antialias when transforming object
-
Smudge Tool
Pntrguy replied to Pntrguy's topic in Pre-V2 Archive of Desktop Questions (macOS and Windows)
Thanks for the info Lee D! And turning off that TFL shortcut did the trick. The "F" shortcut works fine now. Here are some examples of the color changing with use of the smudge tool. In the blue example (Test 2), "A" marks a sample of the original blue color at 100% opacity. The arrows indicate just a couple of the places where the blue went on to a darker shade while smudging. You can see other areas where this happened as well. The multicolor example (Test 1) was made earlier, and I don't remember all of what I was doing there with the smudge tool. I think I was using it with multiple layers selected at once. In any event, you can see where, rather than getting a clean smudging of existing colors, the tool resulted in streaks of darkened variants of the original colors, as well as the addition of gray streaks. And gray wasn't among the original colors at all. Hope this helps. And further insights are welcome. Thank you again!
-
Color Wheel On Demand
Pntrguy replied to Pntrguy's topic in Pre-V2 Archive of Desktop Questions (macOS and Windows)
Thanks all for the helpful comments! Old Bruce nailed it directly, so thanks for that. I kinda figured the instant color wheel "pop up" feature wasn't there, but figured it was worth asking. It might be a wonderful addition to consider for the future. And I didn't know about the large color chooser that does come up by double clicking the color well. So thanks for that info, telemax! -
You can currently use hotkeys for the view-menu rotate functions (at least on a Mac). But there are no default hotkeys for this. You'd have to set them up yourself under Affinity Photo>Preferences>Keyboard Shortcuts. There you can navigate to the "View" feature, and type in whatever hotkeys you want for the rotate functions.
-
I have a question please about width and hardness adjustments in Affinity Photo paint brushes. I know dragging the cursor side to side changes width, and up and down adjusts hardness. But when I rotate the canvas (as seen under View>Rotate Left or View>Rotate Right) to work on a piece from different angles, the required motions to change brush width & hardness seem to reverse. They don’t remain constant relative to the user once the canvas is rotated. Is there an option somewhere to keep these motion commands consistent, relative to the user, for any given working angle?
-
Hi Affinity Forum. Question about Affinity Photo, please. Is there any way to pull up the color wheel on demand wherever the cursor happens to be at the time, even if the wheel already appears in the panels off to the side? Perhaps it could be a shortcut key combo. Or better yet, maybe it could be simply clicking the button on a Wacom stylus. I know this button does the trick in Photoshop, and it’s extremely helpful in digital painting. So far, I haven’t found this feature in Affinity Photo. If it exists, could someone please let me know where it is? Thanks!
-
mallen reacted to a post in a topic:
Rotate Artboard Feature Needed
-
Rotate Artboard Feature Needed
Pntrguy replied to Pntrguy's topic in Feedback for Affinity Photo V1 on Desktop
Thank you Old Bruce! I hear ya. I still use a mouse for some stuff, but have been using a Wacom tablet for ages. Recently upgraded to an Intuos Pro but haven't delved into all the functions. I don't have a trackpad, however. So is a trackpad the only option for free-spinning the canvas? Not sure if there's a way to set my Wacom to work like a trackpad. Under System Preferences>Wacom Tablet>Tool>Touch>Standard Gestures, the "Rotate" option is checked (along with many others), but the gestures don't seem to actually do anything when I try them. Apparently I'm missing something there. Thanks again. More insights are welcome.