

Xzenor
-
Posts
319 -
Joined
-
Last visited
Posts posted by Xzenor
-
-
Heh, I didn't know you could reshape artboards like that. Nice!
-
2025.. this still isn't fixed. I'm sure it's a combination of Affinity and drivers (as an older driver solves this issue) but Affinity does seem to be the only application with this specific issue. I can't use an older driver so I'm screwed either way.
-
On 1/30/2025 at 10:26 AM, Gnobelix said:
Hello @amsamuelbright,
Welcome to this forum.
I know the problem.
The following settings should help.
Edit
Stetitngs
Tools
Low Precision.
Then your pen should work as expected.Not for the Kamvas 13 Gen 3.
An older driver is the solution for a bit older tablets. the Gen 3 doesn't have an older driver though so that's no solution. -
recently got a Kamvas 13 Gen 3.. Sadly, older drivers are not available for the Gen 3.. I'm stuck with either pressure, or working buttons. This sucks.
Edit: Okay, I 'can' install the old driver from the not-gen3 version and it'll still recognize the Gen 3 tablet... Just with the old pen
 So I now have one useless button that I can't configure.
For anyone with the regular Kamvas 13, here's the linke to the old driver: https://driverdl.huion.com/driver/Win/HuionTablet_WinDriver_v15.7.6.756.exe
-
By far the most convenient way to buy a brush pack is from the Affinity store but how would one publish the pack there? There's really no information about this to be found online.
-
17 hours ago, makeaffinitybetter said:
This is actually ridiculous. I can remove backgrounds in one step on the native Preview app on Mac (instantAlpha) but in AD we have to go through several steps to do this super simple task and half of the time it doesn't even work, just deletes the entire miage. This needs to be a simplified process that actually WORKS for the end user.
You created an account just to resurrect a 2 year old post? If you want a one-click solution then AD probably isn't the right tool for you anyway. I personally prefer to have more control instead of hoping for the one-click solution to do it like I want it to.
Instead of a rant, try asking for help. You'll get a better and more useful response. We have no way to tell what kind of image you even want to remove the white background from so no way to give advice. -
Ah thanks.. I searched but that one was not among the results.
It's workable once you know how to work with it. I guess that's why it's been in there for that long. it even moved from V1 to V2.
I did figure out it has nothing to do with the actual selection. It's just the checkbox messing it up. You can do the selection with the checkbox enabled and just before you click the refine button you uncheck the all layers checkbox and then transparency works fine.
-
Found the 'cause'. The quick selection tool has a checkbox called "all layers" and if you uncheck that then there's no problem. I checked with the regular square selection tool and that also does not have the issue.
It's still wrong in my opinion. Doesn't matter if I select from one or all layers. The nothingness behind it should still show if I select the transparent preview..
-
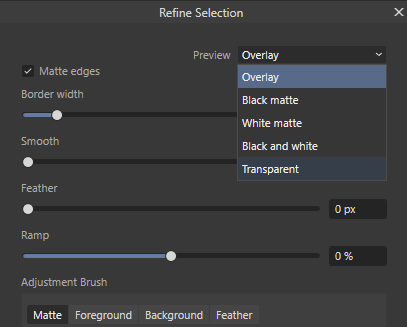
This one

The one at the bottom, "transparent" doesn't seem to work anymore (using V2.5.3 on Windows 10 x64). It just doesn't do anything now. It's easy to reproduce.. just grab a random stock image -> select something with the quick selection tool-> open the refine dialog -> set preview to transparent.
Maybe it does work on Mac?
Edit: I tried it with and without OpenCL acceleration but there's no difference.
-
Ah seems you're right...
happy to see they're working on it
-
I came across this svg that I cannot properly open in Designer. Works fine when showing in a browser and even when opened in Inkscape but it's just a bunch of squares in Affinity Designer.
https://www.micros.nl/resources/img/logo-40-jaar-micros-internetdiensten.svg
Does anyone understand why? I opened the svg as text and it doesn't seem to be bitmap data so that's not the issue. Is there a way to properly open and edit this in Affinity? I tried exporting as a new svg in Inkscape and opening that one but there was no difference.
Using version 2.5.2, in case that matters
-
Thanks all. Glad it's not a bug after all and learned that apparently selections get saved in the document
-
For real? That's bizar... I closed the file and shut down the application. Since when do selections survive that 🤨
But thanks! I'll try if it works for me as well.
-
I'm running onto the weirdest thing with this picture. I can't paint on it anymore, except for a certain piece of the image that matches the mask of the curves layer above it but only with something like 20% opacity it seems. this isn't the cause of the problem though as the problem persists if you remove the entire curves layer (with its mask). I checked my brush's blend mode and wet edges.. reset the brush.. tried a different brush.. Nothing helps
I'm guessing it's a bug but you're welcome to prove me wrong.
I'm not very comfortable posting the image but I guess it's not possible to report a bug without it....
-
-
The amount of noise heavily impacts the size of the png (maybe also other file formats, i don't know. I usually use png).
The resolution isn't always the biggest factor of the file size. A 10000x10000 picture of just one color is only a little over 310kb when exported as PNG. Add 5% of monogramatic gausian noise and it's almost 67MB. Non monogramatic makes it 127MB. All same resolution. just different pixels in it.
-
-
I know.. but Affinity does support HDR monitors..
If you enable the 32Bit preview panel you can just tag the EDR (Mac) or HDR (Windows) checkbox to enable HDR view and make use of the HDR capabilities of your display.
EDIT: Sidenote.. On windows you have to enable HDR in your windows settings first before the checkbox becomes available. Kind of annoying but that's just how it works.. Windows itself looks off in HDR mode so it's not something you want to have turned on constantly.
-
I'm not sure I follow..... Affinity Photo has had support for HDR quite a while now but I cannot imagine that Lightroom did not have that support yet..
-
I think if you just want to create a photobook, you may be better off with specialized software for that like the ones you already mentioned.
It's like using autocad to draw a stickman when all you need is mspaint.exe
-
You literally create a curve. Take the pentool, draw the path you want your text to appear on. (don't worry about it too much, you can change it later.
Take the Artistic Text tool and hover above your curve. The cursor should then change from the regular A to a T with a line below it to indicate that it's gonna be text on a a curve.. Click, and start typing. there are green and red arrows that you can drag to indicate where your text should start and end.
EDIT: ah, @firstdefencebeat me to it...
-
My apologies.. I wondered why I didn't get any replies yet but I found that for absolutely no good reason the email notifications ended up in my spam.
So anyway, yes I want to just mindlessly overwrite and I don't care about the compression settings as most of it is PNG anyway and if I do need to change stuff then I can always just use export but that's more work.
I don't have an example here at the moment but I'll see if I can find one. One little thing I thought of, the pics are in a folder that's being synchronized with syncthing. I just figure that maybe some pics are in use at the moment that I open them and that's why they can't be overwritten.. So I'll turn that off next time and see if anything's different. although I'd expect some Read-Only message or something if that were the case.
-
I wonder what triggers the availability of the "save flattened" button (besides filetype)?
I've opened png's and jpg's and saved them and got the flatten option.. But lots of time the only save option is .afphoto and 'save flattened' is not given as an option even though they really are jpg or png files.
I can't find a pattern in this.
-


Mask stuck to old dimensions in an artboard..but only on the right and the bottom.
in V2 Bugs found on Windows
Posted
A combination of Photo and Designer
2.6.2, so yes.
Absolutely
Yes. Perfectly reproducible on a new document. Added a document anyway, and a screenshot and video
Windows 11
On. I didn't try to turn it off as it's not really a graphics issue.
I could not use a mask beyond a certain line. It's a fixed size. I can enlarge it but it will displace the content in the mask as well, so that's usually not a solution.
1. Open a nice image in Photo. Make sure it's a raster layer (not sure this is necessary but that's what I used every time).
2. crop it to something smaller. Make sure you crop to the middle of the image. Need all sides to demonstrate this.
3. file -> open in Designer
4. create and artboard from it.
5. File -> Open in Photo
6. Create a mask for the image.. mask out some stuff (might not be necessary)
7. Decide that you want the image a little bigger, so get the move tool and increase the artboard-size to all sides to reveal pieces of the image that you cropped in step 2
8. Mask out stuff in the newly created space -> you can't on the right and on the bottom. The mask is stuck to the old dimensions of the artboard for the right and the bottom only. Funny enough this doesn't seem to happen for the left and the top.
9. If you click the mask with the move tool you see you can now move it and enlarge it that way but that will also stretch the contents of that mask.
Nah. it's really an application thing. Could even be by design but I doubt it. It would restrict on all sides if it were by design.
I don't know. It has happened before. I just couldn't figure out what caused it back then.
bug.afphoto