LionelD
-
Posts
331 -
Joined
-
Last visited
Recent Profile Visitors


-
 LionelD reacted to a post in a topic:
Unable to open giga panorama
LionelD reacted to a post in a topic:
Unable to open giga panorama
-
Unable to open giga panorama
LionelD replied to eric4972's topic in Desktop Questions (macOS and Windows)
@eric4972 That’s large, makes me wonder if it’s a BigTiff (I.e., larger than 4GB). If you are able to export from your stitching software as .PSB you might try that. I experimented with BigTiff a little, but found limited compatibility at which point I abandoned it. All my large panos are .PSB… By the way, I don’t use APhoto, so this is a suggestion based on lots of experience with large panos - many way larger than 4GB which is why I experimented with BigTiff. Regards Lionel -
 CRC Studio reacted to a post in a topic:
[feature request] Export same format at multiple sizes in batch
CRC Studio reacted to a post in a topic:
[feature request] Export same format at multiple sizes in batch
-
@Old Bruce I'm sure you're right about the batch process. In my case, I create or edit a document that is sourced from one I use as a template (not a Designer Template), then in Export Persona export all the predefined outputs with a single click. I may iterate through that process a couple of times, but that's the normal development process. Regards
-
Color Profile and Metadata
LionelD replied to boelens218's topic in Desktop Questions (macOS and Windows)
@R C-R Yes, you're right. I'll try to be more diplomatic. Regards -
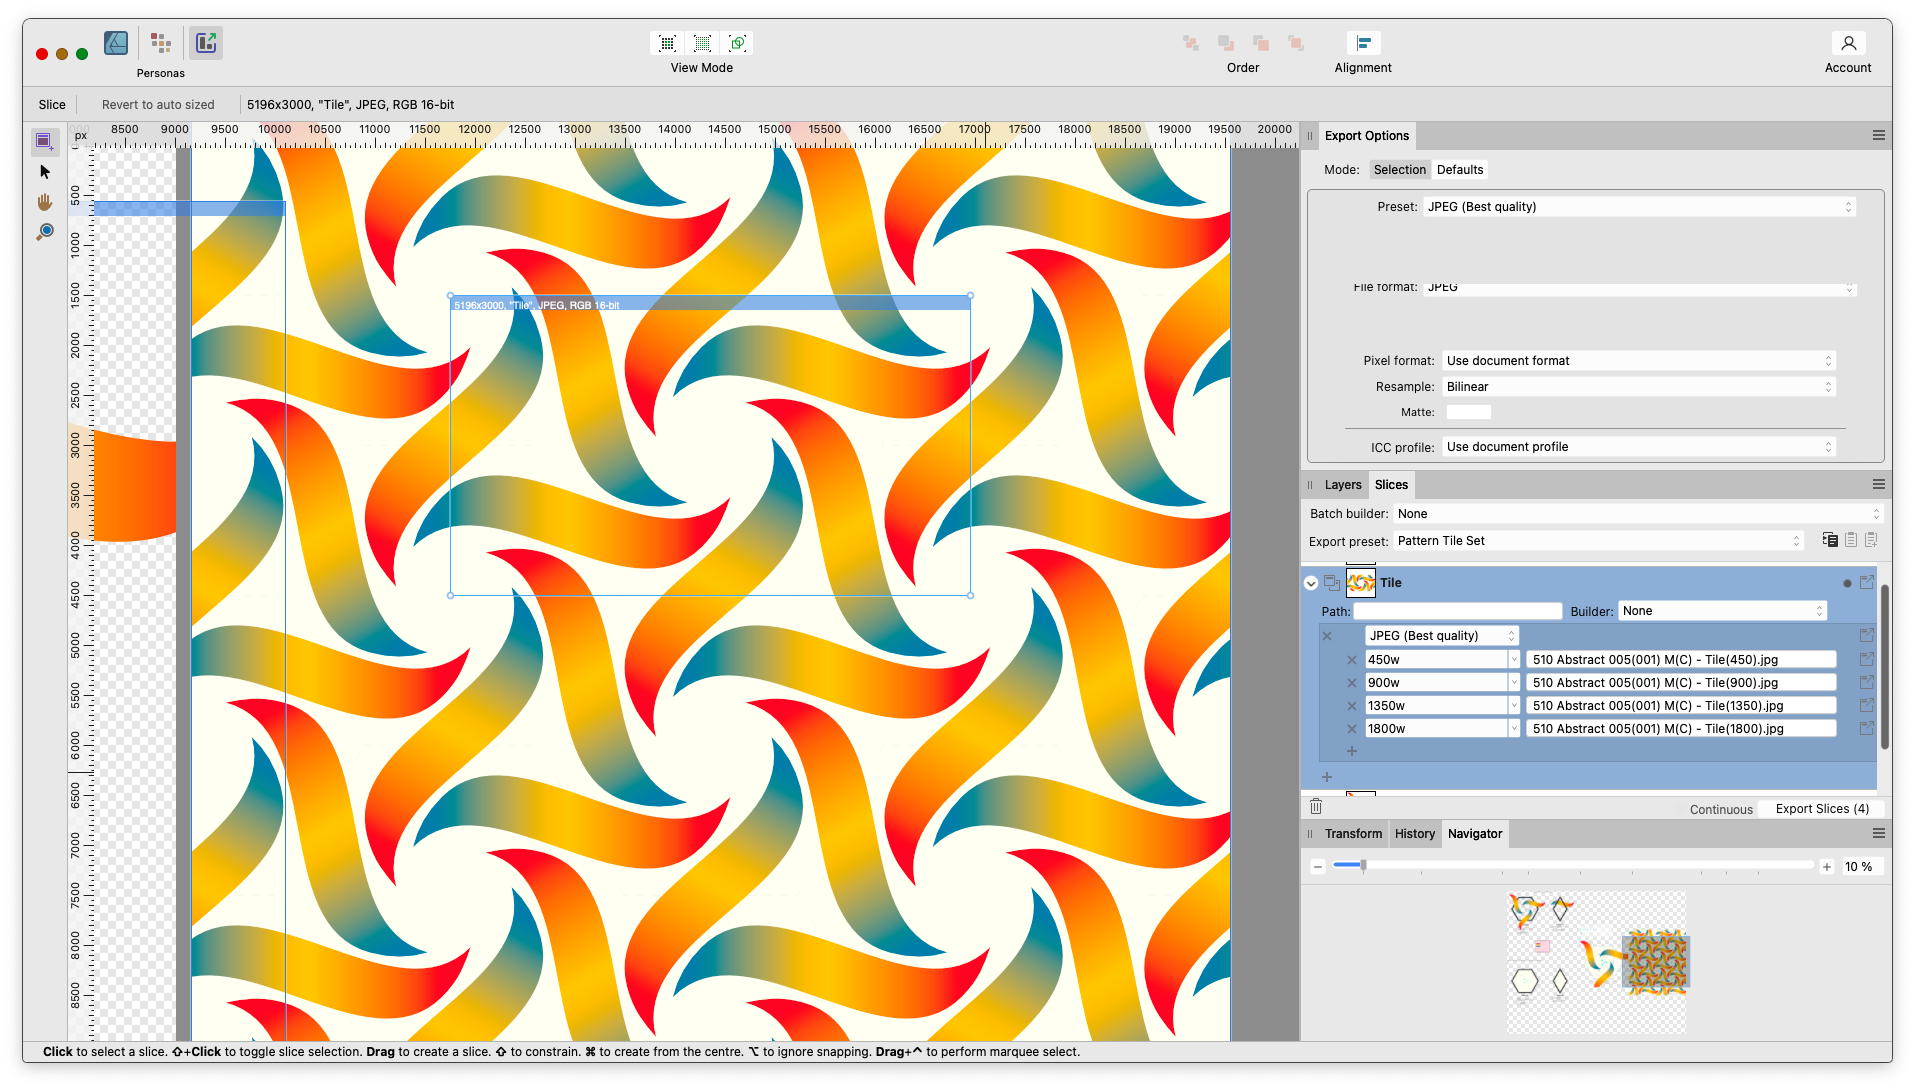
You do not need to create copies to do this. Here is a screenshot from one of my documents that shows one of the artboards, a slice defined on that artboard, and the Export Preset I created to export a single slice at multiple sizes, same aspect ratio. This Preset itself is called "Pattern Tile Set"; it specifies 4 different sizes using multiples of the slice width, using a naming convention I applied. Unfortunately there appears to be no way to export a preset, otherwise I would have attached it. You can make a Preset much more complicated, e.g., adding more file formats (I specified just one). If memory serves, in one of Elaine Giles' videos she shows how exports images for her social media in multiple sizes and multiple formats from a single Preset. It might be quite far into the video I linked, but I'll take a look to see if I can find a reference for you. The Export Persona in Designer is quite a crocodile, not particularly intuitive and rather poorly documented, but well worth learning. Creating a Preset can be a special adventure when you're starting out. I think one of the courts at Roland Garros sports a giant sign that says "Success belongs to the Tenacious"; here's your opportunity. Good luck, let us know how you progress. Regards

-
R C-R reacted to a post in a topic:
Color Profile and Metadata
-
CRC Studio reacted to a post in a topic:
[feature request] Export same format at multiple sizes in batch
-
Color Profile and Metadata
LionelD replied to boelens218's topic in Desktop Questions (macOS and Windows)
Well, that does look rather ironic to me. Color is central to what Photo, Designer and Publisher do. -
LionelD reacted to a post in a topic:
Color Profile and Metadata
-
I can’t tell whether you are referring to Photo or Designer, or what computing device you work on, so my comment may be a little wide of the mark. I don’t use Photo, can’t comment. However, the Export Persona in Designer enables this on desktops. Designer on iPad will honor presets created on the Desktop (so exports produce the same output as they do on desktop), but cannot edit them. Either way, you might take a look at this video on Elaine Giles YouTube channel. It is old and therefore a little out of date, but I still consider it informative. Regards
-
The colour display in affinity designer is sometimes not correct
LionelD replied to Jo.Da's topic in V2 Bugs found on Windows
Perhaps the links here Might be informative, especially the information at the Cambridge in Color website which illustrates what happens when a source color is not in the target color space. Regards Lionel -
The colour display in affinity designer is sometimes not correct
LionelD replied to Jo.Da's topic in V2 Bugs found on Windows
A short while ago I learned that color palettes in Designer are not color-managed, meaning that the palette does not identify the color space in which the swatches were created (sRGB, Adobe RGB, ProPhoto, etc). Searches on this topic suggest this behaviour is not unique to Designer or Affinity. That makes me wonder if this is a manifestation of the same phenomenon (styles created in Color Space A, document using Color Space B, and styles failing to identify the color space in which the styles were created). There are several threads in this forum discussing the palette issue. Regards Lionel -
R C-R reacted to a post in a topic:
Restore overwritten file
-
Restore overwritten file
LionelD replied to Danjele's topic in Desktop Questions (macOS and Windows)
@R C-R Sorry, Time Machine. -
Restore overwritten file
LionelD replied to Danjele's topic in Desktop Questions (macOS and Windows)
@Danjele I’m late, but it sounds as though you’re working on a MBP. Check what you have in your Trash (Dock, far right). Separately, Time Finder has rescued me many times, heartily recommend it. Regards -
Alfred reacted to a post in a topic:
adding keywords
-
Yay for @Alfred and @omia!! 👍😍 Metadata is not optional. The more files you have, the greater the need for comprehensive metadata (think of Adobe Bridge, Lightroom, On-1 products and many more from other vendors). There are well-established standards for metadata, and Affinity should support them in full across the product line. Adobe and others support layer-level metadata (think copyright violations), and video often has frame-level metadata - that’s how the studios find footage featuring a given personality and so on. Designer accounts for almost all my Affinity work. I typically have multiple output image files for each .afdesign file, and I need metadata for organizational and search purposes. I’d really like to enter it for the .afdesign file, and have the Export Persona propagate it to each Exported file. But re-exporting an .afdesign file kills all metadata added to those files externally. Compare that to the workflow I use for Adobe: I put metadata into all my RAW files, and it propagates all the way through my workflow. If your image files do not have metadata you can’t search for them - on your own machine or the web. You can’t distribute your work through an agency effectively - ask Canva. While you’re at it, ask them how to find an image that matches reasonable search criteria. FAA accepts naked image files (no metadata), but your images will be invisible to anyone who does not know which gallery you put them in. Yes, I do know AI is coming, but I believe there is some stuff it may never figure out. If you still have doubts go and take a look at what Adobe and others are building for Image Authentication, and what camera manufacturers are doing to support it. In my opinion Image Authentication still has a very long way to go, and I won’t use it in its current incarnation (too cumbersome and intrusive), but it’s coming. Regards
-
LionelD reacted to a post in a topic:
URGENT: Umlauts don't show anymore
-
 Ldina reacted to a post in a topic:
URGENT: Umlauts don't show anymore
Ldina reacted to a post in a topic:
URGENT: Umlauts don't show anymore
-
LostInTranslation reacted to a post in a topic:
URGENT: Umlauts don't show anymore
-
URGENT: Umlauts don't show anymore
LionelD replied to LostInTranslation's topic in V2 Bugs found on Windows
@LostInTranslation 😔 Sorry…. Somehow did not see that. I’ve been missing stuff for the past few weeks, should get better in about 10 days when my cataract surgery is complete and I have new glasses. At least, I hope so… Regards -
URGENT: Umlauts don't show anymore
LionelD replied to LostInTranslation's topic in V2 Bugs found on Windows
@LostInTranslation You don’t indicate what computer you’re using, but in case you are using Apple: There is a free Mac app called Font Book (in the App Store as usual) that may be useful if you have to find a suitable new font. Some of the fonts are free, some are not. User guide is at https://support.apple.com/en-gb/guide/font-book/welcome/mac And a quick search got me this for iOS: https://support.apple.com/en-gb/guide/ipad/ipad952422ba/ipados Regards -
thomaso reacted to a post in a topic:
in designer how to create an open path with pattern?
-
@thomaso You can try adding nodes to your curve at strategic points - such as sharp points in the curve. For example, if you have a right-angle bend in your curve, add one node either side of the existing corner. They work best when close to the corner, and you should be able to adjust the strength of the effect either side of the corner, as well as traversing the corner. Sharper changes in direction have more dramatic effect distorting your brush. Probably best to add nodes as required, rather than routinely. If memory serves, adjusting an inside stroke requires slightly different treatment, it’s all a compromise. Hope this helps. Regards
-
Hi and welcome to the forums. Looking at your file I see that the results you complain about all come from a curve with two strokes of different color with distinct stroke profiles. When a curve carries just one stroke, Expand Stroke has an unambiguous task, but when there are two it’s a different matter. Were you hoping that Expand Stroke would expand each of the strokes on a curve, and deliver an expanded stroke for each one? As I know it (and I’m no expert), Expand Stroke does not do this… Regards