toltec
-
Posts
3,560 -
Joined
-
Last visited
Everything posted by toltec
-
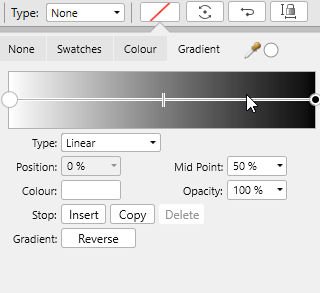
 Do you mean the one by clicking on the Swatch and then Gradient ?
-
Clear or fill the middle line?(Vector persona)
toltec replied to MxT's topic in Pre-V2 Archive of iPad Questions
Freehand Selection Tool Antialias. ON OFF
-
When to convert from RGB to CMYK
toltec replied to a topic in Pre-V2 Archive of Desktop Questions (macOS and Windows)
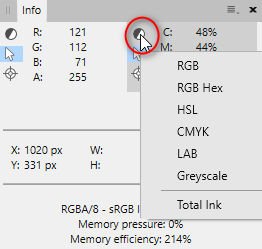
You can use the info panel View > Studio > Info which will give a colour value readout where the mouse pointer is. By default one sampler is RGB and one CMYK, You can change them by clicking on the icon (shown) or add extra samplers (burger menu) and have HSL too. Not sure that is 100% what you want but I think it is the best option.
-
Of course i believe you
-
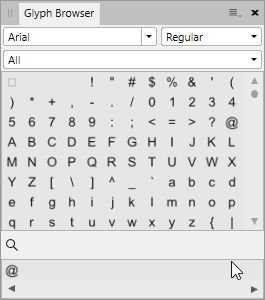
The current apps do have a Glyph Browser (View > Studio > Glyph Browser) or do you mean something else?
-
Just click on the slider If you look at the pointer, it displays a plus (+) to indicate the adding of a node.
-
No, I meant I will not need to use cloud storage at all. Because it's a proper computer, I can use memory sticks and cheap USB external drives. I can buy a Western Digital or similar 2 terrabyte external drive for under £70. To be honest, one big 2 terrabyte disc would scare the life out of me. If it dies, that's an awful lot of data to lose. My choice would be 2 x 2 terrabye external discs with each drive doubled up. Under £140 but much, much safer. I had an external backup disc fail on me a while back and did lose some stuff. Fortunately, most of it was on various PCs and memory sticks but it took me ages to sort it out. Now, I always double up my storage.
-
Hmm, well maybe I am Perhaps I am just lazy then. Given an automatic tool I would use that and take an early lunch, every time
-
No offence first defence but I have to disagree with that. (always one, isn't there). I was a professional photo editor for thirty years. Literally thousands of photos prepared for litho printing. But I am no good at creating anything, I have no artistic ability whatsoever I just edit. Given the option of an automatic tool, I would have used it every day of the week because I was always under severe time pressure. If you knew the print trade, you would understand. When faced with 100 odd photos that needed preparing and several hundreds of pounds lost if a litho machine is idle for an hour. That is a lot of pressure. Over the thirty years or so I have picked up a few things but time is money and I am not interested in learning every feature just for the sake of it. I suspect I am not alone. Most of the numerous tricks I learned was because I needed to do something (or rather a customer wanted me to), not because I wanted to. But it takes all users, and I would have found Photo more or less perfect for my purposes. Are you saying Photo is only "for creative people", maybe I should get a refund Not everybody has the time to play around with software until they become experts. Some people just need to do stuff.
-
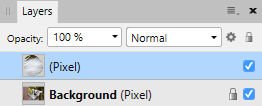
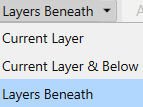
What that means is a. Create a new pixel layer b. Set the clone source to Layer Beneath (Context Toolbar ). c. Alt + click to set a source point, (his or her ear). d. Clone Because the cloned part (the ear) is on a separate layer You can move it, resize it, rotate it and also adjust the opacity of the cloned layer.
-
Ouch! Remind me, why is it you like the iPad? My new convertible PC (delivery Tuesday or Wednesday) won't have any of those problems.
-
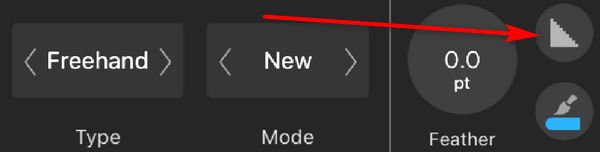
Live Filter Layers can affect the iPad's performance quite badly, so by default filters are applied destructively, so no separate layers. You can convert some filters into Live Filter Layers if you want. Apply the filter, then on the Context Toolbar, tap the icon that looks like a lightning bolt. That converts the filter into a filter layer which will be nested inside the image layer.
-
exchange files between AD and Photo?
toltec replied to VectorCat's topic in Pre-V2 Archive of iPad Questions
I must admit, I really dislike the way Apple decides what I can do with my files. It is pretty stifling and annoying but there are a couple of ways around it. There are two solutions to your opening files problem. 1. Tap on the + in the home screen. Select Import from Cloud or Open from Cloud. You can then choose On My iPad and either app will access the local Files app which will open the folder from either app. So you can see and open the Photos files from Designer and vice versa. Note that you must actually save the files. Files in either app (home screen) are not actually saved, they are just in the app's allocated memory. 2. Drag and drop. If both home screens are open, drag a file (pick it up?) and with another finger, swipe up from the bottom of the screen until the task bar appears. Hold the file (takes a second or so) over the other apps icon until the home screen of that app opens, then drop the file. Pasted, and no need to save the file first, which is quite elegant? To save a file to Photos, go Export, tap Share and then tap Save Image, that directly saves it to Photos. -
I thinkest it is an impossible question to answer. Both are very sophisticated programs with masses of features. Far more than you will ever need and the learning 'wall' of each is similar. So my question is, do you want to pay a small one-off Affinity price, or a large, ongoing, monthly Photoshop price ?
-
You can use the Clone tool with the Opacity setting turned down. But I prefer to Clone onto a new, blank layer and adjust the opacity of said layer., you can even move the cloned contents (or rather, the layer) around a bit. If you clone to a new layer, you will need to set the source to Layers Beneath. P.S. If you are having problems focussing on this, try more coffee
-
When to convert from RGB to CMYK
toltec replied to a topic in Pre-V2 Archive of Desktop Questions (macOS and Windows)
It does make a difference because of what you see. I assume using CMYK is because it will be printed? RGB can contain and display far more colours than CMYK can. If you design using RGB the final job won't look much like what you have on your screen, depending on what colours you use. I have known people get into all sort of problems doing that. If you work in CMYK the display will be much closer to what you get. You could use soft proofing but that is a complicated way of doing the same job. -
Unfortunately not, I would consider myself a 'Power User', but Serif does not always call everything the same as what Adobe does, or doesn't call it anything. What nearly defeated me a year ago was when I wanted to use a path to cut out a pixel object. After 30 years of using PS, I would have called that a 'clipping path'. After hours of searching and loads of videos I was losing the will to live. In fact I came close to chucking Photo altogether. A year on, perhaps you could try finding out information on how to use a path to cut out an object. A little challenge for you "(along with all possible synonyms)" You are also assuming that all users are English. Affinity are worldwide products and although I am constantly amazed by how well many members speak English, they will be at a disadvantage finding "all possible synonyms".
-
Yeah, but finding it was a REAL challenge sometimes. Hard to search for something when you don't know what to search for. Still, this forum was (and is) a great help.
-
Did you look at the PDF file I posted ? Is that pixelated ? It is totally crisp and pin sharp when I view it in Acrobat, even at very large zoom settings. That was created in Designer, contains text converted to curves and was exported as a PDF. If that appears pixelated, you have a problem in your viewing software. If the text appears smooth, you must have done something wrong when you exported, but at least we will know where to start.
-
Impossible to give a short and concise answer unless you supply some information. What program ? What OS? What is in the file ? What software is the client using ? A PNG will always be pixelated at some size (other than 100%) because a PNG is pixel data. A PDF (the best option) will be vector curves if the stuff in the file is curves or text. The attached file contains a simple vector shape and text converted to vector curves. If you look at it in a PDF reader, you can zoom in to huge sizes (non-pixelated) because it is vector data. It was created in Affinity Designer and exported as a PDF. Perhaps you could upload a sample (as Callum suggests). CURVES.pdf
-
Yes, but without specialised software you will probably have to do quite a bit of cleaning up around the hair. I used to do a lot of that and used Primatte software (Photoshop plugin). The trick is, when you take the photographs, don't use too much light on the blue background and get as much space between the model and the background as possible or the background shows through the hair badly. The background needs to be evenly lit to avoid shadows but make it a bit darker than you think or the light reflected off it becomes a 'light source'. Girls with fine blond hair are obviously the worst ! Unless you use specialised software which is specifically designed for blue or green backgrounds, the background colour doesn't really matter, unless the subject is wearing a red dress and you photograph her on a red background If you post an example someone can help more.
-
I expect it is an SVG file. You can use them when you create web pages, although it is a bit more complicated.
-
Yes, I should have said "created here as text" not "saved as text", Sorry for the confusion.
-
As I asked before, what format can the destination accept? You can only do it for a website if you type text, as we are doing now, or if you create the web page. If you are sending the file to somebody else, export as a PDF.