shojtsy
-
Posts
194 -
Joined
-
Last visited
Everything posted by shojtsy
-
Rasterize spare channels after crop
shojtsy replied to shojtsy's topic in Older Feedback & Suggestion Posts
I take a RGBA/16 document with a single pixel layer in AF 1.6.1.93, use the crop tool from tool palette to remove the left half of the image and leave the right half only. This makes the pixels of the left side hidden. Then I click on Document->Clip Canvas and the whole original image is shown again as if I undo the crop. Am I missing something? -
Hi, When cropping a document, the pixel content removed is only hidden and not removed. One needs to click on rasterize on each pixel layer to actually remove the cropped pixels. This is already pretty painful, and not clear what to do with pixel layers with adjustment child layers when you would like to keep the child layer, but remove cropped image area. Rasterize also bakes in the adjustment. However Spare Channels do not even have the rasterize option, so if you had any Spare Channels before cropping they retain hidden but stored pixels outside of your canvas. One problem is that these continue to consume memory and file size, but I have encountered another issue as well, as described below: I had a sky with some electric wires to inpaint. I made a selection of the wires and saved to spare channel. I have cropped the image and rasterized the pixel layer. I returned to removing the wires by loading the spare channel to selection. This resulted in a selection partially outside of the canvas, which was not obvious at all, as the marching ants are only drawn inside of the canvas. When using inpaint with such a selection silly things happen, such as inpaint making the pixels transparent. I see three alternate solutions to make the working of cropping consistent: - Make crop have an option to remove the cropped content (preferred solution) - Have a separate function in menu to remove all content (pixel, masks, embedded mask and spare channel content) that was cropped earlier. - Have a context menu entry for spare channels to remove the cropped content (identical to rasterize for pixel layers)
-
Threshold would work in the sharpening ("Detail Refinement") done on RAW in develop persona where you don't have masking. Plus edge masks are not dynamic, you need to recreate them whenever the underlying layers change. BTW would be cool to have dynamic edge masking for other purposes as well.
-
When you add layer effects to layer they are indicated in the layer panel with an "fx" icon next to the layer. However if you modify the blend ranges for a layer they are not indicated in any way, and the presence of the blend range setting is only visible if you know to open the blend options cog icon. With many layers this can become confusing. Please add a cog icon next to the layer in a similar fashion as the fx icon when the blend range options are not on the default setting to indicate their presence.

-
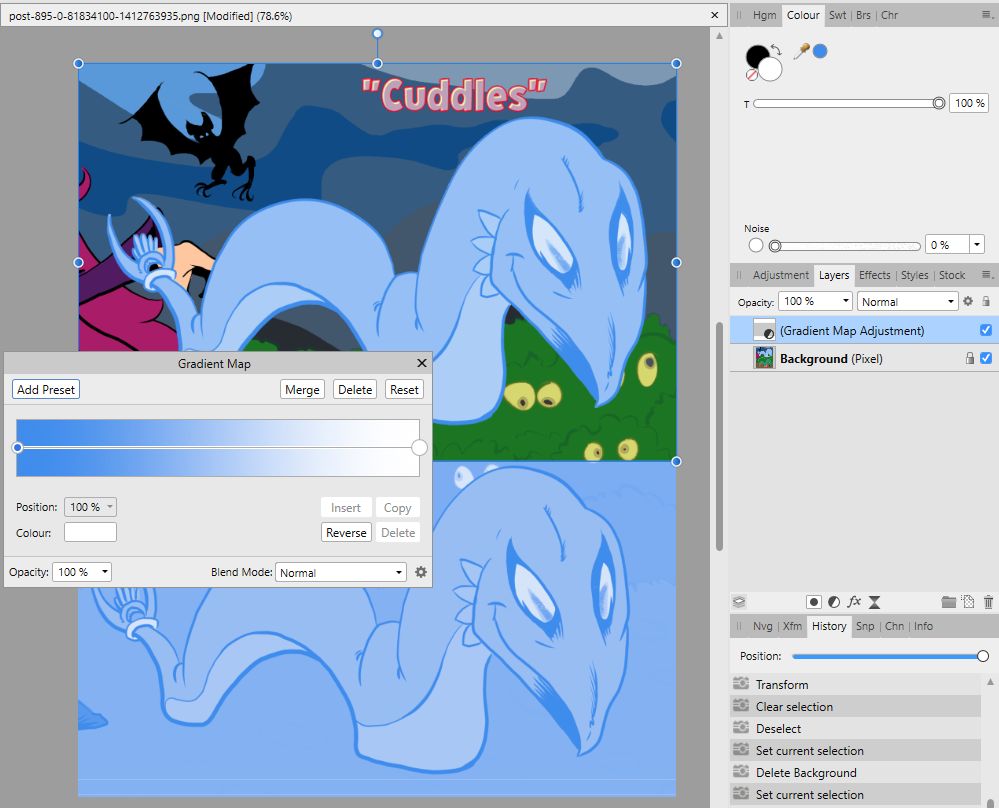
Gradient map adjustment FTW? See attached!
-
Merge live adjustment into mask
shojtsy replied to shojtsy's topic in Older Feedback & Suggestion Posts
bump? -
Hi, I would like to be able to limit the effect of the Detail Refinement feature in Develop persona to relevant edges to avoid emphasizing noise in smooth areas. Please add option of edge detection with a slider to control edge strength in masking the sharpening effect. I understand something similar can be achieved in Photo persona with result of Detect Edges filter used as mask, but it requires Developing the image first (destructive step), and also the lots of steps required are cumbersome for a standard requirement against sharpening to avoid the noise.
-
There is a repeating wish that people would like to use the full scale of editing tools on masks, and handle them as grayscale layers. They are usually told that masks only have the alpha channel, and they are mistaken to think that values of alpha are considered shades of gray. I think this is not the full story. One can use a regular pixel layer as mask, and the alpha channel (transparency) of the pixel layer will be used for masking, while ignoring the RGB channels of it. Furthermore it is possible to put a live Channel mixer adjustment on top of a pixel layer which makes it transparent based on it's luminosity. Combine these two tricks, you get a mask, where you can do every aspect of grayscale editing. Here are the steps: You have pixel layer A you would like to mask, and pixel layer M you would like to use as mask. You nest a Channel Mixer adjustment inside M, choose LAB channels, Alpha channel, make contribution of input Alpha 0, and contribution of input Lightness 100% into Alpha. Layer M should be above layer A. Right-click layer M, and choose Mask to Below. Bam, you have a mask pixel layer to do any edits and it's luminosity is used for masking. (beware of a GUI limitation that nested children of masks are not shown on the layers panel) What do you think?
-
Are there tutorials about custom style creation? If not, could we get one please?
-
You can have pixels with a single channel. You can even have pixels with a single bit of information (two possible values). In https://en.wikipedia.org/wiki/Binary_image see the first sentence "A binary image is a digital image that has only two possible values for each pixel". The simplest approach for the problem is probably to use a pixel layer as mask, by dragging it into the mask position (vertical blue box next to the masked layer icon) which should allow you to use all kinds of effects on the masking pixel layer. Note however that the alpha channel of the layer (not the luminosity) will be used for masking. The Gaussian blur live filter will blur the alpha channel as well, so you should be good to go.
-
How to merge adjustment of mask
shojtsy replied to shojtsy's topic in Pre-V2 Archive of Desktop Questions (macOS and Windows)
Thanks JimmyJack, that is indeed less steps. Sima's solution worked correctly as well for me, only first need to create a Fill layer, drag the mask into it, and then Ctrl-click the fill layer. The resulting selection honors the Curves adjustment. Sima did not say to Ctrl-click the mask, maybe that's what you tried, because that indeed does not reflect the adjustment. -
How to merge adjustment of mask
shojtsy replied to shojtsy's topic in Pre-V2 Archive of Desktop Questions (macOS and Windows)
ok, done -
In AP 1.6.1 I have a live Curves adjustment with changes to the Alpha channel, nested inside a mask. This does affect alpha channel of the mask, and indirectly what the masks makes transparent. I would like to destructively merge the adjustment into the mask it affects. Clicking on the Merge button in the Curves Adjustment does nothing other than adding a new entry to the history. Please implement the feature to be able to destructively apply live adjustments to masks. To be clear I am looking for a way of getting a mask, with identical behavior as my current combination of mask with nested adjustment. As a separate feature request, please make the Merge button in the adjustment dialogs disabled in cases when it doesn't make sense, and won't actually merge anything.
-
How to merge adjustment of mask
shojtsy replied to shojtsy's topic in Pre-V2 Archive of Desktop Questions (macOS and Windows)
I am afraid there is still a misunderstanding. The request was that I have a perfectly working live Alpha Curve adjustment nested in a mask, and I would like to destructively merge the Alpha Curves adjustment into the mask it affects. Sima already provided a way to do this (thanks again), which I find convoluted, while it working by clicking on the Merge button of the adjustment would be consistent with the behavior of adjustments in different layer setups. Merging live adjustments of mask is good for 1) ability to further edit the merged mask without those further edits also being affected by the adjustment 2) helping to avoid confusion by removing a layer which is affecting the result, but hidden from view in the layer panel if the mask itself is nested in a pixel layer, and 3) performance It would lesser problem if it would be possible to destructively apply an adjustment without creating a live adjustment layer first. -
How to merge adjustment of mask
shojtsy replied to shojtsy's topic in Pre-V2 Archive of Desktop Questions (macOS and Windows)
Not only there are alpha-targeting adjustments, but I did just that. A Curves adjustment with changes to the Alpha channel curve. If the adjustment is not targeting alpha why does it make a difference in my image (and you can test yourself that it does)? It was not my own idea that alpha adjustment is a thing: -
How to merge adjustment of mask
shojtsy replied to shojtsy's topic in Pre-V2 Archive of Desktop Questions (macOS and Windows)
I agree. Furthermore if merging doesn't make sense in some scenario, I think the merge button should be disabled, and clicking it should not create an entry in history. -
How to merge adjustment of mask
shojtsy replied to shojtsy's topic in Pre-V2 Archive of Desktop Questions (macOS and Windows)
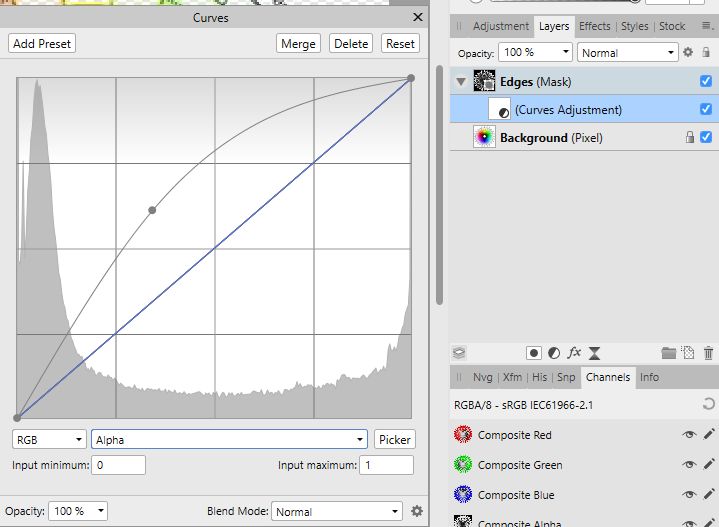
I am not sure if you say that the Alpha channel Curve layer I have created has no effect (because it does), or that it is applied to the underlying Background pixel layer (which would make it identical to being below the mask, and trying that produces a different result), or that it is applied to the pixels resulting after masking (which would make it identical to being above the mask, and trying that produces a different result also). I have attached a simplified example so you can experiment with moving the adjustment layer. If you have a Curves adjustment nested in a mask with partially transparent areas, and you change the Master channel curve it has no effect, however if you change the Alpha channel curve it has an effect. This behavior is not consistent with a mindset in which the adjustment is applied to the underlying pixels being masked, nor with a mindset in which the adjustment is applied on the pixels resulting after masking, because in these cases the Master channel curve would have an effect. It is consistent with a mindset where the adjustment is applied to the mask itself before applying the mask. This explains why the Alpha channel Curve has an effect (as the mask had Alpha channel), and also why the Master channel curve has no effect (as the mask does not have RGB channels). alpha_curve_on_adjustment.afphoto -
How to merge adjustment of mask
shojtsy replied to shojtsy's topic in Pre-V2 Archive of Desktop Questions (macOS and Windows)
Unfortunately no, this only hides the curves layer from display on the layer panel (which is another problem). You can see that the curves adjustment is still there if you drag out the mask to standalone, and the curves adjustment is shown again. -
How to merge adjustment of mask
shojtsy replied to shojtsy's topic in Pre-V2 Archive of Desktop Questions (macOS and Windows)
Thanks R C-R, but I am afraid there is a misunderstanding. I am not trying to use a mask to limit the effects of an adjustment layer. I am using an adjustment layer to change the mask, and then use the mask to make areas of my image transparent. In such a setup, as in the below screenshot, I am looking for a way to merge the adjustment of the mask into the mask itself, and end up with a pixel layer and just a mask. Note that the pixel layer already may have some transparency, and I would like to keep it separately editable from the mask.
-
How to merge adjustment of mask
shojtsy replied to shojtsy's topic in Pre-V2 Archive of Desktop Questions (macOS and Windows)
Thanks. My mask was not nested under any parent layer, and your technique did not work when using on the mask itself, as it was ignoring the effect of the curves. So I needed to create a new fill layer, nest the mask in it, and then do what you have described, followed by the deletion of the fill layer. Ahh, this is really convoluted! -
In AP 1.6.1, I have a mask with a Curves adjustment in Alpha channel nested as child layer of the mask. How can I merge the adjustment into the mask? For example clicking the Merge button in the dialog of the Curves layer does not seem to do anything other then adding a new entry to the history.
-
Numerical input for Curves control points
shojtsy replied to sijo's topic in Older Feedback & Suggestion Posts
Also the option of having more guide lines in the curves dialog (like the option in PS) would be welcome. -
+1
-
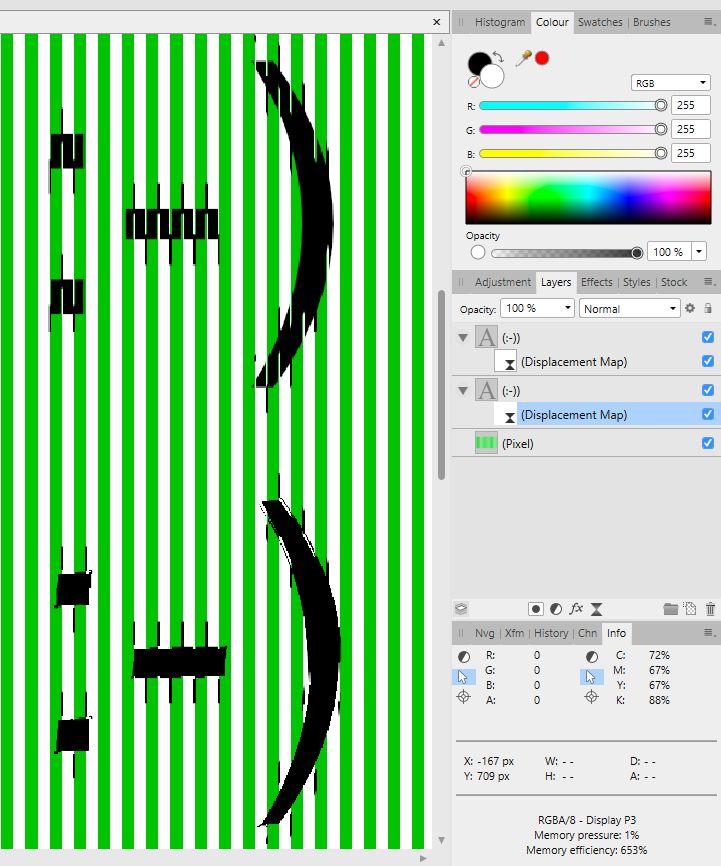
I am afraid the load map from layers beneath does not properly fix the issue. It only loads the map again from all layers. The displacement map contains the current layer contents as well (which is supposed to be replaced), which is causing artifacts in the displacement around the edges in the current layer without any moving at all. See below thread See attached image for demonstration for correct displacement above, and incorrect displacement below having artifacts at the edges. The incorrect displacement was created nested in the text layer, and had "Load Map from layers beneath" selected with the displaced image visible, but not "beneath" the adjustment - it is the displaced image itself, and not logical to be used for building the displacement map. The correct displacement filter was populated with "Load Map from layers beneath" as well, but with only the backround layer visible and then dragged to be effecting the text layer. This made it possible to avoid including the displaced image in the displacement itself. Note that clicking the "Load Map from layers beneath" does not fix the artifact shown, in fact it can even mess up the correctly configured displacement layer.
-
Pencil sketch effect
shojtsy replied to shojtsy's topic in Pre-V2 Archive of Desktop Questions (macOS and Windows)
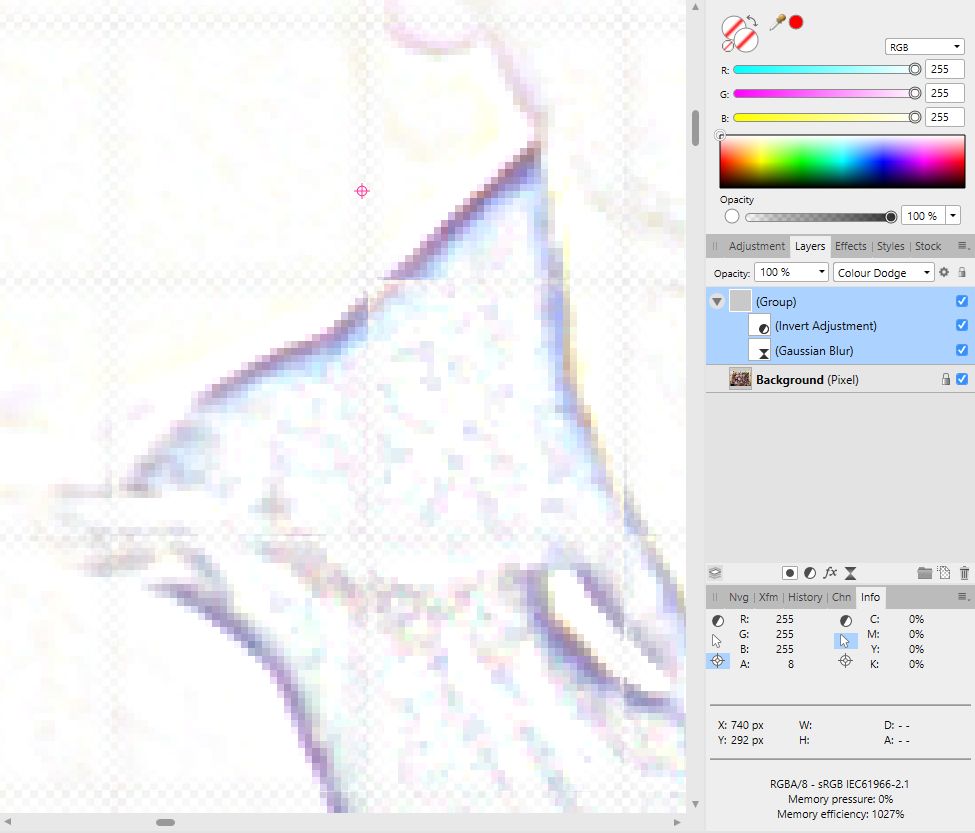
Thanks very much owenr, this is just what I was thinking about. It is logical for a group of adjustments to behave identically to a merged pixel layer with the same adjustments. I did try with normal group children layers and hit the same problem that you refer to "rendering pipeline going awry" that way. Do you agree this "going awry" can be categorized as a bug? I am afraid using the adjustment and filter in the clipping mask position are not a full workaround. The reason for this is that there is another bug related to how gaussian blur (and maybe other filters) are applied when it is in that position. A grid of transparent lines is shown in the preview. See screenshot attached. See also this thread about the bug