

user_0815
-
Posts
242 -
Joined
-
Last visited
Posts posted by user_0815
-
-
General question regarding the forum software:
Is it possible to "jump" right to the first unread comment in a topic? Often I want to catch up and see the new unread comments since I last left or posted in a topic.
-
Export Persona:
1. Go to the Export Persona
2. Select the area
3. Export.
You can select different presets for your export like jpeg, png etc.

-
The first thing I would check is whether Lightroom uses sRGB to display that image. If it uses AdobeRGB or anything else, it might be the reason for that slight difference because Photo uses sRGB for this image.
In the screenshot from Photo you can see (just below the toolbar) that sRGB is applied.
-
I do double-clicks (in Photo) to get to the next layer behind the currently selected one. I haven't tried that in Designer though.
-
-
-
-
Imho the shadow sliders aren’t particularly pleasing. My work-around with raw images (that need more shadow recovery) is to Turn off the default tone curve (in the assistant) and apply it manually to my liking.
-
Generally I prefer well-done icons (like those squares with + and –) because translated words can get tricky in other languages – or in rare cases even result in nonsense.

-
22 hours ago, 3d illusions said:
How do I convert a mask to pixels?
Make a pixel layer from a mask:
1. cmd-click on the mask (= selection)
2. add Pixel layer
3. fill with black (F5)- or -
1. cmd-click on the mask (= selection)
2. add Fill-Layer with black (I use ⇧F for that)
3. right-click and "Rasterize" -
Naja, es gibt keinen Grund warum es nicht funktionieren sollte. Daher war meine Überlegung dass es etwas technisches sein muss warum es nicht richtig dargestellt wird. Wenn man etwas verändert (wie z.B. Rauschen), dann muss das Programm die Sache auch nochmal neu "rendern" bzw. anders berechnen. Und siehe da, es funktioniert. Der Schuss ins Blaue hat getroffen
-
Yes that might purple fringing which can occur in high contrast situations with some lenses.
First I would also try the de-fringe filter. Usually it gets rid of it fine.
If not, it might be colour contamination from the background or other objects around that person.
In that case, I find this the most effective way:
1. Add a HSL layer
2. Set one of the colours to that particular purple (sample it or set the slider)
3. Reduce the saturation until it looks fine
Now apply it only to the areas where you need it (invert the layer and mask it in with a white brush). -
Bei mir hat es funktioniert nachdem ich einmal die Einstellungen im Effekt (Schein nach außen) etwas verändert habe. (Dort auf die Farbe klicken, dann in dem kleinen Farbwählfenster den Schieber "Rauschen" verändert.) Danach hat es sowohl im Dokument als auch im PDF alles richtig angezeigt.
-
4 hours ago, Dan C said:
Affinity apps rely heavily on the GPU to render the canvas etc.
I assume that this also applies to Photo when working with several pixel layers and live filters. Is that correct?
-
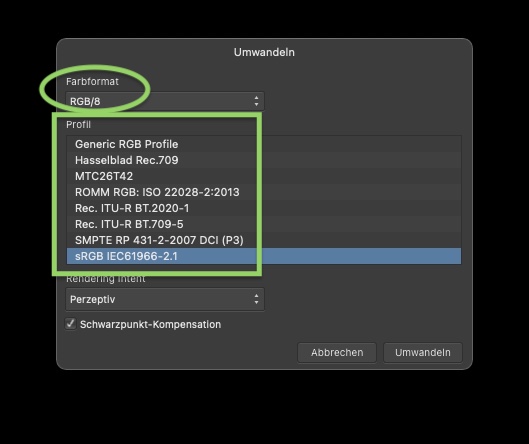
On 10/13/2021 at 11:09 AM, JOleg said:
...converting ICC profile from sRGB to CMYK + applying Soft Proof layer...
Perhaps it is helpful to keep in mind that colour spaces (format) and colour profiles are two different things.
Spaces are RGB and CMYK. Profiles are AdobeRGB, sRGB, U.S. Web Coated (SWOP) v2, PSO uncoated V3, ...
RGB SPACE is for Monitors/Displays adding light to mix colours.
=> Adding Red + Green + Blue = white on your display.Within the RGB space, RGB PROFILES are for example
- sRGB,
- AdobeRGB,
- ROMM RGB etc...
CMYK SPACE is for printing ink on paper to mix colours.
=> Adding Cyan + Magenta + Yellow = Black (or close to black) + K (black) to make things even darker.Within the CMYK space, CMYK PROFILES are for example
- PSO uncoated V3 FOGRA 52 ...
- U.S. Web Coated (SWOP) v2 ...
So, switching from one space to the other, you will always have to change the profile as well, or not? Correct me if I'm wrong here...
At least in Photo I can't select a RGB profile when I'm in CMYK and vice versa.
-
This topic is not easy. From my experience, this is how I understand it:
You have switched the image both from RGB to CMYK and also from the space "sRGB" to "U.S. Web Coated (SWOP) v2".
Going from one to another can be done in different way which will result in different looks.
– You can "convert" a.k.a. change your original image data so that it results in the approx. same look in the new color space, or
– you can "apply" a color space and leave the original image data the same. But the original image data (R value, G value, B value) will look differently in different color spaces.(For example: How to deal with very saturated blue gradients from sRGB to SWOP v2? Shrink them down relative to each other or leave them all at the SWOP maximum saturation? There are good videos on youtube around that topic.)
If you send in your image data in Red Green Blue information, the printer will have deal with it somehow because his press will print in Cyan Magenta Yellow Black. So I would suggest to convert it your self because you have more control over the result.
-
I haveen't posted my followup either. For Focus stacking, I have since also used Silkypix to stack raw images right after the shoot. Both Photo and Silkypix seem to have different algorythms so that either one gets it right – and I don't have to stack manually.
However, I just went back to the original image and found out that "releasing" the Live Group shows the soft brush.
So the mask is actually soft edged but it just won't display it while the live group is active.
The workflow would be to right-click and release the group and then continue masking.
-
TLDR;
A starting point how I would do it:
- For the cooler look use white balance (something like -10 to -15 towards blue) or the Lens Filter using a blue colour.
- For the matte look use the Levels adjustment and pull up the shadow slider slightly (the bottom one, something like 5 to 10%). Adjust the brightness do your liking with the middle slider (Gamma). If you want to go even further, tweak the higlights slider (the top one) to 95 or so.
Optionally, if you think the image is too soft, add Clarity (5-10%) or sharpening.
After a few pictures you'll get the feel for it. (If that's what you're going for.)
-
-
I would not rule out that it is a bug. I have experienced this as well (two or three times over the past two years). When I change the brush colour from black to white that it would continue brushing black. I do not recall what I did to get it working again.
Perhaps do something with other tools and then switch back to the brush or close and re-open the document...
-
-
Wenn du in Publisher sRGB wählst und das PDF sieht gut aus, dann rechnet Publisher alles in sRGB um sodass es "bestmöglich" aussieht. Kann man so machen, dann wird auch in sRGB gedruckt.
Die Gefahr beim Profilwechsel ist immer die, dass dabei die Farben eventuell nicht umgerechnet werden sondern nur das Profil gewechselt wird. Dann stimmen die Farben wieder nicht bei der Ausgabe am Bildschirm oder Drucker.
Ja, das mit dem Farb-Management ist so eine Sache. Es ist sauschwer das alles verständlich zu erklären.
Ich merke mir das stark vereinfacht so:
1. Die Farbprofile haben unterschiedlich viele Farben.
2. Die Farbprofile zeigen dem Bildschirm bzw. Drucker, welche Farben das Bild enthält.
3. Beim Profilwechsel kann man "umwandeln" oder "zuweisen", d.h. entweder
– das Profil wechseln und zugleich die Farben im Bild umrechnen (Bild sieht dann fast identisch aus)
– ODER nur das Profil austauschen und die Farbinformationen im Bild NICHT umrechnen (Bild kann dann durchaus anders aussehen). -
Ok, also wenn du alles mit Adobe RGB machst, einschließlich den Export zum PDF, dann ist das eine Erklärung warum die Farben abweichen.
Für Bildschirmarbeit sollte spätestens beim Export in sRGB umgewandelt werden, denn die meisten Bildschirme können meist nur sRGB anzeigen. Mit anderen Farbräumen kann es dann anders aussehen.
Wenn du allerdings druckst, kannst du auch bei Adobe RGB bleiben wenn der Drucker das auch korrekt verarbeiten und ausgeben kann. Nur auf dem Bildschirm sieht's dann halt anders aus. Außer dein Bildschirm kann auch Adobe RGB anzeigen – dann sieht es da auch korrekt aus.
-


Affinity Publisher: Wie platziere ich eine PDF mit Beschnittzugabe?
in Pre-V2 Archive of Affinity on Desktop Questions (macOS and Windows)
Posted
Wenn du die Druckdaten als "Einzelseiten" zur Druckerei schickst (also ein PDF mit lauter einzelnen Seiten nacheinander), dann macht die Druckerei das. Sie platziert die Einzelseiten dann auf dem Papier so dass sie zusammen passen. Der Anschnitt bleibt also an jeder Seite rund herum dran. So war das jedenfalls bisher bei mir immer.
Wichtig dabei ist zu bedenken, dass der Anschnitt ja weg geschnitten wird. Wenn du also ein Motiv hast, dass sich über beide Seiten zieht, dann müssen die beiden Seiten so zusammen passen, als wäre der Anschnitt nicht da.
Das müsste dir aber deine Druckerei genau beantworten müssen.
Vielleicht hilft dir das weiter:
https://www.wir-machen-druck.de/faq.htm#druckdaten-faq-24-50-204