

- S -
-
Posts
821 -
Joined
Posts posted by - S -
-
-
3 hours ago, tersmuse said:
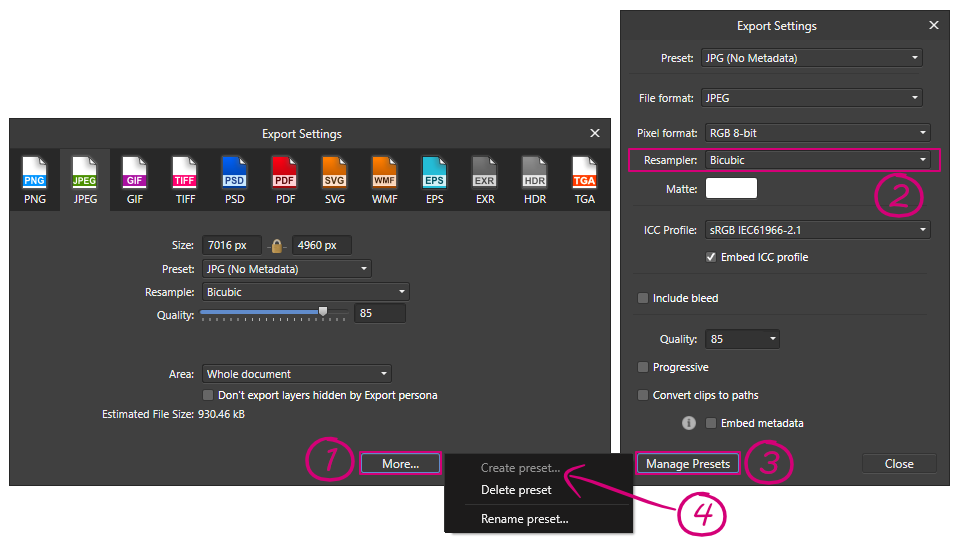
When I do a JPEG export in Photo, the default setting is: Recalculate "Bilinear". I mostly use "Bicubic", so I always change the attitude again and again.
Can I change the default setting in Photo to Bicubic? Then I don't have to adjust it every time I do an export.
You can create your own export presets. Click the 'More' button in the export dialogue box and set your required export settings (including setting Bicubic as the resampler method). Then go to [Manage Presets > Create Preset] and create your own preset. When you use your saved preset it will be set to Bicubic.

-
If I open your PNG file in Affinity Photo (1.7.2.471) and then resave it, the problem disappears.
Therefore I would upload the original .afphoto/.afdesign file.
-
-
You never mentioned what computer you're using, however assuming you're running Windows, you may be able to install the 64-bit version of the operating system on the computer:
– If it's running Windows 7, it's not really worthwhile as Windows 7 goes end-of-life in five months.
– If it was upgraded from Windows 7 or 8.1 to Windows 10 during the Microsoft free upgrade offer period—and the computer has a 64-bit processor—then you may be able to switch from Windows 10 (32-bit) to Windows 10 (64-bit) by using the Windows 10 Media Creation tool to create USB/DVD installation media and then clean installing Windows 10 64-bit. See THIS article for more details.
It will also need to meet the Affinity Designer system requirements.
-
2 hours ago, VinR said:
Thank you very much for your detail explanation,
You're right the original image out of the camera is something like _MG_0125.CR2. I then adjusted few settings in develop persona and then exported it in Photo persona (once with embed metadata again without embed meta data) So based on your explanation, I now exported another JPEG by selecting Adobe RGB as the color profile, and including the metadata. Now if you look at color space exif data of the images, both are same (Adobe RGB) however this new export has the normal colors (not oversaturated), so I'm not sure this is totally based on the Color space value in the exif data
That's what I would expect you to see.
Exported as:
Adobe RGB without metadata = OK
Adobe RGB with metadata = OK
sRGB without metadata = OK
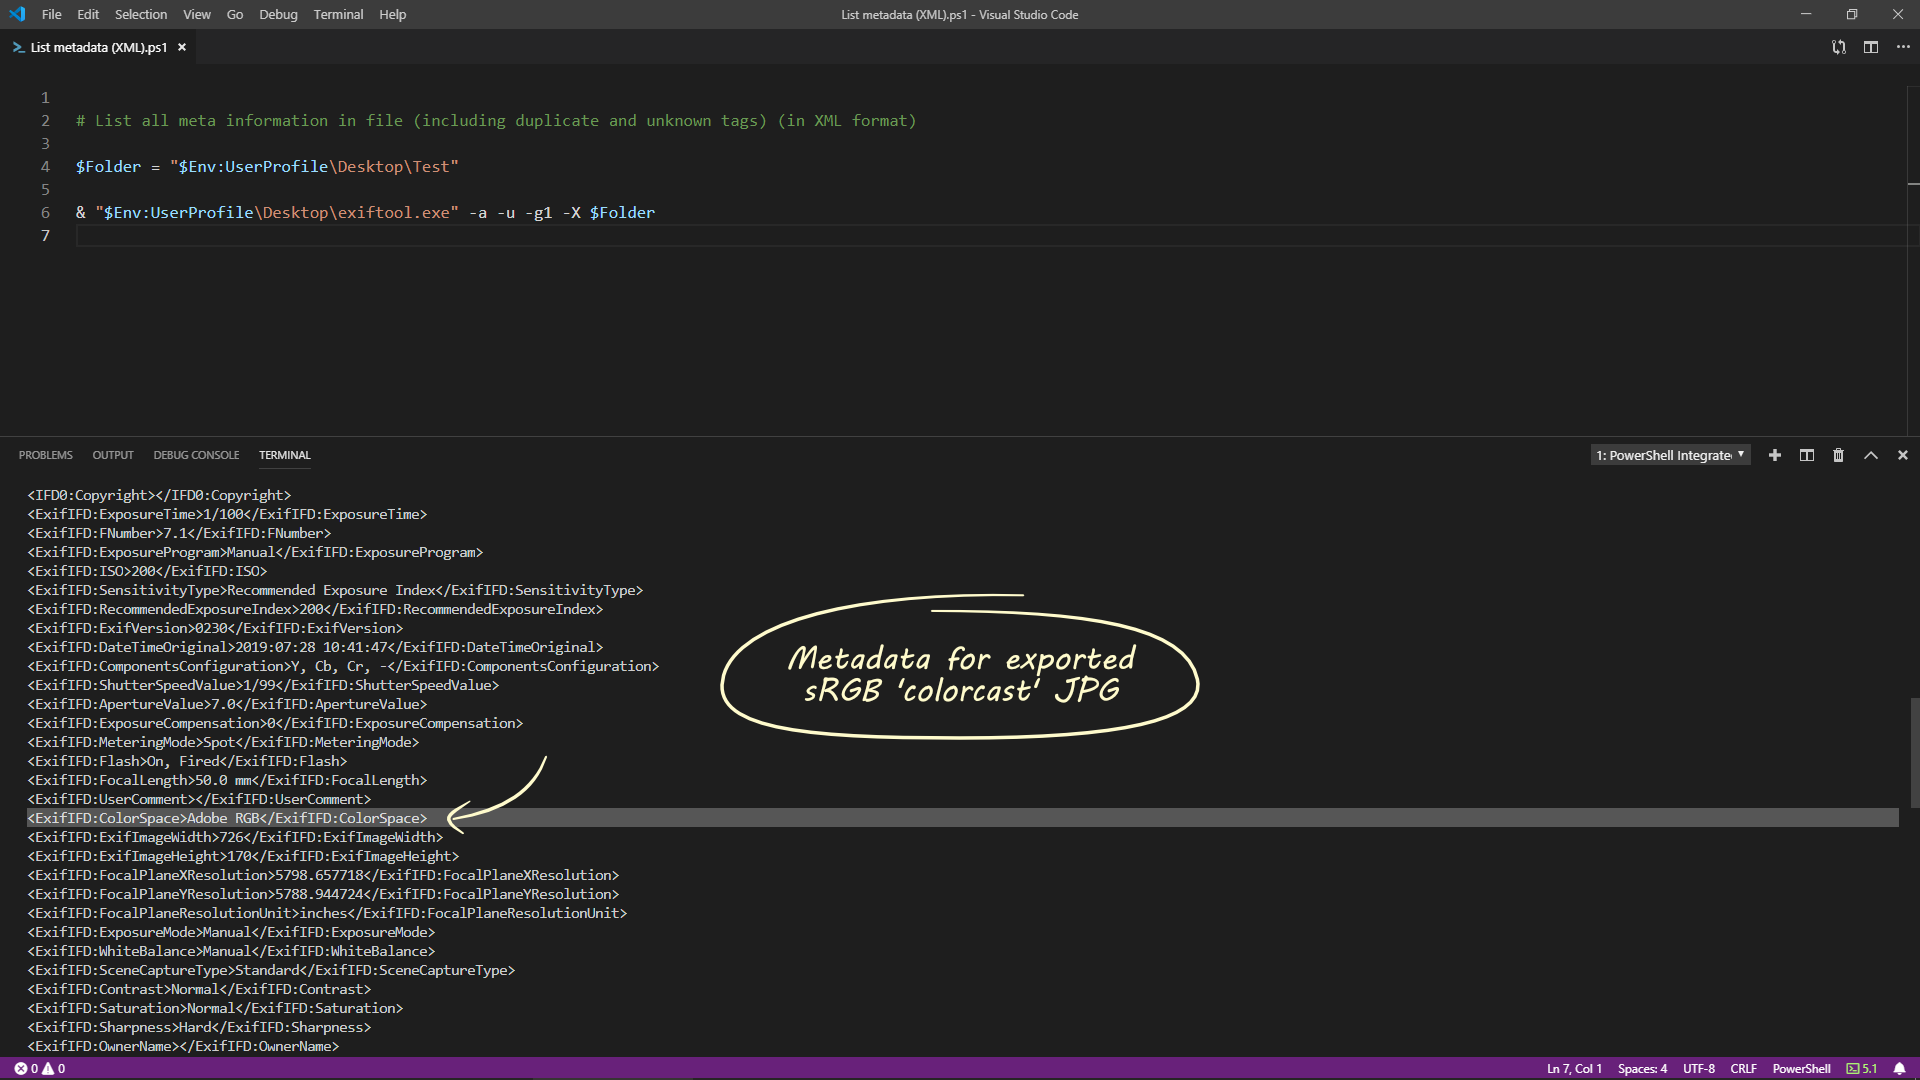
sRGB with metadata = Not OK (due to the EXIF metadata incorrectly telling the Photos app that it's an Adobe RGB image, when it's an sRGB image)I think it's possibly an oversight/bug, but I don't have time to look into it at the moment.
-
I’m not sure what workflow you used to create the ‘colorcast.afphoto’ file that you uploaded, however I suspect it was perhaps something similar to this:
– When taking the original image, the Canon settings were set to Adobe RGB in the in-camera settings. Therefore, the CR2 raw file (or out-of-camera JPG) has the colour space set to Adobe RGB in the metadata. The original file name was also probably something like ‘_MG_0125.CR2’ (with an underscore at the beginning of the file name to denote Adobe RGB colour space).
– Then processed the CR2 raw file in the Affinity Photo develop persona.
– Then exported the image as an “RGBA/8 - sRGB IEC61966-2.1” JPG file.
I don’t know the solution to your issue—so I would see what Serif come back with— however what I think is possibly happening is something along these lines:
1) When you export the image as a JPG (or TIF) with metadata embedded, Affinity Photo is converting the file to “RGBA/8 - sRGB IEC61966-2.1” on export, and leaves the metadata in the file. As one of the EXIF metadata fields says the ColorSpace is Adobe RGB, I think the Windows Photos app is reading this and thinks the image is using an Adobe RGB colour space (hence the oversaturated colours).
2) When you export the image as a JPG (or TIF) without metadata embedded, Affinity Photo is converting the file to “RGBA/8 - sRGB IEC61966-2.1” on export, but is also removing the metadata. As the EXIF metadata field that says the ColorSpace is Adobe RGB is no longer in the file, the Windows Photos app treats it as an sRGB file and therefore the colours are the same as what you see in Affinity Photo.
3) When you export the image as a PNG with metadata embedded, Affinity Photo is converting the file to “RGBA/8 - sRGB IEC61966-2.1” on export. Then although Affinity Photo leaves the metadata in the file and therefore one of the EXIF metadata fields still says the ColorSpace is Adobe RGB; I think the Windows Photos app perhaps uses another field to determine the colour space with PNG files—one that has a higher priority than EXIF—and therefore as this higher priority field says the document is sRGB, the Photos app treats the image as sRGB.
-
-
1 hour ago, DarrenG said:
Installed is light gray and won't let me do anything. Haven't gotten to the launch part yet. Thanks for all the help, by the way.
I haven't seen the button greyed out before. Therefore, if the 'Install' button is greyed out, go to [Windows Settings > System > About > Windows Specifications] and make sure the 1903 update (18362.267) has definitely been installed. If it has, try restarting the computer and trying the 'Install' button again.
If that doesn't resolve the issue, then from the Microsoft Store app main page, click on the three horizontal dots in the top-right corner and go to 'Downloads and updates'. Then, click the 'Get Updates' button in the top-right corner and wait for it to check and download any Store app updates.
If that doesn't resolve the issue, if you're signed into the Microsoft Store with a Microsoft Account, then from the Microsoft Store app main page, click on your profile pic in the top-right corner, sign out and then sign back in.
If that doesn't resolve the issue, go to [Windows Settings > Update & Security > Troubleshoot] and at the bottom select 'Windows Store Apps'. Then click the 'Run the troubleshooter' button and follow it through.
If that doesn't resolve the issue, press the Windows key to open the Start Menu and type WSReset . Search should find the WSReset icon, right-click this icon and select 'Run as Administrator'. This should reset the Microsoft Store cache and then open the Store when done.
1 hour ago, DarrenG said:FWIW I can see them in Canon's DPP4.
Although you can see the thumbnails in Canon DPP4, Canon only use the codecs within DPP4 itself. When you install DPP4, it doesn't install any codecs for Windows File Explorer and Canon don't provide a codec pack that you can download and install like Nikon do.
-
3 hours ago, DarrenG said:
Downloaded 1903. Raw image ext. says I have the app. No luck seeing the thumbnails. Hmmm.
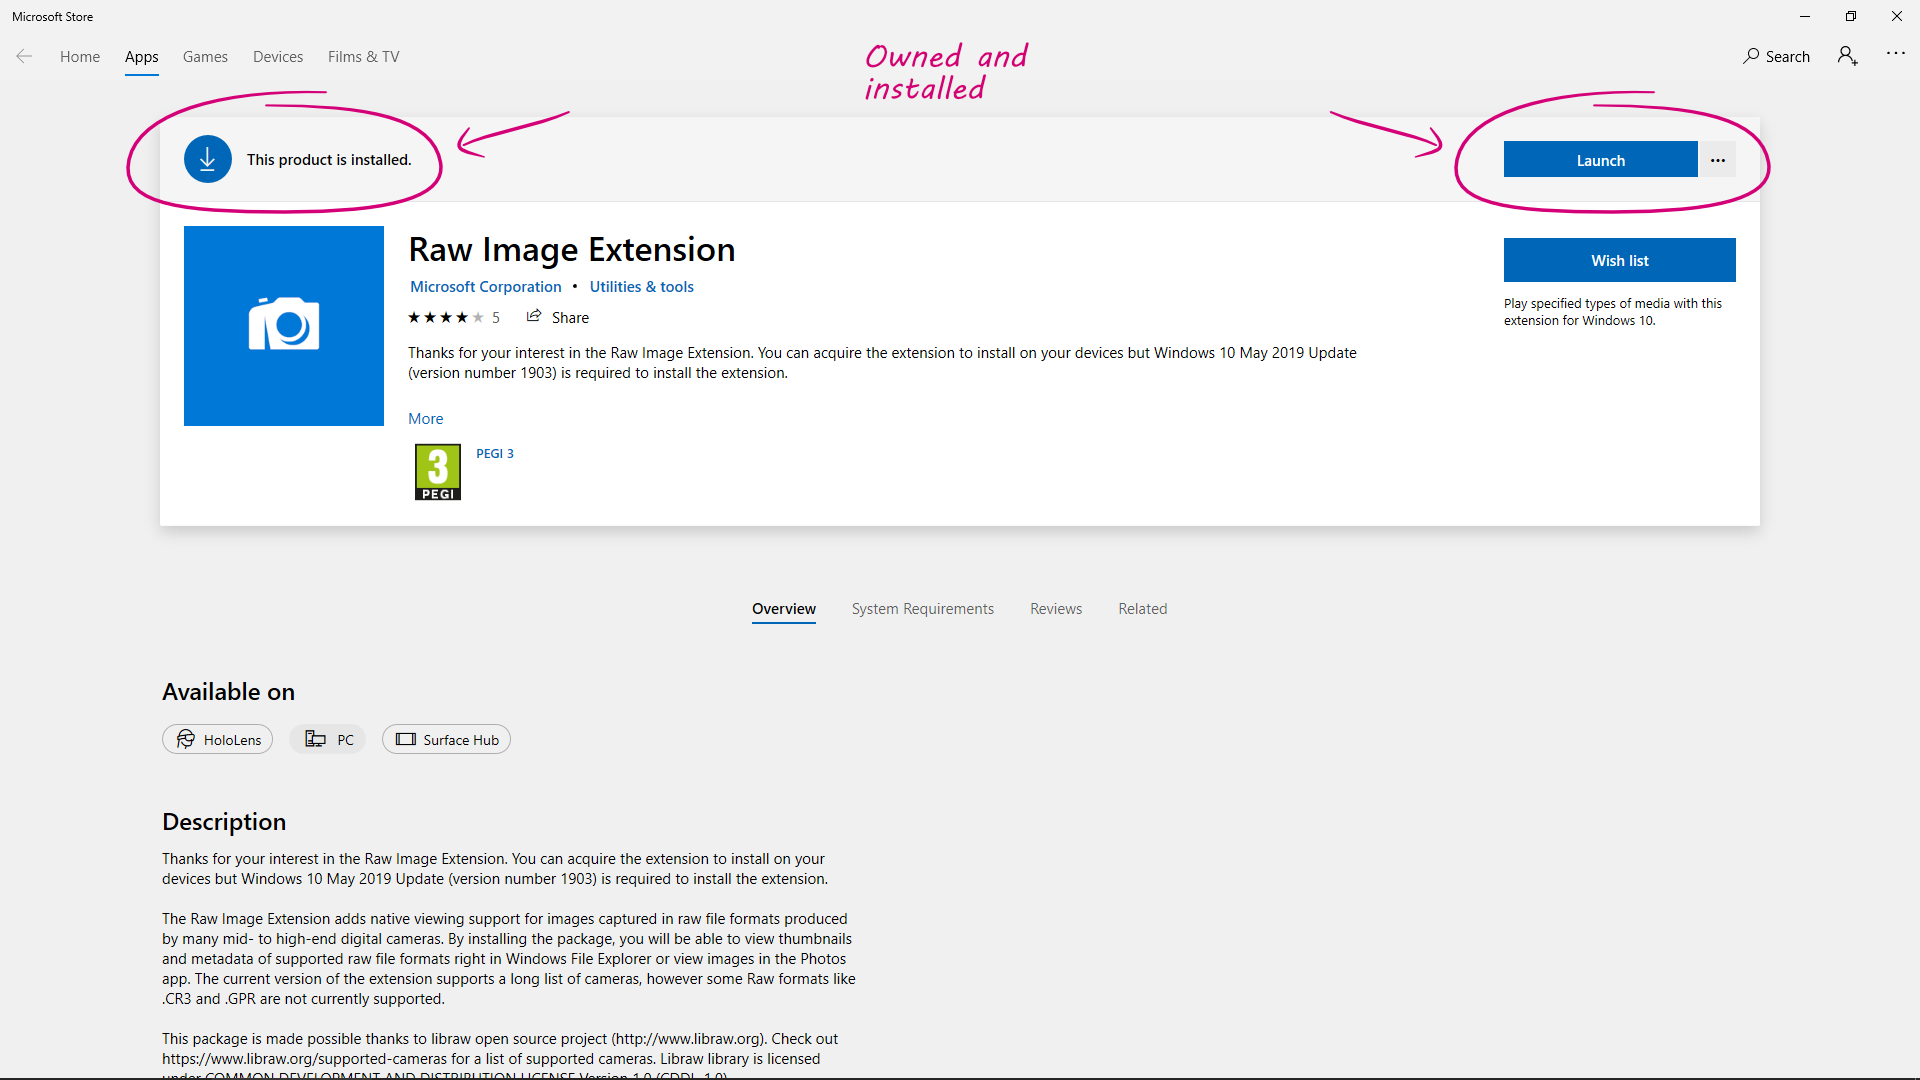
Does the Microsoft Store app say "You own this app", or does it say "This product is installed"?
If it says "You own this app", rather than "This product is installed", then it means it isn't actually installed. Therefore you need to click on the 'Install' button on the right-hand side.
-
12 hours ago, DarrenG said:
I'm running Windows 10 1809. I'll see if I can find a way to get it. Thanks all for the responses.
They throttle the rollout of feature updates (such as 1903), meaning people receive the updates at different times. However, unless there's a block in place for a specific issue, it should be possible to manually trigger the update by going to [Windows Settings > Update & Security > Windows Update] and clicking the 'Check for Updates' button.
- If the feature update is available on your device, a section underneath the ‘Check for Updates’ button should appear, with the option to click 'Download and Install Now', which will download and install the feature update.
- If the feature update is currently blocked, a section underneath the ‘Check for Updates’ button should appear, with a message saying your device isn’t quite ready for it.
You can find more details in the below article:
https://www.bleepingcomputer.com/news/microsoft/windows-10-will-now-notify-users-when-version-1903-is-blocked/ -
10 hours ago, DarrenG said:
I'm new so I hope this hasn't already been covered. I'm on my 4th Canon camera and when opening a "new" photo all my older Raw files a thumbnail is shown except for my Canon 5D mark lV. It only shows the Affinity logo. It makes it hard to find the photo I want. I just downloaded the update about a week ago so I don't think that's the issue. Thanks for any help.
If you're running Windows 10 with the May 2019 update (1903), you can download the Microsoft 'Raw Image Extension' from the Microsoft Store.
This will display thumbnails and metadata in Windows File Explorer (which is what Affinity Photo uses) and the Windows Photos app for most cameras. It doesn't currently support Canon .CR3 raw files yet, however as the Canon 5D Mark IV uses .CR2 raw files, it will work fine with your camera.
Link:
https://www.microsoft.com/en-us/p/raw-image-extension/9nctdw2w1bh8 -
2 hours ago, ivanozzo said:
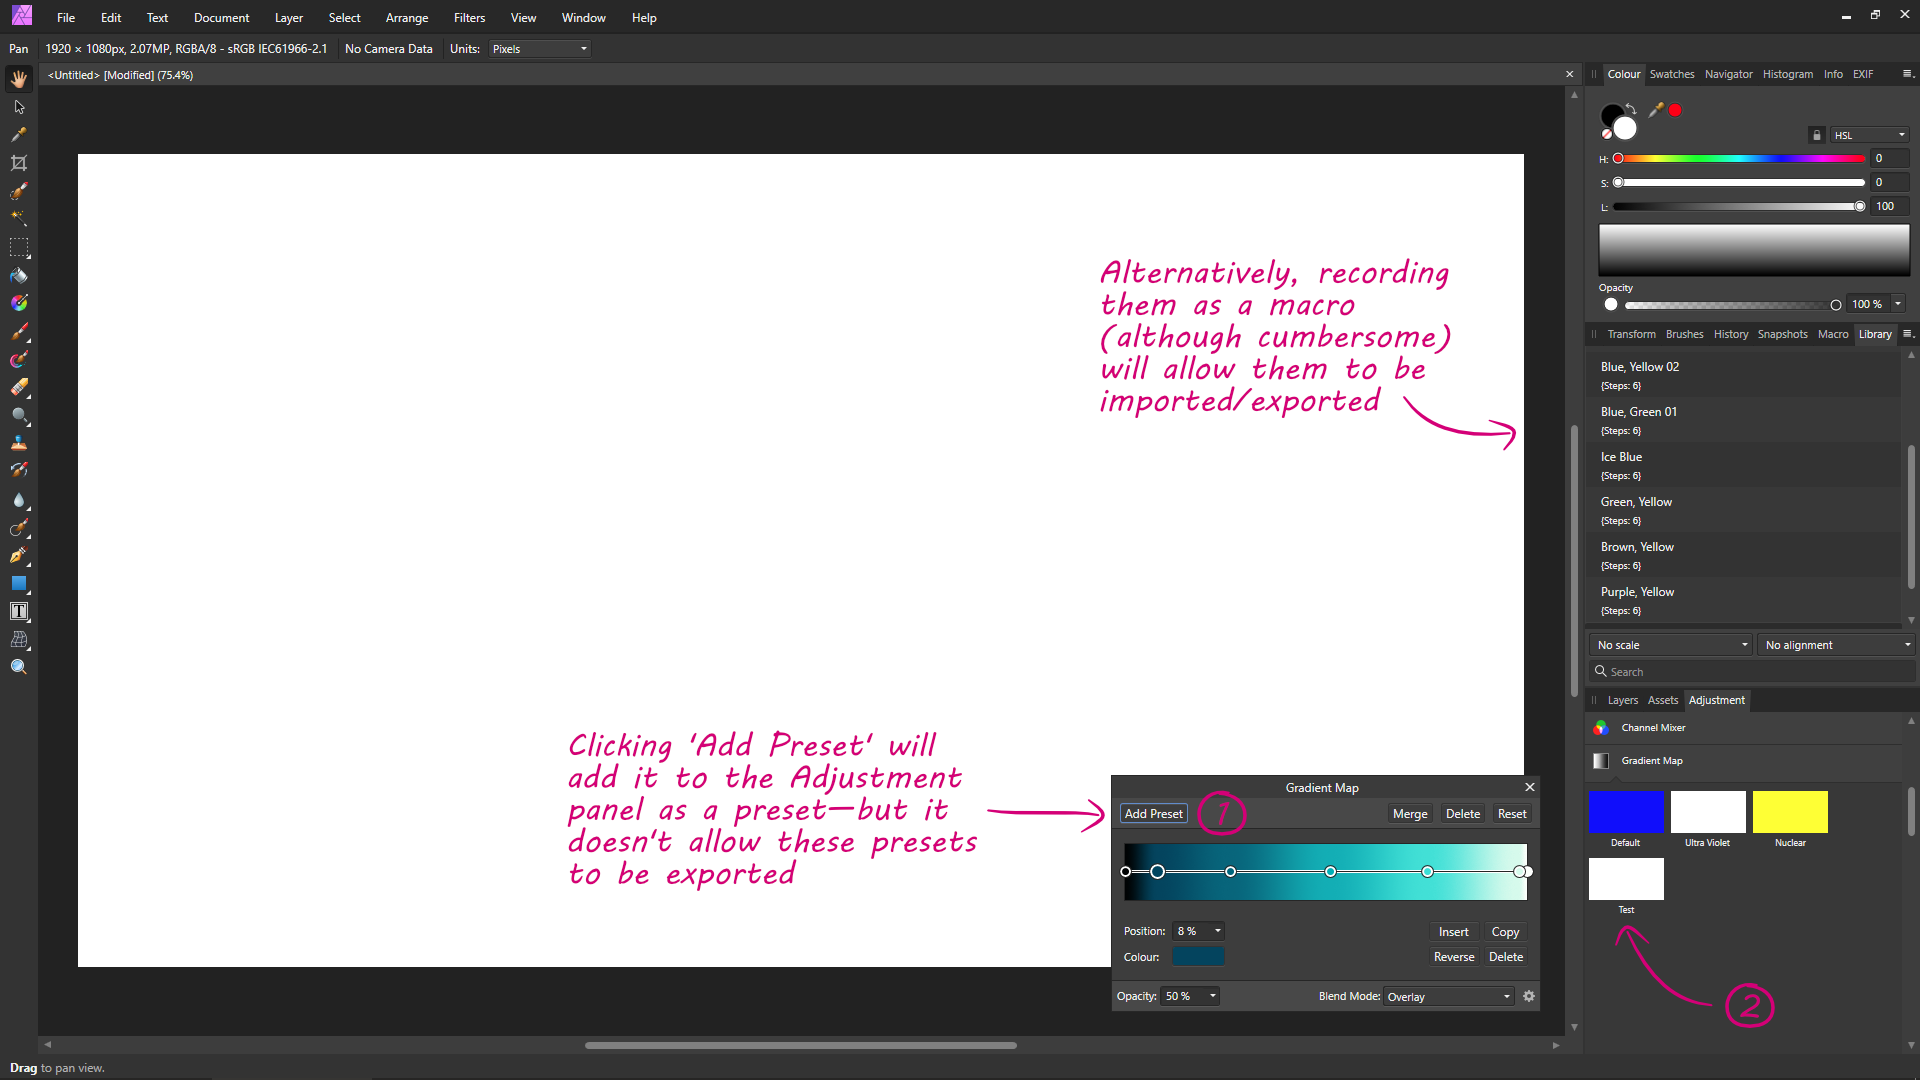
I've saved several gradients into an Application Palette (Hillshade) and now I would like to use these gradients in the Gradient Map Adjustment, but I noticed that you can't use these gradients directly in the Gradient Map Adjustment... or i'm doing something wrong? Is this possible? If yes, could someone tell me how to do that?
Unfortunately you can’t use gradient swatches in Gradient Map adjustment layers.
Your options are to:
A) Create a Gradient Map and then click the ‘Add Preset’ button in the Gradient Map dialogue box. This will add it as a preset in the Adjustment panel, allowing you to use it again later.
B) Record creating a Gradient Map with a macro and then save the recorded macro in the macro library.
I’m currently saving my Gradient Maps as macros in the macro library. The reason being is the Adjustment panel doesn’t allow users to export those presets—and re-creating them again is a PITA. Therefore, although it’s not ideal and it's cumbersome, at least it’s possible to export macros to back them up and re-import them again.
I’ve posted about it previously at the link below, but the situation is currently still the same:
https://forum.affinity.serif.com/index.php?/topic/37341-affinity-photo-ability-to-importexport-gradients-for-gradient-maps/
-
6 hours ago, Alan Powell said:
Thank you. I have at last managed to view my Affinity photo raw files on the desktop using Raw Image Extension. (Windows update wasn't installed!)
But now I cannot view PSD files on my desktop.
Probably about 10+ years ago, Adobe stopped providing PSD codecs for Windows. Likely either due to a licencing disagreement, or they got the hump about Microsoft's new codec requirements, or because they wanted people to use Adobe Bridge—I don't know. Therefore you will need to use third-party codecs to see thumbnails for PSD files in Windows File Explorer.
You'll need to be careful downloading and installing third-party codecs; if they're not reputable they could potentially be malicious or cause problems. FastPictureViewer Codec Pack (paid) is often mentioned by other people, however I'm not sure whether it's still in active development. The last update was 2017 and their Twitter account went dead around the same time.
When Serif release their Affinity Digital Asset Manager, it could possibly have a Bridge-like file explorer that will show thumbnails for PSD files, but obviously I don't know whether this will be the case or not.
-
6 hours ago, Alan Powell said:
A message says that I own the microsoft raw image extension but my raw images are still not available as thumbnails on my desktop folder?
If in the Microsoft Store app it says "You own this app", rather than "This product is installed", then it's possible that it isn't actually installed.
What does the button on the right-hand side say? If it says "Install", then although you own the app, it isn't actually installed. Perhaps it needs re-installing again, as originally it was a beta extension.
-
See my below posts from last year:
https://forum.affinity.serif.com/index.php?/topic/62259-cannot-save-files/&tab=comments#comment-323174Or the shorter version:
If you're running Windows 10 1809 onwards (the below screenshots are from 1903, so may be slightly different), either click the Windows Notification Centre message that appears in the bottom-right corner when something has been blocked by Controlled Folder Access—which will take you directly to the Windows Security settings. Or go to [Windows Security > Virus & Threat Protection > Manage Ransomware Protection > Block History], which will take you to the same place. You can then select ‘Allow on device’ under the ‘Actions’ drop-down menu.
Alternatively, you can go to [Windows Security > Virus & Threat Protection > Manage Ransomware Protection > Allow an app through controlled folder access > Add an allowed app > Recently blocked apps]. You can then add an allowed app from the list.
-
2 hours ago, Gilescooperuk said:
What do you mean no CR3 support?
Affinity Photo 1.7.1 with a CR3 taken from my EOS R this afternoon (which I need to correct the exposure on as it is slightly overdone)
That's likely because you're using a Mac—where you can use the Apple Core Image Raw engine. The SerifLabs raw engine itself doesn't yet support .CR3 files.
The link below contains a list of cameras officially supported by the SerifLabs raw engine. The 6D Mark II (which was announced 2017Q3) is on the list, however the M50 (which was announced 2018Q2—and the first Canon to use the new .CR3 raw format), isn't yet supported.
SerifLabs Supported Raw Cameras (1.7.x) & Lens Correction list:
https://forum.affinity.serif.com/index.php?/topic/73699-seriflabs-supported-raw-cameras-17x-lens-correction-list/
-
If you're running Windows 10 with the May 2019 update (1903), you can download the Microsoft 'Raw Image Extension' from the Microsoft Store. This will display thumbnails and metadata in Windows File Explorer and the Photos app for most cameras—although it doesn't currently support Canon .CR3 raw files at the moment.
https://www.microsoft.com/en-us/p/raw-image-extension/9nctdw2w1bh8
-
2 hours ago, Ben said:
Choosing "Overwrite" won't work on files/directories that have restricted permissions. Windows Defender screws around with file access outside of the regular permissions settings. You can't just force through overwriting the file.
The error messages you currently see in Designer and Photo were due to us not having had to deal with the specific errors/failures that Windows Defender creates. Changes have been made that will get release in 1.7.2 or 1.7.3 to manage these other issues.
I think you're misunderstanding my post.
The first part where I quoted Patrick was to do with Controlled Folder Access.
The second part was in reply to your comments. I was pointing out that if you open a read-only *.tif file, the error message Affinity Photo produces is also a little non-descript, occurs at a fairly poor moment and it tells you half way through the first write that actually it's not going to let you use that file after all (it force closes the file without saving). Therefore I think it's also something that needs addressing if you're currently in the process of improving error reporting for file write errors.
I wasn't suggesting 'Overwrite' for files and folders protected by Controlled Folder Access, but 'Overwrite' and 'Save As' for read-only files; instead of the error message as displayed in my first screenshot above, which just has a 'Close' button.
-
On 7/5/2019 at 1:52 PM, Patrick Connor said:
Thanks for coming straight back with your work around. I hope this thread can point others in the same direction of looking to controlled folders. We should still try to emulate this and find out if the software can avoid this or more likely give a better error message
I've previously posted about 'Controlled Folder Access' in the below thread:
When Controlled Folder Access has been enabled and it blocks writing to file, in addition to the File Explorer error and Affinity error, it should also display a Windows notification in the bottom-right of the screen and also keep the notification in the Windows Action Centre. I'm not sure why it hasn't in the OP's case.
On 7/8/2019 at 11:25 AM, Ben said:…The error that manifests as a result of folder control is a little non-descript and occurs at a fairly poor moment. The error reporting for this should be improved in 1.7.2.
On 7/8/2019 at 12:56 PM, Ben said:Not after you've successfully opened the file for writing, then it tells you half way through the first write that actually it's not going to let you use that file after all with a spurious error that looks like your drive has died.
Without derailing the thread too much, if you open a read-only *.tif file, Affinity Photo also does this.
I've reported it a couple of times before (for example HERE), and although it now shows 'Read-Only' in the title bar, Affinity Photo still doesn't handle the file properly (see below):
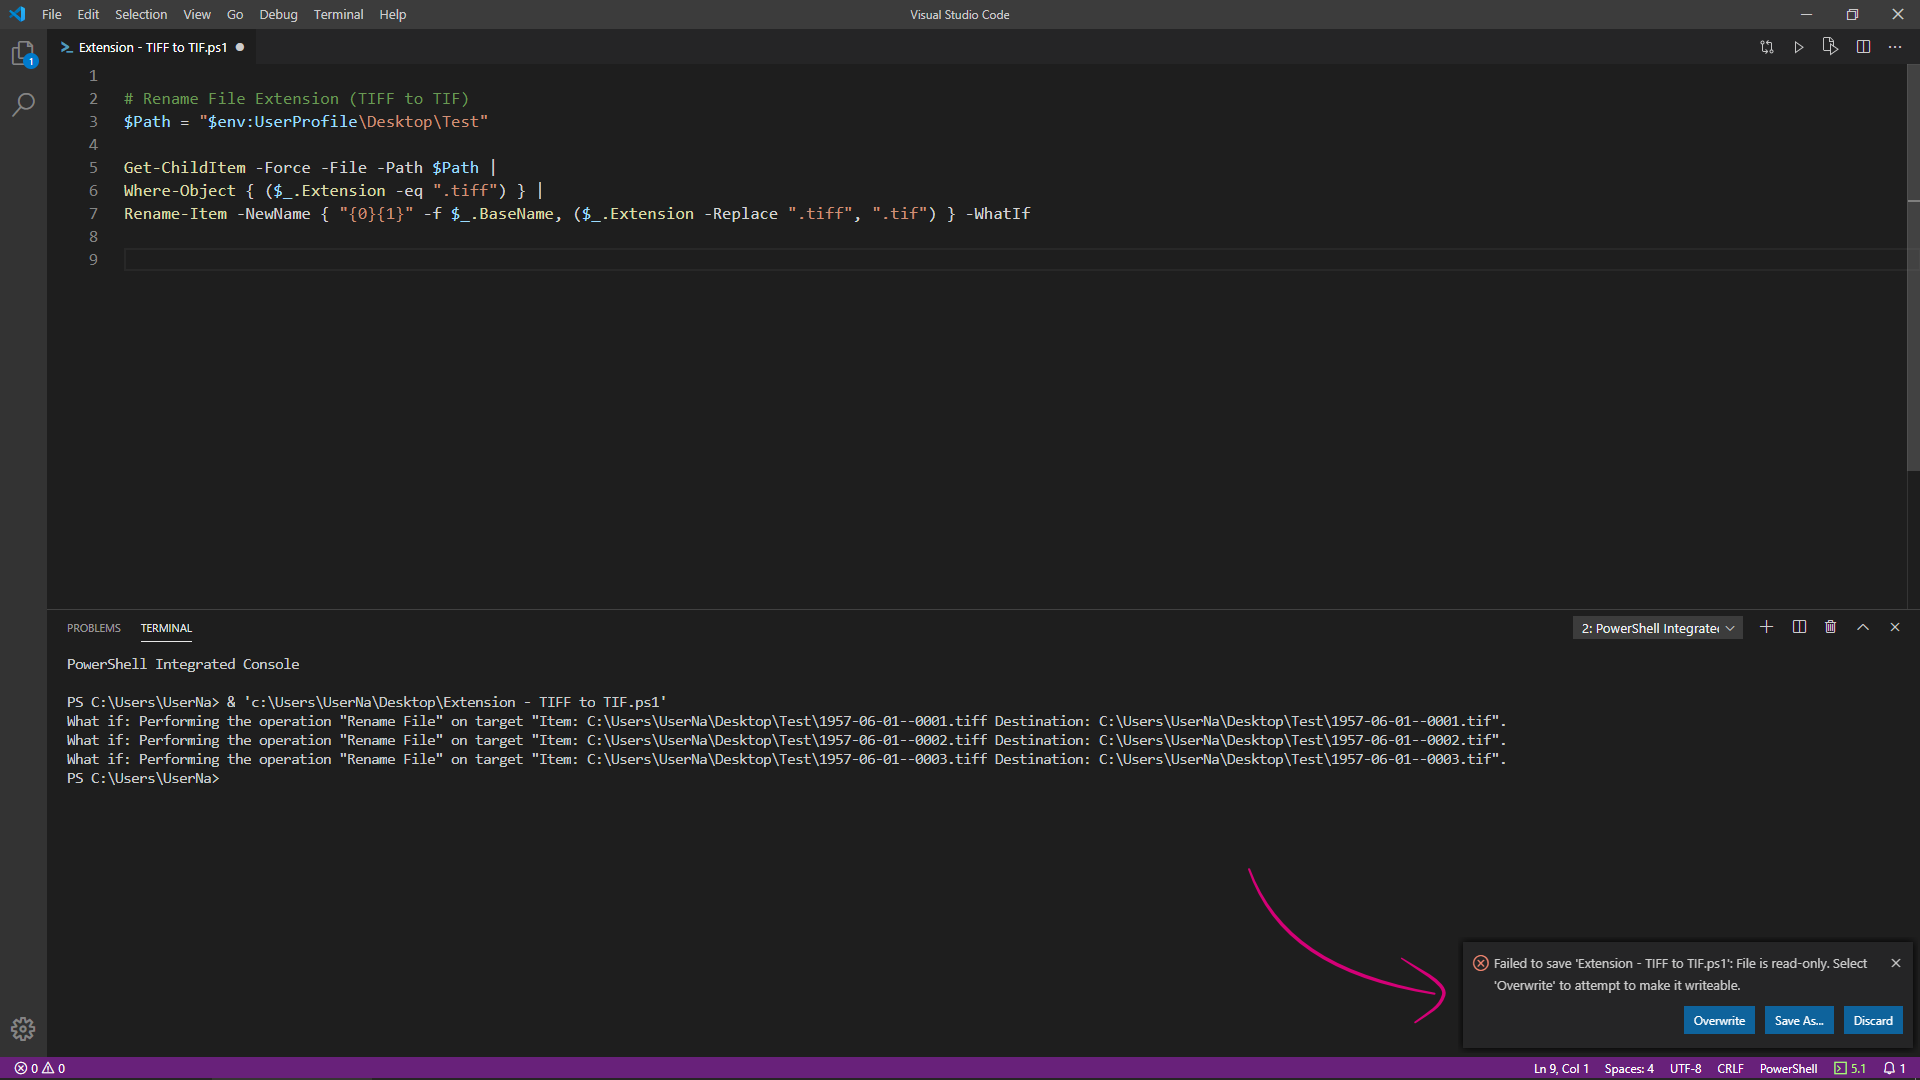
I like how VS Code handles this. When you open a read-only file and try saving it, it tells the user that it's read-only and gives four options:
Overwrite - Removes the read-only file attribute and allows the user to overwrite the file in place
Save As - Brings up the 'Save As' dialogue and allows the user to save it as something else
Discard - Discard changes, reverting file back to it's original state
X - Close dialogue box without doing anything
-
Similar to what Walt suggested, I would go right-back to basics to try and isolate where the issue lies from there.
Assuming you've already installed the latest version of Affinity Photo (1.7.1.404), try doing the following:
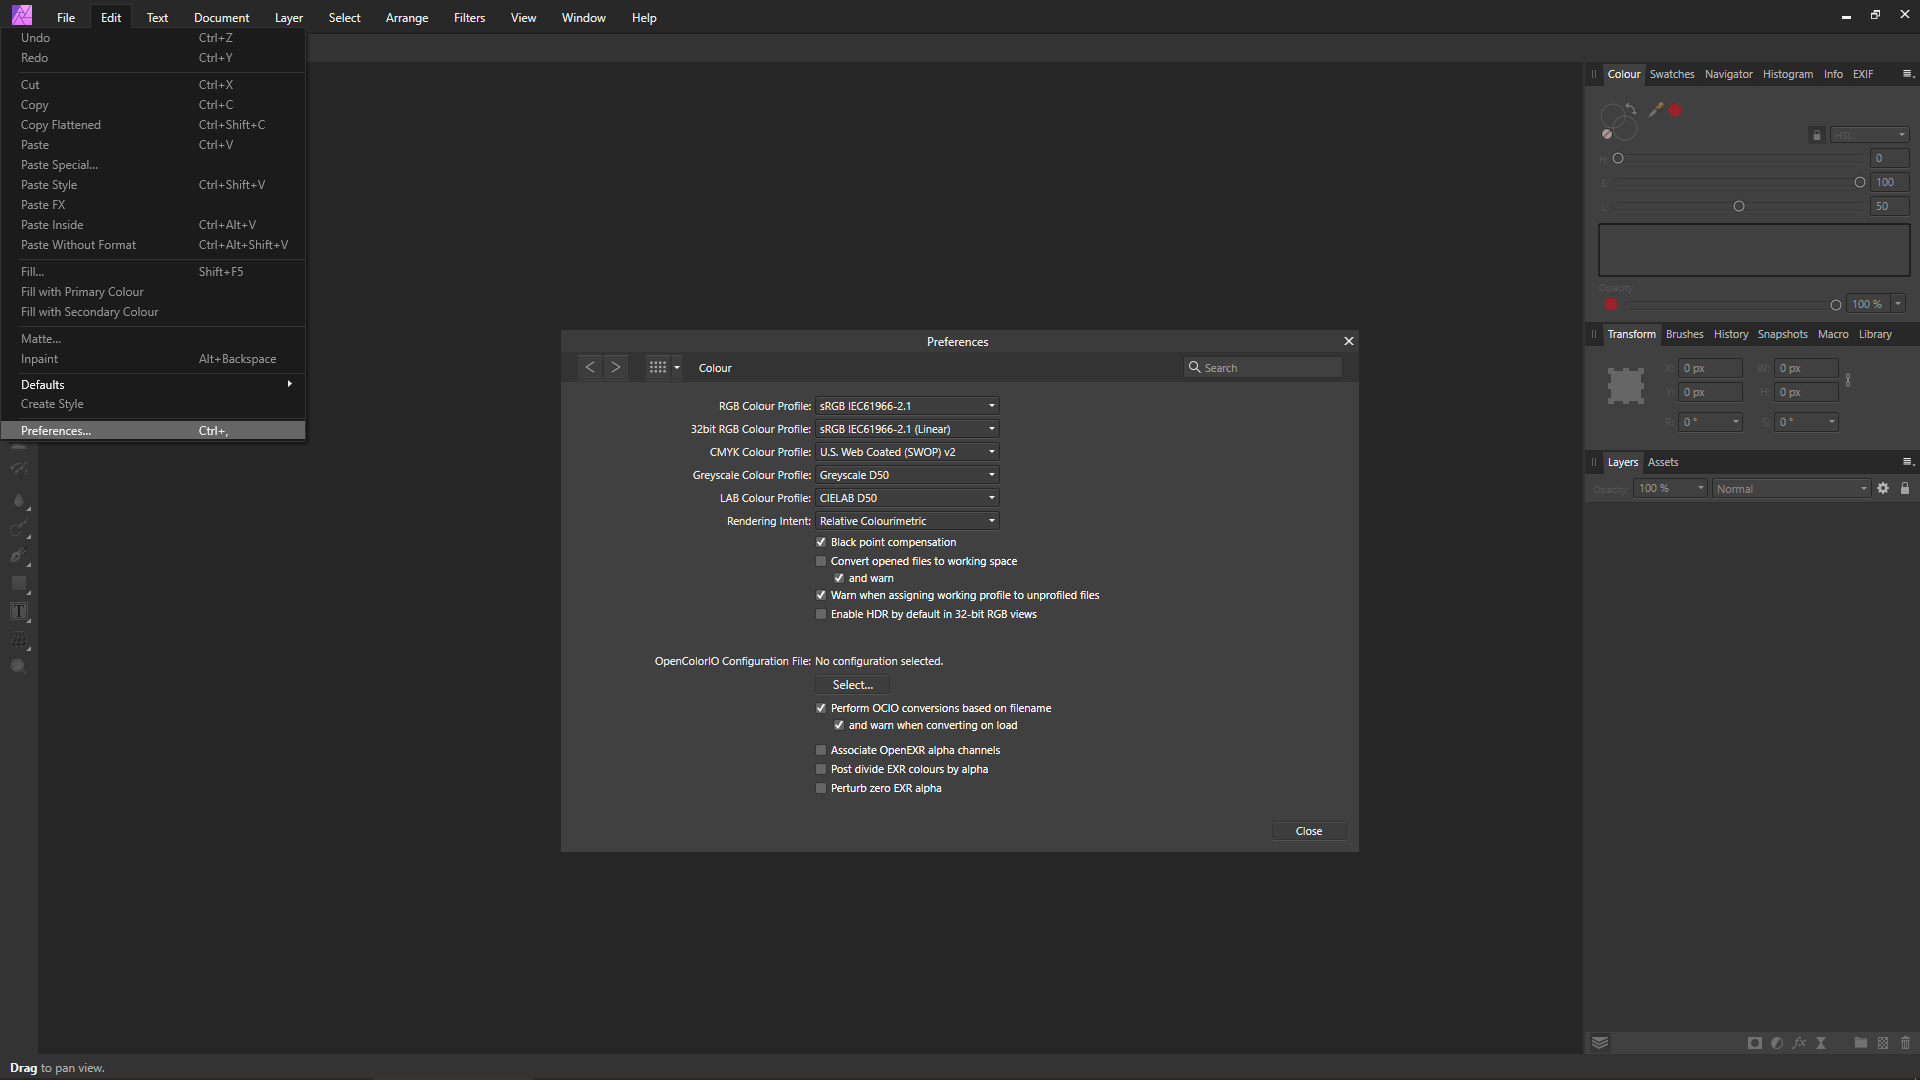
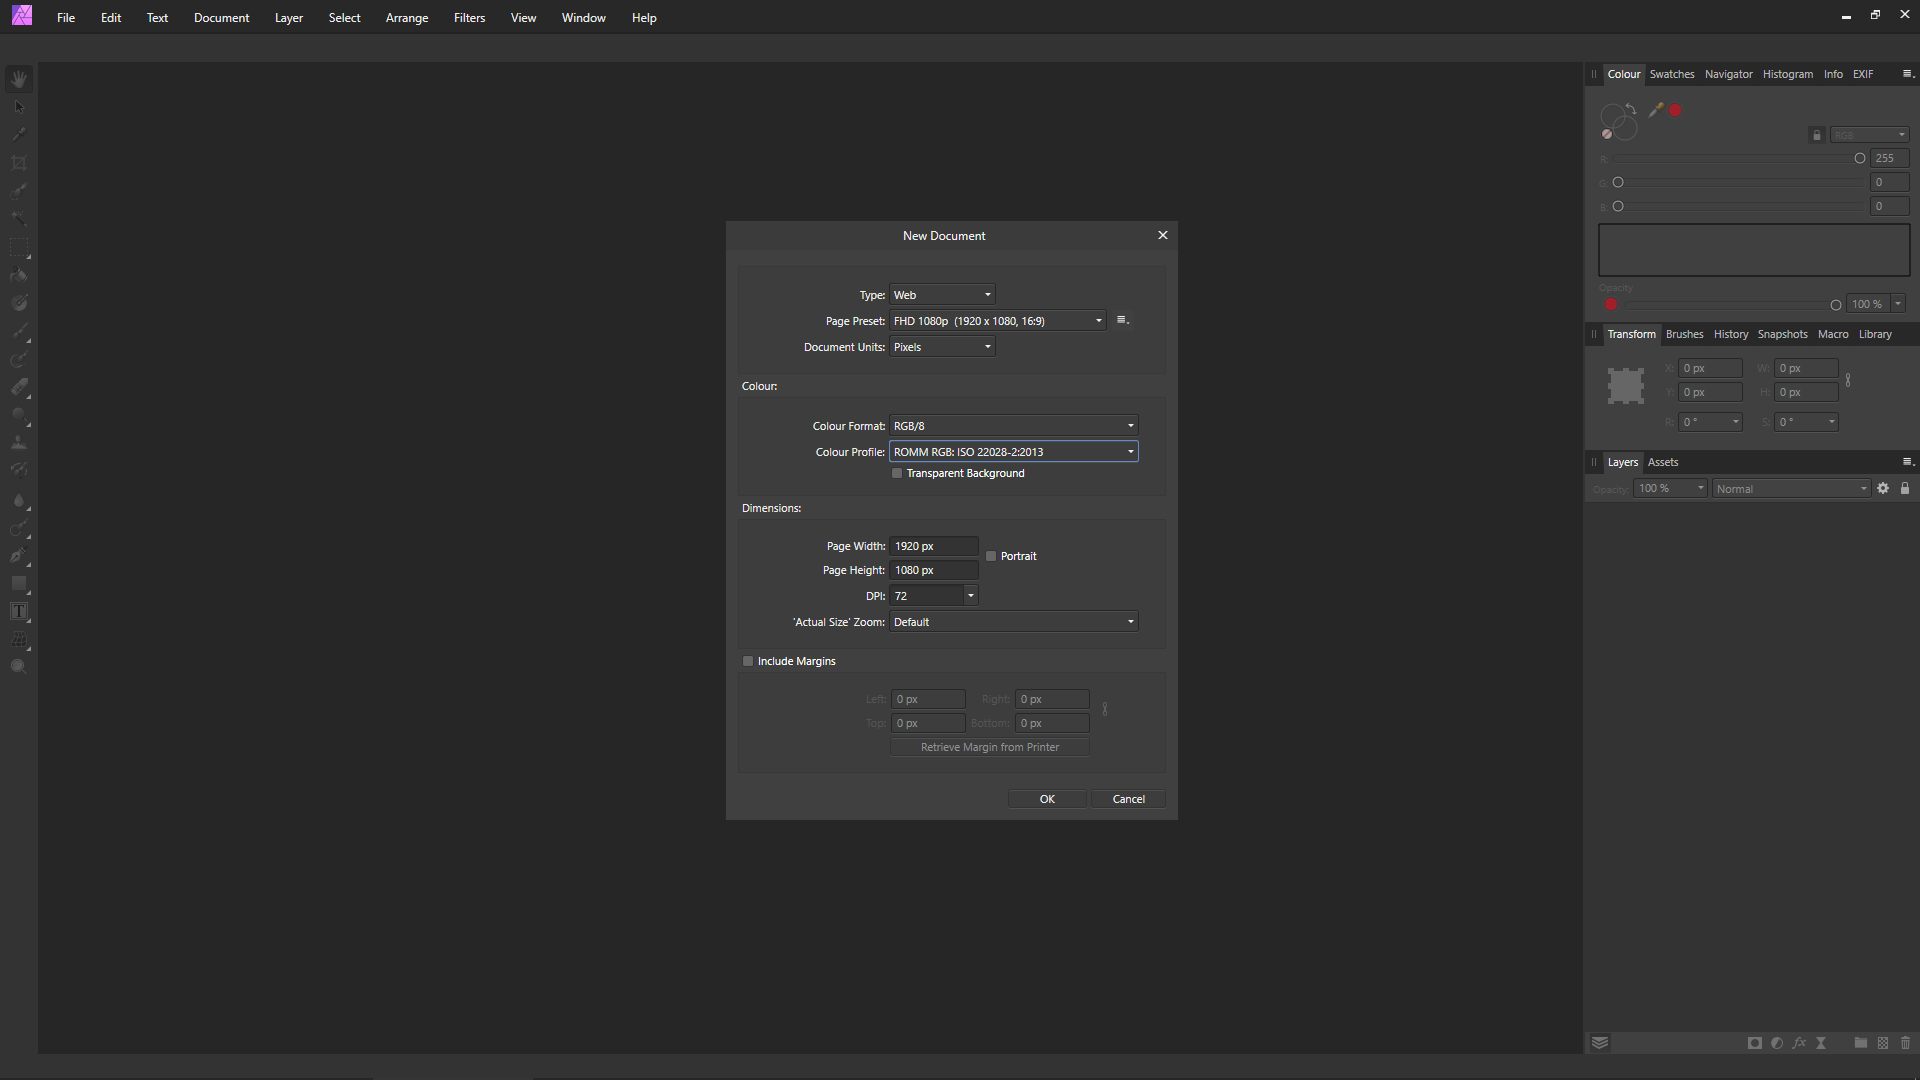
1) Go to [Edit > Preferences > Colour] and set the settings to the same as in the below screenshot:
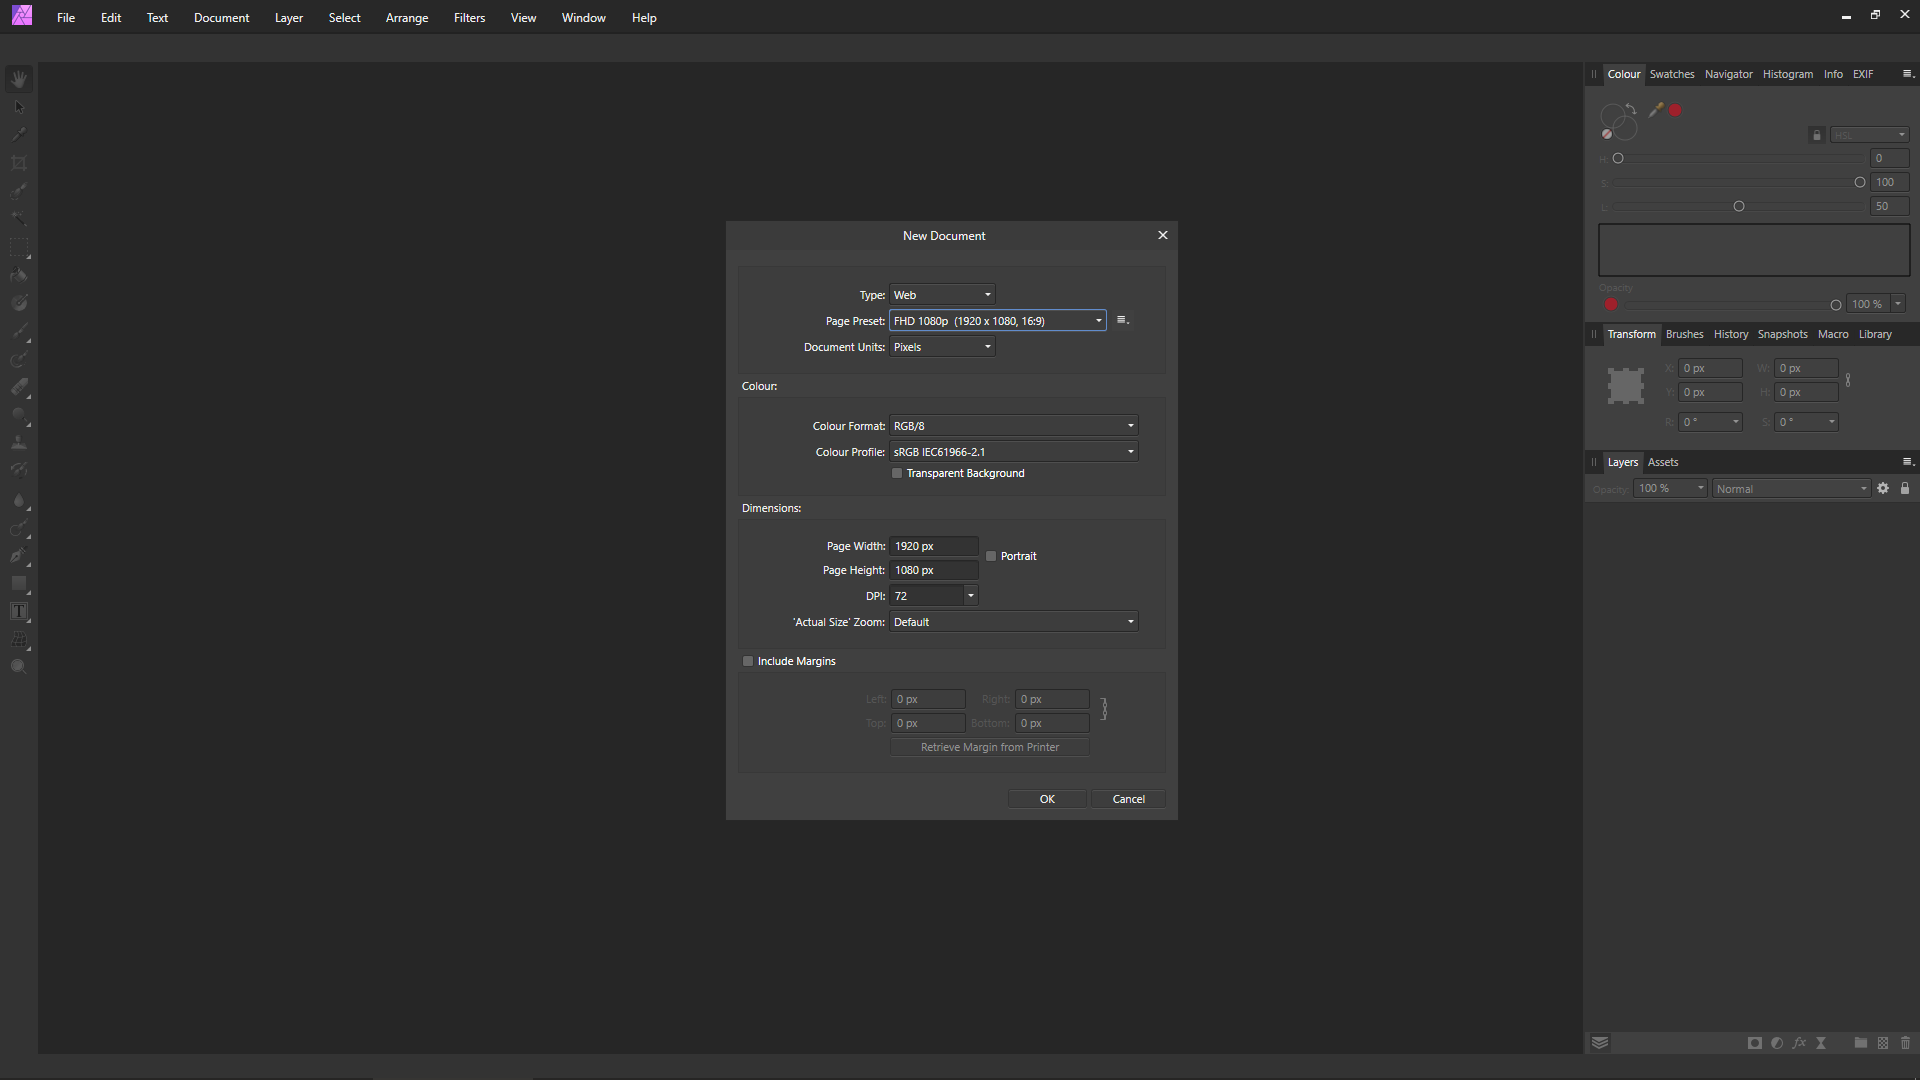
2) Go to [File > New] and open a new blank document using the same settings as in the below screenshot (pay particular attention to the 'Colour Format' and 'Colour Profile'). In this case the document is using a 'sRGB IEC61966-2.1' document colour profile:
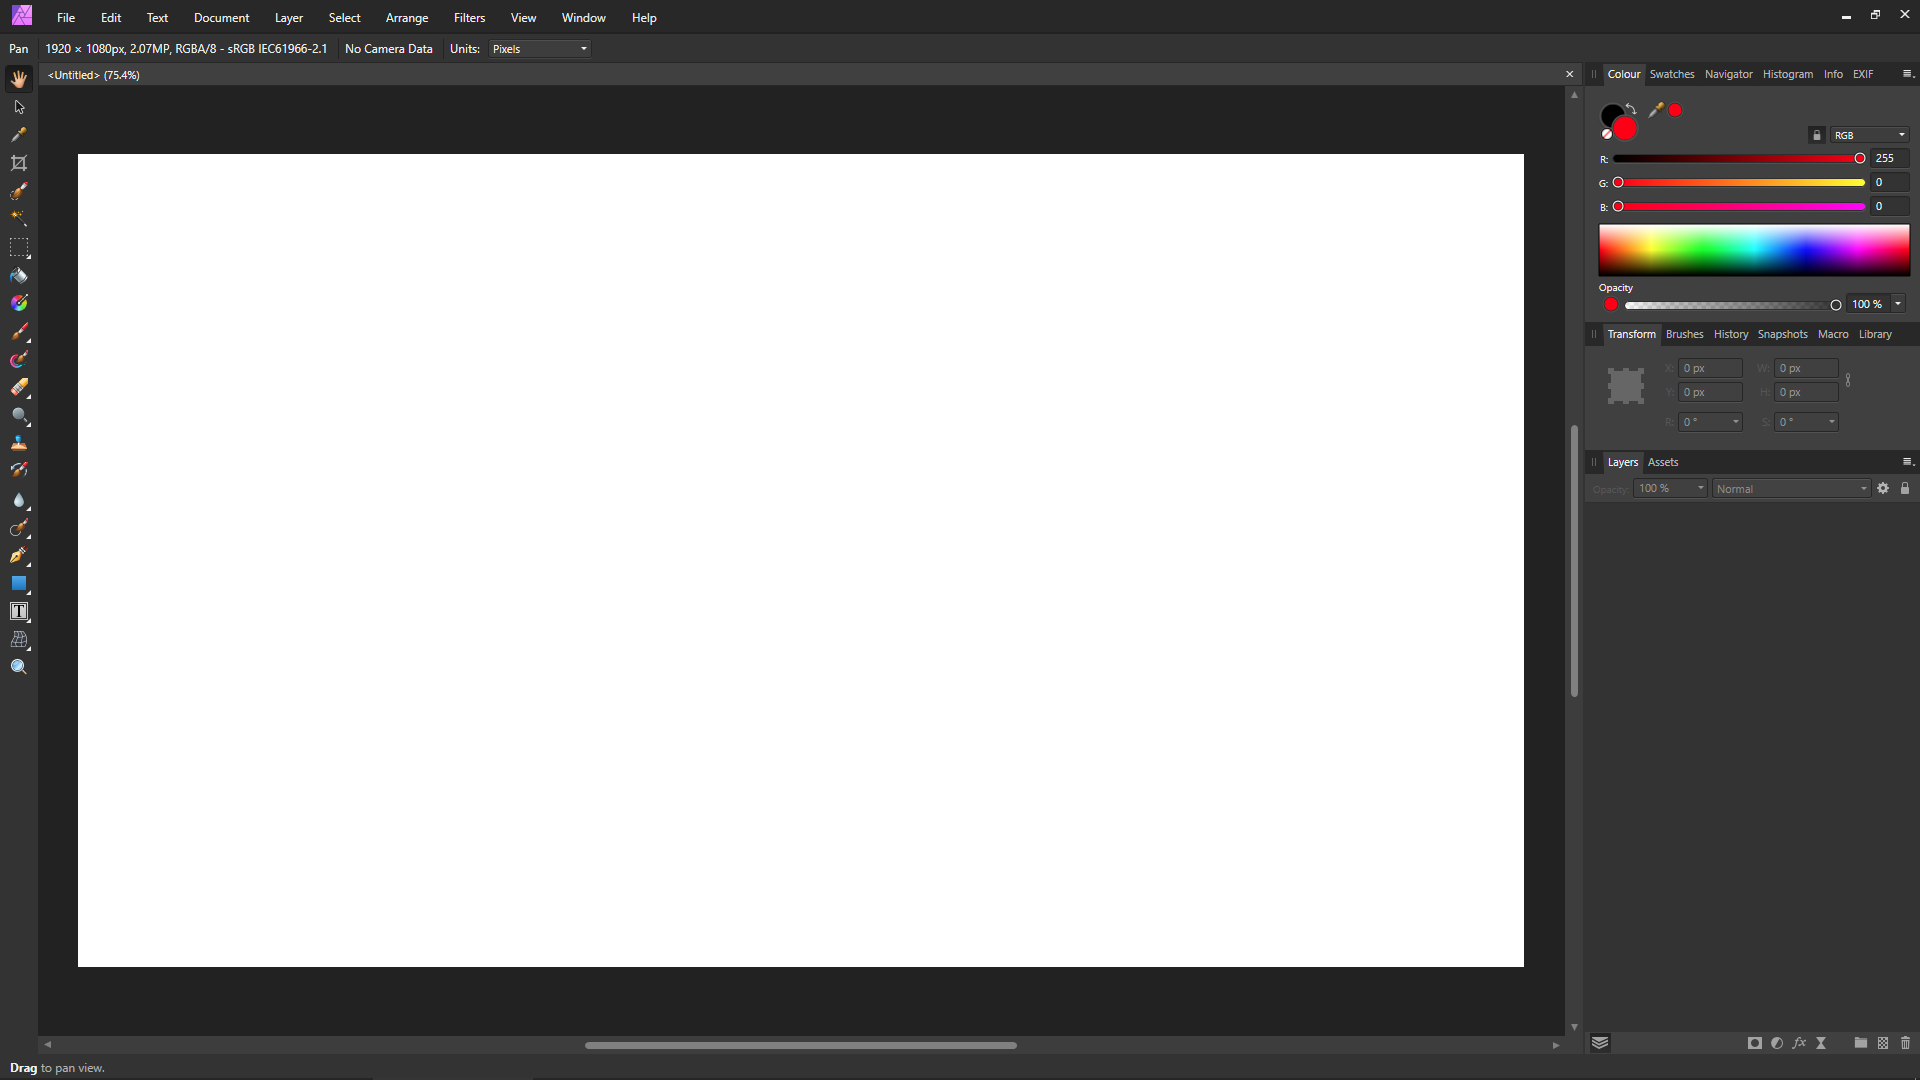
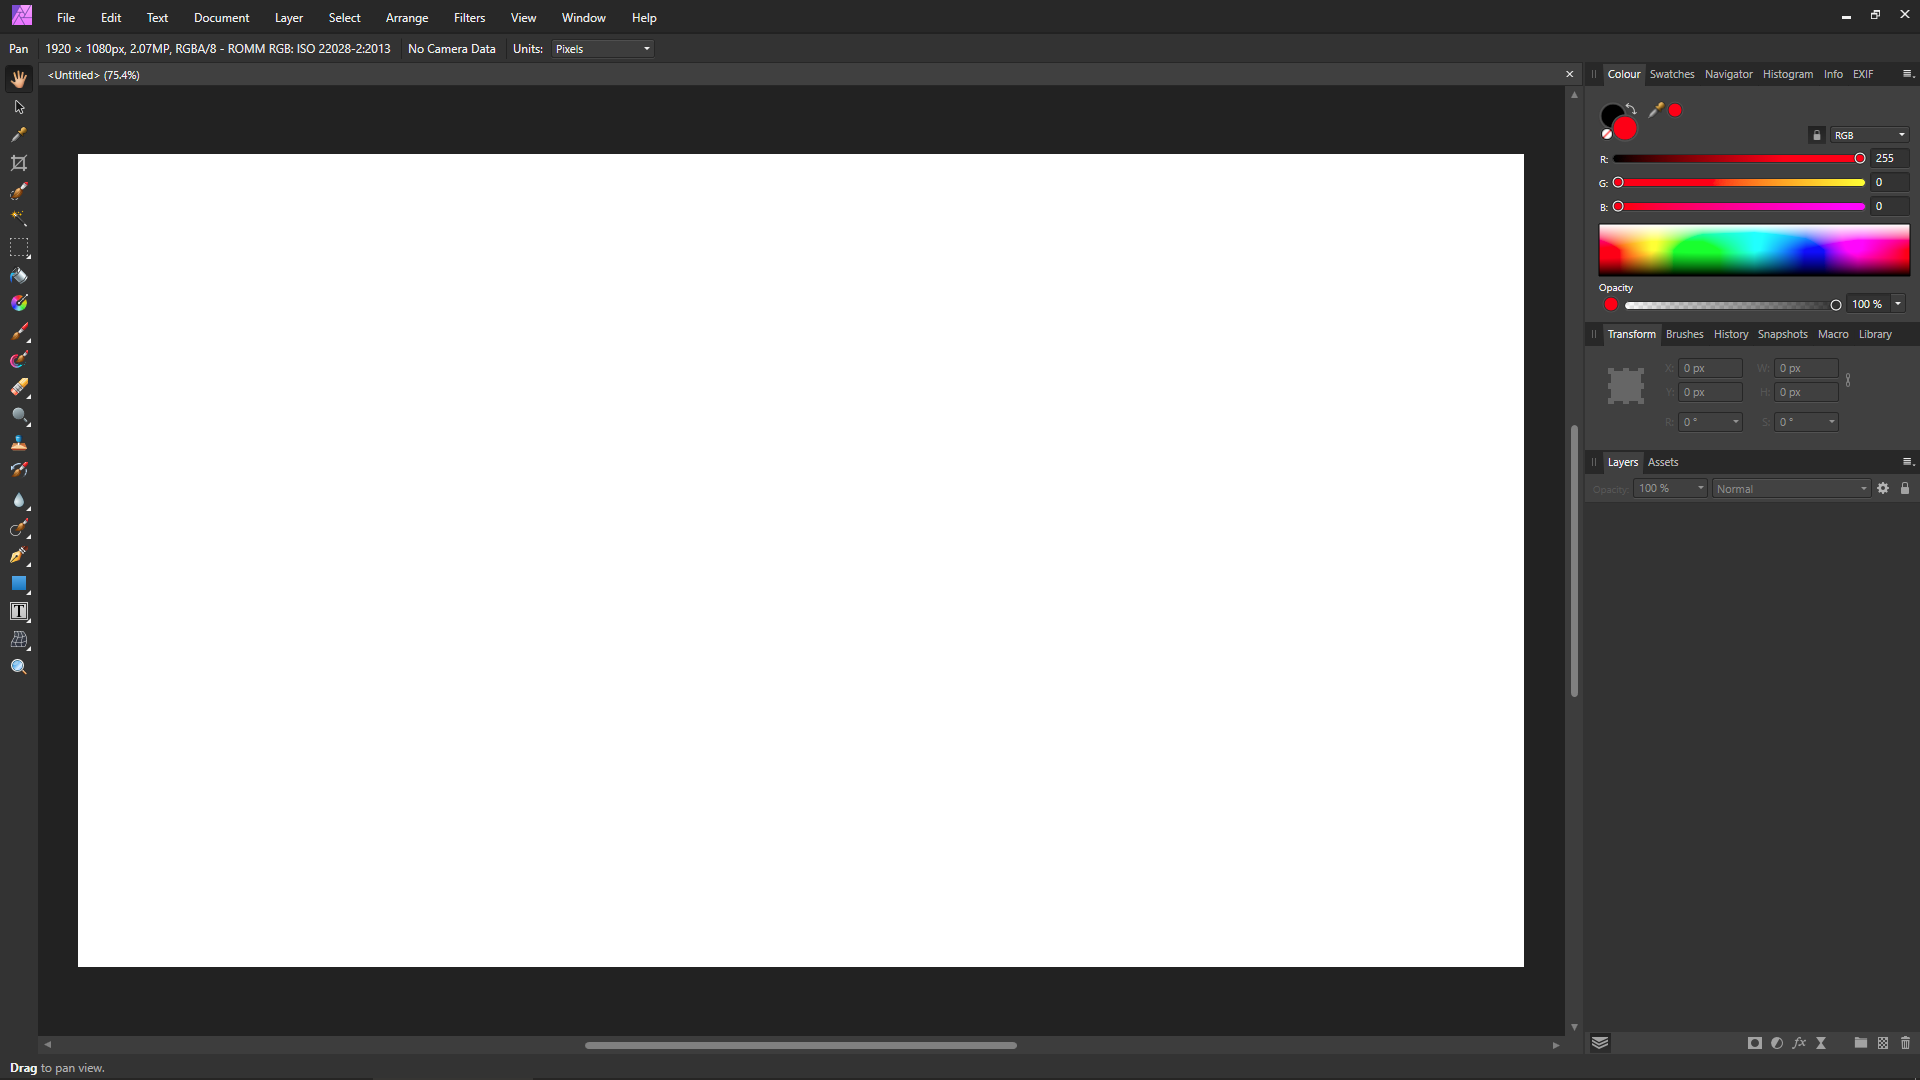
3) Does the red show correctly (red, not orange) in the colour panel, like the following screenshot?
4) Go to [File > New] and open a new blank document using the same settings as in the below screenshot (pay particular attention to the 'Colour Format' and 'Colour Profile'). In this case the document is using a 'ROMM RGB: ISO 22028-2:2013' document colour profile:
5) Does the red show correctly (red, not orange) in the colour panel, like the following screenshot?
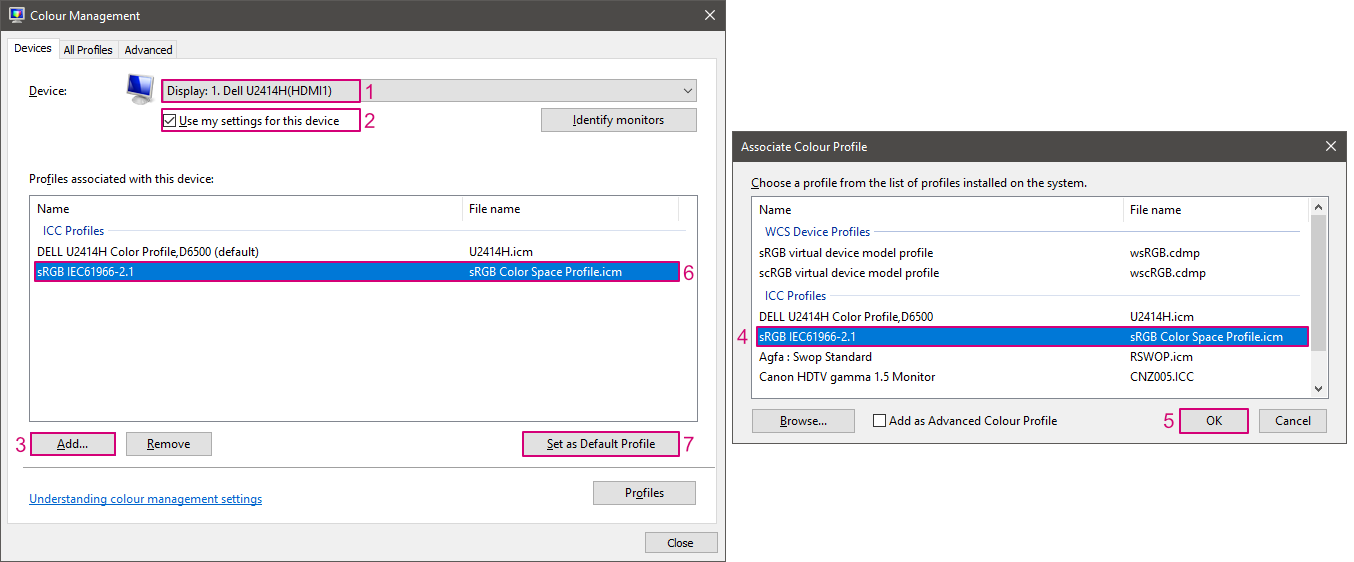
6) If in both cases above (I.E. using either a 'sRGB IEC61966-2.1' document colour profile or a 'ROMM RGB: ISO 22028-2:2013' document colour profile) the red is still not showing correctly, then it's possible there could be an issue with your monitor colour profile.In which case, go to [Windows Control Panel > Colour Management > Devices tab]. Make a note of what colour profile is set for 'Display 1'. Also make a note of what colour profile is set for any other displays as well—if you have more than one display (I.E. 'Display 2' in the drop down menu).
Then temporarily set the monitor profile for the monitor(s) to use the generic 'sRGB IEC61966-2.1' ICM colour profile as the default profile for your monitor(s). This will use a generic 'sRGB IEC61966-2.1' colour profile instead of your monitor's colour profile.
7) Try from Step 2 again and see if red shows correctly in the colour panel now when using a generic 'sRGB IEC61966-2.1' monitor colour profile instead of your monitor's colour profile.8) If the colour shows correct when using a generic 'sRGB IEC61966-2.1' monitor colour profile instead of your monitor's colour profile, then that would indicate there's some sort of issue with the monitor colour profile. In which case, you may be able to see if your monitor manufacturer has drivers on their website that contain a different ICM profile that you can try, or maybe see if you still have the discs that came with the monitor and get them from that, however these will possibly be the same as the ones you're already using. If you know someone with a monitor hardware calibrator, you could also try creating a custom monitor profile with that and using that profile in Windows Colour Management.
-
Serif's insistence on forcing their users to use *.tiff is my number one issue with Affinity Photo.
If one of their developers likes *.tiff for some odd, bizarre reason, then that's their choice. However, to force that choice on all their users is illogical and unacceptable. Everyone else uses *.tif, so I have no idea what they were smoking when they came up with this decision.
It's possible to manually change the file extension, but firstly *.tif files still aren't visible in the file explorer from within Affinity Photo when saving, and secondly if you deal with a lot of TIFF files, it makes it a real PITA to work with. Users shouldn't have to fight the software to use *.tif.
I've complained multiple times to allow us to use *.tif instead of *.tiff, but it always gets ignored; so I'm not sure what else we can do. I'm now at the point of wondering whether I should just use some other software instead.
-
Sometimes the Paint Brush tool 'Wet Edges' setting turns on by itself after using the Erase Brush tool, even though the settings for both the Erase Brush tool and the Paint Brush tool are set to 'Set wet edges off'.
It also happens in reverse too—where the Paint Brush tool 'Wet Edges' setting turns off by itself after using the Erase Brush tool, even though the settings for the Paint Brush tool are set to 'Set wet edges on'.
After manually toggling the 'Wet Edges' setting in the context tool bar, the problem disappears for a while, only to return later.
I think the issue is caused due to a discrepancy between the 'Wet Edges' setting in the brush context tool bar and the 'Wet Edges' setting in the brush settings.
Steps to reproduce 'Wet Edges' turning on by itself:
Steps to reproduce 'Wet Edges' turning off by itself:
-----
Windows 10 - 1903 (18362.207)
Affinity Photo - 1.7.1.404 -
It's likely because your original document is using a ProPhoto RGB (ROMM RGB: ISO 22028-2.2013) document colour profile.
Then whatever you're viewing the exported PNG file with is probably ignoring or stripping the ROMM RGB colour profile and assuming that the document colour profile is sRGB.
For this particular document try clicking the 'More' button in the PNG export settings, setting the 'ICC Profile' to 'sRGB IEC61966-2.1' and ticking 'Embed ICC Profile'. This will try to export it as sRGB as best as possible—however it will still likely be different to the original. It would better to start off with the document colour profile set to 'sRGB IEC61966-2.1' when you first create the new document.
-
Updating the post with steps to reproduce Issue 1, as this is a similar issue to THIS post regarding the Macro panel.
Steps to reproduce the issue below:


Affinity Photo putting strange marks on RAW imiges on import and craching
in Pre-V2 Archive of Affinity on Desktop Questions (macOS and Windows)
Posted
Looking at the squares, I wonder whether it's related to Metal compute acceleration issues in the 1.7 update?
As a test, does the problem still occur if you go to Affinity Photo Preferences > Performance section and untick Enable Metal compute acceleration (restart needed)?