- S -
-
Posts
832 -
Joined
Everything posted by - S -
-
 If you completely block V2 it won't run at all. It must at least be able to use local networking to connect to other apps on the same machine. Windows Firewall doesn't block loopback (localhost) communication, therefore the Affinity applications will still work, even if blocked by Windows Firewall. Other third-party firewalls however can cause issues if they block loopback (or the user blocks loopback). Therefore, people can block Affinity applications with Windows Firewall, however there will be a few caveats: 1) Affinity programs require outbound internet access the first time they're run after installation – as users need to enter their Affinity ID and password to perform a one-time licence check with Affinity servers and activate the licence. 2) Other functionality that requires outbound connections – such as the Affinity Stock panel – obviously won't work if outbound connections are blocked. 3) If using the MSIX installer (rather than the upcoming MSI/EXE installer), the Affinity application paths have the version number in the path. This means the firewall rule will only be relevant for that exact version (I.E. 2.0.3.1688), as Windows Firewall doesn't allow wildcards in paths. Windows Firewall does allow creating rules using an App Package name – instead of a direct file path – which gets around this issue and is how firewall rules are created for Microsoft's own Store apps, however this method doesn't work with Affinity applications (see my previous post HERE). I'm not entirely sure why there isn't an option to disable automatic update checking from the UI, particularly as MacOS has the option. Some people don't like applications having internet access unless strictly necessary, however there is another practical reason why some people may want to disable automatic update checking in professional software – consistency. When doing a large project (for example scanning and restoring a batch of a few thousand photos), a lot of testing and checking will be carried out before starting the run because it's a long, tedious, time consuming task and having to go back and correct any problems is no fun and extremely costly in terms of time. It essentially becomes a production line and the last thing needed is for any of the programs to update midway through the project and introduce any bugs, inconsistencies or unexpected behaviour. Some projects may last weeks or months, so it would be useful to be able to turn off automatic update checking in these circumstances.
 -
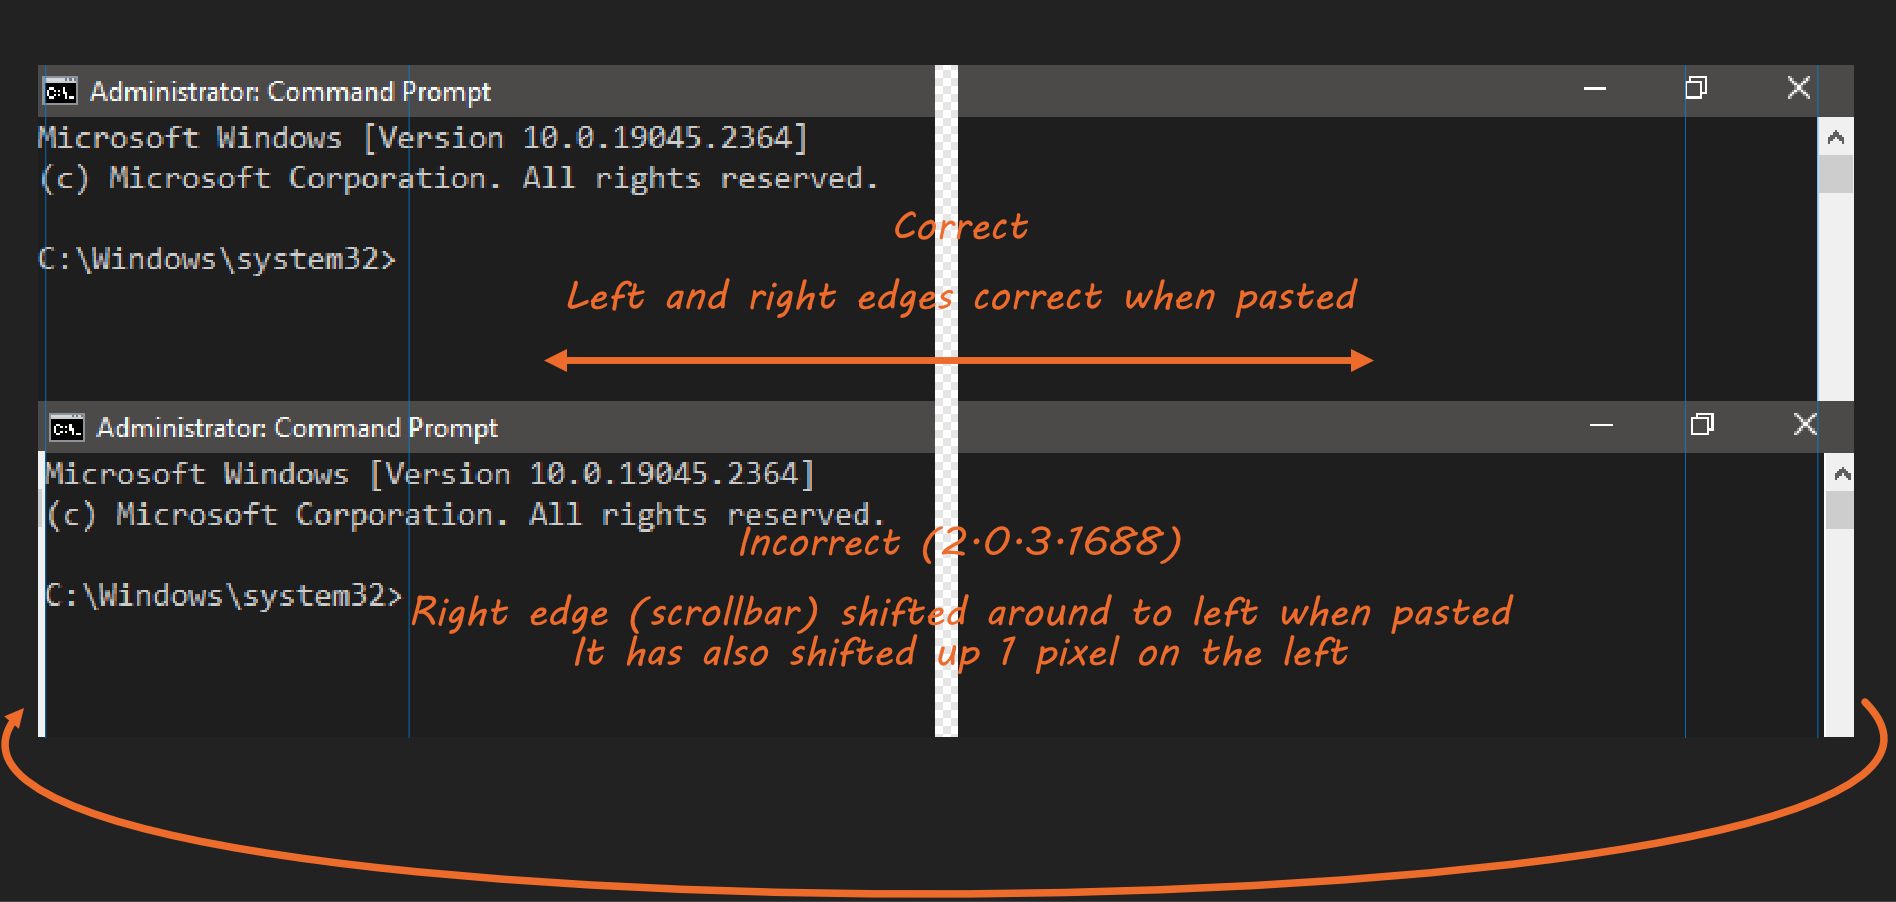
Using "New From Clipboard" pastes a captured screenshot incorrectly in Affinity Photo 2.0.3. In the below example, when copying & pasting a full-screen Command Prompt window, part of the scrollbar on the right-hand side of the image gets shifted to the left-hand side when pasted (3 pixels). The left bit also moves up 1 pixel (so the bottom-left corner ends up with 3×1 pixel transparent area). Screenshot A: Steps to reproduce: 1) Take a full-screen screenshot by pressing the "Print Screen" (PrtScn) button on the keyboard. It doesn't make a difference what's screen captured – I chose a Command Prompt window because a dark window with a light scrollbar makes the issue clearer to see. 2) Then either: a) Go to [File > New From Clipboard] b) Or go to [File > New > FHD 1080p] and then [Edit > Paste] 3) View the left and right edges of the pasted screenshot. The image has shifted when pasting. When pasting the captured screenshot into Microsoft Paint, the pasted image is OK and not shifted. Therefore, Windows seems to be copying it to clipboard correctly and Microsoft Paint seems to be pasting it from clipboard correctly. When using the [Windows Key + PrtScn] shortcut keys to save the screenshot directly to %UserProfile%\Pictures\Screenshots as a PNG file, the image is also OK and not shifted. This issue occurs in Affinity Photo 2.0.3.1688. I'm pretty certain it didn't occur in Affinity Photo 2.0.0.1640. Initially I was thinking that this could be a Windows bug, however as it works correctly in Microsoft Paint, I think there is something else going on here. Animation showing shifted edges: Pasted Edges.mp4 Example files: Example files.zip ----- Windows 10 22H2 (19045.2364) 1920×1080 monitor. Windows display scaling set to "100% (recommended)"

-
I'm not sure whether there's a better way for the Affinity programs to communicate with each other as I'm not a developer. However, it looks like Affinity V2 programs use IPv4 loopback to talk to each other via a local proxy. I haven't used ZoneAlarm firewall, however it should be possible to create allow rules in ZoneAlarm. See screenshot – as CloudFront throws an error when I try to submit a post here containing local IP addresses in the text.
-
As per THIS POST, the issue appears to occur when using an Affinity Designer document that has artboards. Steps to reproduce: Artboard.mp4 File: untitled.afphoto
-
Select invert on a selection doesn't work
- S - replied to DSGNDM's topic in Desktop Questions (macOS and Windows)
Someone else posted a similar issue at the link below a few weeks ago, however I was unable to reproduce it myself. The person in the other post has a similar layer structure to you (a pixel layer, two groups deep). I would make a copy of the document, name it "Test" so it doesn't get mixed up with the original and then start going through and deleting unnecessary groups and layers to see if you can narrow it down a bit more. Once you've narrowed it down, you may be able to figure out whether it's a bug or whether something specific is causing it. Alternatively, it may help if you could upload the file here to see if other people can reproduce the issue with your particular file. -
White or black brush on mask, no difference
- S - replied to nickbatz's topic in Desktop Questions (macOS and Windows)
Your "white" is set to 0% opacity in the Colour panel. If you change it to 100% opacity, it will then show as 55% grey (or whatever the slider is set to). -
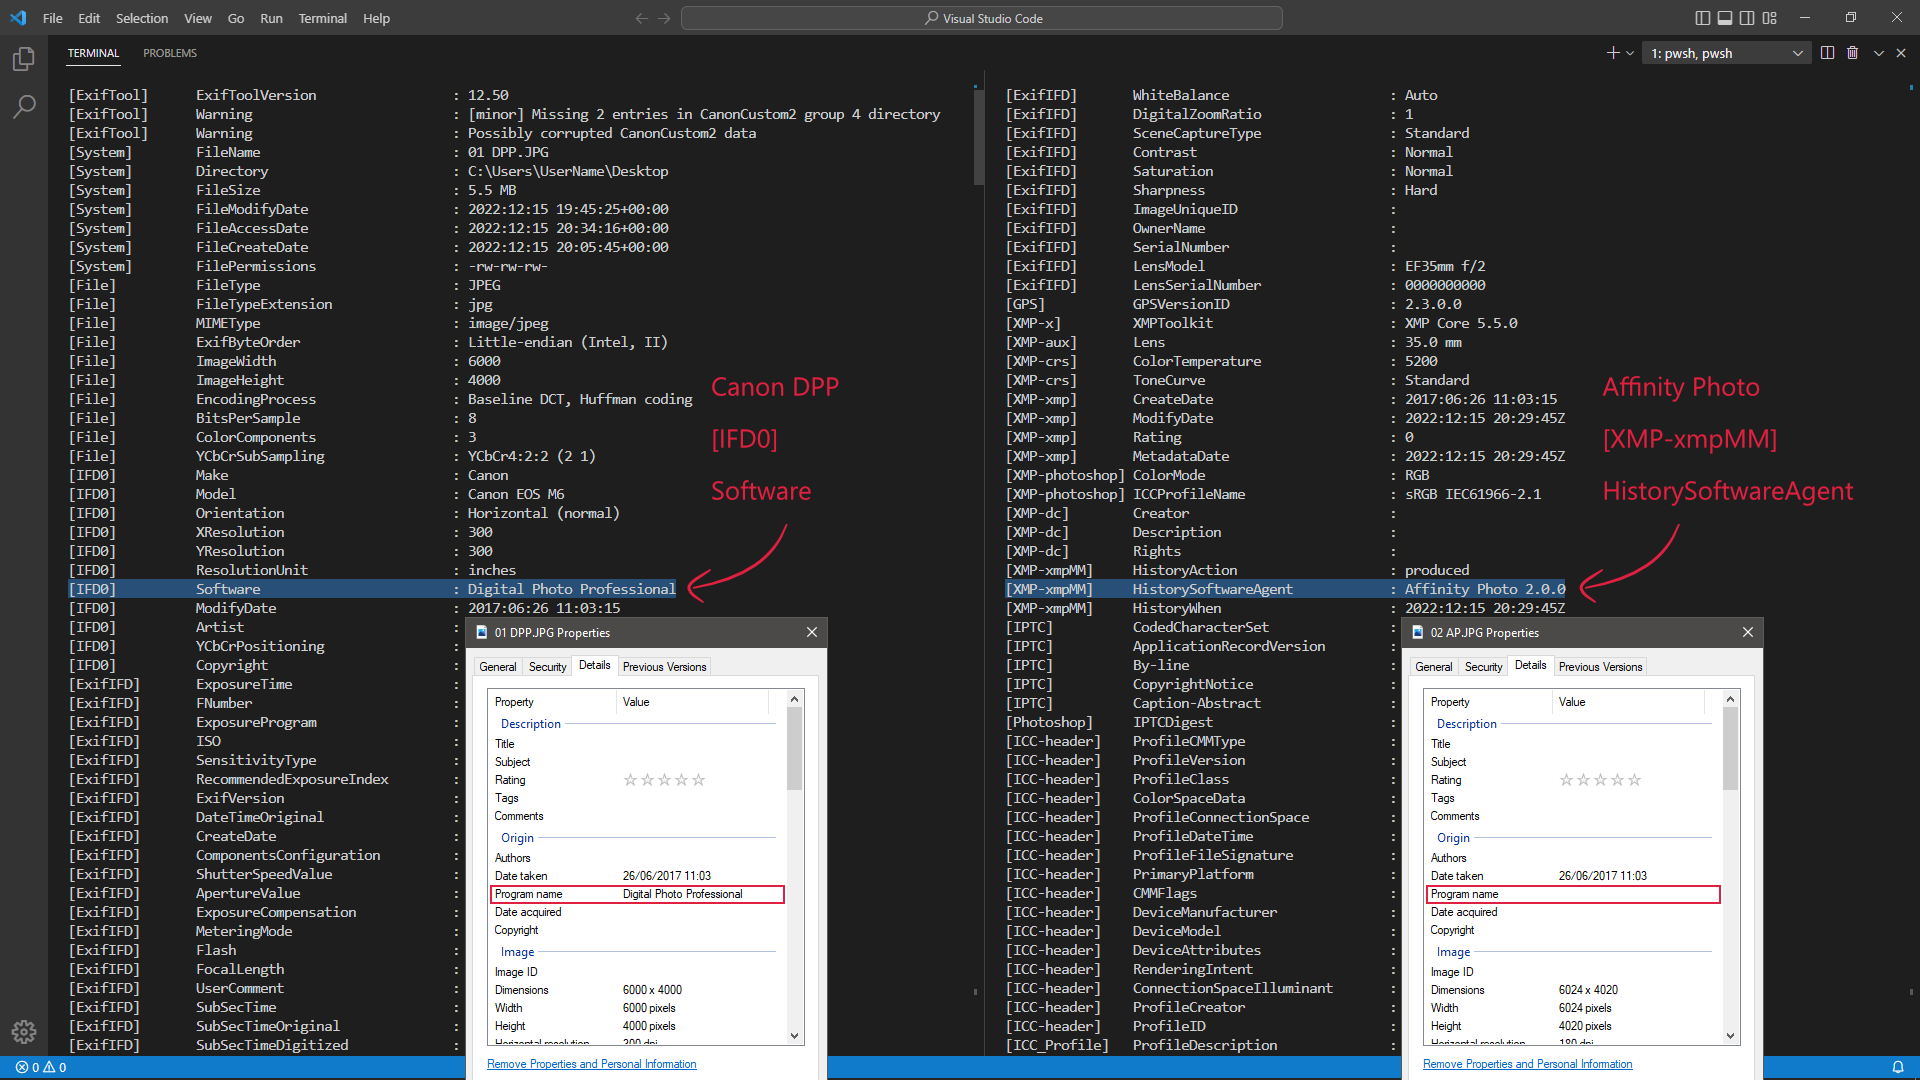
Even earlier than that, I mentioned it in January 2017 (a few weeks after it was released on Windows) in the below post about the "Date Taken" field. The problem is, although Affinity Photo adds the software name to the file metadata, it adds it to the following metadata tag. [XMP-xmpMM] HistorySoftwareAgent While there is nothing wrong with adding it to XMP Media Management metadata, it's not much use if other software (DAM, Windows File Explorer, etc.) is looking for that metadata in the below metadata tag instead and therefore doesn't read it. [IFD0] Software Screenshot:
-
It's because the freehand selection has antialiasing and/or feather applied. Then when you move the newly pasted layer with the Move tool, you still have the selection enabled. This means what you're moving is not the newly pasted layer as a whole, but the (still) selected part of the newly pasted layer (which still has antialiasing and/or feather applied). Therefore, you need to go to [Select > Deselect] (CMD/CTRL + D) to deselect the active selection before moving the layer.
-
Using Special Characters in "States" Panel Search Box Causes Crash
- S - replied to - S -'s topic in V2 Bugs found on Windows
Include commas and quotation marks in your passwords to screw with an attacker's CSV files. -
move selection while using marquee tool
- S - replied to JorisM's topic in Feedback for the Affinity V2 Suite of Products
Using the Move tool on a selection (over a blank pixel layer), or using the Transform panel on a selection will make the edges imprecise as the selection works like a pixel layer, rather than a vector shape. The edges do not stay hard due to resampling. Therefore, using the Move tool in this way in Affinity Photo is not the same as using the "Transform Selection" feature in other image editors – which do keep the edges hard. You will end up with transparency around the edges, rather than it being fully opaque. Although I usually use vector tools, it's "clunky" because it's necessary to switch the vector tools between 0% and 100% opacity so you can see what you're selecting easier. Whereas with the Marquee tools they are already transparent, as that's what they are supposed to be used for. If an end user would rather use the Marquee tools, the Marquee tools should let them work that way without needing to use the vector tools. However, being unable to use the Spacebar to move the selection during creation makes this more difficult. I'm well aware there are different methods of doing different things, but this is a topic in the "Feedback" section of the forum where users can give Serif feedback on their software. In this case, give feedback on improvements to the Marquee tools so that they can be more useful. Making improvements to the Marquee tools so that modifier keys like the Spacebar or CTRL can be used during selection shouldn't be a contested issue, especially as Affinity Photo doesn't have a true "Transform Selection" feature. Selection tools can be used for many things, from adding and subtracting from existing masks, to quickly knocking out eyes or wheels for example. It's difficult to drag a marquee perfectly without being able to position it with the Spacebar. It can even be done in a web browser… Selection.mp4 -
move selection while using marquee tool
- S - replied to JorisM's topic in Feedback for the Affinity V2 Suite of Products
Unfortunately, that's correct. The Rectangular Marquee tool and Elliptical Marquee tool are still very primitive. If you want to use the Spacebar, or resize the marquee after initial draw without making the edges soft, you will need to use the Rectangle tool and Ellipse tool (vector shape tools) instead and then create a selection from them – which is obviously a bit of a clunky work-a-round. -
"New From Clipboard" adds 1px border
- S - replied to TrickyWidget's topic in V2 Bugs found on Windows
Unless you're resizing the selection, that sounds like a slightly different issue. With the Flood Select tool issue, does it occur regardless of whether the Antialias setting in the context toolbar along the top is enabled or disabled? Or does it only occur when Antialias is enabled? Capture.mp4 -
"New From Clipboard" adds 1px border
- S - replied to TrickyWidget's topic in V2 Bugs found on Windows
How are you getting the 200px × 200px selection in the Transform panel? Are you: A) Dragging the Rectangular Marquee tool until it matches 200px × 200px precisely, then letting go of the mouse button? B) Dragging the Rectangular Marquee tool loosely, then typing 200px × 200px in the Transform panel to get those precise dimensions? If the answer is "B", then that is likely your issue, as unfortunately the Rectangular Marquee tool does not work like a vector shape. You will need to use the Rectangle tool (shape tool) and create a selection from that instead, as the Rectangular Marquee tool and Elliptical Marquee tool are pretty poor. -
If special characters (such as those below for example) are used in the "States" Panel "Layer name is…" search box and "Regular Expressions" is enabled, it will cause Affinity Photo to crash. * ? ( Although it won't crash if the special characters are escaped with a backslash, it probably shouldn't crash the application if the user enters special characters directly into the search field. Crash.mp4
-
When using the search box in the macros "Library" panel, it often does not return any results despite containing a macro of that name. The issue is due to the search box being case-sensitive. However, I can't think of a scenario where this would be beneficial to the user, therefore it's likely that this is something that has just been overlooked. IMO the search box should not be case-sensitive by default, as it will trip users up. Looking at other search boxes in Affinity Photo, the search box in the "Assets" panel for example is not case-sensitive and therefore works in a more user-friendly way. In addition, the search box in the "Swatches" panel is also not case-sensitive. Therefore, I would imagine it's not actually intended behaviour in the "Library" panel search box either. As a side note, I also don't see it as beneficial to have it as the default behaviour in the layer "States" panel either (Layer name is…) – although that search box is a bit different to the others as it also gives the option to use RegEx as well. Search Boxes.mp4
-
This issue is still present in Affinity Photo V2. See here:
-
Issue with soft edge masking
- S - replied to Arno A's topic in Desktop Questions (macOS and Windows)
It's due to the group being in "Passthrough" blending mode (the default). Although the behaviour is not correct, you can try changing the blending mode of the group to "Normal". See my post here: -
The four uppermost input fields (X/Y/W/H) in the Transform panel are different sizes (taller) when using a Pen tool line compared with using other types of layers, such as a Shape layer or Image layer. Although it's only a minor UI difference, it's distracting when switching between layers with the Move tool selected, as it alters the panel size and therefore moves the other panels. The input field sizes should probably be uniform. Video: Transform.mp4
-
Canon thumbnails show no image?
- S - replied to carca's topic in Desktop Questions (macOS and Windows)
As Walt mentioned, Windows File Explorer camera raw codecs are no longer distributed through Windows updates. You need to install the "Raw Image Extension" from the Microsoft Store. https://www.microsoft.com/store/productId/9NCTDW2W1BH8 -
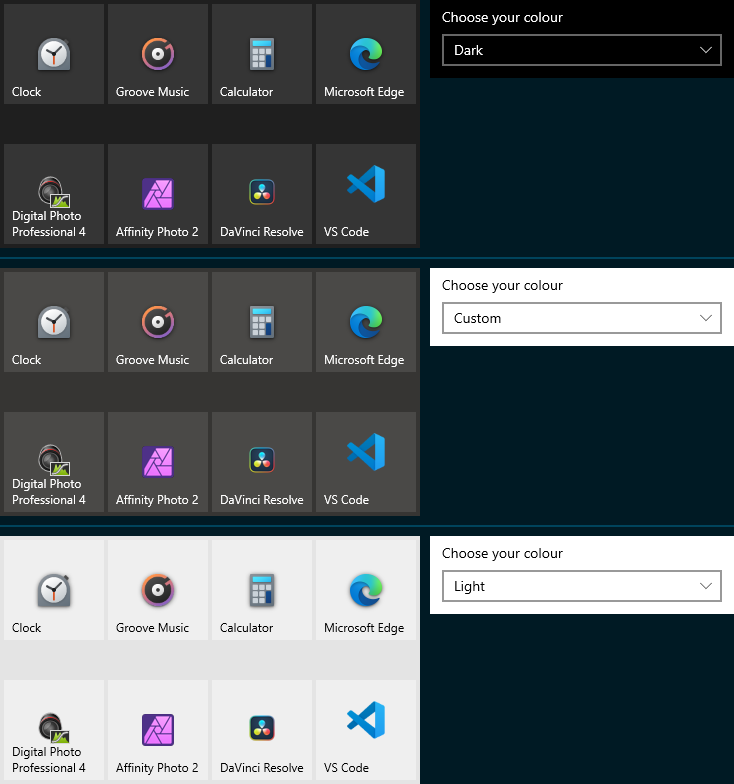
I have included screenshots below showing the Start menu tiles with both light and dark themes. While the Affinity Start menu tile looks even worse on a light theme, the issue in the original post remains regardless of colour theme. Screenshot A (what it looks like): Screenshot B (what it should look like): It seems as though the icon needs more padding and also the icon background changed to transparent so that the tile background colour shows the Windows theme set by the user and matches the rest of their Start menu tiles. Screenshot C:
-
Text size within the programme panels.
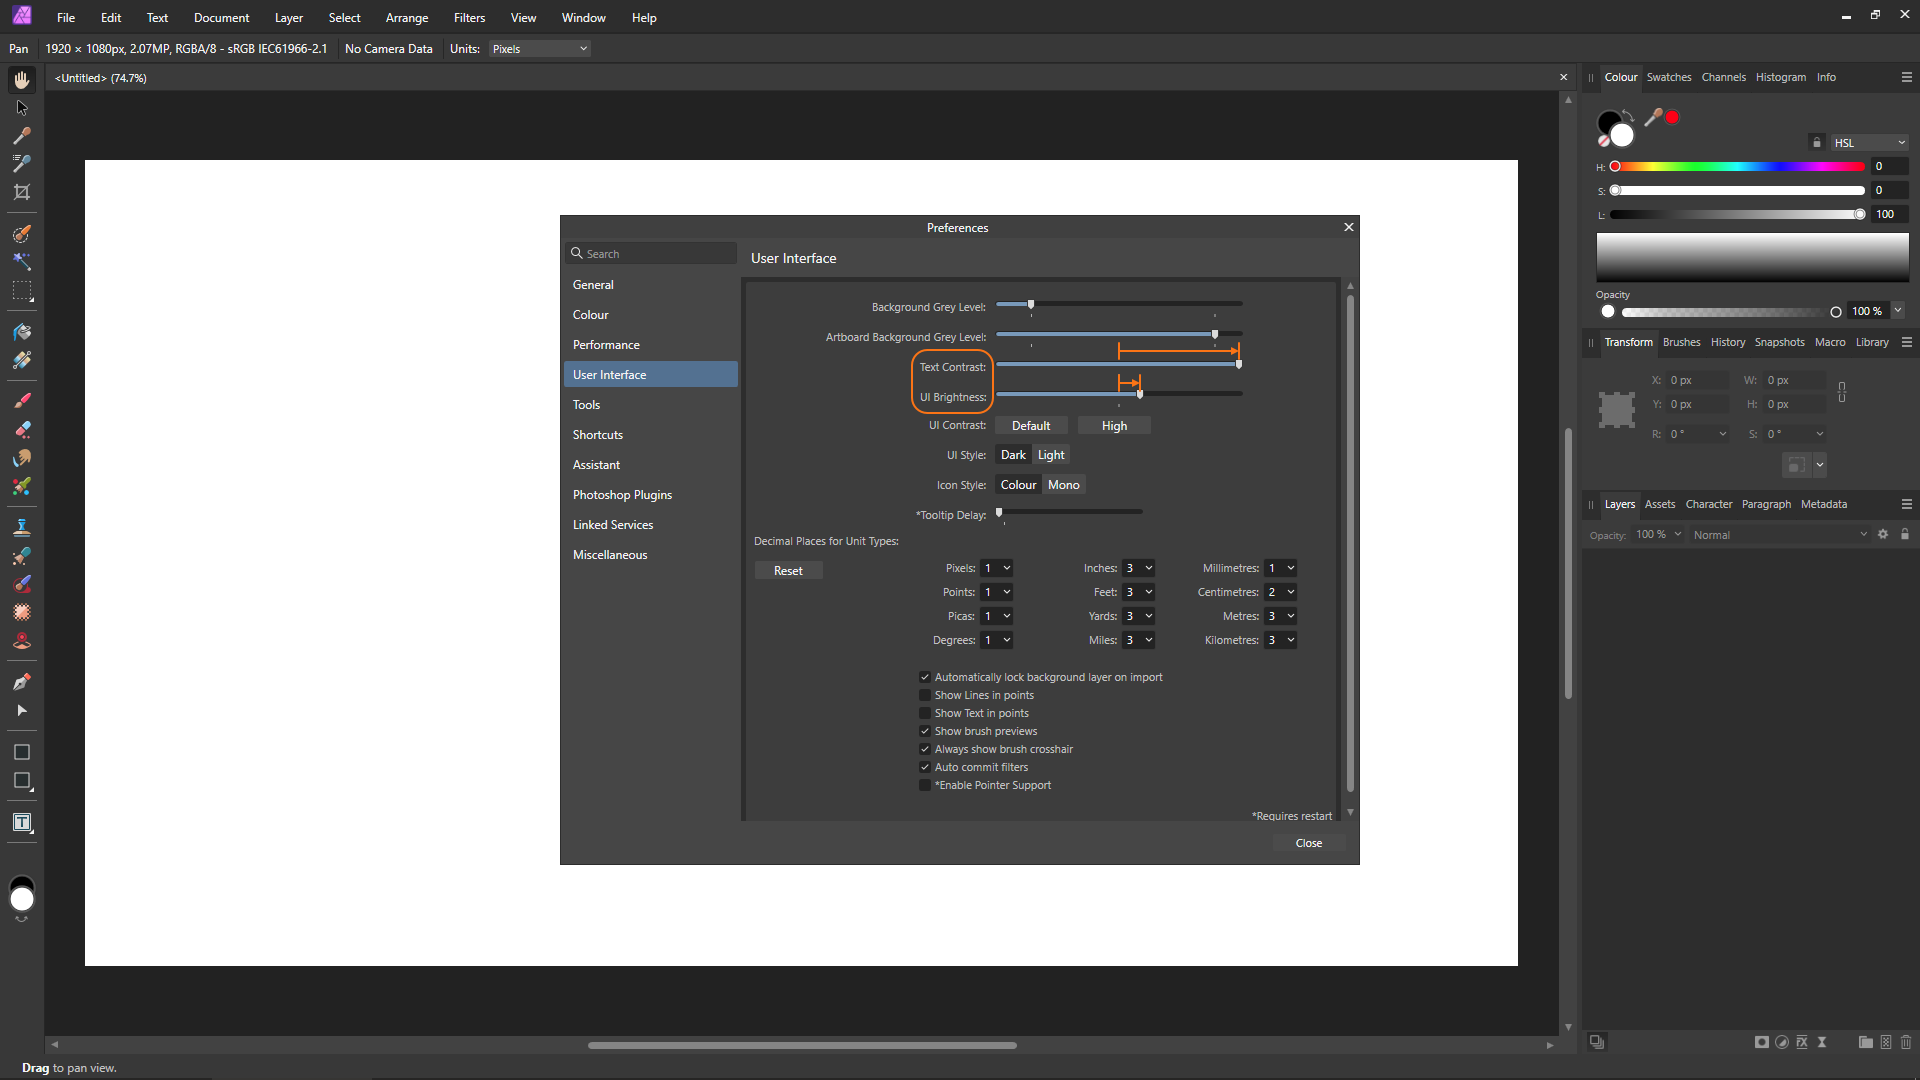
- S - replied to Sandi's topic in Feedback for the Affinity V2 Suite of Products
Although this won't resolve your issue if the text is too small, one of the differences between V1 and V2 is that the text is darker (greyer), which doesn't help with readability. Increasing the 'Text Contrast' and the 'UI Brightness' in settings may help a bit. However, even with the text contrast slider all the way to the right, it will still not be as clear as Affinity V1.
-
Thanks for the tip! Named them "- My Assets" and the Assets panel now opens to them by default. 👍
-
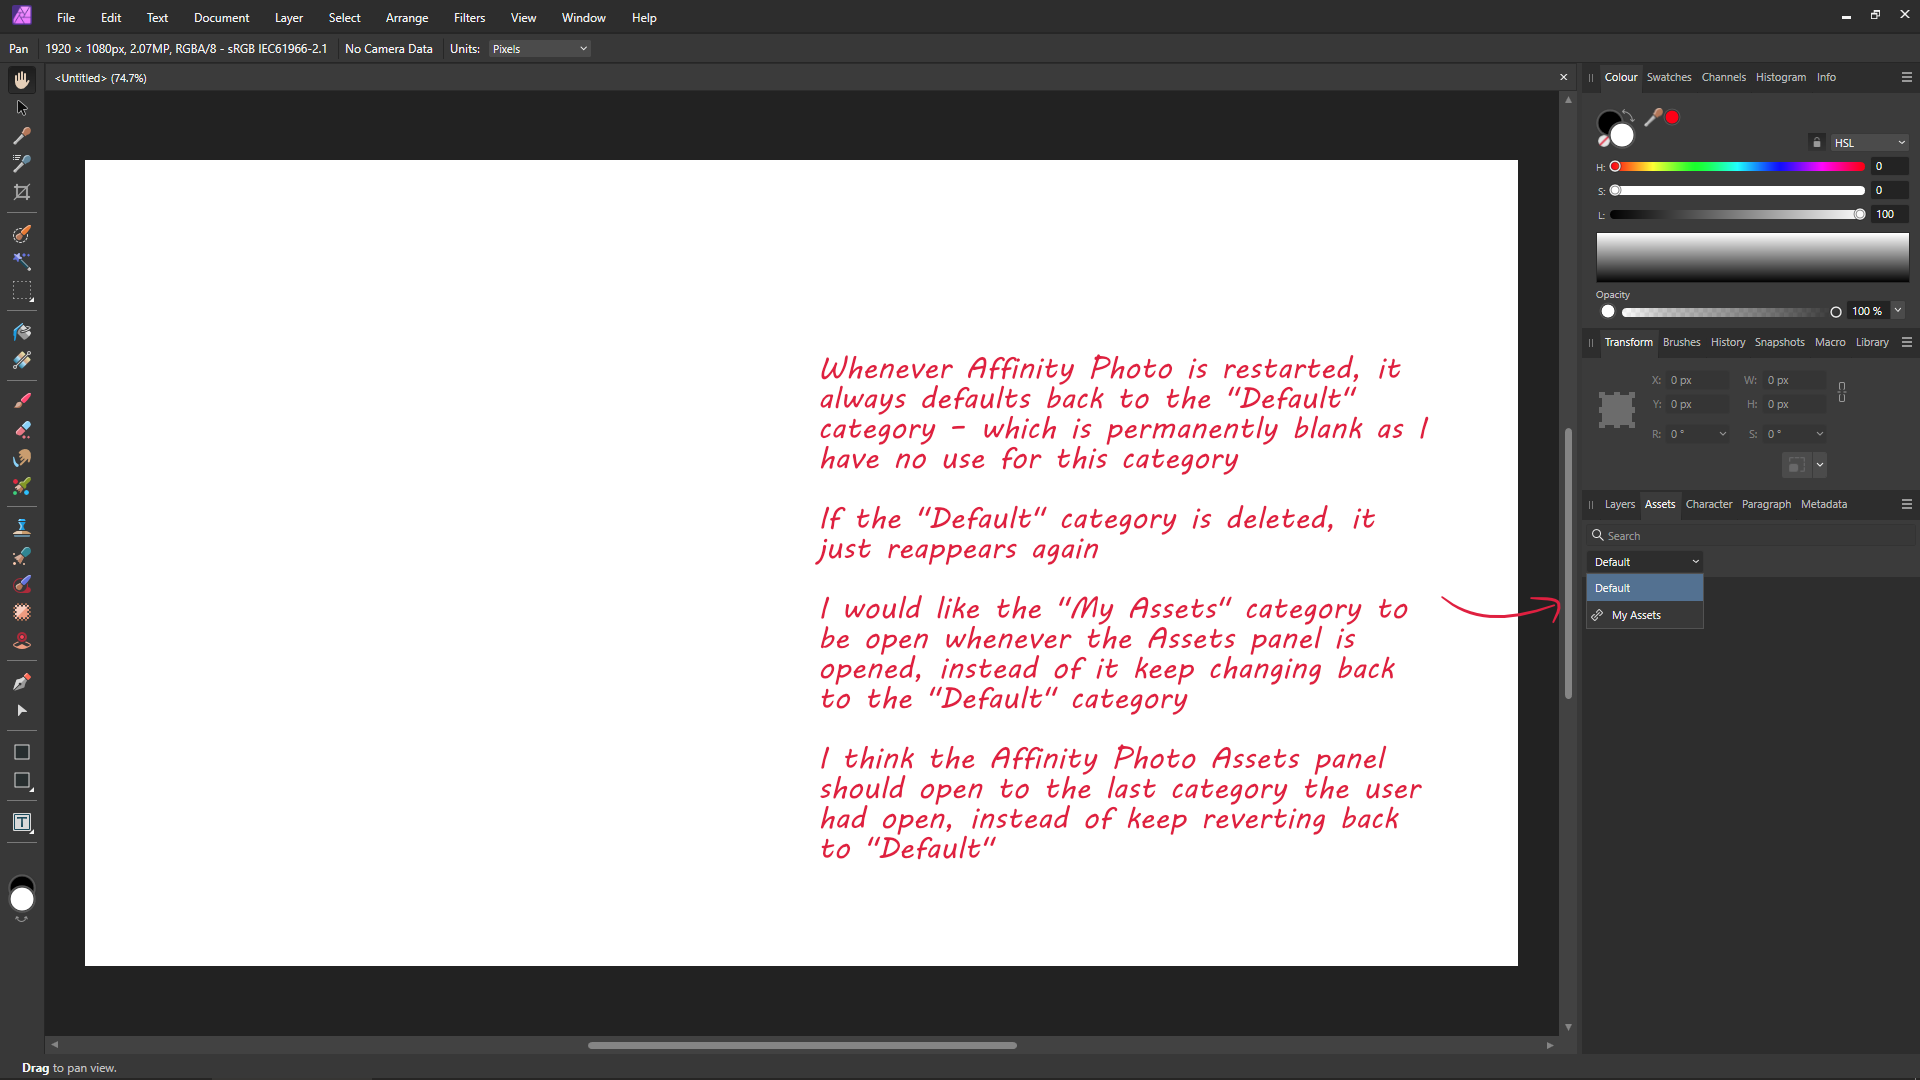
It is not possible to import assets (*.afassets) directly into the "Default" category in the Assets panel. Therefore, when importing assets they are placed in their own category beneath it. The problem is whenever Affinity Photo is restarted, it always defaults back to the "Default" category – which is permanently blank as I have no use for this category. The only category I use is the assets imported from file (My Assets.afassets) and add new assets to that category. If the "Default" category is deleted so that only "My Assets" are listed, then instead of "My Assets" becoming the new default, Affinity Photo just adds another "Default" category when restarted and defaults straight back to it again. I would like the "My Assets" category to be open whenever the Assets panel is opened, instead of it keep changing back to the "Default" category. Therefore, I think the Affinity Photo Assets panel should open to the last category the user had open, instead of keep reverting back to "Default".
-
I never modify the permissions for the WindowsApps folder, as doing so will likely allow privilege escalation. So the answer is yes, they will work when users have not modified the permissions of the WindowsApps folder If a user tries to navigate to C:\Program Files\WindowsApps through Windows File Explorer, then they will see a warning saying "You don't currently have permission to access this folder". What the OP is doing though is pasting the path to the Affinity folder in the Windows File Explorer address bar, which is launched by the Windows Security app when clicking the "Add an allowed app" button. I.E. When pasting one of the below in the address bar, it will navigate directly to that folder location without displaying the permissions warning and will allow selecting the required exe to add to the allow list (assuming the app is installed). C:\Program Files\WindowsApps\SerifEuropeLtd.AffinityPhoto2_2.0.0.1640_x64__3cqzy0nppv2rt\App C:\Program Files\WindowsApps\SerifEuropeLtd.AffinityDesigner2_2.0.0.1640_x64__3cqzy0nppv2rt\App C:\Program Files\WindowsApps\SerifEuropeLtd.AffinityPublisher2_2.0.0.1640_x64__3cqzy0nppv2rt\App Adding allowed applications using PowerShell or Group Policy will also work fine with default folder permissions.