

- S -
-
Posts
832 -
Joined
Posts posted by - S -
-
-
1) I cannot undo certain things. Example: if I click on a Style to see how it looks, there's no way to undo the effect. It's baked into that layer permanently. I encountered this issue during a free trial of Affinity and it was my #1 reason for not buying it originally. Surely I'm overlooking something??
I'm not sure why it isn't working for you as you should be able to undo applying a style. Maybe after resetting using one of the three methods mentioned above, it will start working correctly. However you should be able to do the following.
- Ctrl/Cmd + Z keyboard shortcut key to undo the style
- Edit > Undo Apply Object Style, from the top menu
- Go to the History panel and move back a step to before 'Apply Object Style'
Alternatively, if you want to get rid of the applied style at a later stage where isn't practical to use Undo, using the Move Tool you can select the object that has the Style applied to it and then go to Edit > Defaults > Revert. This will revert it to the default setting that's set for that object.
Or if you want, you can create your own Style. To do this, set an object how you want it (I.E. Two pixel black stroke, with a white fill), then right-click on it and select 'Create Style' (or Edit > Create Style, from the top menu). Then you can click on it whenever you want to change the object to one of your own preset 'default' Styles.
-
Yes, Alt Gr + [ is the default combination. Also work with Ctrl ALt + [
Now I understand your first screenshot more. To me it sounds as if the default combination in Affinity Photo for Italian Qwerty Keyboards should just be set to Ctrl + Alt + [ and not use AltGr + [ at all. Then the Huion Express keys/pen buttons would likely work with the Affinity defaults.
Glad you've resolved the issue.
-
... i did not find a way to change the size of the brushes and tools, in A.D. and A.P., directly from the pen.
It's not possible to do what I think you're trying to do. The shortcut in Affinity Photo (for Windows) is Alt + Left Mouse Button + Right Mouse button and then drag up/down/left/right to change the size/hardness of the brush. Unfortunately you can't do this with the pen because it's not possible to press both the left and right mouse buttons on the pen at the same time, as they are on a rocker switch. Hopefully Serif will find another solution in the future...
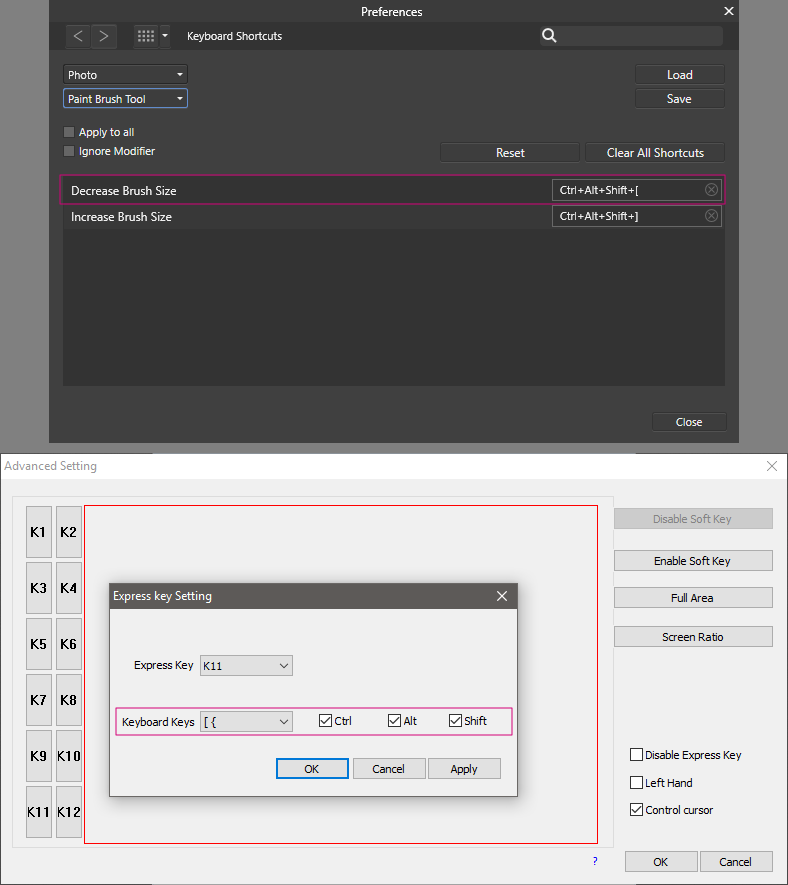
I use keyboard shortcut (Italian Qwerty Keyboard) AltGr [ and AltGr ] to change the brush
...all key I set (from K1 to K10) work correctly, except for brushes and tools size
The Huion Express keys (and pen buttons) will only allow you to set Alt, not AltGr as a key. Therefore you can't use AltGr + [ and AltGr + ] with the Huion Express keys.
I also tried all option btw "Ctrl, Alt, Shift" and [
Your screenshot only shows Ctrl + Alt + [ (the shift key is unticked). If you set both Affinity Photo and the Huion Express keys to Ctrl + Alt + Shift + [, it should work correctly.

Is AltGr + [ the default shortcut key in Affinity Photo for Italian Qwerty Keyboards, or is this a combination that you've set yourself? If it's a combination that you've set yourself, it may be worth just sticking with the Affinity default keys because I don't know of a way to change all the brushes at the same time in Affinity Photo. Therefore it means that you'd need to set each brush tool one at a time to your new shortcut.
-
On 14/06/2017 at 2:17 PM, Tazintosh said:
Here's the challenge:
Make me this in Affinity (Photo or Designer, choose the one you want).
Made in Photoshop in 5 clicks. The gradient tool is set from solid black to 0% black.
As MEB said, you may get away with using a different method (duplicating the mask with CTRL/CMD + J). Although it's obviously not 5 clicks like you're asking for, it does have the benefit of all the gradients being editable at a later stage if you decide you need to go back and alter them.
Video:
Timeline 1.mov (file no longer available) -
Here is the image
In the Paint Brush tool context bar at the top, untick the 'Protect Alpha' setting.
-
I have the opacity and the flow both set to 100%, and all I'm trying to do is to remove the adjustment layer effects from parts of a photo. With a Black and White Layer it should be readily obvious.
It may be worth posting a screenshot. Does the Paint Brush tool paint properly on a normal pixel layer?
-
I agree. I have tens of thousands of TIFF images dating back almost a hundred years. The originals and post-processed master files are all in *.tif format and therefore I will continue to use *.tif for consistency reasons. Having a mixture of *.tif and *.tiff would be an error waiting to happen especially when carrying out searches/filtering, or carrying out operations in bulk using command line tools. In addition the Affinity Photo 'save as' dialogue box doesn't see any *.tif files at all, which is a PITA.
In all honesty I don't understand why Serif don't just standardise on *.tif anyway. I don't see any advantages of defaulting to *.tiff when everyone else uses *.tif and have done for a long time. In my eyes it adds unnecessary complications with no benefit.
- awhite and rafikiphoto
-
 2
2
-
I purchased Affinity Designer then downloaded the Affinity Designer Beta (as it stated to do) But... like I said before (in my other post) It DID work prior to me cleaning up my system. Now it won't work at all.
I think you've misunderstood my reply. In your recent posts you've said that you are a landscape/macro photographer and that you bought Affinity because you want to switch to Affinity from Photoshop. There are two different Affinity products, there's Affinity Designer and there's Affinity Photo. You are using Affinity Designer, which is great, however there will be more photo oriented tools in Affinity Photo than in Affinity Designer. That's the reason why I asked whether you've accidently bought Affinity Designer instead of Affinity Photo. I don't want you to think Affinity is missing features, when in reality it's because those features are in Affinity Photo rather than in Affinity Designer.
With regards to your file permissions problem, a quick search of previous forum posts brings up some issues to do with sandboxing and too many fonts installed, however I really can't help you with that as it's not something I know anything about. Somebody else will need to help you with that.
-
Is the Paint Brush tool's Opacity and Flow both set to 100% in the top context bar? If you add a new pixel layer and then paint black on it using the Paint Brush tool, does it paint properly on the pixel layer?
-
...99% of the time I use Photoshop.
Creative Cloud is becoming too expensive so I've luckily found this awesome program.
Unfortunately I don't know the answer to your question, so someone else will need to help you out with that, however looking at this post and also your post in another thread, did you accidently purchase Affinity Designer instead of Affinity Photo? Or have you bought both?
-
I downloaded the DAUB Vector Set II brush set via the Affinity Blog, and I wondered if the first Vector Set was still hanging around somewhere for installing. I found reference to it being included a few years back as part of an eZine, but I didn't see any links to it more recently.
Is it still floating around out there somewhere?
I don't know whether the second set includes the ones from the first set as well, however you can find them on the following page:
http://www.miguelboto.com/affinity/resources/
(The site is run by one of the moderators here)
-
Following on from the previous post, this is the video in particular that covers this topic.
-
This camera is not supported in the iOS version. Check this page for a list of supported cameras.
Looking at that list of supported cameras, the EOS M3 should be supported as it was released in 2015Q1. For some reason though it's listed as a 'Canon EOS Kiss M3', instead of 'Canon EOS M3', which is a mistake. I don't know whether this has any relevance or not.
The most recent supported Canon's on that list are the 80D and Rebel T6/1300D, which were released in 2016Q2. Therefore it should be just camera's from the 5D Mark IV onwards (which was released in 2016Q3) that are yet to be supported?
-
I have my suspicions that it's an iPad question. If you ignore the original posts from February, it sounds like the question is asking whether there's a quick way on iPad to do the same as Alt/Opt clicking on a node or handle to make a sharp angle. That's my guess anyway.
-
I'm realy enjoying Affinity Designer on Windows, but I"m missing a feature. For me it is very hadny to have previews of my files in explorer, but since I asscoiated the SVG file type with Designer, I can no longer have them. So, I'd rather suggest to add support for this.
Are you sure you were able to view SVG thumbnails in Windows File Explorer before? If so it would be due to third-party software you have installed, as Windows doesn't have native thumbnail support for SVG files.
In order to display thumbnails, Windows File Explorer needs a codec for that file type so that it can read them, and that comes from the developers behind that file format. As Windows File Explorer doesn't natively have a codec for SVG files, they won't be displayed in Windows File Explorer and instead you will just see an icon which will be the icon for the program the file type is set to open with (in this case, Affinity Designer).
You'll find the same issue with Camera Raw files, where until the camera manufacturer's submit codecs for their Raw files to Microsoft, you also won't be able to view their thumbnails in Windows File Explorer either, just the icons. However I don't know the reason why other developers such as Adobe or the W3C don't provide codecs for PSD files, SVG files, etc., I guess there's some sort of political reason behind it that only they know. Maybe licencing issues, I don't know.
Therefore the only way to display SVG thumbnails in Windows File Explorer is via third-party software, however I can't give you any advise on this as I don't use them. If you do take that route though, be cautious about what you download and install.
-
I suspect this will sort itself out just like it did (for the most part) when the Windows apps were first released. Shortly after the release date, the Questions & Feedback forum was flooded with topics specific to the brand new Windows versions, but that died down within a week or so.
Besides, a great many topics are not limited to any one app or platform. Most of the tools work about the same on all of them & the various techniques users write about are generally applicable regardless of the device used.
The difference with that scenario is that the Mac and Windows versions are pretty much the same, which means the vast majority of the questions can be answered regardless of the OS. What OS people are running is rather moot and unless it's a question specific to something like the RAW engine used, or file system, no-one really cares about the OS as it's largely irrelevant. Therefore, people running Windows are able to answer questions from people with Macs and people with Macs are able to answer questions from people running Windows. Everyone's happy.
With iPad, the menu's, etc. are different, which means unlike Mac/Windows questions, iPad questions really need to be answered by iPad users. I have no way of knowing whether my answer is applicable to the iPad version and am likely to find that after spending time typing a response to a question, that I'm going to be met with a "I can't find the XYZ menu item you mentioned" because I had no idea they were using an iPad.
This is why even though I am happy with (and prefer) Windows and Mac being together, I didn't think the iPad versions should just be jumbled in with Mac and Windows versions and could do with it's own forum section.
That said, one of the suggestions listed in your other post sounds reasonable. When posting a new topic the poster needs to select a product from a drop-down, which is then displayed under the subject title. That way it's possible to know straight away what the post is referring to when looking through the posts and it will also allow filtering. Something along these lines where it's possible to identify iPad posts would be OK for me personally:
-
The forum "Questions & Feedback" has become very confusing. It would be better to create sub-forums for Mac, Windows and IPad (just like in the Bugs forum). In any case, the questions about IPad should be in a sub-forum.
I've never found Mac and Windows being together a problem (outside of bug reporting, which is already split) as the programs themselves are more or less the same, however I think iPad could do with it's own sub-forum. It's pretty nuts in here today. :)
-
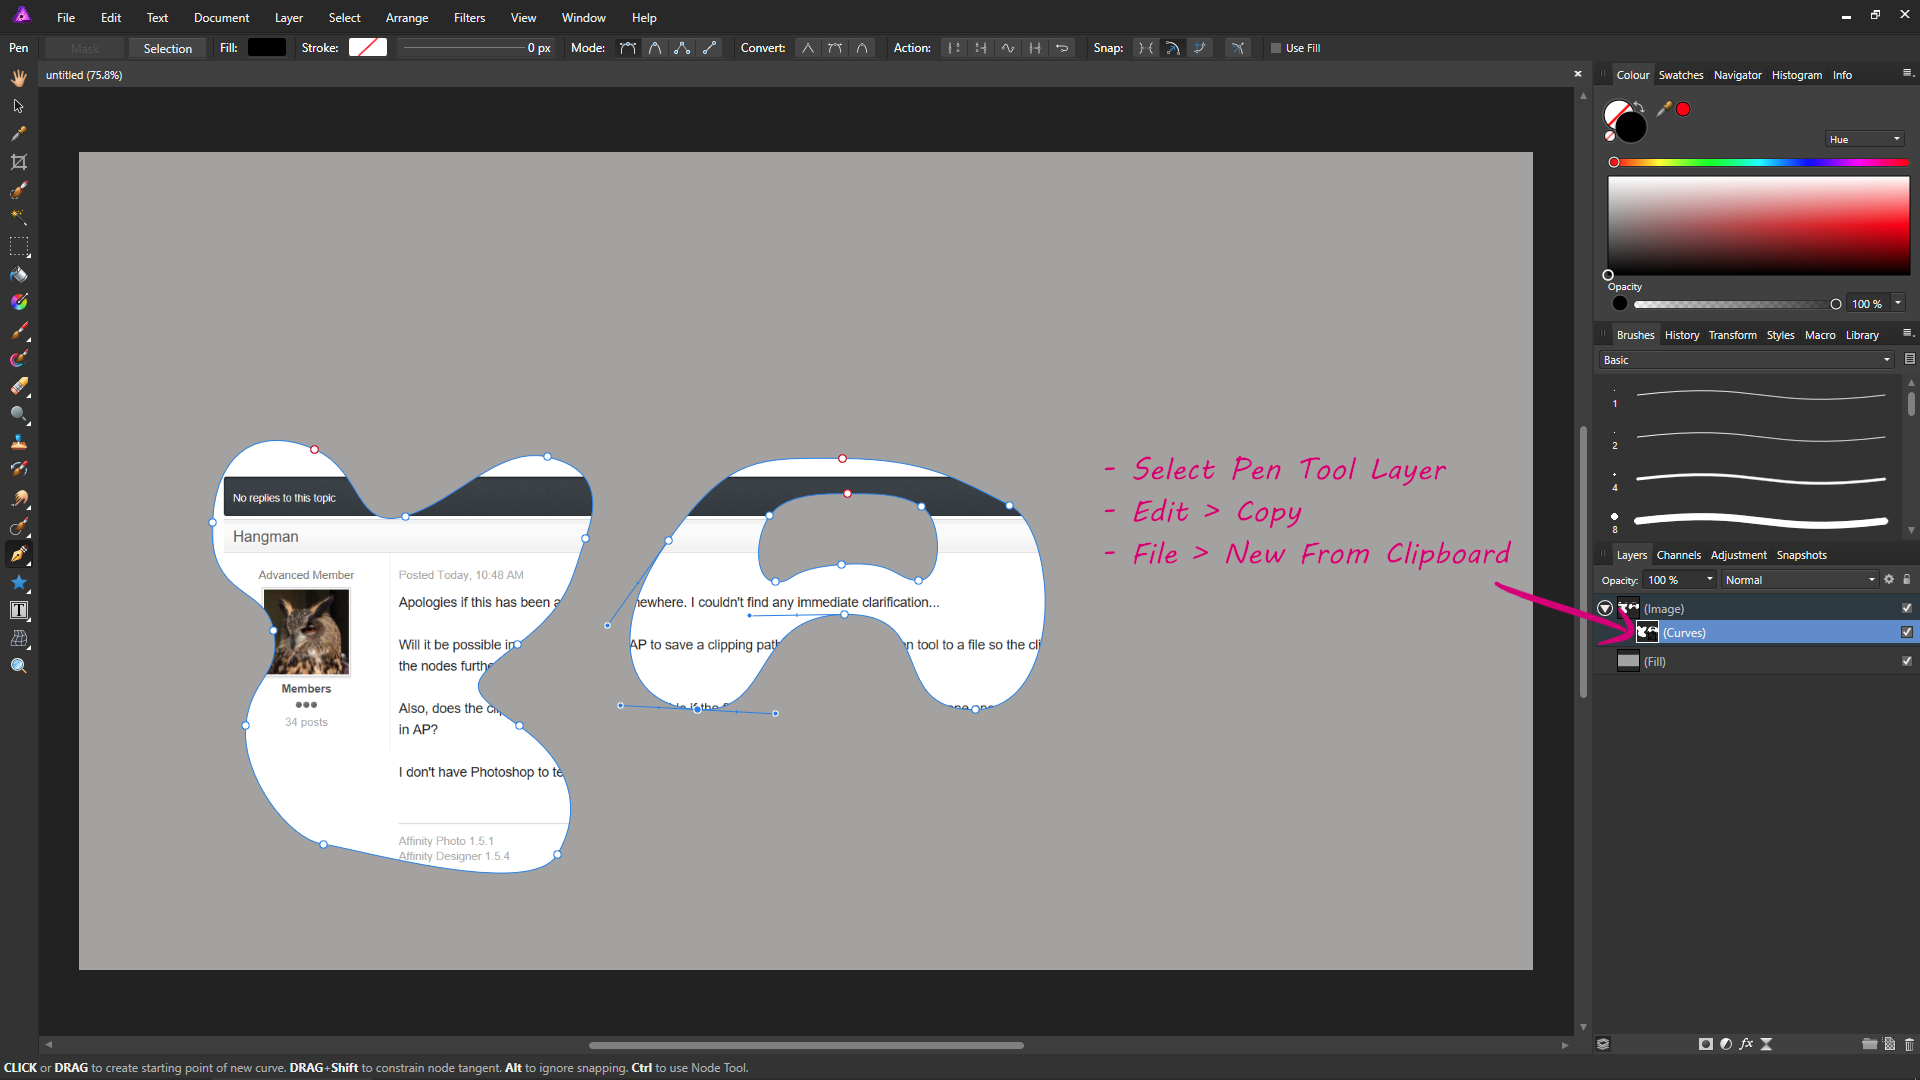
Will it be possible in a future version of AP to save a clipping path created using the pen tool to a file so the clipping path can then be loaded into a new image and the nodes further adjusted?
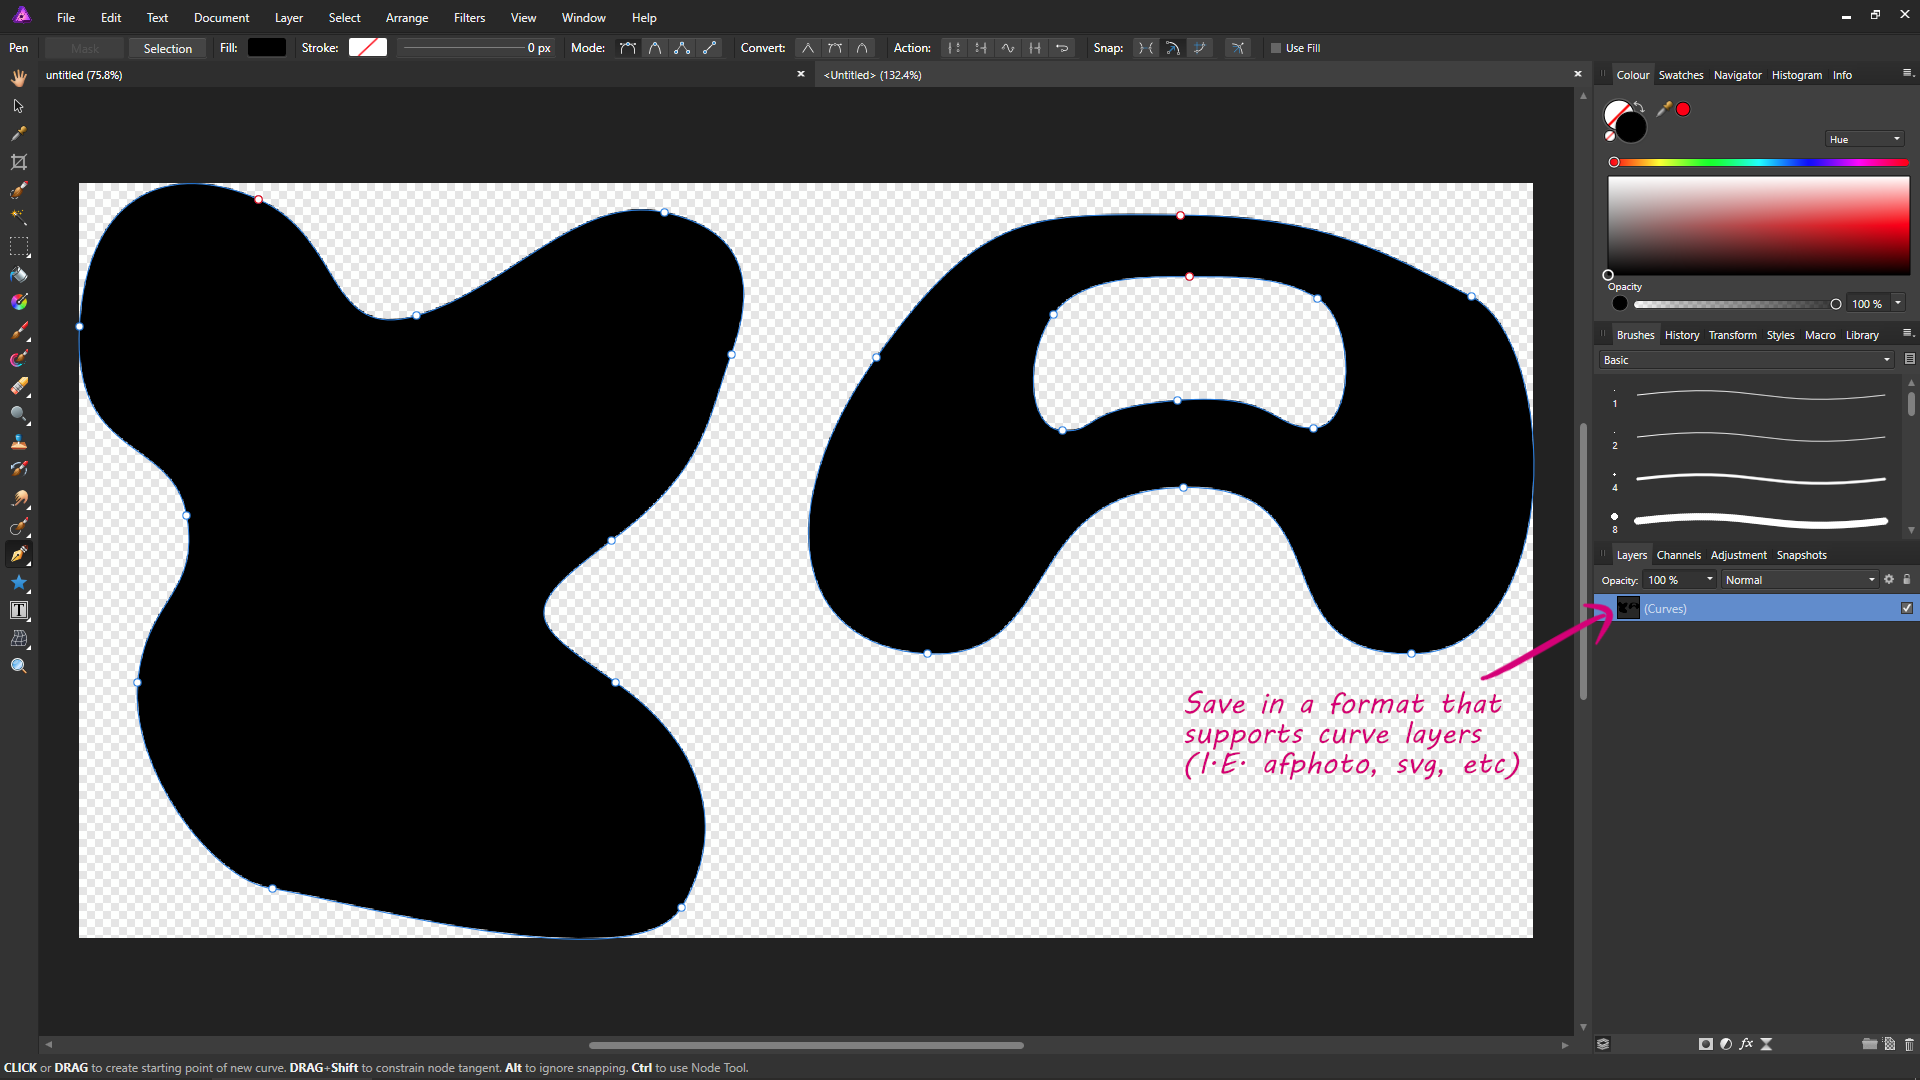
You can sort of already do that. Select the layer that's using the pen tool shape as a layer mask, then go to 'Edit > Copy', then 'File > New From Clipboard' to paste the layer into a new document. Save the document in a format that supports curve layers (I.E. afphoto, svg, etc.)
Importing it is a bit clunkier because if you open a new document, go to 'File > Place' and place the document with the pen tool shape you created, it will place it as an 'Embedded Document' instead of a Curve layer. So realistically instead of 'placing' the image, you need to open it as it's own document and copy and paste it across into the document you want it in, which will keep it as a Curve layer.
-
From Affinity Photo 1.5 you can set not just flow, but also accumulation (opacity) to pen pressure in the brushes 'Dynamics' tab. The icon on the far right will also allow you to adjust the pressure ramp.
-
-
-
I think it only works with Vector brushes and so unfortunately it doesn't work in Affinity Photo as it only has raster brushes. I posted a screenshot (Post No.4 HERE) where it looks like it's possible, but it doesn't actually do anything.
-
If you're running Windows 10 the chances are you could install the 64-bit version of Windows on your machine if you wanted.
It may be worth reading through the below article where it gives details about switching from Windows 10 (32-bit) to Windows 10 (64-bit) using Microsoft's Media Creation tool and clean installing Windows.
Link:
-
Latest drivers downloaded installed and a reboot. Still no pressure sensitivity. The tablet works fine in Photoshop CS6.
It may be because you're just using the default basic round brush, which is a constant size brush (I.E. It isn't set to use pen pressure for brush size control by default).
With the Brush tool selected, click the 'Force Pressure to Control Size' button next to the 'More' button in the brush context bar at the top. This will override the brushes size jitter setting in brush dynamics and use pen pressure for brush size control.


Accidentally deleted a Style / cannot undo Styles
in Pre-V2 Archive of Desktop Questions (macOS and Windows)
Posted
I'm trying to think of a scenario where 'Edit > Undo Apply Object Style' won't work by design, but I can't think of one at the moment. Together with the part about the Style being all the way back at the beginning of the History panel, to me sounds pretty odd.
If you just want to get the file you're working on to a state where you can continue working without the style applied, you could try the following to see if it removes the Style:
1) Select the layer with the applied Style
2) As previously mentioned in Post No.3, if it has an fx symbol on the right of the layer, click on it and untick all the effects, including making sure the 'Fill Opacity' at the bottom is set to 100% also.
3) Select the Rectangle tool, then in the top context bar click 'Fill' and set it to 'None'. Click 'Stroke' and set it to 'None'
As for getting to the root cause of the issue, I don't think I'll be of much help, however you could upload a sample file and I'll see if I can reproduce it. Is it just one particular document where the issue occurs, or does the same happen on a completely new document as well? If you can reproduce it on a new document, it will probably be better to upload that instead, with 'File > Save History With Document' applied.