h_d
-
Posts
1,472 -
Joined
-
Last visited
Everything posted by h_d
-
 You can set the effects for one image, then either (a) copy the image, select another image, choose Paste FX from the Edit menu (command-control-v on Mac, don't know on Windows); or (b) select the effected image and save its settings as a new style in the Styles panel and apply that style to subsequent images. However, both methods depend on the original pixel dimensions and resolution of the images. When I try it with same-sized original images, it works fine. But with different-sized originals, the pixel dimensions for Offset and Radius differ from the the first image. So it may not be a perfect solution.
 -
Hi @ScottF2000 and welcome! Search the Help files for 'Creative effects using stacks'. The example image is a bit different from yours but I think the technique should be the same.
-
Details - Detail Refinement.
-
Font Organization
h_d replied to imagefirst's topic in Pre-V2 Archive of Affinity on Desktop Questions (macOS and Windows)
Same on Intel, you're by no means the first to complain. Aunt Edith's idea is a good one though. Me too. -
Font Organization
h_d replied to imagefirst's topic in Pre-V2 Archive of Affinity on Desktop Questions (macOS and Windows)
Likewise. Until I used FontBook to create Collections. These aren't accessible through the Font menu in the Context Toolbar, but they are in the Font pull-down in the Character Panel in Studio. For example I created a FontBook Collection called "Purchased", dragged my own fonts into it, and now they're easily available in the Character Panel. Publisher shown here, but it works for Photo and Designer too: (He who dies with the most fonts wins. I'm losing badly. 😉)
-
With Preserve Alpha checked, at higher Radius values I get this is in the corners: That's on the OP's original screenshot though, which is a very small low-res image. With larger originals the issue isn't anywhere near so obvious, and by the time you reach a point where it kicks in, the original is so degraded as to be pretty much unusable anyway. Bottom right corner before: After: (Could make an interesting artistic effect though...)
-
Have you tried the Dust and Scratches filter (Live or destructive)? The settings will depend on the size of the image but it does a pretty good job: Watch out for 'rounding' in the corners of the image though.
-
Why not edit the existing masters and add Page Number fields to each?
-
I think @Sandra Aska may mean the main Affinity site, rather than this forum
-
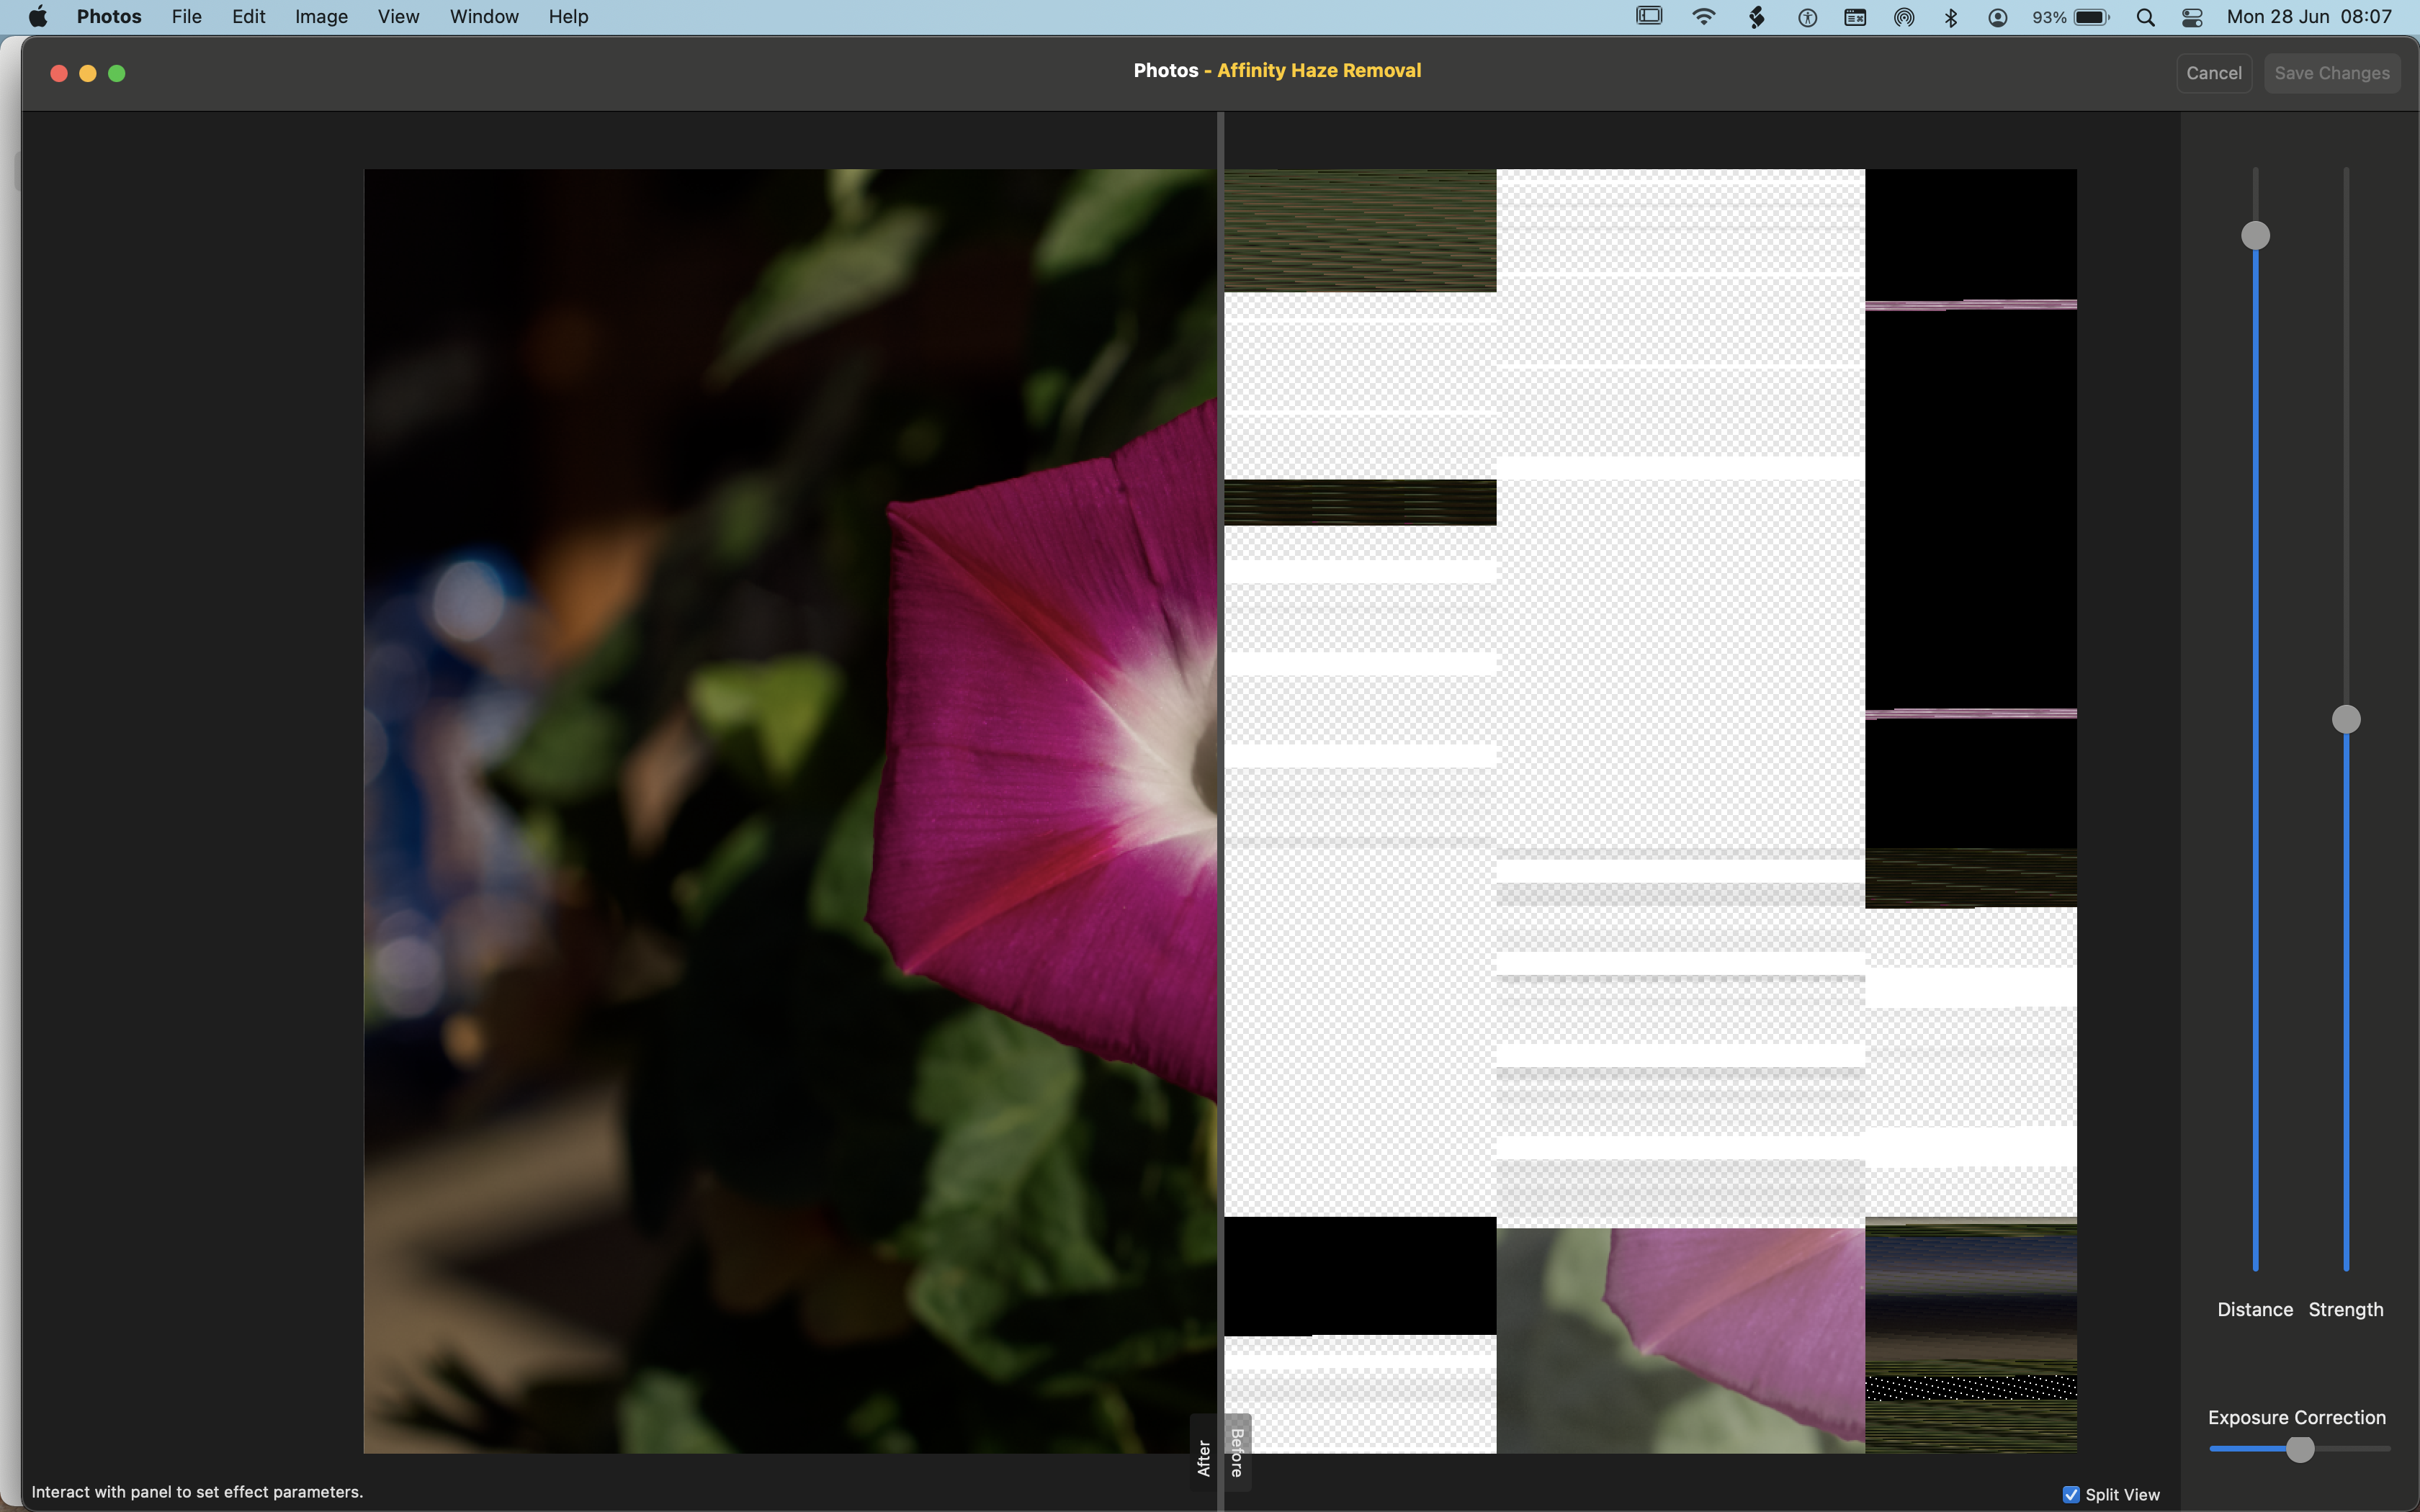
Haze Removal extension - corrupted display of raw images
h_d replied to h_d's topic in [ARCHIVE] Photo beta on macOS threads
hi @Chris B Just uploaded an .rw2 file. Others are reporting the same issue in the original thread. -
Haze Removal extension - corrupted display of raw images
h_d replied to h_d's topic in [ARCHIVE] Photo beta on macOS threads
hi @Chris B Would you be able to send me a Dropbox link please? I'd rather not make the metadata available. Thanks, H -
Please see this post in the main Affinity on Desktop forum for the original description. When using the Haze Removal extension in Apple Photos to edit RAW and RAW + JPEG images, the display of the 'before' image is badly corrupted. In my case this is with Panasonic .rw2 images. The OP didn't specify what kind of images he was editing. This occurs with the extension that is installed with Beta 1.10.0.244, hence my post here, but it's also present in the current Apple App Store version (1.9.3). Cheers, H
-
Hi @Tony M. and welcome! I am seeing the same as you when I use the Haze Removal extension on Raw images (Panasonic .rw2 format). It also occurs with images identified by Apple Photos as "RAW + JPEG", but not with "JPEG + RAW" or with jpegs. Is that the same with you? Looks to me like a bug, which I'm also getting if I try the same thing in the latest beta. I'll report it as a bug there.
-
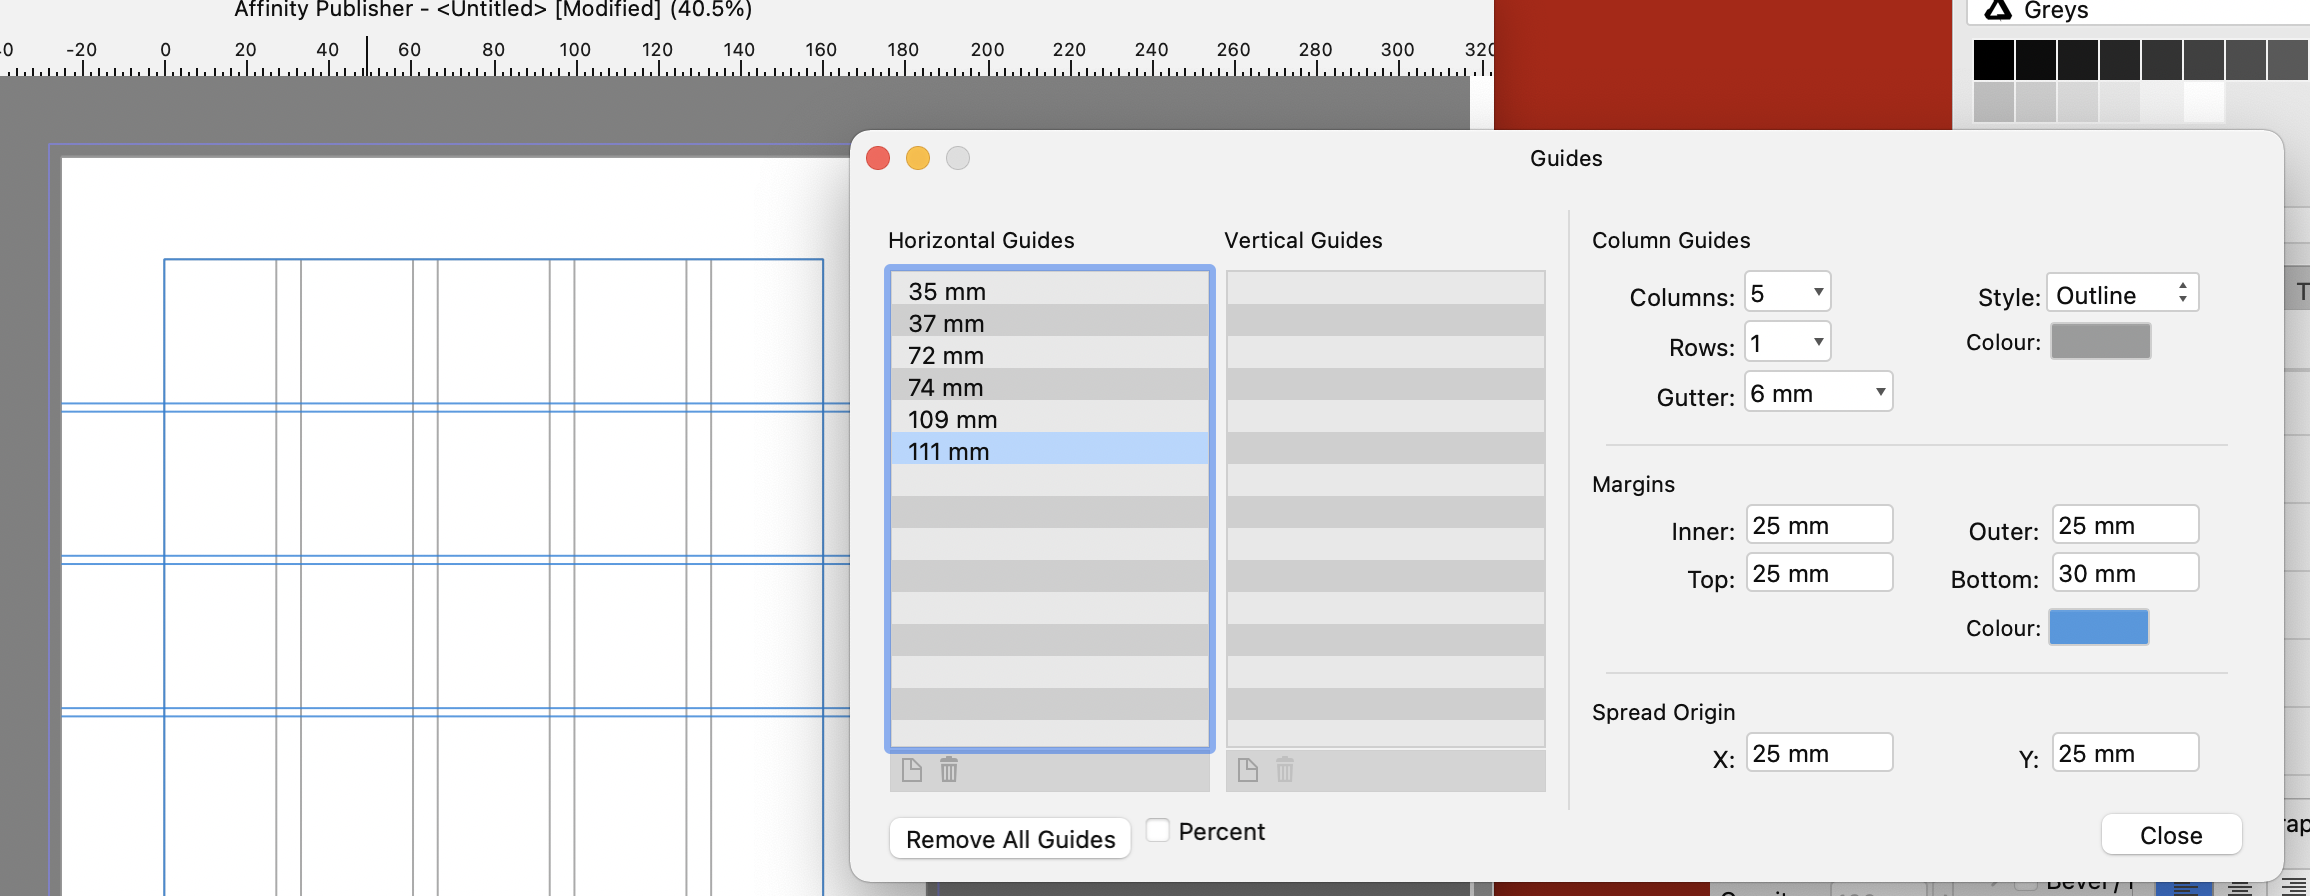
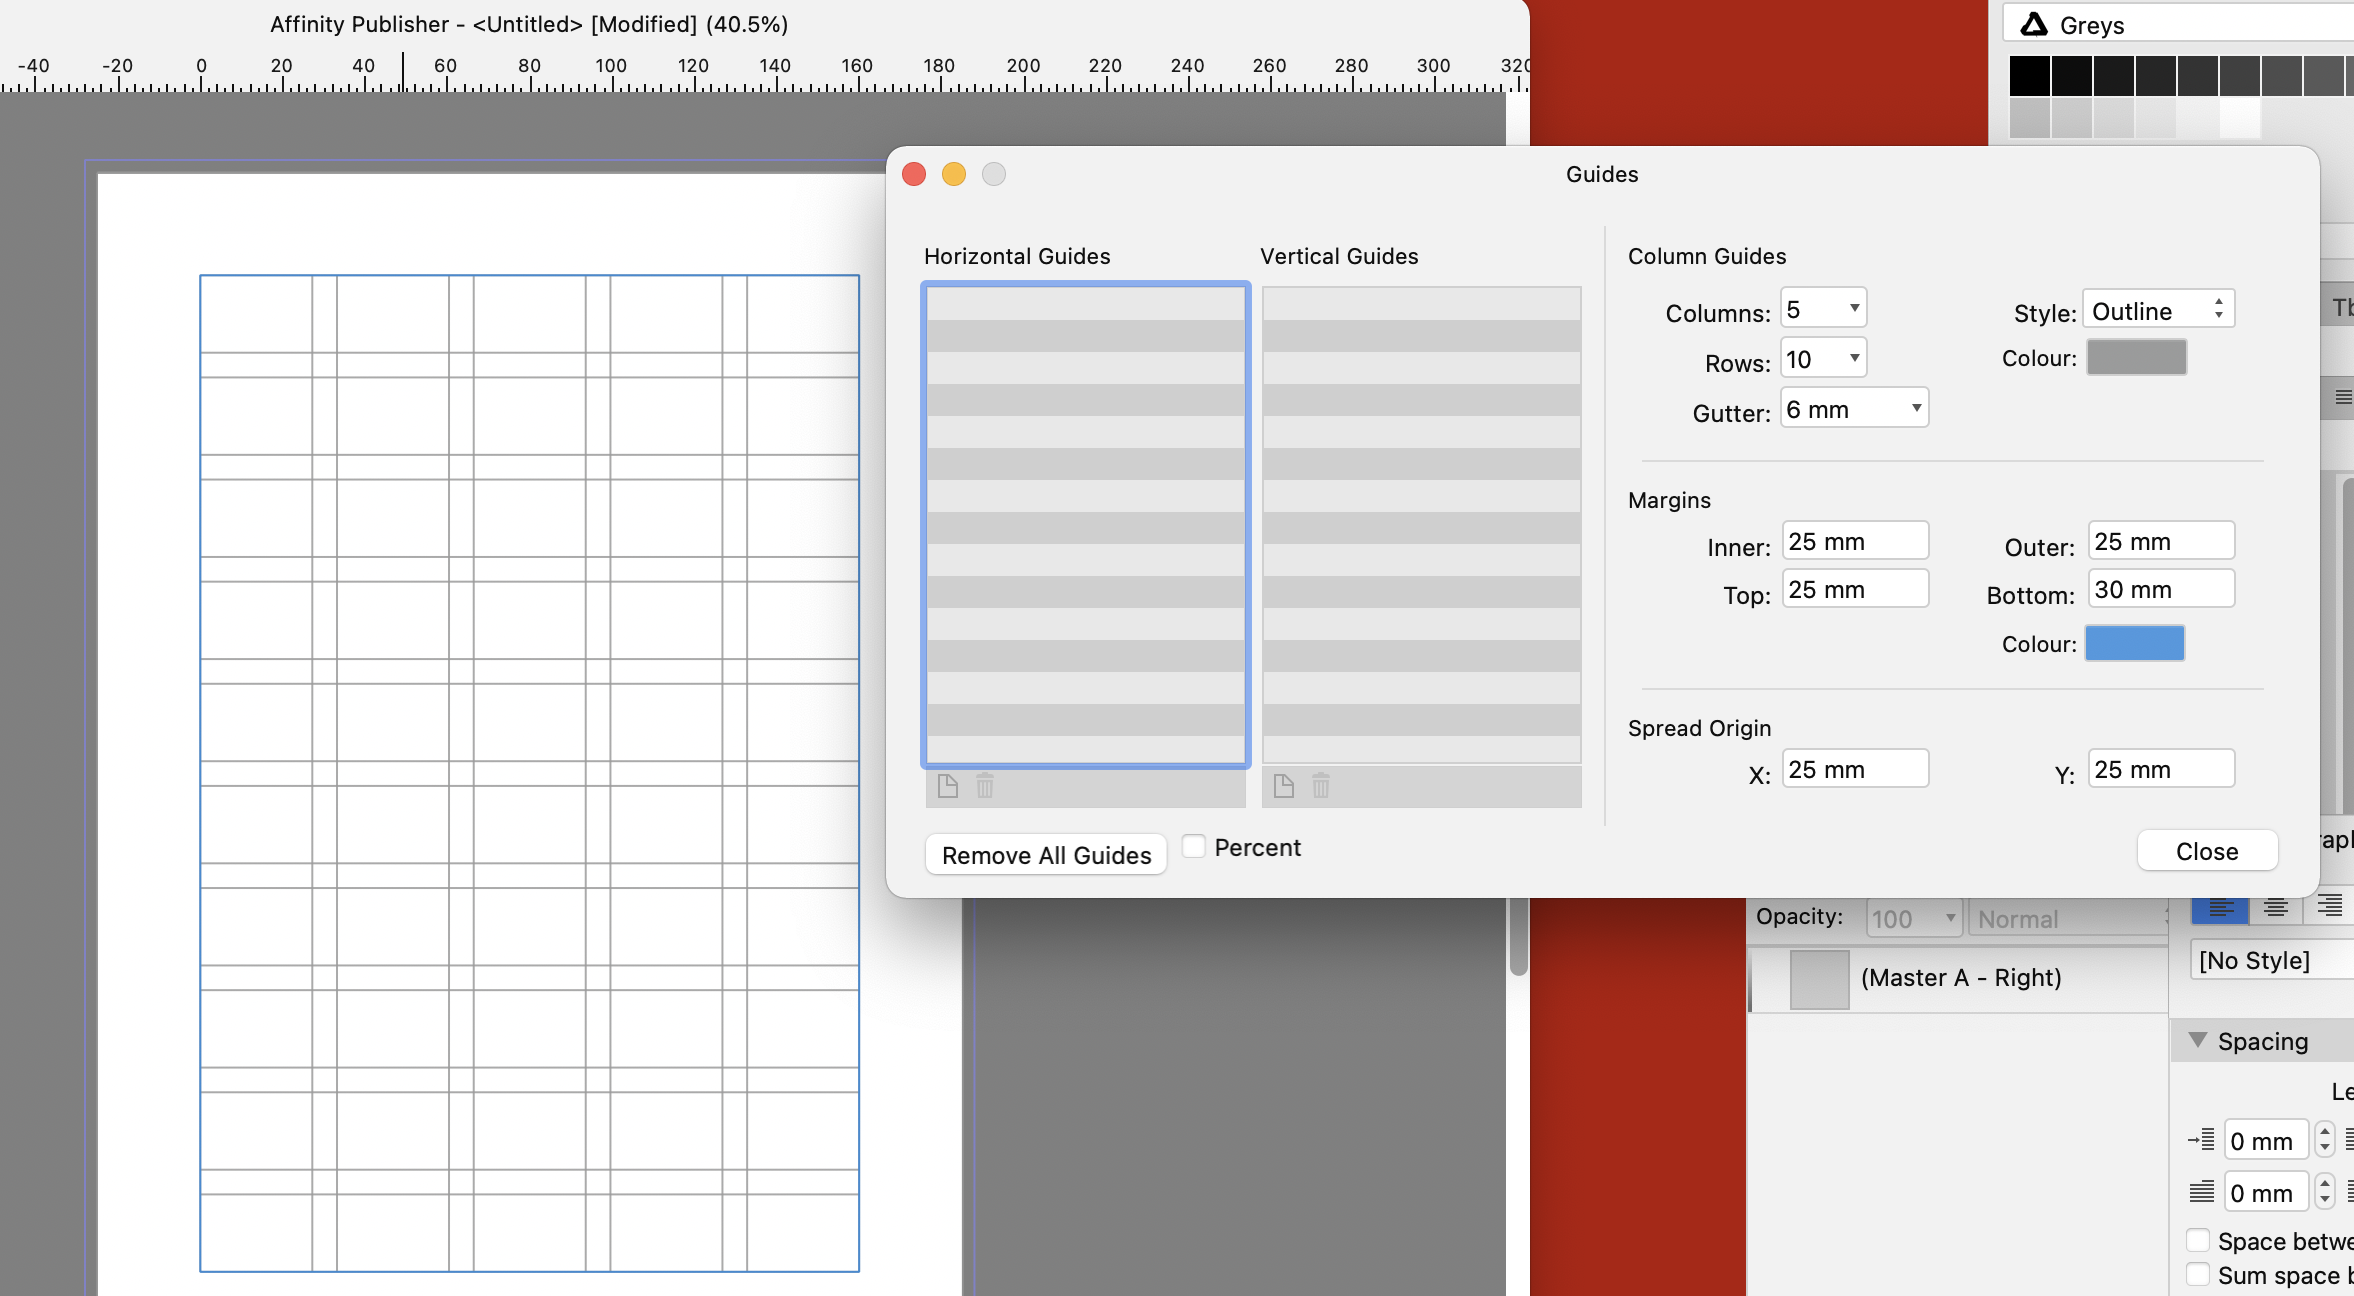
+1 for column guides It would be fab if vertical and horizontal gutters could be set independently: the current arrangement is quite limiting. As an example, I want columns with 6mm vertical gutters, and rows with 2mm horizontal gutters. If I set the gutters in the Guides Manager to 6mm and specify a number of rows greater than 1, the horizontal gutters are too deep: The only solution that I can see is manually, and laboriously, to add pairs of horizontal guides: And if I later decide to change the depth of my rows, I need to recalculate and re-input all the vertical spacings.
- 1 reply
-
- 1
-

-
And it has to be one that you're not going to use for typing (eg letters and numbers on their own, or combined with Shift). Working on a large editorial system long ago I set an all-user shortcut key to Shift+B. I didn't half get some grief when people tried to type "Bristol".
-
Just a thought: The default shortcut for the zoom key is Z, which is just above the left-hand option key. I wonder if you're either accidentally touching the Z key (if you use that option key) or if there's an issue with your keyboard. It might be worth disabling or changing the Z shortcut in preferences and seeing if it makes any difference. (Not totally convinced this is the solution though.)
-
I bought Publisher from Serif and there is never any delay when I launch it. I bought Photo and Designer from the Apple App Store and there is sometimes (every day or two) a delay when launching them. Apple issue those licences. You'd need to ask them.
-
The issue is only experienced by those of us who have bought our Affinity applications from the Apple App Store. Windows users are unaffected, and likewise Mac users who have bought their application directly from the Affinity Store. I'm on macOS. I bought Photo and Designer from the Apple App Store and Publisher directly from Affinity. I get slow launch (30 or 40 bounces in the Dock) every couple of days from Photo and Designer, and that's it. It would be great if Serif fixed it, but until they do I'd rather sit back and wait for those bounces than pay Adobe. Stop obsessing.
-
And drum scanners...
-
A straightforward way of adjusting the relative positions of the bullets and the text within the frame is to go to View, choose Show Text Ruler and fiddle with the sliders: Screen Recording 2021-06-25 at 19.45.21.mov But I don't think there can be an automatic way of centring a longest line of arbitrary length on the frame, and then left-aligning the rest of the text on that. If the length of the longest line is arbitrary, then the position of its first character is also arbitrary, and you would have to use manual adjustment. Plus, as @Old Bruce points out, what happens if one of your lines is longer than the width of the frame?
-
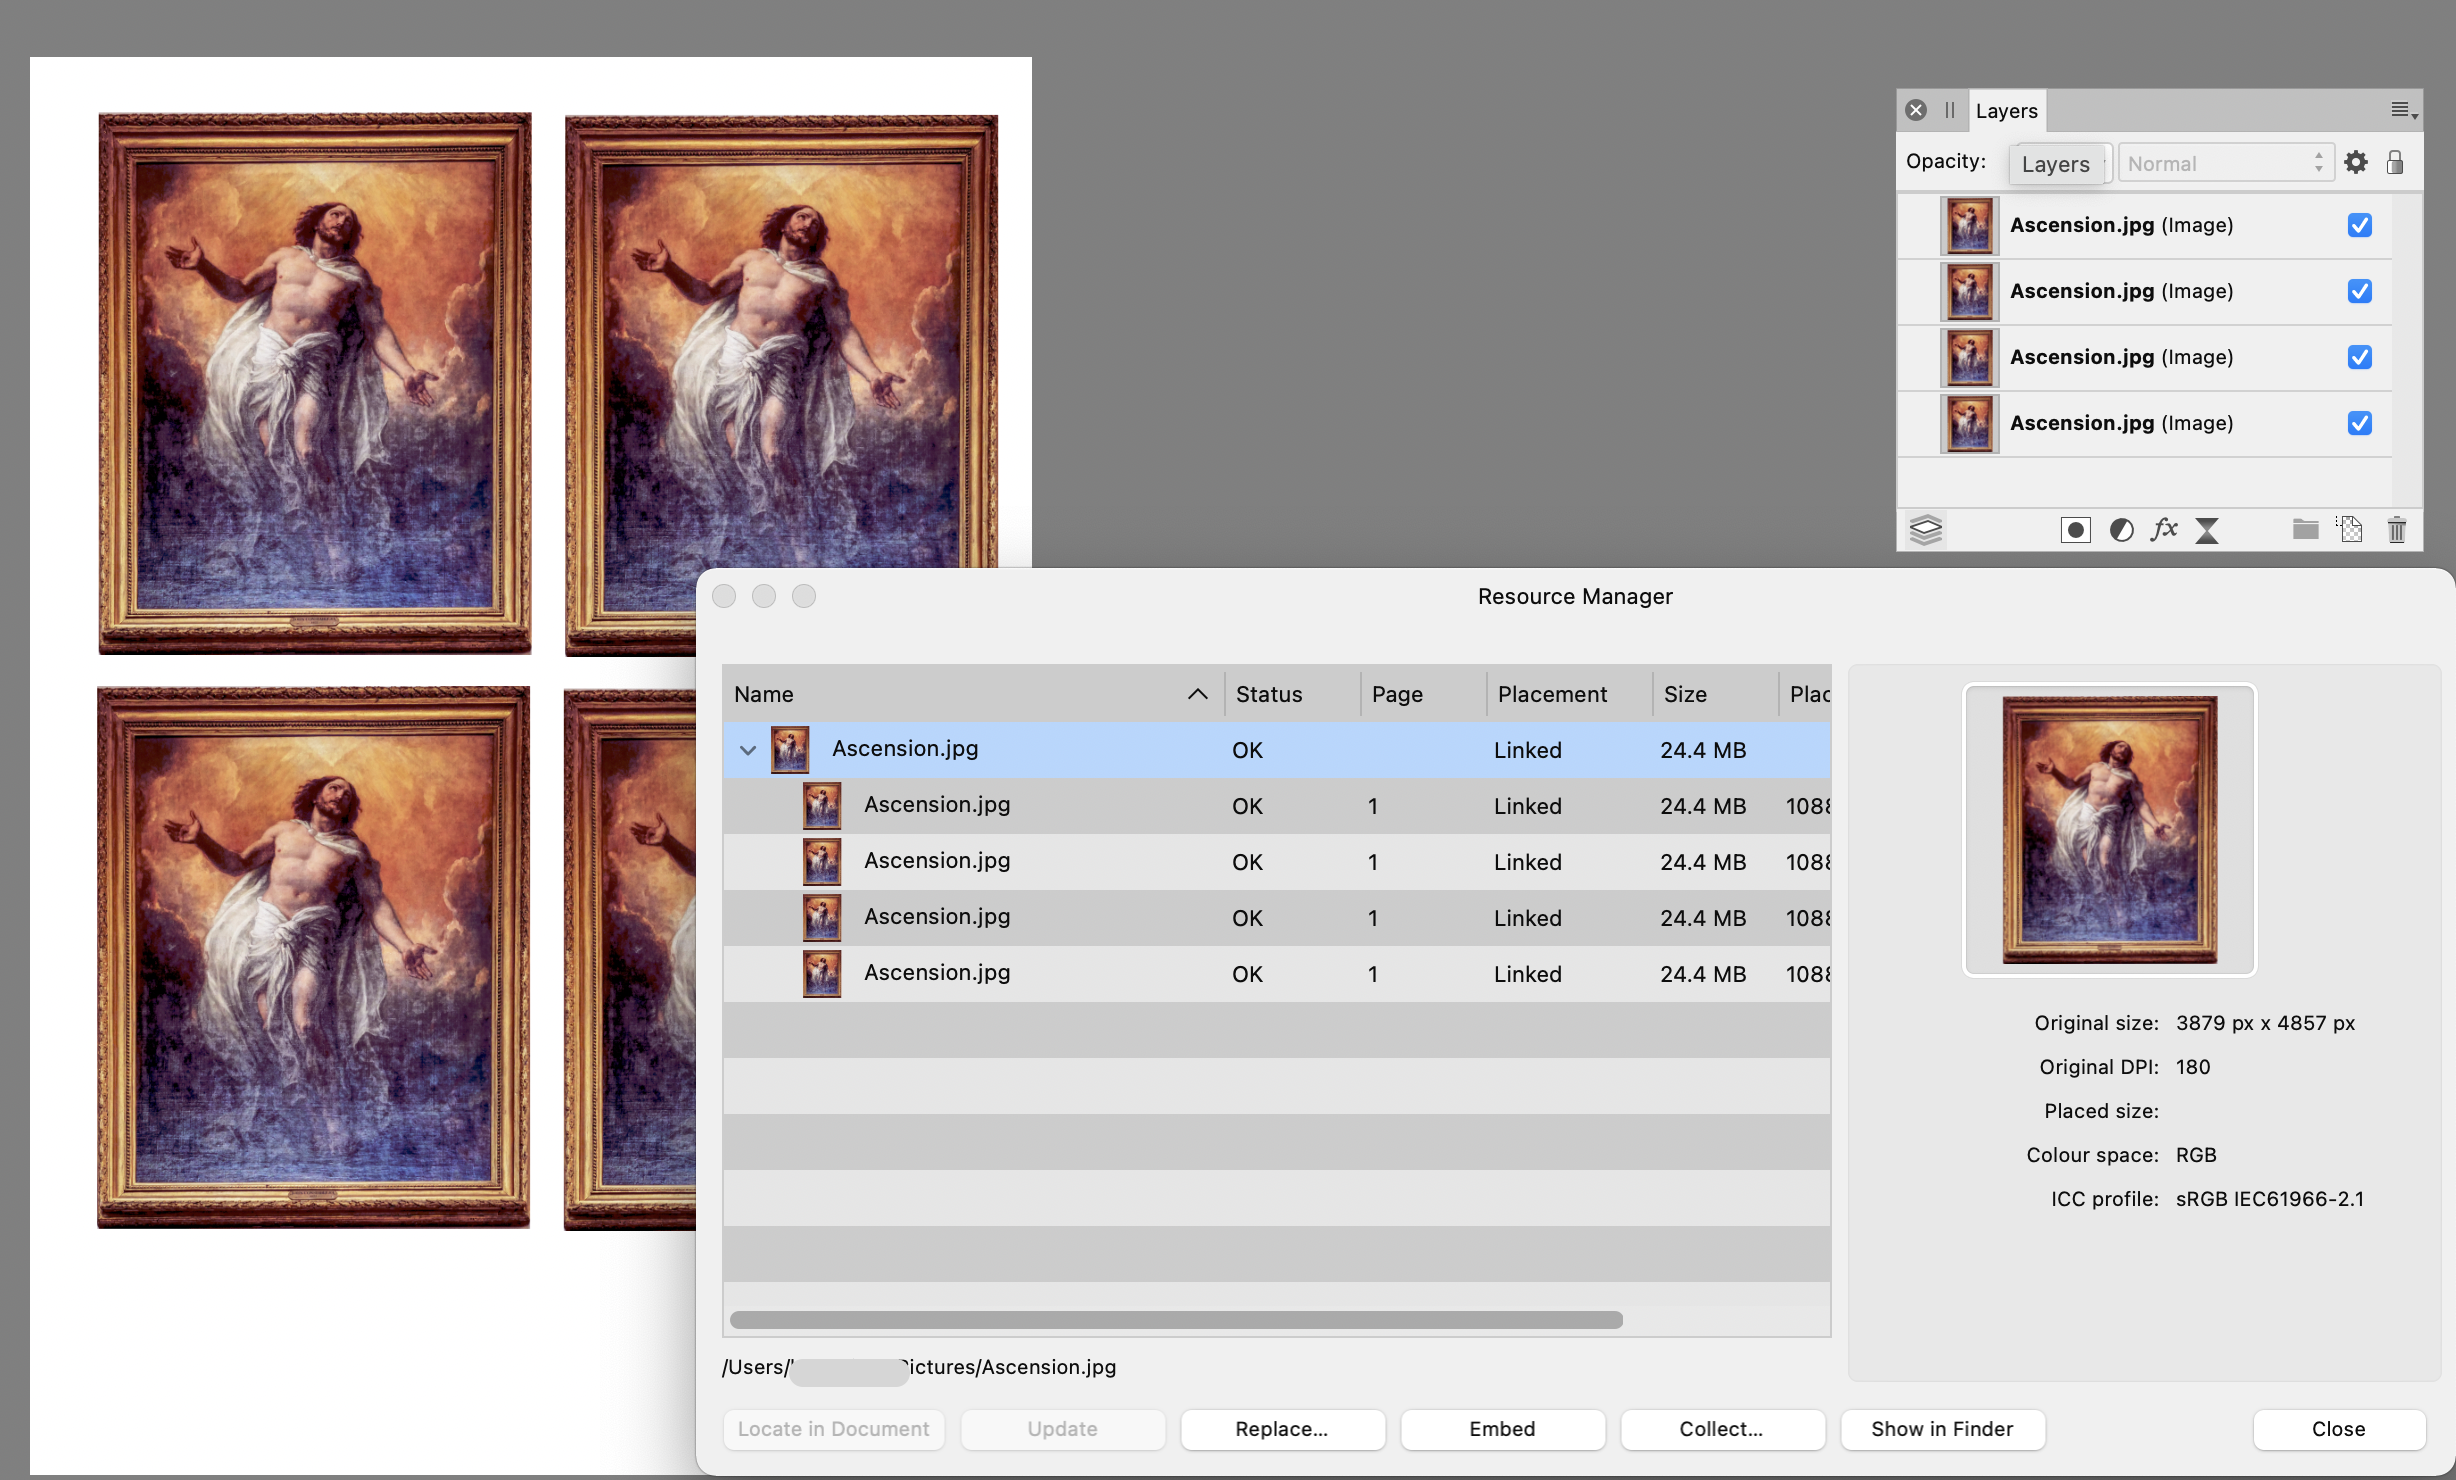
To replace all the images in one pass (rather than one-by-one), go to View and choose Resource Manager. If the images are embedded, highlight them and make them linked using the central Make Linked... button in the Resource Manager. This should give you a view something like this: Select the top-level image in the hierarchy (highlighted light blue in my screenshot) and click the Replace... button. You'll get a file navigation dialog from which you can choose the next image you want to place. When you confirm your selection, all four instances of the original will be replaced in your document. However... this method will work best if all the source images are exactly the same size. If your individual artwork files vary, they will tend to get resized during the replacement process. Another, more effective, option would be to use Affinity Publisher to create a data merge. It takes a bit of setting up (and a copy of Publisher, natch), but it would create a document with a page for every image grid, as opposed to the single-page Photo document which would need repeated changes. (Not my artwork - John Constable on a bad day.) EDIT - on re-reading, I'm not sure if @Halli wants to replace all four existing images with the same one (for four-up printing), or with four distinct images. If the latter, then a Publisher data merge would definitely be the way to go.
-
I don't know why it's happening, but I can tell you how to stop it. If you expand the entries in the index panel you'll see that there are a number of apparently blank lines: If you click on these lines and then press the delete (bin) icon in the Index panel, the full stops (periods) will disappear. Possibly a bug, but hope this helps you to sort them.
-
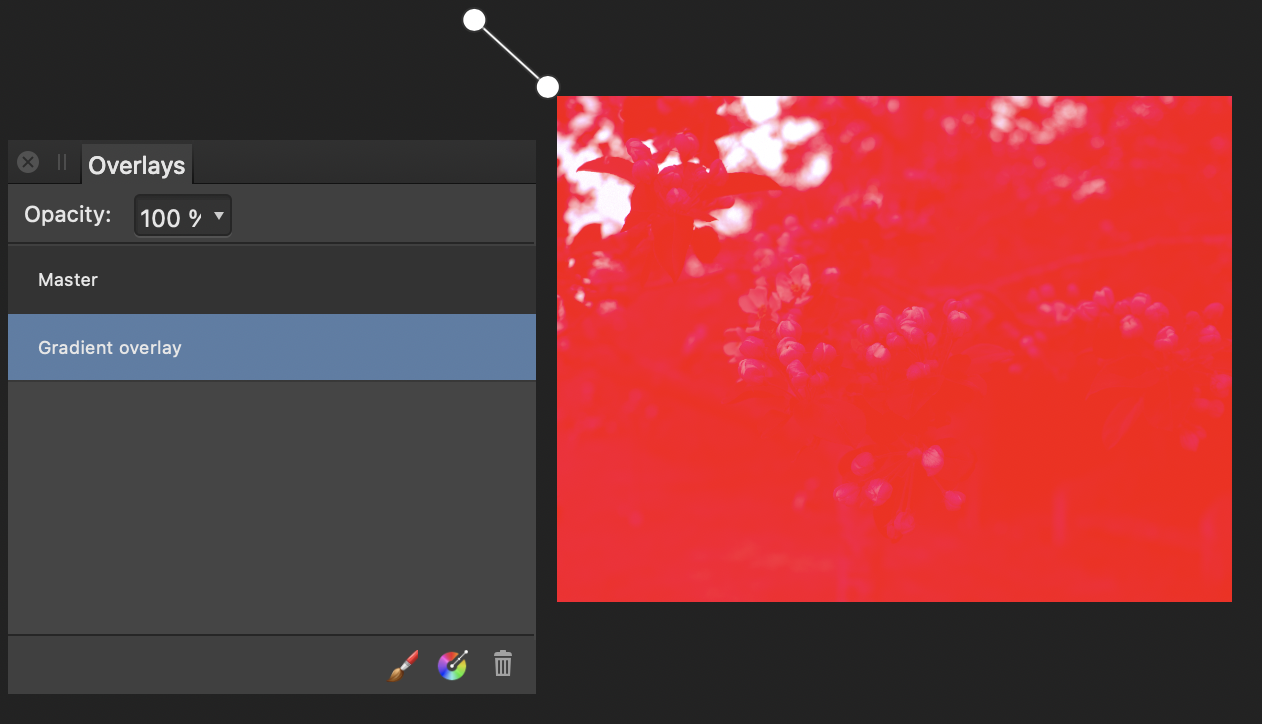
Overlays problem
h_d replied to Geraldine007's topic in Pre-V2 Archive of Affinity on Desktop Questions (macOS and Windows)
I don't suppose you've accidentally dragged both handles of the gradient off the image area?
-
Most of those are the Apple Photos extensions (Develop Extension, Edit in Affinity Photo Extension, Affinity Haze Removal etc) which are separate from the main Affinity apps and are only accessible via the editing suite in Apple Photos (not Affinity Photo). That's presumably why they're not listed in the article. They aren't affected by any resets to the main Affinity apps. If you don't use Apple Photos you'll never have seen them in action, although they get installed by default, and they don't really have any associated settings or preferences so I don't think you'd be losing much if you didn't back them up. I should just go for the files in the paths down from the Data/ folders for Affinity Photo itself, and Affinity Designer.