NathanC
-
Posts
3,160 -
Joined
Everything posted by NathanC
-
 Welcome to the forums @Fridge, Each stroke will be drawn in relation to the Pressure applied to your drawing tablet as well as the Size variance and the Pressure profile set in the Brush editor. You can customise the latter two settings in the brush editor by going to 'More' along the context toolbar with a vector brush selected or double clicking on the desired brush in the 'Brushes' panel. If you want less variance in the brush size you can reduce the variance slider to your liking to maintain the width. Next to the 'Pressure' controller in the editor you can also adjust the pressure spline graph to control how the brush size varies according to the pressure set, there are a few pre-set profiles available for use. As far as I'm aware the line smoothing applied to vector brush strokes can't be configured or disabled at the moment.
 -
Hi @Ezbaze, Feel free to use the upload link below and we'll take a look. 🙂 https://www.dropbox.com/request/lNb0wBbdBXd7X5f2c7Iz
-
Hi @Mlausier, Thanks for the upload, I've taken a look at the file but unfortunately it doesn't appear to have been saved with history so I can't check historically what's happened with the document to cause, but I've made a few observations below: - The master page layer re-order issue only appears to start from pages 94/95 onward, and only causes a visible problem from pages 114/115 onward as the rectangle shapes are positioned behind the background layer. - The empty picture frame layers following 112/113 do appear to be offset compared to previous pages, however the master page dimensions are the same across the document and the picture frames are page elements and don't belong to a master. I'd suggest making the following amendments, but make a backup first just in case: - For the offset picture frames these don't belong to a master, so they will need to be re-sized to correct this on each spread. One way to do this is to make a note of the picture frame X/Y on the earlier spreads, For example I can see that on page 113 the top right hand picture frame's position is 4.379 in X 0.86 in Y. If I shift + left click to select the top right picture frame on the left hand spread on each of the affected pages I can then enter these values into the 'Transform' panel which will correct their positioning on each spread. I can then repeat this for the bottom right hand picture frame on the left hand spread and then repeat the same for the right hand spread using page 114 for the X/Y. - To get the master page content re-ordered correctly again I'd suggest re-applying the master to pages 114/115 onwards which have all been most adversely affected by this unusual re-ordering due to the rectangles being positioned behind the pixel background layer. In the pages panel if you select page 114 and then shift + click the very last page and then right click > apply master this will prompt the 'Add Master' dialog. Make sure that replace existing is ticked and the content is set to 'Migrate' before pressing 'Apply'. This will fix the Master A layer ordering, however as a result of the text frame layers belonging to the master pages this gets automatically migrated over to the newly re-applied text frames according to a number of rules, which can affect the text content positioning that may need some manual corrections per page. You can re-apply the master from page 94 onward but since the frames are filled with text content this may require more corrections. Migrate info/rule order: https://affinity.help/publisher2/English.lproj/pages/Pages/migrateMasterPages.html Apologies, this wasn't intended, just genuine intrigue.
-
Publisher 2 with MacOS Sonoma 14.5 not Launching Aa All
NathanC replied to imteniedo's topic in V2 Bugs found on macOS
Thanks for the crash report, it does appear to potentially be font related. Could you try booting into safe mode? This clears a number of Caches, one of which I believe is the font cache. Once you've booted into safe mode see if the app now launches. Mac safe mode help: https://support.apple.com/en-gb/guide/mac-help/mh21245/mac If it still crashes after booting into safe mode, and also after going back into your standard user account again could you try creating a new temporary MacOS user account and launching the apps from that account? This will help confirm if it's anything local user environment related or specific to the local app folders which are re-generated. https://support.apple.com/en-gb/guide/mac-help/mchl3e281fc9/ -
All afphoto, afpub, afdesign files showing icons not thumbnails
NathanC replied to dradept's topic in V2 Bugs found on macOS
Hi @dradept, I can confirm this issue is one we're aware of and is specific to the Sequoia beta (Which isn't officially supported as Hangman mentioned). Hopefully this is one that will get fixed 'In the wash' during the beta cycle but if not it's logged for the devs to investigate further. 🙂 -
Hi @JohnWGa, I'd initially suggest disabling 'Hardware Acceleration' found under the app Settings > Performance. Once you've unticked this setting close the interface and restart when prompted to and see how it goes moving forward. If it's had no impact can you provide us with a screen recording demonstrating the problem? Also, when the unresponsiveness starts to happen check Mac Activity Monitor/Windows Task manager and check your Mem/CPU/GPU usages as if the problem only starts when the document starts getting more complex you may be running out of available resources or hitting hardware limits.
-
Images edited in Affinity 2 won't save in Photos
NathanC replied to NevB's topic in V2 Bugs found on macOS
Welcome to the forums @Shotbychea, It appears that you're trying to save your document in the .PDF format, as far as I'm aware it's not possible to save this format back to apple photos, you'll need to select a compatible raster format such as JPEG or PNG in order for the 'Save Image' option to appear on the Share sheet. If you want to export it as a PDF you'll need to save the .PDF file to your local iPad storage (Files). -
Welcome to the forums @Mlausier, I'm surprised to hear that the master page layer stack movement has been triggered by an action as simple as an object opacity change and not something else so I'm not sure how easy this will be to replicate without seeing what happened in the document's history, but if you could provide a copy of your .afpub document we can certainly take a look at what can be done. If you don't wish to share the file publicly i've included a private upload link below. https://www.dropbox.com/request/ua1MMKywBvuu3IRewT7Q Thanks
-
BUG on Hidden values with imported PDF files
NathanC replied to Daniele Salvatore's topic in V2 Bugs found on Windows
Hi @Daniele Salvatore, I'll get your file logged with the developers for further investigation. Could you advise which program the PDF file originates from? I can see you quoted Hangman earlier who raised this query but I can't see a response to his question. This info may prove helpful for the developers. Many thanks -
[Photo 2.5.3] Reproducible crash when changing tools
NathanC replied to Kemelvor's topic in V2 Bugs found on Windows
Hi @Kemelvor, This isn't an issue I'm able to re-produce by following your steps/recording on Windows, but if you could provide a copy of the .afbrushes file shown in your recording to confirm if that's related to your brushes. If it's not something you wish to share publicly I've also included a dropbox link below. https://www.dropbox.com/request/Mafw8vBrk1Qsc6jJDV41 Thanks -
Publisher 2.5.3 Auto-select --> Default does not work
NathanC replied to anto's topic in V2 Bugs found on Windows
Fantastic, thanks @carl123 I can confirm I've re-produced this following your recipe, I'm assuming that the setting is intended to be sticky but the dropdown is not visually updating. I'll get this logged. -
Welcome to the forums @Dale CC, Many thanks for providing a detailed report and recording, this appears to affect MacOS only and I can confirm I've re-produced this issue and logged it with the developers.
-
App crashes when using the PLACE command
NathanC replied to Eric1701's topic in V2 Bugs found on Windows
Hi @Eric1701, I've logged your original file which is triggering the crash with the developers for further investigation. 🙂 -
Publisher 2.5.3 Auto-select --> Default does not work
NathanC replied to anto's topic in V2 Bugs found on Windows
Hi @anto, This appears to be a duplicate report of an issue you've already raised over on the beta forums. Much to the same result as the other users on the original thread this simply isn't re-producible unfortunately when using a single click on any device I've tested on. If I double click it will select the frame's content as expected. As Walt mentions in the thread it's just not possible to tell from the screen recordings alone if you're single or double clicking. I would be interested to see if any other users are able to replicate this. -
[Bug?]Shape Builder Cleaning Inside Curves
NathanC replied to JhonatanS's topic in V2 Bugs found on iPad
Hi @JhonatanS, I'm quite on the fence with this one, but mainly based on the fact that boolean ops such as 'Add' preserve child layers following the curve merge i'm lead to believe this is not expected behaviour so i'll log this with the developers. FWIW I don't think the 'Clean up' rules apply to this specific scenario with regard to child layers. If I get anything back to suggest otherwise or if this is by design i'll report back. -
Hi @damdam, This is currently logged with the developers, i've updated and bumped the issue with your report. 🙂
-
Publisher 2 with MacOS Sonoma 14.5 not Launching Aa All
NathanC replied to imteniedo's topic in V2 Bugs found on macOS
Hi @imteniedo, Thanks, but we'll need the full crash report .IPS file to properly investigate, could you follow the guidance in the FAQ to save it out of Mac Console as an .IPS file and attach a copy of the crash report file? -
Hi @Mathis DESCOUT, No news to share i'm afraid. The issue ref you've reported is tagged against this forum thread, so the Affinity Info bot will automatically reply when there are any updates.
-
Publisher 2 with MacOS Sonoma 14.5 not Launching Aa All
NathanC replied to imteniedo's topic in V2 Bugs found on macOS
Welcome to the forums @imteniedo, Can you provide any recent crash reports from Publisher 2? The FAQ below details how to find these. -
Crash when editing brush with sub brush - Affinity Photo 2
NathanC replied to Art51's topic in V2 Bugs found on macOS
Hi @Art51, This is a known issue currently logged with the developers, i've bumped the existing issue with your report. As a potential workaround to prevent the app crashes before editing the brush and subsequent sub brush select a different tool such as the move tool first, you should then hopefully find that the app no longer crashes when editing the dynamics sliders. -
Affinity Designer 2.5.3: Path looks wrong when SVG is exported
NathanC replied to colugo's topic in V2 Bugs found on Windows
Welcome to the forums @colugo, This is a known bug currently logged with the developers, duplicated and transformed strokes and closed shapes with strokes applied can appear distorted when viewed in certain apps and web browsers. Enabling 'Flatten Transforms' is the best way to mitigate this issue. I'll bump the existing issue with your report. -
Hi @LCamachoDesign, Can confirm i've now logged this regression with the developers, thanks for the detailed report.
-
I only have a 30 day trial on mac?
NathanC replied to OpaleXiss's topic in Affinity on Desktop Questions (macOS and Windows)
We now have an official FAQ regarding this: -
Focus Merge Crashing unpredictably
NathanC replied to soundsliketree's topic in V2 Bugs found on macOS
The Crash report and Console log all point towards a User Interface issue but isn't specific on what element, it's also at this specific stage you've highlighted that the 'Sources' panel terminates at the start of the merge and re-launches itself at the end. Annoyingly this is one of the only panels can't be a permanent fixture and always re-performs this when you begin a Focus or HDR merge, on Windows it doesn't do this. I'm convinced that it's either the Sources panel or the Loading prompt that appears at the start but at this stage I'm a bit limited to suggestions unfortunately mainly down to the fact that it's just not re-producible. You could try creating a temporary new MacOS user and trying the merges from a new user account, this may work if the problem is related to either the local user environment or the local app data, as you're essentially using a fresh copy of the app with none of your original local user settings. You could also try booting your Mac into safe mode and then trying the merge a few times, this clears down a few caches and also may stop a potentially problematic third party app from interfering, but that's quite unlikely. https://support.apple.com/en-gb/guide/mac-help/mh21245/mac Let me know how this goes. -
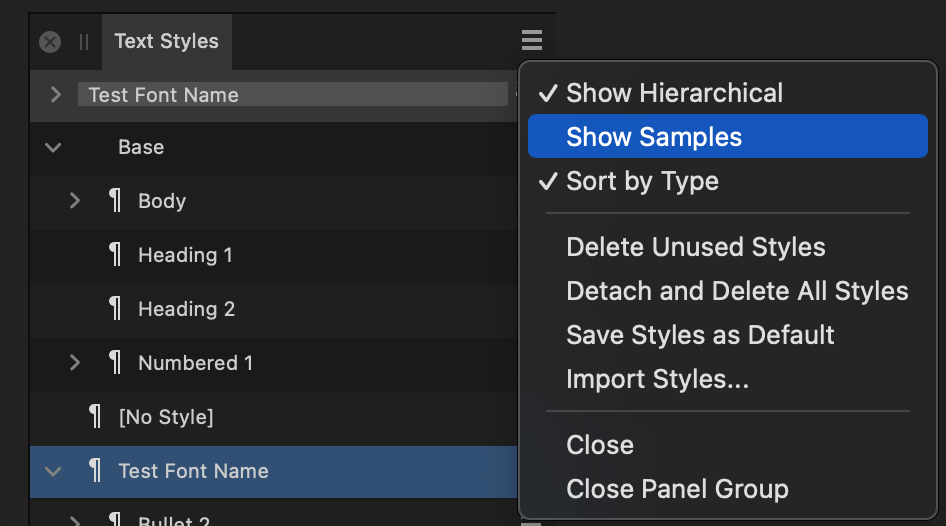
Rename Style name to English
NathanC replied to TravancoreKing's topic in Affinity on Desktop Questions (macOS and Windows)
Hi @TravancoreKing, In the Text Style panel context menu turn off 'Show Samples' and it will list the text style in plain text instead of mirroring the style/font used.