iKoma
-
Posts
9 -
Joined
-
Last visited
Recent Profile Visitors
498 profile views

-
 Patrick Connor reacted to a post in a topic:
WIP: Eargasm
Patrick Connor reacted to a post in a topic:
WIP: Eargasm
-
Hiswe reacted to a post in a topic:
Self-Portrait from Vectors
-
penwiper reacted to a post in a topic:
Self-Portrait from Vectors
-
bodobe reacted to a post in a topic:
Self-Portrait from Vectors
-
specworkfan reacted to a post in a topic:
Self-Portrait from Vectors
-
StudioDorgs reacted to a post in a topic:
Self-Portrait from Vectors
-
Thank you for your supportive comments! :)
-
MattP reacted to a post in a topic:
Self-Portrait from Vectors
-
iKoma reacted to a post in a topic:
Logo design in AD
-
iKoma reacted to a post in a topic:
Self-Portrait from Vectors
-
Mediafuel reacted to a post in a topic:
Self-Portrait from Vectors
-
iKoma reacted to a post in a topic:
Playing around "Game Boy" Using Affinity Designer... 100% Vector..
-
iKoma reacted to a post in a topic:
Illustration: Judgement Day
-
My girlfriend took a picture of me and I created a vector-based portrait from it. It looks simple but it wasn't for me. I'm still getting used to vectors.

-
Freshblue reacted to a post in a topic:
Live Monitoring
-
MattP reacted to a post in a topic:
Live Monitoring
-
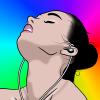
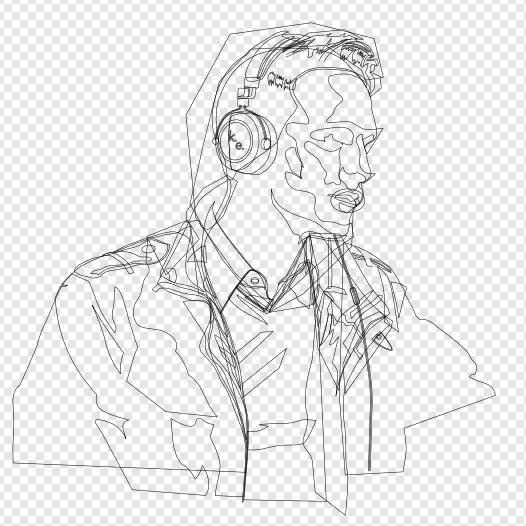
Very basic, mostly using outlines of a photograph of my work colleague. I decided to highlight his in-ear monitors, something people usually never pay attention to.
-
iKoma reacted to a post in a topic:
Black Ice WIP
-
iKoma reacted to a post in a topic:
iPhones flat mockup
-
iKoma reacted to a post in a topic:
PLEASE READ THIS: Sharing Guidelines
-
iKoma reacted to a post in a topic:
WIP: Eargasm
-
Here is the file. I edited it quite some more than I intended. There is one big issue that needs to be solved before anyone should attempt to send it to a printer. The layer "skin", which backs all of the woman, has two tiny line gaps. I couldn't figure out how to cut out areas and remove them from a fill, so I tried to move the lines around the gap, hoping they would overlap, but instead they negated. Sorry, I really don't know how to explain. Should become pretty obvious when selecting the layer. I'm now looking forward to my first very own project. BTW, here is the link to the original photograph: Sweet, Soft, Plenty Rhythm by stefangrosjean on deviantART (Picture might be blocked for unregistered members due to mature content.) Eargasm.afdesign
-
iKoma reacted to a post in a topic:
First Try - Logo
-
iKoma reacted to a post in a topic:
2. Illustration with AD, Full Version, 'In Love with Alice'.
-
How could I miss that? Thanks a lot! It's kind of a lot of work to tick the option on every line, but I will definitely try to remember it for my next graphic. I never intended to give her nipples because, at first, my intention was to give her a shirt. But actually, putting a shirt on her has either of two results: 1. the shirt covers her beautiful figure, losing almost all of the sexiness. 2. giving her a shirt/ bikini that is still revealing to show her feminine body, will result in a kind of slutty projection and I think leaving her naked (but without nipples to not be too explicit) is the best option. However, I received the feedback that the graphic is too sexist for some. Coming from Germany, I might have been too open. So sorry if I offended you. I decided to cut off the lower part. If you want the rest of her body, just drop a line and I will upload the file. I cleaned it up a bit and created groups. I did not figure out how to correctly cut out the background color. I'm searching for some kind of knife tool that will cut the lower layer by the upper layer. I don't even know if this tool exists or if other programs have it. But actually I'm starting to dig the double-circle skin coloring so I will leave it for now.
-
Today I have checked out as many tutorials as I could find and I thought it would be time to start my first project. I am featuring this as a work-in-progress because I need some support. This is not an original work. I used a photograph from Stefan Grosjean as reference (not sure if this is allowed, copyright-wise?) because it looked extremely simple to edit. The women looks as if she is really enjoying some music - only the earphones are missing, which I will add digitally. ;) My next work will be based on a drawing or photograph by me, but first I want to finish this for practice. As you can see, my first difficulty is how to remove some of the background color. I used two large circles to color the woman. For the parts where the colors are correctly in place (e.g. lips) I created a filled area along the black lines. But this will be a problem if I decide to make the lines thinner. It will create a space between the line and the filled area. In this case, it won't be a problem because some of the lines are actually too thin. But I would like to know what the correct method of editing is for future projects. I have attached the actual file for you to better understand what I mean because I am still lacking the necessary vocabulary. The file needs a lot of polish, some lines didn't work out as smooth, but I noticed how the vectors got better (with less points) the further I got. It's actually a lot of fun! The layers are a mess and lack groups. Sorry for that. Secondly, I noticed when scaling the vectors, the line thickness doesn't scale along. Is there a way to make the line thickness scale with the rest of the picture? Say if in the future, I create a web graphic and decide to print it as a poster, how do i correctly change the image size? Thanks a ton for your support! Eargasm.afdesign
-
I'm not an anime or manga fan, but I heard so many great things about the movie Princess Mononoke that I had to watch the old Classic. All I could think of was creating the small wood habitants as vector. Not really worth sharing, but it's my first ever vector graphic. I didn't have time to check out any tutorials so I just observed the files that were included with the app. Some parts are still very confusing to me (layer arrangement) but overall I think AD is still a very easy to pick up program. I'm definitely looking forward to improve.
-
Thank you for the warm welcome. Actually there is one feature that I couldn't find in any tutorial yet and I don't know where to start looking. I would like to know if Affinity Designer has the option to create a path on it's own if it's given any kind of reference. I started redoing the phoenix bird by Japanese artist Hokusai digitally (with Photoshop), but unfortunately I did not use vectors. Before I start anew, is there any way I can use any of my previous work? I have all line brushes on separate layers and I would like AD to transfer my "black outline" into a path. Edit: To make it more clear. I want these layers turned into paths without having to draw them myself (again):
-
Hi all, I just did a spontaneous purchase. I spend most of my free time with music and photography. I know my way around Lightroom and Photoshop, however, I am very new to vector graphics. I've always been interested in vectors and I would love to digitalize some artworks that I put on paper. I hope I will get used to Affinity Designer quickly although I am not familiar with similar programs.