joe_l
-
Posts
793 -
Joined
-
Last visited
Everything posted by joe_l
-
At work I open a lot of PDF files having tables inside. Unfortunately these tables are not really tables when you open them and here is Serif not to blame. Maybe Serif proves me wrong, but here is what I strongly believe: 1) Open a PDF with 300 dpi (you can test this with the attached one) with options as you like. 2) Create a table in this document. 3) Select a word with the text cursor and drag it into a table cell. Result: The dragged word in the table cell is now with a factor of about 4,17 smaller than the orginal word. Divide 300 by 4,17 and the result would be about 72. MY conclusion: The opened PDF is somewhere "flagged" by APu to be treated as a 300 dpi, but the content is still 72 dpi. This could be the explanation why linking text frames in opened PDF lead to different font sizes in different text frames. wotever.pdf
-
Strange title ... 1) Create a red rectangle. 2) Add a B&W adjustment with Red -75%, which turns the red rectangle black. 3) Create a new Layer and move the adjustment into it and keep it selected. 4) Add this Layer to Assets from selection. 5) Delete the already existing Layer on the page and drag the new asset onto the document. Result: The red rectangle is not turned black. Workaround: Move the adjustment out of the Layer. EDIT: A dummy icon for such an asset would be nice, right now it is blank, shown as list you see at least the name otherwise you have to hover the blank for the name of the asset.
-
I guess this has been discussed en detail, but I cannot find a solution ... if there is any. Makes me wonder why it is inconsistent anyway. 1) Add a BW adjustment (top) to a "normal" page with a coloured box covering page and bleed. Result: The BW adjustment is applied to the complete box including bleed area. 2) Add a BW adjustment (top) to a Master Page. Add to the normal page a coloured box covering page and bleed. Result: Nothing happens on the normal page. To make it "work" with an adjustment on a Master Page: 3) Add a Layer on the Master Page and the adjustment inside. Add to the normal page a coloured box covering page and bleed. Result: Now the adjustment is applied to the coloured box covering the page but NOT the bleed.
-
Perhaps this is somewhere mentioned: 1) Allow to define Application or Book wide States, right now States are limited to a single Document. My (old) documents are structured very similar, so I could use States for all of them without importing States or defining them anew. 2) If States are going to be Application wide too, sorting States into Categories would be handy.
-
Oops. Embarrassing. Missing in Publisher Persona of APu. Everything fine, I simply expected to see this as well in the Publisher Persona. Delete this thread if you want.
-
Customising the toolbar in APu lacks the second Geometry toolset or tools for merging, separating curves etc. in comparison to AD. Any specific reasons for that? Would be a nice-to-have, although I added a key shortcut for this in APu.
-
1. Place an image. 2. Scale it a bit non-proportionally. 3. Move the image into a picture frame. 4. Try to set same scaling or DPI for x and y. 5. Good luck. I like the Affinities, a lot, but handling images and colours error free is bread and butter for a layout programme. APu fails in this field. I use APu right from the start and with every new version it feels like 2 steps forward, 1 step back and some "problematic" areas are not going to be tackled. Sorry for sounding harsh, but this upsets me a bit. Something similar I found here:
-
Look at Preferences > Keyboard Shortcuts > Layer > Make your own shortcut here if you use Publisher or CTRL + Return, when you are using Designer or Photo.
-
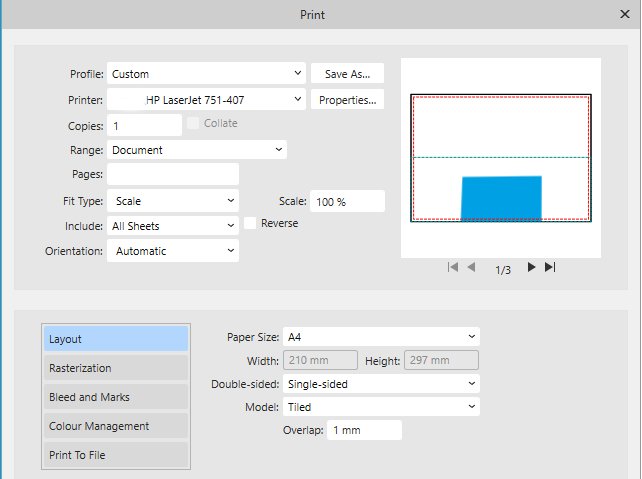
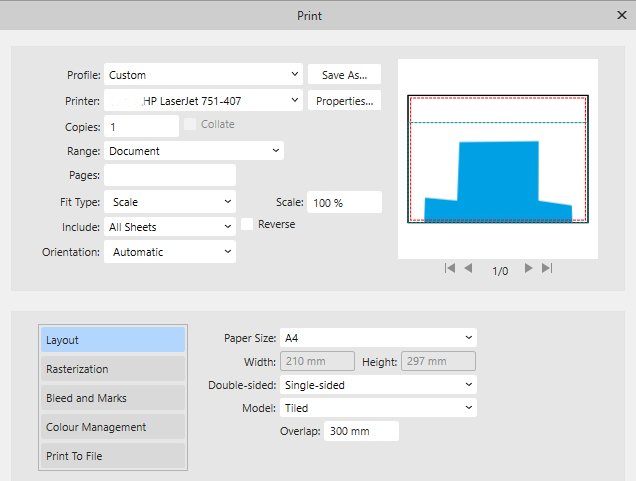
Another nice one. The maximum overlapping is 2147483647 mm resulting in: Ok, even with an overlapping of 1 mm there have to be three pages. But the positioning is funny anyway. BUT the printer is not capable of borderless printing, so 0 mm overlap has to result in 3 pages also.

-
My test document is an A3 document to be printed to A4 on a HP M751. The overlapping and the number of pages feels wrong. See attached images. My personal favourite is 300 mm overlap. 1 of 0 pages? Please Serif, add additional positioning marks while printing. Printing A0 with A4 and glueing them together is no joy.
-
Assuming you have 4 pages, my first thought was to use model N-Up. Pages: 4,1,4,1,2,3,2,3,4,1,4,1,2,3,2,3 Scale: 70,7% (type this in, although 71% is shown afterwards) Paper size: A3 Double-sided: Flip short side Model: N-Up Across: 2 Down: 2 Repeat: 1 Leave the rest of the fields untouched. After printing you just have to cut and fold the menu.
-
Entweder Rechtsklick links oben wo sich beide Lineal treffen oder unter "Dokumenteinstellungen" "Dokument" bei "Dokumenteinheiten" von Punkt auf Millimeter wechseln.
-
This is in version 2.3x, currently in beta state.
-
Who wants to pay a monthly fee just to cut a vector? I am curious just like carl123, what are you trying to cut? A vector with a raster tool?
-
If this is helpful for you: The Knife Tool is part of the Designer Persona.
-
But it is ...
-
Make the Motion Blur a child of the rectangle, then the complete text is vector otherwise it is only the part of the text that isn't "touched" by the blur fx.
-
Erm, everything inside your attached file is a raster image. No vectors at all.
-
Reported before? I have to admit, that I do not use the Area Tool, but there is room for a small improvment IMO. Imagine two elements that you want to measure, none of them selected. 1. Pick the Area Tool and click one element and you get your measurement values. 2. Now try to click the second element with the Area Tool ... ... ... not working. The first element stays selected. To get the measurement of the second element you have to e.g. change to the Move Tool and then back to the Area Tool to measure the second element. Two actions too much.
-
Contact sheet creation
joe_l replied to KeithStoddart's topic in Affinity on Desktop Questions (macOS and Windows)
https://www.xnview.com/en/xnviewmp/#downloads -
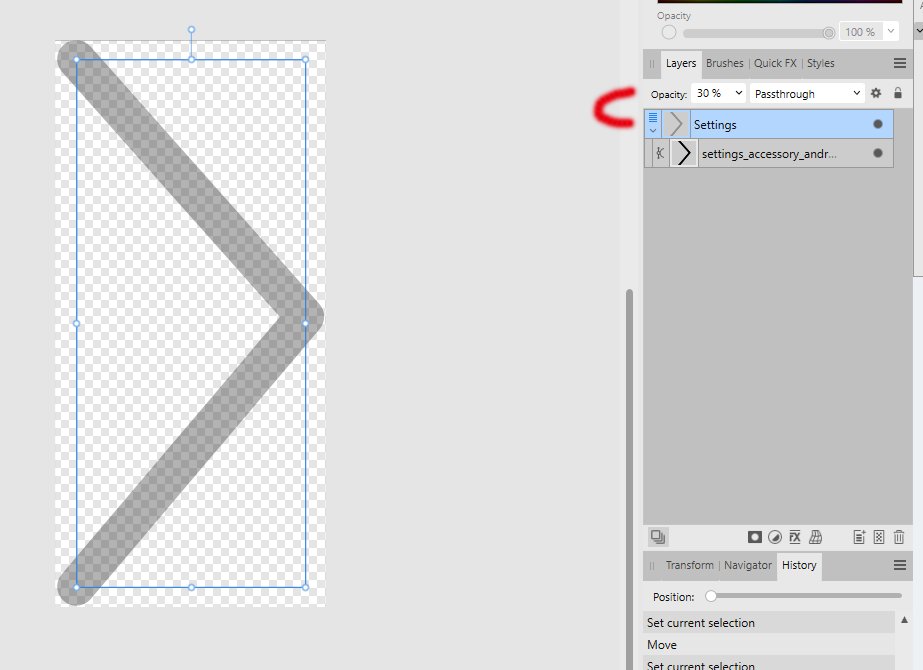
Where is the opacity set for a line?
joe_l replied to Chakie's topic in Affinity on Desktop Questions (macOS and Windows)
-
Import PDF with bleed to publisher
joe_l replied to Dan Sumption's topic in Affinity on Desktop Questions (macOS and Windows)
Keep the placed PDF selected and look at the top context toolbar. Right to Page Box you have various options e.g. to show the bleed with or without trim marks- 2 replies
-
- 1
-

-
- affinity publisher
- publisher v2
- (and 1 more)
-
I re-added the stroke to the As, ungrouped, scaled everything to 400 % and then expanded the stroke. Don't ask me why this works. 🤦♂️
-
This is a constructed example. 1. Create two documents, write the same wrong word into both documents, save the documents and keep both open. 2. In document 1 add the wrong word to the dictionary and save document 1. 3. Switch to document 2, which still indicates that the word is wrong. To make the spellcheck error go away, you have to close document 2 and open it again. More an improvement than a bug.
-
Affinity Publisher 2 Global Farbe Problem
joe_l replied to Red Al's topic in Feedback for the Affinity V2 Suite of Products
Man gewöhnt sich an einige Dinge im Laufe der Affinity-Zeit. Habe mich anfangs - kommend von ID - schwer getan mit der Affinity-Farbverwaltung. Umwandeln von "normalen" Farben in Sonderfarben und umgekehrt, Löschen von unbenutzten Farben in der Palette in einer Aktion, Ersetzen von Farben gegen andere Farben würden mein Herz erfreuen.